User Manual
Page 3
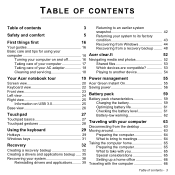
... condition 43 Recovering from Windows 44 Your guides 16 Recovering from a recovery backup ........ 48 Basic care and tips for using your computer 16 Acer clear.fi 52 Turning your computer on and off 16 Navigating media and photos 52 Taking care of your computer 17 Shared files 53 Taking care of your AC adapter 18 Which devices are compatible 53 Cleaning and servicing 18...
... condition 43 Recovering from Windows 44 Your guides 16 Recovering from a recovery backup ........ 48 Basic care and tips for using your computer 16 Acer clear.fi 52 Turning your computer on and off 16 Navigating media and photos 52 Taking care of your computer 17 Shared files 53 Taking care of your AC adapter 18 Which devices are compatible 53 Cleaning and servicing 18...
User Manual
Page 4
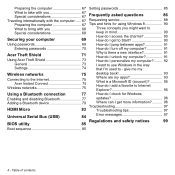
... 86 Traveling internationally with the computer...... 67 Requesting service 88 Preparing the computer 67 Tips and hints for Windows Enabling and disabling Bluetooth 77 updates 96 Adding a Bluetooth device 79 Where can I 'm used to use Windows in the way that I get more information?.......... 96 HDMI Micro Troubleshooting 97 83 Troubleshooting tips 97 Universal Serial Bus (USB) BIOS utility 84 Error messages 97 85 Regulations and safety notices 99 Boot sequence 85...
... 86 Traveling internationally with the computer...... 67 Requesting service 88 Preparing the computer 67 Tips and hints for Windows Enabling and disabling Bluetooth 77 updates 96 Adding a Bluetooth device 79 Where can I 'm used to use Windows in the way that I get more information?.......... 96 HDMI Micro Troubleshooting 97 83 Troubleshooting tips 97 Universal Serial Bus (USB) BIOS utility 84 Error messages 97 85 Regulations and safety notices 99 Boot sequence 85...
User Manual
Page 16
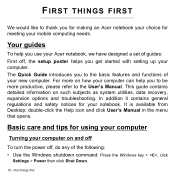
... off To turn the power off , the setup poster helps you get started with setting up your new computer. double-click the Help icon and click User's Manual in the menu that opens. First things first FIRST THINGS FIRST We would like to thank you for making an Acer notebook your choice for meeting your notebook. Your guides To help you to the User's Manual. The Quick Guide introduces...
... off To turn the power off , the setup poster helps you get started with setting up your new computer. double-click the Help icon and click User's Manual in the menu that opens. First things first FIRST THINGS FIRST We would like to thank you for making an Acer notebook your choice for meeting your notebook. Your guides To help you to the User's Manual. The Quick Guide introduces...
User Manual
Page 19
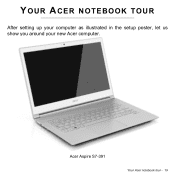
YOUR ACER NOTEBOOK TOUR After setting up your computer as illustrated in the setup poster, let us show you around your new Acer computer. Acer Aspire S7-391 Your Acer notebook tour - 19
YOUR ACER NOTEBOOK TOUR After setting up your computer as illustrated in the setup poster, let us show you around your new Acer computer. Acer Aspire S7-391 Your Acer notebook tour - 19
User Manual
Page 29
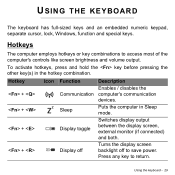
...Sleep mode. Puts the computer in the hotkey combination. Turns the display screen backlight off Description Enables / disables the computer's communication devices. Press any key to access most of the computer's controls like screen brightness and volume output. Using the keyboard - 29 Hotkeys The computer employs hotkeys or key combinations to return. Switches display output between the display screen, external monitor (if connected) and both. USING THE KEYBOARD The keyboard has full-sized keys and an embedded numeric keypad, separate cursor, lock, Windows, function...
...Sleep mode. Puts the computer in the hotkey combination. Turns the display screen backlight off Description Enables / disables the computer's communication devices. Press any key to access most of the computer's controls like screen brightness and volume output. Using the keyboard - 29 Hotkeys The computer employs hotkeys or key combinations to return. Switches display output between the display screen, external monitor (if connected) and both. USING THE KEYBOARD The keyboard has full-sized keys and an embedded numeric keypad, separate cursor, lock, Windows, function...
User Manual
Page 39
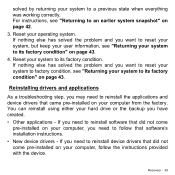
... reinstall using either your hard drive or the backup you want to reset your system, but keep your user information, see "Returning your system to reinstall device drivers that did not come pre-installed on your computer, follow that came pre-installed on your computer from the factory. Reset your system to reinstall the applications and device drivers that software's installation instructions. • New device drivers - Reinstalling drivers and applications As a troubleshooting...
... reinstall using either your hard drive or the backup you want to reset your system, but keep your user information, see "Returning your system to reinstall device drivers that did not come pre-installed on your computer, follow that came pre-installed on your computer from the factory. Reset your system to reinstall the applications and device drivers that software's installation instructions. • New device drivers - Reinstalling drivers and applications As a troubleshooting...
User Manual
Page 48
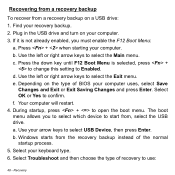
... startup, press + to select the Main menu. a. Recovery Press + when starting your keyboard type. 6. b. Select Troubleshoot and then choose the type of BIOS your arrow keys to Enabled. If it is selected, press + to change this setting to select USB Device, then press Enter. c. Use the left or right arrow keys to open the boot menu. Select your computer. The boot menu allows you must enable the F12 Boot Menu: a. Windows starts from , select the USB drive. Recovering from a recovery backup To recover from a recovery backup...
... startup, press + to select the Main menu. a. Recovery Press + when starting your keyboard type. 6. b. Select Troubleshoot and then choose the type of BIOS your arrow keys to Enabled. If it is selected, press + to change this setting to select USB Device, then press Enter. c. Use the left or right arrow keys to open the boot menu. Select your computer. The boot menu allows you must enable the F12 Boot Menu: a. Windows starts from , select the USB drive. Recovering from a recovery backup To recover from a recovery backup...
User Manual
Page 86
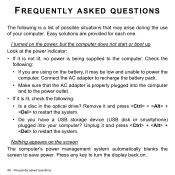
... provided for each one. Remove it is not lit, no power is properly plugged into your computer. Press any key to turn the display back on the power, but the computer does not start or boot up Look at the power indicator: • If it and press + + to restart the system. • Do you have a USB storage device (USB disk or smartphone) plugged into...
... provided for each one. Remove it is not lit, no power is properly plugged into your computer. Press any key to turn the display back on the power, but the computer does not start or boot up Look at the power indicator: • If it and press + + to restart the system. • Do you have a USB storage device (USB disk or smartphone) plugged into...
Acer S7-391 Notebook Service Guide
Page 5
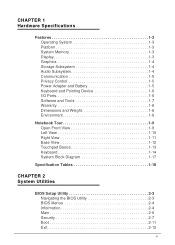
... 1 Hardware Specifications Features 1-3 Operating System 1-3 Platform 1-3 System Memory 1-3 Display 1-3 Graphics 1-4 Storage Subsystem 1-4 Audio Subsystem 1-4 Communication 1-5 Privacy Control 1-5 Power Adapter and Battery 1-5 Keyboard and Pointing Device 1-6 I/O Ports 1-6 Software and Tools 1-7 Warranty 1-8 Dimensions and Weight 1-8 Environment 1-8 Notebook Tour 1-9 Open Front View 1-9 Left View 1-10 Right View 1-11 Base View 1-12 Touchpad Basics 1-13 Keyboard 1-14 System Block Diagram 1-17 Specification Tables 1-18 CHAPTER 2 System Utilities BIOS Setup Utility...
... 1 Hardware Specifications Features 1-3 Operating System 1-3 Platform 1-3 System Memory 1-3 Display 1-3 Graphics 1-4 Storage Subsystem 1-4 Audio Subsystem 1-4 Communication 1-5 Privacy Control 1-5 Power Adapter and Battery 1-5 Keyboard and Pointing Device 1-6 I/O Ports 1-6 Software and Tools 1-7 Warranty 1-8 Dimensions and Weight 1-8 Environment 1-8 Notebook Tour 1-9 Open Front View 1-9 Left View 1-10 Right View 1-11 Base View 1-12 Touchpad Basics 1-13 Keyboard 1-14 System Block Diagram 1-17 Specification Tables 1-18 CHAPTER 2 System Utilities BIOS Setup Utility...
Acer S7-391 Notebook Service Guide
Page 6
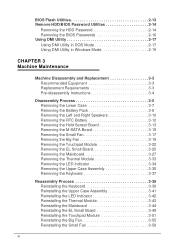
... the BIOS Passwords 2-16 Using DMI Utility 2-17 Using DMI Utility in DOS Mode 2-17 Using DMI Utility in Windows Mode 2-19 CHAPTER 3 Machine Maintenance Machine Disassembly and Replacement 3-3 Recommended Equipment 3-3 Replacement Requirements 3-3 Pre-disassembly Instructions 3-4 Disassembly Process 3-5 Removing the Lower Case 3-7 Removing the Battery Pack 3-8 Removing the Left and Right Speakers 3-10 Removing the RTC Battery 3-12 Removing the Hold Sensor Board 3-13 Removing the M-SATA Board 3-15 Removing the Small Fan 3-17 Removing the Big Fan 3-19 Removing the Touchpad Module...
... the BIOS Passwords 2-16 Using DMI Utility 2-17 Using DMI Utility in DOS Mode 2-17 Using DMI Utility in Windows Mode 2-19 CHAPTER 3 Machine Maintenance Machine Disassembly and Replacement 3-3 Recommended Equipment 3-3 Replacement Requirements 3-3 Pre-disassembly Instructions 3-4 Disassembly Process 3-5 Removing the Lower Case 3-7 Removing the Battery Pack 3-8 Removing the Left and Right Speakers 3-10 Removing the RTC Battery 3-12 Removing the Hold Sensor Board 3-13 Removing the M-SATA Board 3-15 Removing the Small Fan 3-17 Removing the Big Fan 3-19 Removing the Touchpad Module...
Acer S7-391 Notebook Service Guide
Page 23
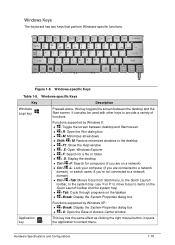
... you are connected to a network domain), or switch users (if you're not connected to a network domain) Ctrl+ +Tab: Moves focus from Start menu, to the Quick Launch toolbar, to the system tray (use or to move focus to provide a variety of Access Center window Application key This key has the same effect as clicking the right mouse button; it opens the application's context menu. Hardware Specifications and Configurations 1-15...
... you are connected to a network domain), or switch users (if you're not connected to a network domain) Ctrl+ +Tab: Moves focus from Start menu, to the Quick Launch toolbar, to the system tray (use or to move focus to provide a variety of Access Center window Application key This key has the same effect as clicking the right mouse button; it opens the application's context menu. Hardware Specifications and Configurations 1-15...
Acer S7-391 Notebook Service Guide
Page 41
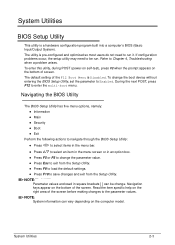
... menu screen or in square brackets [ ] can vary depending on the bottom of the F12 Boot Menu is pre-configured and optimized so most users do not need to be change the parameter value. Press Esc to exit from the Setup Utility. Press F9 to load the default settings. Press F10 to Enabled. To change the boot device without entering the BIOS Setup Utility, set...
... menu screen or in square brackets [ ] can vary depending on the bottom of the F12 Boot Menu is pre-configured and optimized so most users do not need to be change the parameter value. Press Esc to exit from the Setup Utility. Press F9 to load the default settings. Press F10 to Enabled. To change the boot device without entering the BIOS Setup Utility, set...
Acer S7-391 Notebook Service Guide
Page 55
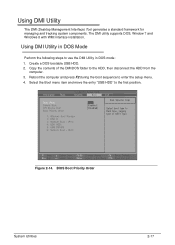
... the HDD, then disconnect the HDD from the computer. 3. Figure 2-14. Using DMI Utility in DOS mode: 1. Create a DOS bootable USB HDD. 2. Reboot the computer and press F2 during the boot sequence to the first position. BIOS Boot Priority Order System Utilities 2-17 The DMI utility supports DOS, Window 7 and Windows 8 with WMI interface installation. Select the Boot menu item and move the entry "USB HDD" to enter the setup menu. 4. Using DMI Utility 0 The DMI (Desktop Management Interface...
... the HDD, then disconnect the HDD from the computer. 3. Figure 2-14. Using DMI Utility in DOS mode: 1. Create a DOS bootable USB HDD. 2. Reboot the computer and press F2 during the boot sequence to the first position. BIOS Boot Priority Order System Utilities 2-17 The DMI utility supports DOS, Window 7 and Windows 8 with WMI interface installation. Select the Boot menu item and move the entry "USB HDD" to enter the setup menu. 4. Using DMI Utility 0 The DMI (Desktop Management Interface...
Acer S7-391 Notebook Service Guide
Page 60
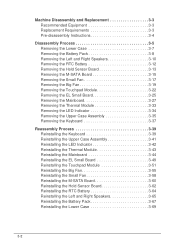
... 3-3 Replacement Requirements 3-3 Pre-disassembly Instructions 3-4 Disassembly Process 3-5 Removing the Lower Case 3-7 Removing the Battery Pack 3-8 Removing the Left and Right Speakers 3-10 Removing the RTC Battery 3-12 Removing the Hold Sensor Board 3-13 Removing the M-SATA Board 3-15 Removing the Small Fan 3-17 Removing the Big Fan 3-19 Removing the Touchpad Module 3-22 Removing the EL Small Board 3-25 Removing the Mainboard 3-27 Removing the Thermal Module 3-33 Removing the LED Indicator 3-34 Removing the Upper Case Assembly 3-35 Removing the Keyboard...
... 3-3 Replacement Requirements 3-3 Pre-disassembly Instructions 3-4 Disassembly Process 3-5 Removing the Lower Case 3-7 Removing the Battery Pack 3-8 Removing the Left and Right Speakers 3-10 Removing the RTC Battery 3-12 Removing the Hold Sensor Board 3-13 Removing the M-SATA Board 3-15 Removing the Small Fan 3-17 Removing the Big Fan 3-19 Removing the Touchpad Module 3-22 Removing the EL Small Board 3-25 Removing the Mainboard 3-27 Removing the Thermal Module 3-33 Removing the LED Indicator 3-34 Removing the Upper Case Assembly 3-35 Removing the Keyboard...

Acer S7-391 Notebook Service Guide
Page 134
... reduce display brightness. 2. Readjust if necessary. 4. Boot the computer. If the issue is not running on page 9-3 7. Roll back the video driver to Disassembly Process. 3. Connect the power cable and reboot the computer. 5. Run the Windows Memory Diagnostic from the operating system DVD and follow the on page 3-39. NOTE: NOTE: Make sure that : The device is discovered. 9. Drain stored power by one by removing the power cable...
... reduce display brightness. 2. Readjust if necessary. 4. Boot the computer. If the issue is not running on page 9-3 7. Roll back the video driver to Disassembly Process. 3. Connect the power cable and reboot the computer. 5. Run the Windows Memory Diagnostic from the operating system DVD and follow the on page 3-39. NOTE: NOTE: Make sure that : The device is discovered. 9. Drain stored power by one by removing the power cable...
Acer S7-391 Notebook Service Guide
Page 146
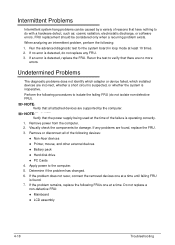
... adapter or device failed, which installed devices are supported by a variety of reasons that have nothing to verify that there are found . 7. Apply power to isolate the failing FRU (do not isolate non-defective FRU). If the problem remains, replace the following devices: Non-Acer devices Printer, mouse, and other external devices Battery pack Hard disk drive PC Cards...
... adapter or device failed, which installed devices are supported by a variety of reasons that have nothing to verify that there are found . 7. Apply power to isolate the failing FRU (do not isolate non-defective FRU). If the problem remains, replace the following devices: Non-Acer devices Printer, mouse, and other external devices Battery pack Hard disk drive PC Cards...
Acer S7-391 Notebook Service Guide
Page 149
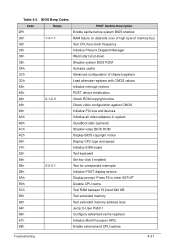
... ROM copyright notice 48h Check video configuration against CMOS 49h Initialize PCI bus and devices 4Ah Initialize all video adapters in system 4Bh QuietBoot start (optional) 4Ch Shadow video BIOS ROM 4Eh Display BIOS copyright notice 50h Display CPU type and speed 51h Initialize EISA board 52h Test keyboard 54h Set key click if enabled 58h 2-2-3-1 Test for unexpected interrupts 59h Initialize POST display service 5Ah Display prompt "Press F2 to enter SETUP" 5Bh Disable CPU cache 5Ch Test RAM...
... ROM copyright notice 48h Check video configuration against CMOS 49h Initialize PCI bus and devices 4Ah Initialize all video adapters in system 4Bh QuietBoot start (optional) 4Ch Shadow video BIOS ROM 4Eh Display BIOS copyright notice 50h Display CPU type and speed 51h Initialize EISA board 52h Test keyboard 54h Set key click if enabled 58h 2-2-3-1 Test for unexpected interrupts 59h Initialize POST display service 5Ah Display prompt "Press F2 to enter SETUP" 5Bh Disable CPU cache 5Ch Test RAM...
Acer S7-391 Notebook Service Guide
Page 153
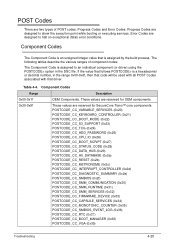
...(0x39) Troubleshooting 4-25 Component Codes Range Description 0x00-0x1f OEM Components. POST Codes 0 There are designed to show the execution point while booting or executing services. If the value that driver. Error Codes are reserved...driver) using the POSTCODE= option in the range 0x00-0xdf, then that code will be used with all POST Codes associated with that follows POSTCODE= is a hexadecimal or decimal number, in the DSC file. Table 4-4. The following tables describe the various ranges of POST codes: Progress Codes and Error Codes. Component Codes 0 The Component Code...
...(0x39) Troubleshooting 4-25 Component Codes Range Description 0x00-0x1f OEM Components. POST Codes 0 There are designed to show the execution point while booting or executing services. If the value that driver. Error Codes are reserved...driver) using the POSTCODE= option in the range 0x00-0xdf, then that code will be used with all POST Codes associated with that follows POSTCODE= is a hexadecimal or decimal number, in the DSC file. Table 4-4. The following tables describe the various ranges of POST codes: Progress Codes and Error Codes. Component Codes 0 The Component Code...

Acer S7-391 Notebook Service Guide
Page 156
... or more architectural protocols at the end of DXE. 4-28 Troubleshooting Exiting S3 boot path back to zero. POSTCODE_PC_IPL_RECOVERY (0xe7) - Couldn't find PPIs needed by DXE. POSTCODE_EC_DXE_ARCH (0xef) - The corresponding Progress Code value is always set to the OS. Reset vector. Entering DXE Dispatch. POSTCODE_EC_IPL_DXE (0xed) - Table 4-4. Entering PEI Dispatch. POSTCODE_EC_PEI_IPL (0xec) - POSTCODE_PC_SEC_ENTRY (0xe0) - Leaving SEC/Going to...
... or more architectural protocols at the end of DXE. 4-28 Troubleshooting Exiting S3 boot path back to zero. POSTCODE_PC_IPL_RECOVERY (0xe7) - Couldn't find PPIs needed by DXE. POSTCODE_EC_DXE_ARCH (0xef) - The corresponding Progress Code value is always set to the OS. Reset vector. Entering DXE Dispatch. POSTCODE_EC_IPL_DXE (0xed) - Table 4-4. Entering PEI Dispatch. POSTCODE_EC_PEI_IPL (0xec) - POSTCODE_PC_SEC_ENTRY (0xe0) - Leaving SEC/Going to...
Acer S7-391 Notebook Service Guide
Page 164
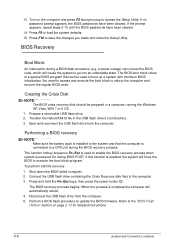
... prepared in the USB flash drive's root directory. 3. Creating the Crisis Disk 0 NOTE: NOTE: The BIOS crisis recovery disk should be used to reboot the computer and recover the regular BIOS code. The function hotkey sequence Fn+Esc is used to boot up a system with minimum BIOS initialization.You need to access and execute the boot block to enable the BIOS recovery process when system is complete the computer will automatically reboot. 4. 13. Press F9...
... prepared in the USB flash drive's root directory. 3. Creating the Crisis Disk 0 NOTE: NOTE: The BIOS crisis recovery disk should be used to reboot the computer and recover the regular BIOS code. The function hotkey sequence Fn+Esc is used to boot up a system with minimum BIOS initialization.You need to access and execute the boot block to enable the BIOS recovery process when system is complete the computer will automatically reboot. 4. 13. Press F9...


