
AL2051 User's Guide EN
Page 2
... void the user's authority to which can radiate radio frequency energy, and if not installed and used in a residential installation. Shielded interface cables and AC power cord, if any radio or TV interference caused by unauthorized modification to comply with the limits for any , must be determined by turning the equipment...
... void the user's authority to which can radiate radio frequency energy, and if not installed and used in a residential installation. Shielded interface cables and AC power cord, if any radio or TV interference caused by unauthorized modification to comply with the limits for any , must be determined by turning the equipment...
AL2051 User's Guide EN
Page 3
...bathtub, washbowl, kitchen sink, laundry tub, swimming pool or in the back and bottom of the cabinet are not sure of the type of power supplied to the appliance. Use only a cart or stand recommended by the manufacturer and follow the kit instructions. z Slots and openings in ...voltages and other hazards. PRECAUTIONS z Do not use the monitor near the equipment and shall be used for ventilation. z Do not overload power strips and extension cords. opening or removing covers can result in a bookcase or cabinet unless proper ventilation is equipped with a three-pronged ...
...bathtub, washbowl, kitchen sink, laundry tub, swimming pool or in the back and bottom of the cabinet are not sure of the type of power supplied to the appliance. Use only a cart or stand recommended by the manufacturer and follow the kit instructions. z Slots and openings in ...voltages and other hazards. PRECAUTIONS z Do not use the monitor near the equipment and shall be used for ventilation. z Do not overload power strips and extension cords. opening or removing covers can result in a bookcase or cabinet unless proper ventilation is equipped with a three-pronged ...

AL2051 User's Guide EN
Page 4
...of the fluorescent light, the screen may flicker during initial use . • The LCD screen has effective pixels of 99.99% or more. Power Cord 4. BEFORE YOU OPERATE THE MONITOR FEATURES • 51cm(20") TFT Color LCD Monitor • Crisp, Clear Display for hours. External ...Adapter 5. 15-pin D-Sub Cable 6. Audio Cable 8. Turn off the Power Switch for Windows • Recommened Resolutions: 1680 X 1050 @75Hz • Dual Input (DVI + Analog) (Only Dual-Input Model) • Ergonomic Design (...
...of the fluorescent light, the screen may flicker during initial use . • The LCD screen has effective pixels of 99.99% or more. Power Cord 4. BEFORE YOU OPERATE THE MONITOR FEATURES • 51cm(20") TFT Color LCD Monitor • Crisp, Clear Display for hours. External ...Adapter 5. 15-pin D-Sub Cable 6. Audio Cable 8. Turn off the Power Switch for Windows • Recommened Resolutions: 1680 X 1050 @75Hz • Dual Input (DVI + Analog) (Only Dual-Input Model) • Ergonomic Design (...
AL2051 User's Guide EN
Page 5
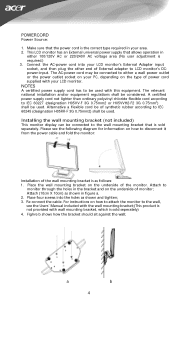
... that allows operation in your LCD monitor. Attach to monitor through the holes in figure a. 2. Re-connect the cable. The AC-power cord may be used . POWERCORD Power Source: 1. Connect the AC-power cord into the holes as shown in the bracket and on how to disconnect it from the... power cable and fold the monitor: Installation of External adapter to IEC 60245 (designation H05RR-F 3G 0.75mm2) shall be of power cord supplied with this equipment. NOTES A certified power supply cord has to be connected to IEC 60227 (designation...
... that allows operation in your LCD monitor. Attach to monitor through the holes in figure a. 2. Re-connect the cable. The AC-power cord may be used . POWERCORD Power Source: 1. Connect the AC-power cord into the holes as shown in the bracket and on how to disconnect it from the... power cable and fold the monitor: Installation of External adapter to IEC 60245 (designation H05RR-F 3G 0.75mm2) shall be of power cord supplied with this equipment. NOTES A certified power supply cord has to be connected to IEC 60227 (designation...
AL2051 User's Guide EN
Page 6
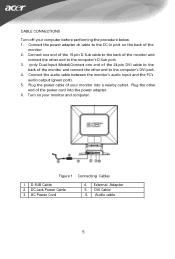
... Dual-Input Model)Connect one end of the 24-pin DVI cable to the back of the monitor and connect the other end of the power cord into a nearby outlet. Plug the other end to the DC-In port on your computer before performing the procedure below. 1. D-SUB Cable... 2. CONTROLS AND CONNECTORS CABLE CONNECTIONS Turn off your monitor and computer. DVI Cable 6. AC Power Cord 4. Connect the audio cable between the monitor's audio input and the PC's audio output (green port). 5. Figure 1 Connecting Cables 1. Connect the...
... Dual-Input Model)Connect one end of the 24-pin DVI cable to the back of the monitor and connect the other end of the power cord into a nearby outlet. Plug the other end to the DC-In port on your computer before performing the procedure below. 1. D-SUB Cable... 2. CONTROLS AND CONNECTORS CABLE CONNECTIONS Turn off your monitor and computer. DVI Cable 6. AC Power Cord 4. Connect the audio cable between the monitor's audio input and the PC's audio output (green port). 5. Figure 1 Connecting Cables 1. Connect the...
AL2051 User's Guide EN
Page 8
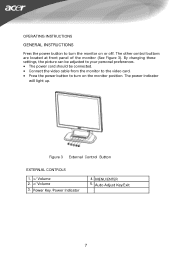
The other control buttons are located at front panel of the monitor (See Figure 3). Figure 3 External Control Button EXTERNAL CONTROLS 1. >/ Volume 2. The power indicator will light up. By changing these settings, the picture can be adjusted to your personal preferences. • The power cord should be connected. • Connect the video cable from the monitor to the video card. • Press the power button to turn on or off. OPERATING INSTRUCTIONS GENERAL INSTRUCTIONS Press the power button to turn the monitor on the monitor position.
The other control buttons are located at front panel of the monitor (See Figure 3). Figure 3 External Control Button EXTERNAL CONTROLS 1. >/ Volume 2. The power indicator will light up. By changing these settings, the picture can be adjusted to your personal preferences. • The power cord should be connected. • Connect the video cable from the monitor to the video card. • Press the power button to turn on or off. OPERATING INSTRUCTIONS GENERAL INSTRUCTIONS Press the power button to turn the monitor on the monitor position.

AL2051 User's Guide EN
Page 9
...thinner, benzene, or abrasive cleaners, since these will damage the cabinet. Never use strong solvents such as EXIT-KEY (EXIT OSD menu). 2. Orange - Power off. • MENU / ENTER : Activate OSD menu when OSD is OFF or activate/de-activate adjustment function when OSD is ON or Exit OSD ... solution. When OSD menu is activated. • Auto Adjust button / Exit: 1. Stubborn stains may be removed with a cloth lightly dampened with a soft cloth. Power On mode. The Auto Adjustment function is in handy if you ever have to turn the monitor ON or OFF, And display the monitor's state...
...thinner, benzene, or abrasive cleaners, since these will damage the cabinet. Never use strong solvents such as EXIT-KEY (EXIT OSD menu). 2. Orange - Power off. • MENU / ENTER : Activate OSD menu when OSD is OFF or activate/de-activate adjustment function when OSD is ON or Exit OSD ... solution. When OSD menu is activated. • Auto Adjust button / Exit: 1. Stubborn stains may be removed with a cloth lightly dampened with a soft cloth. Power On mode. The Auto Adjustment function is in handy if you ever have to turn the monitor ON or OFF, And display the monitor's state...
AL2051 User's Guide EN
Page 13
...bidirectional data channel based on type connector body, rated 10A, 250V, having standard CEE-22 female configuration. This reduces the monitor's internal power supply consumption. The appearance is similar to use a cord set by the Video Electronics Standards Association (VESA) and The Swedish Confederation ... When there is no video input signal present. After the video input signal is restored, full power is restored and the display is restored by reducing power consumption when there is no video input signal this monitor, following a time-out period, will ...
...bidirectional data channel based on type connector body, rated 10A, 250V, having standard CEE-22 female configuration. This reduces the monitor's internal power supply consumption. The appearance is similar to use a cord set by the Video Electronics Standards Association (VESA) and The Swedish Confederation ... When there is no video input signal present. After the video input signal is restored, full power is restored and the display is restored by reducing power consumption when there is no video input signal this monitor, following a time-out period, will ...
AL2051 User's Guide EN
Page 14
...'s video cable and make sure that may cause pattern is operational by hitting the CAPS LOCK key on *Check if the Power Switch is in the ON position *Power Cord should be connected No Plug & Play *Check if the PC system is Plug & Play compatible *Check if the ...15 plug pin of Video Cable is bent Picture is fuzzy *Adjust the Contrast and Brightness Controls. TECHNICAL SUPPORT (FAQ) Problem & Question Possible Solution Power LED is not on the keyboard while observing the CAPS LOCK LED. Picture bounces or a wave *Move electrical devices that none of the primary ...
...'s video cable and make sure that may cause pattern is operational by hitting the CAPS LOCK key on *Check if the Power Switch is in the ON position *Power Cord should be connected No Plug & Play *Check if the PC system is Plug & Play compatible *Check if the ...15 plug pin of Video Cable is bent Picture is fuzzy *Adjust the Contrast and Brightness Controls. TECHNICAL SUPPORT (FAQ) Problem & Question Possible Solution Power LED is not on the keyboard while observing the CAPS LOCK LED. Picture bounces or a wave *Move electrical devices that none of the primary ...

AL2051 User's Guide EN
Page 17
... Response time 8ms Gray to 90% Dimensions 480X172X408(W×H×D)mm Weight (N. Resolution Plug & Play 1680 x 1050 @75Hz VESA DDC2B TM Power Consumption ON Mode ≤ 68W OFF Mode ≤ 2W Input Connector D-Sub 15pin DVI-D 24pin (Only Dual-Input Model) Input Video ...Signal Analog:0.7Vp-p(standard), 75 OHM, Positive Digital signal (Only Dual-Input Model) Maximum Screen Size Horizontal : 432mm Vertical : 270mm Power Source 100~240VAC,47~63Hz Environmental Operating Temp: 0° to 40°C Considerations Storage Temp.: -20° to 60°C Operating...
... Response time 8ms Gray to 90% Dimensions 480X172X408(W×H×D)mm Weight (N. Resolution Plug & Play 1680 x 1050 @75Hz VESA DDC2B TM Power Consumption ON Mode ≤ 68W OFF Mode ≤ 2W Input Connector D-Sub 15pin DVI-D 24pin (Only Dual-Input Model) Input Video ...Signal Analog:0.7Vp-p(standard), 75 OHM, Positive Digital signal (Only Dual-Input Model) Maximum Screen Size Horizontal : 432mm Vertical : 270mm Power Source 100~240VAC,47~63Hz Environmental Operating Temp: 0° to 40°C Considerations Storage Temp.: -20° to 60°C Operating...
AL2051 User's Guide EN
Page 18
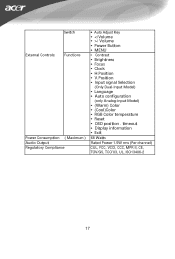
... channel) CUL, FCC, VCCI, CCC, MPR II, CE, TÜV/GS, TCO'03, UL, ISO13406-2 17 Switch External Controls: Functions Power Consumption ( Maximum ) Audio Output Regulatory Compliance • Auto Adjust Key • / Volume • Power Button • MENU • Contrast • Brightness • Focus • Clock • H.Position • V.Position • Input signal...
... channel) CUL, FCC, VCCI, CCC, MPR II, CE, TÜV/GS, TCO'03, UL, ISO13406-2 17 Switch External Controls: Functions Power Consumption ( Maximum ) Audio Output Regulatory Compliance • Auto Adjust Key • / Volume • Power Button • MENU • Contrast • Brightness • Focus • Clock • H.Position • V.Position • Input signal...
AL2051 User's Guide EN
Page 20
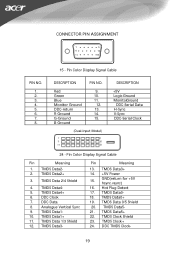
.... 14. 15. (Dual-Input Model) DESCRIPTION +5V Logic Ground MonitorGround DDC-Serial Data H-Sync V-Sync DDC-Serial Clock 24 - TMDS Data3- TMDS Data3+ 14. +5V Power 15. TMDS Data0+ 19. TMDS Data 2/4 Shield 4. TMDS Data0- 18. DDC Clock 7. DDC Data 8. TMDS Data 1/3 Shield 12. DDC TMDS Clock- 19 CONNECTOR PIN ASSIGNMENT...
.... 14. 15. (Dual-Input Model) DESCRIPTION +5V Logic Ground MonitorGround DDC-Serial Data H-Sync V-Sync DDC-Serial Clock 24 - TMDS Data3- TMDS Data3+ 14. +5V Power 15. TMDS Data0+ 19. TMDS Data 2/4 Shield 4. TMDS Data0- 18. DDC Clock 7. DDC Data 8. TMDS Data 1/3 Shield 12. DDC TMDS Clock- 19 CONNECTOR PIN ASSIGNMENT...


