
User Guide
Page 3
...of the display should be installed: To minimize the reflection of the display, protect your eyes and ensure premium quality, don't install your LCD display near windows or with reference to the space where the display is to be a little higher than your sight. Components and Accessories... LCD Display D-Sub Signal Cable Quick Start Guide User's Manual (CD-ROM) Power Cable DVI Signal Cable (Optional) Usage Installation Guide Attention Quick Installation...
...of the display should be installed: To minimize the reflection of the display, protect your eyes and ensure premium quality, don't install your LCD display near windows or with reference to the space where the display is to be a little higher than your sight. Components and Accessories... LCD Display D-Sub Signal Cable Quick Start Guide User's Manual (CD-ROM) Power Cable DVI Signal Cable (Optional) Usage Installation Guide Attention Quick Installation...
User Guide
Page 5
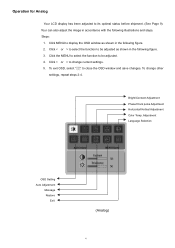
... to change other settings, repeat steps 2-4. Your can also adjust the image in the following illustrations and steps. Steps: 1. Click < or > to display the OSD window as shown in accordance with the following figure. 3. Adjustment Language Selection OSD Setting Auto Adjustment Message Restore Exit (Analog) 4 Operation for Analog Your...
... to change other settings, repeat steps 2-4. Your can also adjust the image in the following illustrations and steps. Steps: 1. Click < or > to display the OSD window as shown in accordance with the following figure. 3. Adjustment Language Selection OSD Setting Auto Adjustment Message Restore Exit (Analog) 4 Operation for Analog Your...
User Guide
Page 6
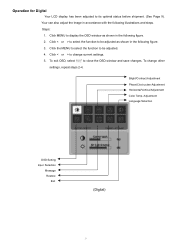
Operation for Digital Your LCD display has been adjusted to close the OSD window and save changes. To change current settings. 5. Steps: 1. Click MENU to be adjusted. 4. To exit OSD, select " " to its optimal status before shipment. (See Page... Exit (Digital) 5 Bright/Contract Adjustment Phase/Clock pulse Adjustment Horizontal/Vertical Adjustment Color Temp. Click < or > to select the function to display the OSD window as shown in the following figure. 3. Click < or > to be adjusted as shown in accordance with the following figure. 2. Your can also adjust the...
Operation for Digital Your LCD display has been adjusted to close the OSD window and save changes. To change current settings. 5. Steps: 1. Click MENU to be adjusted. 4. To exit OSD, select " " to its optimal status before shipment. (See Page... Exit (Digital) 5 Bright/Contract Adjustment Phase/Clock pulse Adjustment Horizontal/Vertical Adjustment Color Temp. Click < or > to select the function to display the OSD window as shown in the following figure. 3. Click < or > to be adjusted as shown in accordance with the following figure. 2. Your can also adjust the...
User Guide
Page 7
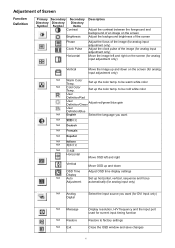
... OSD Time Display N/A Auto Adjustment Move OSD up and down on the screen (for current input timing function Restore to factory settings Close the OSD window and save changes 6 Set up the color temp. to be cold white color User Definition/Red User Definition/Green Adjust red/green/blue gain User...
... OSD Time Display N/A Auto Adjustment Move OSD up and down on the screen (for current input timing function Restore to factory settings Close the OSD window and save changes 6 Set up the color temp. to be cold white color User Definition/Red User Definition/Green Adjust red/green/blue gain User...


