

AL1717 Service Guide
Page 7
Table of contents Chapter 1 Monitor Feature 8 Chapter 2 Operating Instruction 27 Chapter 3 Machine Disassembly and Replacement 35 Chapter 4 Troubleshooting 48 Chapter 5 Connector Information 52 Chapter 6 FRU List 53 Chapter 7 Schematic Diagram 63 - 7 -
Table of contents Chapter 1 Monitor Feature 8 Chapter 2 Operating Instruction 27 Chapter 3 Machine Disassembly and Replacement 35 Chapter 4 Troubleshooting 48 Chapter 5 Connector Information 52 Chapter 6 FRU List 53 Chapter 7 Schematic Diagram 63 - 7 -
AL1717 User's Guide
Page 1
TABLE OF CONTENTS Special notes on LCD monitors 1 Introduction 2 Features 2 Unpacking 3 Attaching/Removing the base 4 Screen position adjustment 4 Connecting the power cord 5 Safety precaution 5 Cleaning your monitor 5 Preset modes 6 Power saving 7 DDC ...7 Installation 8 User controls 9 Troubleshooting 13 Specification 14
TABLE OF CONTENTS Special notes on LCD monitors 1 Introduction 2 Features 2 Unpacking 3 Attaching/Removing the base 4 Screen position adjustment 4 Connecting the power cord 5 Safety precaution 5 Cleaning your monitor 5 Preset modes 6 Power saving 7 DDC ...7 Installation 8 User controls 9 Troubleshooting 13 Specification 14
AL1717 User's Guide
Page 9
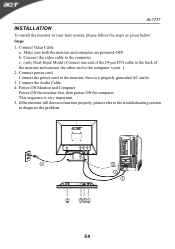
Connect the Audio Cable. 4. If the monitor still does not function properly, please refer to the troubleshooting section to your host system, please follow the steps as given below: Steps 1. AL1717 INSTALLATION To install the monitor to diagnose the problem. Connect Video Cable a. Connect the video cable to a properly grounded AC outlet. 3. Connect power cord...
Connect the Audio Cable. 4. If the monitor still does not function properly, please refer to the troubleshooting section to your host system, please follow the steps as given below: Steps 1. AL1717 INSTALLATION To install the monitor to diagnose the problem. Connect Video Cable a. Connect the video cable to a properly grounded AC outlet. 3. Connect power cord...

AL1717 User's Guide
Page 14
...case of missing full-screen image, please select other resolution or other vertical refresh timing. · Wait for servicing, please check the troubleshooting list below to see if you can self-diagnose the problem. LED OFF · Check the power switch. E-13 No Picture ·...Using OSD, adjust RESOLUTION, CLOCK, center shift, or too CLOCK-PHASE, H-POSITION and V- Display is properly connected to the monitor. AL1717 TROUBLESHOOTING Before sending your LCD monitor for a few seconds after adjusting the size of the host PC is in minimum position and try to raise the volume ...
...case of missing full-screen image, please select other resolution or other vertical refresh timing. · Wait for servicing, please check the troubleshooting list below to see if you can self-diagnose the problem. LED OFF · Check the power switch. E-13 No Picture ·...Using OSD, adjust RESOLUTION, CLOCK, center shift, or too CLOCK-PHASE, H-POSITION and V- Display is properly connected to the monitor. AL1717 TROUBLESHOOTING Before sending your LCD monitor for a few seconds after adjusting the size of the host PC is in minimum position and try to raise the volume ...


