
AL1515 User's Guide
Page 1
... 4 Viewing Angle Adjustment...4 Detaching LCD Monitor from Its Stand 5 Interface for Arm Applications ...5 Connecting the Display ...5 Connecting the AC Power...5 Connecting the Audio Cable (For AL1515 m and AL1515 bm 6 Power Management System ...6 Chapter 2 Display Controls 7 General Instructions ...7 Front Panel Control...8 How To Adjust A Setting...9 Adjusting The Picture ...9 Chapter 3 Technical Information 11 Specifications...
... 4 Viewing Angle Adjustment...4 Detaching LCD Monitor from Its Stand 5 Interface for Arm Applications ...5 Connecting the Display ...5 Connecting the AC Power...5 Connecting the Audio Cable (For AL1515 m and AL1515 bm 6 Power Management System ...6 Chapter 2 Display Controls 7 General Instructions ...7 Front Panel Control...8 How To Adjust A Setting...9 Adjusting The Picture ...9 Chapter 3 Technical Information 11 Specifications...
AL1515 User's Guide
Page 4
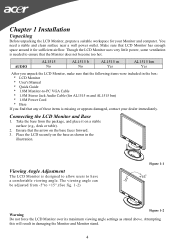
...table). 2. Ensure that the Monitor does not become too hot. Chapter 1 Installation Unpacking Before unpacking the LCD Monitor, prepare a suitable workspace for AL1515 m and AL1515 bm) * 1.8M Power Cord * Base If you unpack the LCD Monitor, make sure that the following items were included in the box: *... LCD Monitor * User's Manual * Quick Guide * 1.8M Monitor-to have a comfortable viewing angle. AUDIO AL1515 No AL1515 b No AL1515 m Yes AL1515 bm Yes After you find that LCD Monitor has enough space around it on the base as stated above. The viewing angle can...
...table). 2. Ensure that the Monitor does not become too hot. Chapter 1 Installation Unpacking Before unpacking the LCD Monitor, prepare a suitable workspace for AL1515 m and AL1515 bm) * 1.8M Power Cord * Base If you unpack the LCD Monitor, make sure that the following items were included in the box: *... LCD Monitor * User's Manual * Quick Guide * 1.8M Monitor-to have a comfortable viewing angle. AUDIO AL1515 No AL1515 b No AL1515 m Yes AL1515 bm Yes After you find that LCD Monitor has enough space around it on the base as stated above. The viewing angle can...

AL1515 User's Guide
Page 6
... power LED indicator will light yellow. 6 The VESA DPMS provides four power saving modes through detecting a horizontal or vertical sync. Connecting the Audio Cable (For AL1515 m and AL1515 bm) 1. Connect the audio cable to the " LINE OUT " jack on your PC's audio card or to the front panel's "AUDIO OUT" jack of...
... power LED indicator will light yellow. 6 The VESA DPMS provides four power saving modes through detecting a horizontal or vertical sync. Connecting the Audio Cable (For AL1515 m and AL1515 bm) 1. Connect the audio cable to the " LINE OUT " jack on your PC's audio card or to the front panel's "AUDIO OUT" jack of...
AL1515 User's Guide
Page 11
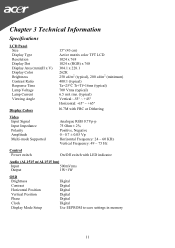
...; 2% Positive, Negative 0 - 0.7 ± 0.05 Vp Horizontal Frequency: 24 ~ 60 KHz Vertical Frequency: 49 ~ 75 Hz Control Power switch On/Off switch with LED indicator Audio (AL1515 m/AL1515 bm) Input 500mVrms Output 1W+1W OSD Brightness Contrast Horizontal Position Vertical Position Phase Clock Display Mode Setup Digital Digital Digital Digital Digital Digital Use...
...; 2% Positive, Negative 0 - 0.7 ± 0.05 Vp Horizontal Frequency: 24 ~ 60 KHz Vertical Frequency: 49 ~ 75 Hz Control Power switch On/Off switch with LED indicator Audio (AL1515 m/AL1515 bm) Input 500mVrms Output 1W+1W OSD Brightness Contrast Horizontal Position Vertical Position Phase Clock Display Mode Setup Digital Digital Digital Digital Digital Digital Use...