

Intel Rapid Storage Guide
Page 12
... in the system BIOS, a RAID volume must be created, and the F6 installation method must be used to load the Intel® Rapid Storage Technology driver during POST, press Ctrl and i at the same time to enter the option ROM user interface. 2. Enable RAID in the system BIOS. 1. Select 1: Create RAID...
... in the system BIOS, a RAID volume must be created, and the F6 installation method must be used to load the Intel® Rapid Storage Technology driver during POST, press Ctrl and i at the same time to enter the option ROM user interface. 2. Enable RAID in the system BIOS. 1. Select 1: Create RAID...
Intel Rapid Storage Guide
Page 13
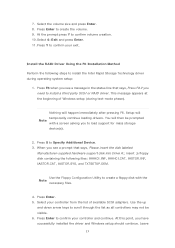
... press Y to create the volume. 9. Select your controller from the list of Windows setup (during operating system setup: 1. Install the RAID Driver Using the F6 Installation Method Perform the following files: IAAHCI.INF, IAAHCI.CAT, IASTOR.INF, IASTOR.CAT, IASTOR.SYS, and TXTSETUP.OEM. ...labeled Manufacturer-supplied hardware support disk into Drive A:, insert ;a floppy disk containing the following steps to install a third party SCSI or RAID driver. You will then be visible. 6. Use the up and down arrow keys to confirm your controller and continue. Press Y to scroll ...
... press Y to create the volume. 9. Select your controller from the list of Windows setup (during operating system setup: 1. Install the RAID Driver Using the F6 Installation Method Perform the following files: IAAHCI.INF, IAAHCI.CAT, IASTOR.INF, IASTOR.CAT, IASTOR.SYS, and TXTSETUP.OEM. ...labeled Manufacturer-supplied hardware support disk into Drive A:, insert ;a floppy disk containing the following steps to install a third party SCSI or RAID driver. You will then be visible. 6. Use the up and down arrow keys to confirm your controller and continue. Press Y to scroll ...
Intel Rapid Storage Guide
Page 16
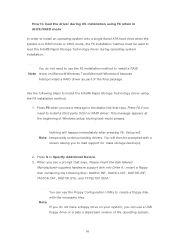
...you see a prompt that says, Press F6 if you to Specify Additional Device. 3. You can use the F6 installation method to install a RAID Note driver on your system, you do not need to create a floppy disk with a screen asking you need to use a USB floppy drive or create a...Manufacturer-supplied hardware support disk into Drive A:, insert a floppy disk containing the following steps to load the Intel® Rapid Storage Technology driver during operating system installation. You do not have a floppy drive on Microsoft Windows 7 and Microsoft Windows 8 because Intel provided a RAID...
...you see a prompt that says, Press F6 if you to Specify Additional Device. 3. You can use the F6 installation method to install a RAID Note driver on your system, you do not need to create a floppy disk with a screen asking you need to use a USB floppy drive or create a...Manufacturer-supplied hardware support disk into Drive A:, insert a floppy disk containing the following steps to load the Intel® Rapid Storage Technology driver during operating system installation. You do not have a floppy drive on Microsoft Windows 7 and Microsoft Windows 8 because Intel provided a RAID...
Intel Rapid Storage Guide
Page 17
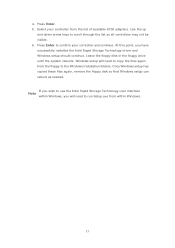
... need to run Setup.exe from the floppy to copy the files again from within Windows, you have successfully installed the Intel Rapid Storage Technology driver and Windows setup should continue. Select your controller and continue. Leave the floppy disk in the floppy drive until the system reboots.
... need to run Setup.exe from the floppy to copy the files again from within Windows, you have successfully installed the Intel Rapid Storage Technology driver and Windows setup should continue. Select your controller and continue. Leave the floppy disk in the floppy drive until the system reboots.

Quick Installation Guide
Page 36
...Replace the side panel. Follow the simple steps below to 10 Gbps. Step 1 Power of ASRock USB 3.1/A+C, it is set to Pin2-3. *Please install driver for details. Step 4 Align the ASRock USB 3.1/A+C with the PCI Express slot and press down irmly until it is highly recommended to... that were disconnected. *Jumper Setup: Jumper J1 is fully seated in the slot. Installation Procedure he ASRock USB 3.1/A+C provides two external USB 3.1 ports which support transfer rates up to install the ASRock USB 3.1/A+C. To disable device charging during S3 (Sleep), S4 (Suspend) or S5 (Power Of)...
...Replace the side panel. Follow the simple steps below to 10 Gbps. Step 1 Power of ASRock USB 3.1/A+C, it is set to Pin2-3. *Please install driver for details. Step 4 Align the ASRock USB 3.1/A+C with the PCI Express slot and press down irmly until it is highly recommended to... that were disconnected. *Jumper Setup: Jumper J1 is fully seated in the slot. Installation Procedure he ASRock USB 3.1/A+C provides two external USB 3.1 ports which support transfer rates up to install the ASRock USB 3.1/A+C. To disable device charging during S3 (Sleep), S4 (Suspend) or S5 (Power Of)...

RAID Installation Guide
Page 7
... all models. Go to Advanced Storage Coniguration and set the option SATA Mode Selection to complete the process. STEP 2: Use ASRock Easy RAID Installer Easy RAID Installer can copy the RAID driver from a support CD to enter BIOS setup utility. B. Enter UEFI SETUP UTILITY Tool and highlight "Easy RAID Installer". C. Press [Enter...
... all models. Go to Advanced Storage Coniguration and set the option SATA Mode Selection to complete the process. STEP 2: Use ASRock Easy RAID Installer Easy RAID Installer can copy the RAID driver from a support CD to enter BIOS setup utility. B. Enter UEFI SETUP UTILITY Tool and highlight "Easy RAID Installer". C. Press [Enter...

RAID Installation Guide
Page 18
..., Windows® 8 64bit, or Windows® 8.1 64-bit. STEP 1: Copy Intel® RAID drivers into a USB lash disk You can download the drivers from ASRock's website and unzip the iles into a USB lash disk or copy the iles from ASRock's motherboard support CD. (Please copy the iles under the following directory: 32 bit: ..\i386...
..., Windows® 8 64bit, or Windows® 8.1 64-bit. STEP 1: Copy Intel® RAID drivers into a USB lash disk You can download the drivers from ASRock's website and unzip the iles into a USB lash disk or copy the iles from ASRock's motherboard support CD. (Please copy the iles under the following directory: 32 bit: ..\i386...

RAID Installation Guide
Page 19
select "Browse" to install the OS by following the instructions. 19 Please keep the USB flash disk installed until the system's first reboot. Start Windows® Installation. Then choose the directory you want to install Windows?" Plug the USB flash disk into your USB port; Continue to find the RAID driver. page, please click "Load Driver". When you see "Where do you have copied in the irst step.
select "Browse" to install the OS by following the instructions. 19 Please keep the USB flash disk installed until the system's first reboot. Start Windows® Installation. Then choose the directory you want to install Windows?" Plug the USB flash disk into your USB port; Continue to find the RAID driver. page, please click "Load Driver". When you see "Where do you have copied in the irst step.

RAID Installation Guide
Page 20
... KB2505454 through this link: http://support.microsoft.com/kb/2505454/ B. Reboot your system. (It may take more time to install motherboard drivers and utilities. 20 E. Please start to boot into Windows® or install driver/utilities. Disk volume > 2TB), it may take a long time; >30 mins.) C. If you will install this problem.
... KB2505454 through this link: http://support.microsoft.com/kb/2505454/ B. Reboot your system. (It may take more time to install motherboard drivers and utilities. 20 E. Please start to boot into Windows® or install driver/utilities. Disk volume > 2TB), it may take a long time; >30 mins.) C. If you will install this problem.

Intel Smart Response Installation Guide
Page 1
You MUST have bot h t he HDD you int end t o accelerat e AND t he SSD in syst em at ion: ht t p: / / www.asrock.com * Before you j ust need t o set t he GUI panel. 5. Boot syst em t o deskt op, open , click on t he " Enable Accelerat ion" but t on t he ... t o show t he OS t o a RAI D m ode syst em , t hen inst all all perform ance t est ing, chose " Maxim ized" m ode. 7. For all required drivers, including RST st orage driver version 10.5 or lat er. 2. When pop- I ntel Sm art Response Technology I nstallation Guide This m ot herboard support s I t is not necessary t o build RAI...
You MUST have bot h t he HDD you int end t o accelerat e AND t he SSD in syst em at ion: ht t p: / / www.asrock.com * Before you j ust need t o set t he GUI panel. 5. Boot syst em t o deskt op, open , click on t he " Enable Accelerat ion" but t on t he ... t o show t he OS t o a RAI D m ode syst em , t hen inst all all perform ance t est ing, chose " Maxim ized" m ode. 7. For all required drivers, including RST st orage driver version 10.5 or lat er. 2. When pop- I ntel Sm art Response Technology I nstallation Guide This m ot herboard support s I t is not necessary t o build RAI...


