
Intel Rapid Storage Guide
Page 12
... method must be used to enable RAID in System BIOS Use the instructions included with your motherboard to load the Intel® Rapid Storage Technology driver during POST, press Ctrl and i at the same time to enter the option ROM user interface. 2. Enable RAID in the system BIOS. 1. Unless you have...
... method must be used to enable RAID in System BIOS Use the instructions included with your motherboard to load the Intel® Rapid Storage Technology driver during POST, press Ctrl and i at the same time to enter the option ROM user interface. 2. Enable RAID in the system BIOS. 1. Unless you have...

Intel Rapid Storage Guide
Page 13
... Note with the Note necessary files. 4. Leave 13 Nothing will temporarily continue loading drivers. Press Enter. 5. Select your controller and continue. Press Enter to install a third party SCSI or RAID driver. Press F6 when you see a prompt that says, Press F6 if you to...confirm your controller from the list of Windows XP* setup (during operating system setup: 1. When you have successfully installed the driver and Windows setup should continue. 7. Press Enter to Specify Additional Device. 3. Select 4: Exit and press Enter. 11. Press S to create the...
... Note with the Note necessary files. 4. Leave 13 Nothing will temporarily continue loading drivers. Press Enter. 5. Select your controller and continue. Press Enter to install a third party SCSI or RAID driver. Press F6 when you see a prompt that says, Press F6 if you to...confirm your controller from the list of Windows XP* setup (during operating system setup: 1. When you have successfully installed the driver and Windows setup should continue. 7. Press Enter to Specify Additional Device. 3. Select 4: Exit and press Enter. 11. Press S to create the...

Intel Rapid Storage Guide
Page 16
...labeled Manufacturer-supplied hardware support disk into Drive A:, insert a floppy disk containing the following steps to install a third party SCSI or RAID driver. Press F6 when you can use a USB floppy drive or create a slipstream version of Windows XP* setup (during operating system installation.... You will then be used to load the Intel® Rapid Storage Technology driver during text-mode phase). This message appears at the beginning of the operating system. 16 Use the following files: IAAHCI.INF, IAAHCI....
...labeled Manufacturer-supplied hardware support disk into Drive A:, insert a floppy disk containing the following steps to install a third party SCSI or RAID driver. Press F6 when you can use a USB floppy drive or create a slipstream version of Windows XP* setup (during operating system installation.... You will then be used to load the Intel® Rapid Storage Technology driver during text-mode phase). This message appears at the beginning of the operating system. 16 Use the following files: IAAHCI.INF, IAAHCI....

Intel Rapid Storage Guide
Page 17
.... Windows setup will need to use the Intel Rapid Storage Technology user interface Note within Windows, you have successfully installed the Intel Rapid Storage Technology driver and Windows setup should continue. If you wish to copy the files again from within Windows. 17 Press Enter. 5. Press Enter to the Windows installation...
.... Windows setup will need to use the Intel Rapid Storage Technology user interface Note within Windows, you have successfully installed the Intel Rapid Storage Technology driver and Windows setup should continue. If you wish to copy the files again from within Windows. 17 Press Enter. 5. Press Enter to the Windows installation...

Intel Rapid Storage Guide
Page 18
...the files will be located in the Microsoft document Deployment Guide Automating Windows NT* Setup. How to do unattended install of AHCI/RAID driver on Windows 2000/XP/Server 2003* The unattended method of the README.TXT. Insert the lines shown below, as described in the...// Insert the lines below into the UNATTEND.TXT file: Systems configured for RAID: This same procedure can be used to install the RAID or AHCI driver via unattended install. 1. Perform the following command line options: -A -A -PC:\, as applicable, into the UNATTEND.TXT file [MassStorageDrivers] "Intel(R) 82801R...
...the files will be located in the Microsoft document Deployment Guide Automating Windows NT* Setup. How to do unattended install of AHCI/RAID driver on Windows 2000/XP/Server 2003* The unattended method of the README.TXT. Insert the lines shown below, as described in the...// Insert the lines below into the UNATTEND.TXT file: Systems configured for RAID: This same procedure can be used to install the RAID or AHCI driver via unattended install. 1. Perform the following command line options: -A -A -PC:\, as applicable, into the UNATTEND.TXT file [MassStorageDrivers] "Intel(R) 82801R...

User Manual
Page 3
...Expansion Slots (PCI and PCI Express Slots 22 2.7 CrossFireXTM and Quad CrossFireXTM Operation Guide 23 2.8 Dual Monitor and Surround Display Features 27 2.9 ASRock Smart Remote Installation Guide 30 2.10 Jumpers Setup 31 2.11 Onboard Headers and Connectors 32 2.12 Serial ATA (SATA) / Serial ATA2 (... 2.15 Hot Plug and Hot Swap Functions for SATA3 HDDs ..... 38 2.16 SATA / SATA2 / SATA3 HDD Hot Plug Feature and Operation Guide 39 2.17 Driver Installation Guide 41 2.18 Installing Windows® 7 / 7 64-bit / VistaTM / VistaTM 64-bit With RAID Functions 41 2.19 Installing Windows® 7...
...Expansion Slots (PCI and PCI Express Slots 22 2.7 CrossFireXTM and Quad CrossFireXTM Operation Guide 23 2.8 Dual Monitor and Surround Display Features 27 2.9 ASRock Smart Remote Installation Guide 30 2.10 Jumpers Setup 31 2.11 Onboard Headers and Connectors 32 2.12 Serial ATA (SATA) / Serial ATA2 (... 2.15 Hot Plug and Hot Swap Functions for SATA3 HDDs ..... 38 2.16 SATA / SATA2 / SATA3 HDD Hot Plug Feature and Operation Guide 39 2.17 Driver Installation Guide 41 2.18 Installing Windows® 7 / 7 64-bit / VistaTM / VistaTM 64-bit With RAID Functions 41 2.19 Installing Windows® 7...

User Manual
Page 4
... 61 3.6 Boot Screen 62 3.7 Security Screen 63 3.8 Exit Screen 64 4 Software Support 65 4.1 Install Operating System 65 4.2 Support CD Information 65 4.2.1 Running Support CD 65 4.2.2 Drivers Menu 65 4.2.3 Utilities Menu 65 4.2.4 Contact Information 65 4
... 61 3.6 Boot Screen 62 3.7 Security Screen 63 3.8 Exit Screen 64 4 Software Support 65 4.1 Install Operating System 65 4.2 Support CD Information 65 4.2.1 Running Support CD 65 4.2.2 Drivers Menu 65 4.2.3 Utilities Menu 65 4.2.4 Contact Information 65 4
User Manual
Page 8
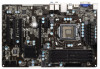
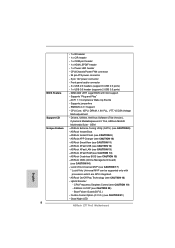
...ASRock Instant Flash (see CAUTION 20) - Hybrid Booster: - ASRock U-COP (see CAUTION 9) - Good Night LED 8 Supports jumperfree - Drivers, Utilities, AntiVirus Software (Trial Version), CyberLink MediaEspresso 6.5 Trial, ASRock MAGIX Multimedia Suite - ASRock SmartView (see CAUTION 15) - ASRock Crashless BIOS (see CAUTION 11) - ASRock... (supports 2 USB 3.0 ports) - 64Mb AMI UEFI Legal BIOS with processors which are GPU integrated. - ASRock Instant Boot - ASRock XFast LAN (see CAUTION 21) - Combo Cooler Option (C.C.O.) (see CAUTION 13) - CPU/Chassis/Power FAN...
...ASRock Instant Flash (see CAUTION 20) - Hybrid Booster: - ASRock U-COP (see CAUTION 9) - Good Night LED 8 Supports jumperfree - Drivers, Utilities, AntiVirus Software (Trial Version), CyberLink MediaEspresso 6.5 Trial, ASRock MAGIX Multimedia Suite - ASRock SmartView (see CAUTION 15) - ASRock Crashless BIOS (see CAUTION 11) - ASRock... (supports 2 USB 3.0 ports) - 64Mb AMI UEFI Legal BIOS with processors which are GPU integrated. - ASRock Instant Boot - ASRock XFast LAN (see CAUTION 21) - Combo Cooler Option (C.C.O.) (see CAUTION 13) - CPU/Chassis/Power FAN...
User Manual
Page 10
...If you can press the key during the POST or the key to enter into Standby mode (S1), Suspend to access ASRock Instant Flash. Simply install the APP Charger driver, it shows the fan speed and temperature for you to improve efficiency when the CPU cores are idle without entering... operating systems first like MS-DOS or Windows®. ASRock website: http://www.asrock.com/Feature/AppCharger/index.asp 10 For ...
...If you can press the key during the POST or the key to enter into Standby mode (S1), Suspend to access ASRock Instant Flash. Simply install the APP Charger driver, it shows the fan speed and temperature for you to improve efficiency when the CPU cores are idle without entering... operating systems first like MS-DOS or Windows®. ASRock website: http://www.asrock.com/Feature/AppCharger/index.asp 10 For ...

User Manual
Page 23
... (GPU) in CrossFireXTM mode. 2.7.1 Installing Two CrossFireXTM-Ready Graphics Cards Different CrossFireXTM cards may require different methods to AMD graphics card manuals for ATITM CrossFireXTM driver updates. 1. Combining a range of different operating modes with Windows® VistaTM / 7 OS only. Insert one Radeon graphics card into PCIE2 slot and the other CrossFireXTM...
... (GPU) in CrossFireXTM mode. 2.7.1 Installing Two CrossFireXTM-Ready Graphics Cards Different CrossFireXTM cards may require different methods to AMD graphics card manuals for ATITM CrossFireXTM driver updates. 1. Combining a range of different operating modes with Windows® VistaTM / 7 OS only. Insert one Radeon graphics card into PCIE2 slot and the other CrossFireXTM...
User Manual
Page 25
...Apply". 25 You must have Windows® XP Service Pack 2 or higher installed in your computer and boot into OS. 2.7.2 Driver Installation and Setup Step 1. The Catalyst Uninstaller is no need to downloading and installing the CATALYST Control Center. Please check AMD website for... ATITM driver updates. Power on your computer. Restart your Windows® taskbar. Click "View", select "CrossFireXTM", and then check the item "...
...Apply". 25 You must have Windows® XP Service Pack 2 or higher installed in your computer and boot into OS. 2.7.2 Driver Installation and Setup Step 1. The Catalyst Uninstaller is no need to downloading and installing the CATALYST Control Center. Please check AMD website for... ATITM driver updates. Power on your computer. Restart your Windows® taskbar. Click "View", select "CrossFireXTM", and then check the item "...

User Manual
Page 27
If you have already installed the onboard VGA driver from our support CD to this motherboard. Connect a D-Sub monitor cable to the D-Sub port on the I/O panel and connect a HDMI monitor cable to support ... can easily enjoy the benefits of dual monitor function after your computer. 27 If you haven't installed the onboard VGA driver yet, please install the onboard VGA driver from our support CD to your system, you can freely enjoy the benefits of dual monitor feature without installing any...
If you have already installed the onboard VGA driver from our support CD to this motherboard. Connect a D-Sub monitor cable to the D-Sub port on the I/O panel and connect a HDMI monitor cable to support ... can easily enjoy the benefits of dual monitor function after your computer. 27 If you haven't installed the onboard VGA driver yet, please install the onboard VGA driver from our support CD to your system, you can freely enjoy the benefits of dual monitor feature without installing any...
User Manual
Page 28
... VGA cards, you do not adjust the UEFI setup, the default value of the add-on PCI Express VGA cards on PCI Express VGA card driver to six. 28 A. Click the "Identify" button to the corresponding connectors of "Share Memory", [Auto], will be Primary, and all additional monitors ...choose "Properties", and select the "Settings" tab so that you use multiple monitors with your primary monitor, and then select "Primary". Install the onboard VGA driver and the add-on PCIE2 and PCIE3 slots. 3. Click "Apply" or "OK" to enter UEFI setup. D. Please refer to the following steps to ...
... VGA cards, you do not adjust the UEFI setup, the default value of the add-on PCI Express VGA cards on PCI Express VGA card driver to six. 28 A. Click the "Identify" button to the corresponding connectors of "Share Memory", [Auto], will be Primary, and all additional monitors ...choose "Properties", and select the "Settings" tab so that you use multiple monitors with your primary monitor, and then select "Primary". Install the onboard VGA driver and the add-on PCIE2 and PCIE3 slots. 3. Click "Apply" or "OK" to enter UEFI setup. D. Please refer to the following steps to ...

User Manual
Page 39
...carefully. The SATA / SATA2 / SATA3 HDD, which are from your dealer or HDD user manual. Below operation procedure is available on our website: www.asrock.com 2. SATA power cable SATA 7-pin connector The SATA 15-pin power connector (Black) connect to SATA / SATA2 / SATA3 HDD 1x4-pin conventional...) connect to support Hot Plug and will be processed. 2. The latest SATA / SATA2 / SATA3 driver is designed only for SATA / SATA2 / SATA3 HDD in the product spec on our support website: www.asrock.com 4. Make sure to use the SATA power cable & data cable, which cannot support Hot Plug...
...carefully. The SATA / SATA2 / SATA3 HDD, which are from your dealer or HDD user manual. Below operation procedure is available on our website: www.asrock.com 2. SATA power cable SATA 7-pin connector The SATA 15-pin power connector (Black) connect to SATA / SATA2 / SATA3 HDD 1x4-pin conventional...) connect to support Hot Plug and will be processed. 2. The latest SATA / SATA2 / SATA3 driver is designed only for SATA / SATA2 / SATA3 HDD in the product spec on our support website: www.asrock.com 4. Make sure to use the SATA power cable & data cable, which cannot support Hot Plug...

User Manual
Page 41
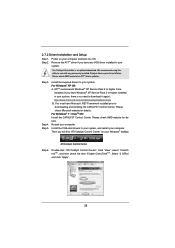
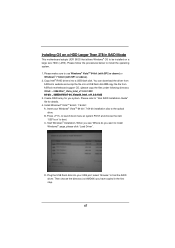
...: .. \ RAID Installation Guide STEP 3: Install Windows® 7 / 7 64-bit / VistaTM / VistaTM 64-bit OS on your optical drive first. Then, the drivers compatible to your system can work properly. 2.18 Installing Windows® 7 / 7 64-bit / VistaTM / VistaTM 64-bit With RAID Functions If you are allowed to... functions, please follow the order from the Support CD again so that "Intel Rapid Storage" will be auto-detected and listed on the support CD driver page. After the installation of Windows® 7 / 7 64-bit / VistaTM / VistaTM 64-bit OS, if you want to manage RAID functions, ...
...: .. \ RAID Installation Guide STEP 3: Install Windows® 7 / 7 64-bit / VistaTM / VistaTM 64-bit OS on your optical drive first. Then, the drivers compatible to your system can work properly. 2.18 Installing Windows® 7 / 7 64-bit / VistaTM / VistaTM 64-bit With RAID Functions If you are allowed to... functions, please follow the order from the Support CD again so that "Intel Rapid Storage" will be auto-detected and listed on the support CD driver page. After the installation of Windows® 7 / 7 64-bit / VistaTM / VistaTM 64-bit OS, if you want to manage RAID functions, ...
User Manual
Page 65
... if "AUTORUN" is enabled in the Support CD to visit ASRock's website at http://www.asrock.com; or you need to contact ASRock or want to your dealer for more about ASRock, welcome to display the menu. 4.2.2 Drivers Menu The Drivers Menu shows the available device's drivers if the system detects installed devices. Refer to know more...
... if "AUTORUN" is enabled in the Support CD to visit ASRock's website at http://www.asrock.com; or you need to contact ASRock or want to your dealer for more about ASRock, welcome to display the menu. 4.2.2 Drivers Menu The Drivers Menu shows the available device's drivers if the system detects installed devices. Refer to know more...
User Manual
Page 67
... or above). 2. Press to launch boot menu at system POST and choose the item "UEFI:xxx" to install the operating system. 1. D. You can download the driver from ASRock motherboard support CD. (please copy the files under following directory: 32 bit: ..\i386\Win7_Vista_Intel_v11.0.0.1032 64-bit: ..\AMD64\Win7-64_Vista64_Intel_v11.0.0.1032 3. B. Please follow...
... or above). 2. Press to launch boot menu at system POST and choose the item "UEFI:xxx" to install the operating system. 1. D. You can download the driver from ASRock motherboard support CD. (please copy the files under following directory: 32 bit: ..\i386\Win7_Vista_Intel_v11.0.0.1032 64-bit: ..\AMD64\Win7-64_Vista64_Intel_v11.0.0.1032 3. B. Please follow...

User Manual
Page 68
... Windows® instructions. 5. The steps listed below to follow the instructions below are Microsoft®'s suggested solution: A. Continue to boot into Windows® or install driver/utilities. Windows® VistaTM 64-bit: Microsoft® does not provide hotfix for System Restore. Then Press "Ok". 68 Please keep the USB fl...
... Windows® instructions. 5. The steps listed below to follow the instructions below are Microsoft®'s suggested solution: A. Continue to boot into Windows® or install driver/utilities. Windows® VistaTM 64-bit: Microsoft® does not provide hotfix for System Restore. Then Press "Ok". 68 Please keep the USB fl...

User Manual
Page 70
... link: http://support.microsoft.com/kb/2505454/ B. Please start to reboot.) D. Reboot your system. (It may take about 5 minutes to install motherboard drivers and utilities. Finish. 70 Set "Startup type" to install motherboard drivers and utilities. 6. Reboot your system. E. After reboot, please start to "Disable" then Click "OK". Windows® 7 64-bit: A. C. c.
... link: http://support.microsoft.com/kb/2505454/ B. Please start to reboot.) D. Reboot your system. (It may take about 5 minutes to install motherboard drivers and utilities. Finish. 70 Set "Startup type" to install motherboard drivers and utilities. 6. Reboot your system. E. After reboot, please start to "Disable" then Click "OK". Windows® 7 64-bit: A. C. c.
Quick Installation Guide
Page 8
... - Drivers, Utilities, AntiVirus Software (Trial Version), CyberLink MediaEspresso 6.5 Trial, ASRock MAGIX Multimedia Suite - ASRock OMG (Online Management Guard) (see CAUTION 18) - ASRock On/Off Play Technology (see CAUTION 16) - Boot Failure Guard (B.F.G.) - OEM - ASRock SmartView (see CAUTION 15) - ASRock Crashless BIOS (see CAUTION 11) - Hybrid Booster: - CPU Frequency Stepless Control (see CAUTION 10) - Good Night LED ASRock Z77 Pro3...
... - Drivers, Utilities, AntiVirus Software (Trial Version), CyberLink MediaEspresso 6.5 Trial, ASRock MAGIX Multimedia Suite - ASRock OMG (Online Management Guard) (see CAUTION 18) - ASRock On/Off Play Technology (see CAUTION 16) - Boot Failure Guard (B.F.G.) - OEM - ASRock SmartView (see CAUTION 15) - ASRock Crashless BIOS (see CAUTION 11) - Hybrid Booster: - CPU Frequency Stepless Control (see CAUTION 10) - Good Night LED ASRock Z77 Pro3...


