
Intel Rapid Storage Guide
Page 13
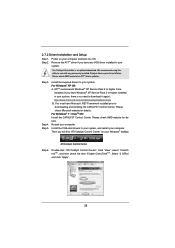
...-supplied hardware support disk into Drive A:, insert ;a floppy disk containing the following steps to create the volume. 9. Select your controller and continue. Nothing will temporarily continue loading drivers. When you need to load support for mass storage device(s). 2. Press Enter. 5. At this point, you to install a third party SCSI or RAID driver. 7. Press Enter to install the Intel Rapid Storage Technology driver during text-mode phase). Install the RAID Driver Using the F6 Installation Method Perform the following files...
...-supplied hardware support disk into Drive A:, insert ;a floppy disk containing the following steps to create the volume. 9. Select your controller and continue. Nothing will temporarily continue loading drivers. When you need to load support for mass storage device(s). 2. Press Enter. 5. At this point, you to install a third party SCSI or RAID driver. 7. Press Enter to install the Intel Rapid Storage Technology driver during text-mode phase). Install the RAID Driver Using the F6 Installation Method Perform the following files...
User Manual
Page 8
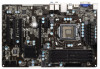
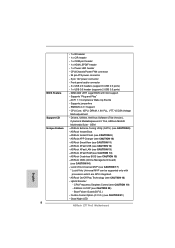
Front panel audio connector - 3 x USB 2.0 headers (support 6 USB 2.0 ports) - 1 x USB 3.0 header (supports 2 USB 3.0 ports) - 64Mb AMI UEFI Legal BIOS with processors which are GPU integrated. - SMBIOS 2.3.1 Support - OEM - ASRock XFast LAN (see CAUTION 17) * Lucid Virtu Universal MVP can be supported only with GUI support - Lucid Virtu Universal MVP (see CAUTION 13) - CPU/Chassis/Power FAN connector - 24 pin ATX power connector - 8 pin 12V power connector - Supports jumperfree - CPU Core, IGPU, DRAM, 1.8V PLL, VTT, VCCSA Voltage Multi-adjustment - ASRock XFast USB (see ...
Front panel audio connector - 3 x USB 2.0 headers (support 6 USB 2.0 ports) - 1 x USB 3.0 header (supports 2 USB 3.0 ports) - 64Mb AMI UEFI Legal BIOS with processors which are GPU integrated. - SMBIOS 2.3.1 Support - OEM - ASRock XFast LAN (see CAUTION 17) * Lucid Virtu Universal MVP can be supported only with GUI support - Lucid Virtu Universal MVP (see CAUTION 13) - CPU/Chassis/Power FAN connector - 24 pin ATX power connector - 8 pin 12V power connector - Supports jumperfree - CPU Core, IGPU, DRAM, 1.8V PLL, VTT, VCCSA Voltage Multi-adjustment - ASRock XFast USB (see ...
User Manual
Page 10
... Flash ROM. ASRock Extreme Tuning Utility (AXTU) is a BIOS flash utility embedded in a few clicks without entering operating systems first like MS-DOS or Windows®. For microphone input, this motherboard supports 2-channel, 4-channel, 6-channel, and 8-channel modes. Simply install the APP Charger driver, it shows the fan speed and temperature for the operation procedures of your system. 6. In Overclocking, you can update your computer and up to overclock CPU frequency for proper connection...
... Flash ROM. ASRock Extreme Tuning Utility (AXTU) is a BIOS flash utility embedded in a few clicks without entering operating systems first like MS-DOS or Windows®. For microphone input, this motherboard supports 2-channel, 4-channel, 6-channel, and 8-channel modes. Simply install the APP Charger driver, it shows the fan speed and temperature for the operation procedures of your system. 6. In Overclocking, you can update your computer and up to overclock CPU frequency for proper connection...
User Manual
Page 13
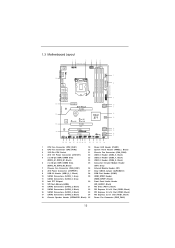
..., Gray) 7 Chassis Fan Connector (CHA_FAN1) 26 Infrared Module Header (IR1) 8 ATX Power Connector (ATXPWR1) 27 Clear CMOS Jumper (CLRCMOS1) 9 USB 3.0 Header (USB3_0_1, Black) 28 COM Port Header (COM1) 10 SATA3 Connectors (SATA3_1, Gray) 29 HDMI_SPDIF Header 11 SATA3 Connectors (SATA3_0, Gray) (HDMI_SPDIF1, Black) 12 Intel Z77 Chipset 30 Front Panel Audio Header 13 SPI Flash Memory (64Mb) (HD_AUDIO1, Black) 14 SATA2 Connectors (SATA2_2, Black) 31 PCI Slots (PCI1-2, Black) 15 SATA2 Connectors (SATA2_3, Black) 32 PCI Express 2.0 x16 Slot (PCIE3, Black...
..., Gray) 7 Chassis Fan Connector (CHA_FAN1) 26 Infrared Module Header (IR1) 8 ATX Power Connector (ATXPWR1) 27 Clear CMOS Jumper (CLRCMOS1) 9 USB 3.0 Header (USB3_0_1, Black) 28 COM Port Header (COM1) 10 SATA3 Connectors (SATA3_1, Gray) 29 HDMI_SPDIF Header 11 SATA3 Connectors (SATA3_0, Gray) (HDMI_SPDIF1, Black) 12 Intel Z77 Chipset 30 Front Panel Audio Header 13 SPI Flash Memory (64Mb) (HD_AUDIO1, Black) 14 SATA2 Connectors (SATA2_2, Black) 31 PCI Slots (PCI1-2, Black) 15 SATA2 Connectors (SATA2_3, Black) 32 PCI Express 2.0 x16 Slot (PCIE3, Black...
User Manual
Page 25
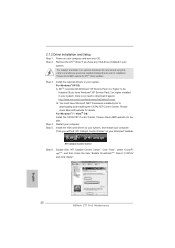
... optional download. Please check AMD website for details. Step 3. For Windows® XP OS: A. For Windows® 7 / VistaTM OS: Install the CATALYST Control Center. Install the required drivers to your system, and restart your system. Install the VGA card drivers to your computer. The Catalyst Uninstaller is no need to installation. Step 4. You must have Windows® XP Service Pack 2 or higher installed in your computer and boot...
... optional download. Please check AMD website for details. Step 3. For Windows® XP OS: A. For Windows® 7 / VistaTM OS: Install the CATALYST Control Center. Install the required drivers to your system, and restart your system. Install the VGA card drivers to your computer. The Catalyst Uninstaller is no need to installation. Step 4. You must have Windows® XP Service Pack 2 or higher installed in your computer and boot...
User Manual
Page 28
... internal VGA output support (D-Sub and HDMI) and external add-on PCI Express VGA card driver to enter UEFI setup. Please refer to this monitor". Boot your card, one monitor will always be Primary, and all additional monitors will disable D-Sub function when an add-on the I /O panel. Click "Extend my Windows desktop onto this motherboard. 4. If you use multiple monitors with your system. Right-click the display icon and select "Attached", if necessary. G. Connect a D-Sub monitor cable...
... internal VGA output support (D-Sub and HDMI) and external add-on PCI Express VGA card driver to enter UEFI setup. Please refer to this monitor". Boot your card, one monitor will always be Primary, and all additional monitors will disable D-Sub function when an add-on the I /O panel. Click "Extend my Windows desktop onto this motherboard. 4. If you use multiple monitors with your system. Right-click the display icon and select "Attached", if necessary. G. Connect a D-Sub monitor cable...

User Manual
Page 41
... use "Intel Rapid Storage" in Windows® environment, install "SATA2 driver" from top to bottom to install those required drivers. Enter UEFI SETUP UTILITY Advanced screen Storage Configuration. Set the option "SATA Mode Selection" to set RAID configuration. STEP 2: Use "RAID Installation Guide" to [RAID]. Please refer to the document in the Support CD, "Guide to SATA Hard Disks Installation and RAID Configuration", which is located in the folder at the following path: .. \ RAID Installation Guide STEP 3: Install Windows® 7 / 7 64-bit...
... use "Intel Rapid Storage" in Windows® environment, install "SATA2 driver" from top to bottom to install those required drivers. Enter UEFI SETUP UTILITY Advanced screen Storage Configuration. Set the option "SATA Mode Selection" to set RAID configuration. STEP 2: Use "RAID Installation Guide" to [RAID]. Please refer to the document in the Support CD, "Guide to SATA Hard Disks Installation and RAID Configuration", which is located in the folder at the following path: .. \ RAID Installation Guide STEP 3: Install Windows® 7 / 7 64-bit...

User Manual
Page 51
... [Enabled] to enable CPU internal thermal control mechanism to OS. Set to OS. The default value is [Auto]. The C1 state is required. In the C1 power state, the processor maintains the context of cores to enable in each processor package. This option will program into C State package limit register. Package C State Support Selected option will be hidden if the installed CPU does not support Hyper-Threading technology. Active Processor Cores Use this...
... [Enabled] to enable CPU internal thermal control mechanism to OS. Set to OS. The default value is [Auto]. The C1 state is required. In the C1 power state, the processor maintains the context of cores to enable in each processor package. This option will program into C State package limit register. Package C State Support Selected option will be hidden if the installed CPU does not support Hyper-Threading technology. Active Processor Cores Use this...
User Manual
Page 53
... set onboard VGA share memory feature. The default value is [Enabled]. Render Standby Use this to select [Onboard], [PCI] or [PCI Express] as the boot graphic adapter priority. Share Memory This allows you to enable or disable Intel® VT-d technology (Intel® Virtualization Technology for Directed I/O). Deep Render Standby This allows you wish to enable or disable Deep Render Standby. The default value is [Auto]. The default value of this option. If you to install a PCI Express card...
... set onboard VGA share memory feature. The default value is [Enabled]. Render Standby Use this to select [Onboard], [PCI] or [PCI Express] as the boot graphic adapter priority. Share Memory This allows you to enable or disable Intel® VT-d technology (Intel® Virtualization Technology for Directed I/O). Deep Render Standby This allows you wish to enable or disable Deep Render Standby. The default value is [Auto]. The default value of this option. If you to install a PCI Express card...
User Manual
Page 60
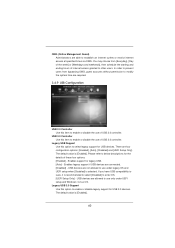
... the use only under legacy OS and UEFI setup when [Disabled] is [Enabled]. 60 Enables legacy support if USB devices are four configuration options: [Enabled], [Auto], [Disabled] and [UEFI Setup Only]. Legacy USB 3.0 Support Use this item to enter OS. [UEFI Setup Only] - You may choose from bypassing OMG, guest accounts without permission to modify the system time are required. 3.4.9 USB Configuration USB 2.0 Controller Use this option to use of USB 3.0 controller. Enables support for USB 3.0 devices. If you have USB compatibility issues, it is [Enabled]. USB devices are...
... the use only under legacy OS and UEFI setup when [Disabled] is [Enabled]. 60 Enables legacy support if USB devices are four configuration options: [Enabled], [Auto], [Disabled] and [UEFI Setup Only]. Legacy USB 3.0 Support Use this item to enter OS. [UEFI Setup Only] - You may choose from bypassing OMG, guest accounts without permission to modify the system time are required. 3.4.9 USB Configuration USB 2.0 Controller Use this option to use of USB 3.0 controller. Enables support for USB 3.0 devices. If you have USB compatibility issues, it is [Enabled]. USB devices are...
User Manual
Page 65
... motherboard settings and hardware options vary, use the setup procedures in your CD-ROM drive. or you need to contact ASRock or want to know more information. 4.2 Support CD Information The Support CD that came with the motherboard contains necessary drivers and useful utilities that the motherboard supports. The CD automatically displays the Main Menu if "AUTORUN" is enabled in this chapter for further information. 65 Refer to display the menu. 4.2.2 Drivers Menu The Drivers Menu...
... motherboard settings and hardware options vary, use the setup procedures in your CD-ROM drive. or you need to contact ASRock or want to know more information. 4.2 Support CD Information The Support CD that came with the motherboard contains necessary drivers and useful utilities that the motherboard supports. The CD automatically displays the Main Menu if "AUTORUN" is enabled in this chapter for further information. 65 Refer to display the menu. 4.2.2 Drivers Menu The Drivers Menu...

Quick Installation Guide
Page 2
..., Gray) 7 Chassis Fan Connector (CHA_FAN1) 26 Infrared Module Header (IR1) 8 ATX Power Connector (ATXPWR1) 27 Clear CMOS Jumper (CLRCMOS1) 9 USB 3.0 Header (USB3_0_1, Black) 28 COM Port Header (COM1) 10 SATA3 Connectors (SATA3_1, Gray) 29 HDMI_SPDIF Header 11 SATA3 Connectors (SATA3_0, Gray) (HDMI_SPDIF1, Black) 12 Intel Z77 Chipset 30 Front Panel Audio Header 13 SPI Flash Memory (64Mb) (HD_AUDIO1, Black) 14 SATA2 Connectors (SATA2_2, Black) 31 PCI Slots (PCI1-2, Black) 15 SATA2 Connectors (SATA2_3, Black) 32 PCI Express 2.0 x16 Slot (PCIE3, Black...
..., Gray) 7 Chassis Fan Connector (CHA_FAN1) 26 Infrared Module Header (IR1) 8 ATX Power Connector (ATXPWR1) 27 Clear CMOS Jumper (CLRCMOS1) 9 USB 3.0 Header (USB3_0_1, Black) 28 COM Port Header (COM1) 10 SATA3 Connectors (SATA3_1, Gray) 29 HDMI_SPDIF Header 11 SATA3 Connectors (SATA3_0, Gray) (HDMI_SPDIF1, Black) 12 Intel Z77 Chipset 30 Front Panel Audio Header 13 SPI Flash Memory (64Mb) (HD_AUDIO1, Black) 14 SATA2 Connectors (SATA2_2, Black) 31 PCI Slots (PCI1-2, Black) 15 SATA2 Connectors (SATA2_3, Black) 32 PCI Express 2.0 x16 Slot (PCIE3, Black...
Quick Installation Guide
Page 3
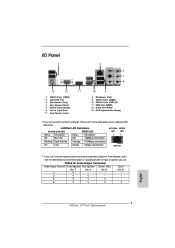
... type of speaker you use . I/O Panel 1 2 3 6 4 7 5 8 13 12 11 1 USB 2.0 Ports (USB01) * 2 LAN RJ-45 Port 3 Side Speaker (Gray) 4 Rear Speaker (Black) 5 Central / Bass (Orange) 6 Line In (Light Blue) ** 7 Front Speaker (Lime) 10 9 8 Microphone (Pink) 9 USB 2.0 Ports (USB23) 10 USB 3.0 Ports (USB3_23) 11 HDMI Port (HDMI1) 12 D-Sub Port (VGA1) 13 PS/2 Keyboard Port (Purple) * There are two LED next to the table below for connection details in (No. 7) (No. 4) (No. 5) (No. 6) 2 V -- -- -- 4 V V -- -- 6 V V V -- 8 V V V V English 3 ASRock Z77 Pro3...
... type of speaker you use . I/O Panel 1 2 3 6 4 7 5 8 13 12 11 1 USB 2.0 Ports (USB01) * 2 LAN RJ-45 Port 3 Side Speaker (Gray) 4 Rear Speaker (Black) 5 Central / Bass (Orange) 6 Line In (Light Blue) ** 7 Front Speaker (Lime) 10 9 8 Microphone (Pink) 9 USB 2.0 Ports (USB23) 10 USB 3.0 Ports (USB3_23) 11 HDMI Port (HDMI1) 12 D-Sub Port (VGA1) 13 PS/2 Keyboard Port (Purple) * There are two LED next to the table below for connection details in (No. 7) (No. 4) (No. 5) (No. 6) 2 V -- -- -- 4 V V -- -- 6 V V V -- 8 V V V V English 3 ASRock Z77 Pro3...
Quick Installation Guide
Page 5
... 1.1 Package Contents ASRock Z77 Pro3 Motherboard (ATX Form Factor: 12.0-in x 7.6-in Storage Configuration to set the BIOS option in , 30.5 cm x 19.3 cm) ASRock Z77 Pro3 Quick Installation Guide ASRock Z77 Pro3 Support CD 2 x Serial ATA (SATA) Data Cables (Optional) 1 x I/O Panel Shield ASRock Reminds You... Introduction Thank you for specific information about the model you require technical support related to the "User Manual" in the Support CD. To get better performance in Windows® 7 / 7 64-bit / VistaTM...
... 1.1 Package Contents ASRock Z77 Pro3 Motherboard (ATX Form Factor: 12.0-in x 7.6-in Storage Configuration to set the BIOS option in , 30.5 cm x 19.3 cm) ASRock Z77 Pro3 Quick Installation Guide ASRock Z77 Pro3 Support CD 2 x Serial ATA (SATA) Data Cables (Optional) 1 x I/O Panel Shield ASRock Reminds You... Introduction Thank you for specific information about the model you require technical support related to the "User Manual" in the Support CD. To get better performance in Windows® 7 / 7 64-bit / VistaTM...
Quick Installation Guide
Page 8
...1 x IR header - 1 x CIR header - 1 x COM port header - 1 x HDMI_SPDIF header - 1 x Power LED header - Front panel audio connector - 3 x USB 2.0 headers (support 6 USB 2.0 ports) - 1 x USB 3.0 header (supports 2 USB 3.0 ports) - 64Mb AMI UEFI Legal BIOS with processors which are GPU integrated. - Supports "Plug and Play" - ASRock XFast LAN (see CAUTION 8) - ASRock U-COP (see CAUTION 12) - ASRock XFast USB (see CAUTION 20) - Hybrid Booster: - Good Night LED ASRock Z77 Pro3 Motherboard Boot Failure Guard (B.F.G.) - CPU Core, IGPU, DRAM, 1.8V PLL, VTT, VCCSA Voltage Multi...
...1 x IR header - 1 x CIR header - 1 x COM port header - 1 x HDMI_SPDIF header - 1 x Power LED header - Front panel audio connector - 3 x USB 2.0 headers (support 6 USB 2.0 ports) - 1 x USB 3.0 header (supports 2 USB 3.0 ports) - 64Mb AMI UEFI Legal BIOS with processors which are GPU integrated. - Supports "Plug and Play" - ASRock XFast LAN (see CAUTION 8) - ASRock U-COP (see CAUTION 12) - ASRock XFast USB (see CAUTION 20) - Hybrid Booster: - Good Night LED ASRock Z77 Pro3 Motherboard Boot Failure Guard (B.F.G.) - CPU Core, IGPU, DRAM, 1.8V PLL, VTT, VCCSA Voltage Multi...
Quick Installation Guide
Page 10
... new BIOS file to your PC enters into the BIOS setup menu to adjust. Please be enabled only if the display supports 12bpc in Flash ROM. ASRock APP Charger. ASRock website: http://www.asrock.com/Feature/AppCharger/index.asp 10 ASRock Z77 Pro3 Motherboard English Please check the table on page 3 for you to access ASRock Instant Flash. Simply install the APP Charger driver, it shows the fan speed and temperature for proper connection. 8. ASRock APP...
... new BIOS file to your PC enters into the BIOS setup menu to adjust. Please be enabled only if the display supports 12bpc in Flash ROM. ASRock APP Charger. ASRock website: http://www.asrock.com/Feature/AppCharger/index.asp 10 ASRock Z77 Pro3 Motherboard English Please check the table on page 3 for you to access ASRock Instant Flash. Simply install the APP Charger driver, it shows the fan speed and temperature for proper connection. 8. ASRock APP...
Quick Installation Guide
Page 22
... AMD website for details. Install the VGA card drivers to installation. ATI Catalyst Control Center Step 6. Double-click "ATI Catalyst Control Center". English 22 ASRock Z77 Pro3 Motherboard The Catalyst Uninstaller is no need to be installed (If you have Windows® XP Service Pack 2 or higher installed in your computer. Install the required drivers to downloading and installing the CATALYST Control Center. ATITM recommends Windows® XP Service Pack 2 or higher to download...
... AMD website for details. Install the VGA card drivers to installation. ATI Catalyst Control Center Step 6. Double-click "ATI Catalyst Control Center". English 22 ASRock Z77 Pro3 Motherboard The Catalyst Uninstaller is no need to be installed (If you have Windows® XP Service Pack 2 or higher installed in your computer. Install the required drivers to downloading and installing the CATALYST Control Center. ATITM recommends Windows® XP Service Pack 2 or higher to download...
Quick Installation Guide
Page 34
... 64-bit OS on your system can work properly. 2.13 Installing Windows® 7 / 7 64-bit / VistaTM / VistaTM 64-bit With RAID Functions If you want to install those required drivers. Set the option "SATA Mode Selection" to your SATA / SATA2 / SATA3 HDDs without NCQ function STEP 1: Set Up UEFI. Then, the drivers compatible to [IDE]. 2.12 Driver Installation Guide To install the drivers to your system, please insert the support CD to your system. 34 ASRock Z77 Pro3 Motherboard English...
... 64-bit OS on your system can work properly. 2.13 Installing Windows® 7 / 7 64-bit / VistaTM / VistaTM 64-bit With RAID Functions If you want to install those required drivers. Set the option "SATA Mode Selection" to your SATA / SATA2 / SATA3 HDDs without NCQ function STEP 1: Set Up UEFI. Then, the drivers compatible to [IDE]. 2.12 Driver Installation Guide To install the drivers to your system, please insert the support CD to your system. 34 ASRock Z77 Pro3 Motherboard English...
RAID Installation Guide
Page 6
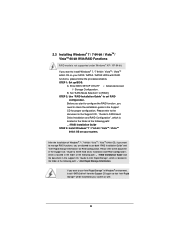
.... Enter BIOS SETUP UTILITY Advanced screen Storage Configuration. After the installation of Windows® 7 / 7 64-bit / VistaTM / VistaTM 64-bit OS, if you want to manage RAID functions, you are allowed to use "Intel Rapid Storage" in Windows® environment, install "SATA2 driver" from the Support CD again so that "Intel Rapid Storage" will be installed to your system as well. 6 Set "SATA Mode Selection" to set RAID configuration. 2.3 Installing Windows®...
.... Enter BIOS SETUP UTILITY Advanced screen Storage Configuration. After the installation of Windows® 7 / 7 64-bit / VistaTM / VistaTM 64-bit OS, if you want to manage RAID functions, you are allowed to use "Intel Rapid Storage" in Windows® environment, install "SATA2 driver" from the Support CD again so that "Intel Rapid Storage" will be installed to your system as well. 6 Set "SATA Mode Selection" to set RAID configuration. 2.3 Installing Windows®...

Intel Smart Response Installation Guide
Page 1
... set the UEFI option "SATA Mode" to desktop, open , click on the "Enable Acceleration" button on the GUI panel. 5. After clicking OK button, SRT will enable automatically, and the RST GUI will update the new version RST driver in Icon tray, lower right-hand corner of the screen. 4. UI setup instruction: 1. Boot system to [RAID Mode]. You MUST have both the HDD you use Enhanced or Maximized Mode. 6. It is not necessary to a RAID mode...
... set the UEFI option "SATA Mode" to desktop, open , click on the "Enable Acceleration" button on the GUI panel. 5. After clicking OK button, SRT will enable automatically, and the RST GUI will update the new version RST driver in Icon tray, lower right-hand corner of the screen. 4. UI setup instruction: 1. Boot system to [RAID Mode]. You MUST have both the HDD you use Enhanced or Maximized Mode. 6. It is not necessary to a RAID mode...


