User Manual
Page 13
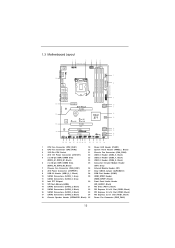
... LINE IN Center: FRONT Bottom: MIC IN ErP/EuP Ready 34 PCIE1 Z77 Pro3 LAN PHY PCIE2 PCI Express 3.0 SATA3_1 SATA3_0 10 11 CMOS 33 Battery Super I/O XFast LAN XFast USB XFast RAM 12 Intel Z77 64Mb BIOS 13 32 31 PCIE3 RoHS AUDIO CODEC PCI1 HD_AUDIO1 HDMI_SPDIF1 1 ...(DDR3_A2, DDR3_B2, Black) (CIR1, Gray) 7 Chassis Fan Connector (CHA_FAN1) 26 Infrared Module Header (IR1) 8 ATX Power Connector (ATXPWR1) 27 Clear CMOS Jumper (CLRCMOS1) 9 USB 3.0 Header (USB3_0_1, Black) 28 COM Port Header (COM1) 10 SATA3 Connectors (SATA3_1, Gray) 29 HDMI_SPDIF Header 11 SATA3 ...
... LINE IN Center: FRONT Bottom: MIC IN ErP/EuP Ready 34 PCIE1 Z77 Pro3 LAN PHY PCIE2 PCI Express 3.0 SATA3_1 SATA3_0 10 11 CMOS 33 Battery Super I/O XFast LAN XFast USB XFast RAM 12 Intel Z77 64Mb BIOS 13 32 31 PCIE3 RoHS AUDIO CODEC PCI1 HD_AUDIO1 HDMI_SPDIF1 1 ...(DDR3_A2, DDR3_B2, Black) (CIR1, Gray) 7 Chassis Fan Connector (CHA_FAN1) 26 Infrared Module Header (IR1) 8 ATX Power Connector (ATXPWR1) 27 Clear CMOS Jumper (CLRCMOS1) 9 USB 3.0 Header (USB3_0_1, Black) 28 COM Port Header (COM1) 10 SATA3 Connectors (SATA3_1, Gray) 29 HDMI_SPDIF Header 11 SATA3 ...
User Manual
Page 31
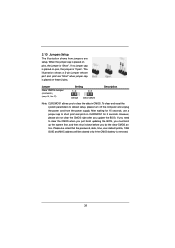
..."Short". Please be noted that the password, date, time, user default profile, 1394 GUID and MAC address will be cleared only if the CMOS battery is removed. 31 2.10 Jumpers Setup The illustration shows how jumpers are "Short" when jumper cap is placed on CLRCMOS1 for 5 seconds. After waiting...just finish updating the BIOS, you must boot up the system first, and then shut it down before you do not clear the CMOS right after you to default setup, please turn off the computer and unplug the power cord from the power supply. The illustration shows a 3-pin ...
..."Short". Please be noted that the password, date, time, user default profile, 1394 GUID and MAC address will be cleared only if the CMOS battery is removed. 31 2.10 Jumpers Setup The illustration shows how jumpers are "Short" when jumper cap is placed on CLRCMOS1 for 5 seconds. After waiting...just finish updating the BIOS, you must boot up the system first, and then shut it down before you do not clear the CMOS right after you to default setup, please turn off the computer and unplug the power cord from the power supply. The illustration shows a 3-pin ...

Quick Installation Guide
Page 2
... 25 Consumer Infrared Module Header (DDR3_A2, DDR3_B2, Black) (CIR1, Gray) 7 Chassis Fan Connector (CHA_FAN1) 26 Infrared Module Header (IR1) 8 ATX Power Connector (ATXPWR1) 27 Clear CMOS Jumper (CLRCMOS1) 9 USB 3.0 Header (USB3_0_1, Black) 28 COM Port Header (COM1) 10 SATA3 Connectors (SATA3_1, Gray) 29 HDMI_SPDIF Header 11 SATA3 Connectors (SATA3_0, Gray) (HDMI_SPDIF1... (PCIE2, Black) 17 SATA2 Connectors (SATA2_5, Black) 34 PCI Express 2.0 x1 Slot (PCIE1, Black) 18 Chassis Speaker Header (SPEAKER1, Black) 35 Power Fan Connector (PWR_FAN1) 2 ASRock Z77 Pro3 Motherboard English
... 25 Consumer Infrared Module Header (DDR3_A2, DDR3_B2, Black) (CIR1, Gray) 7 Chassis Fan Connector (CHA_FAN1) 26 Infrared Module Header (IR1) 8 ATX Power Connector (ATXPWR1) 27 Clear CMOS Jumper (CLRCMOS1) 9 USB 3.0 Header (USB3_0_1, Black) 28 COM Port Header (COM1) 10 SATA3 Connectors (SATA3_1, Gray) 29 HDMI_SPDIF Header 11 SATA3 Connectors (SATA3_0, Gray) (HDMI_SPDIF1... (PCIE2, Black) 17 SATA2 Connectors (SATA2_5, Black) 34 PCI Express 2.0 x1 Slot (PCIE1, Black) 18 Chassis Speaker Header (SPEAKER1, Black) 35 Power Fan Connector (PWR_FAN1) 2 ASRock Z77 Pro3 Motherboard English
Quick Installation Guide
Page 28
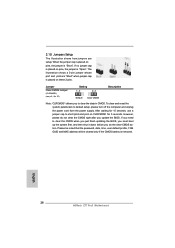
... be noted that the password, date, time, user default profile, 1394 GUID and MAC address will be cleared only if the CMOS battery is placed on CLRCMOS1 for 15 seconds, use a jumper cap to default setup, please turn off the computer and unplug the power cord... need to clear the data in CMOS. English 28 ASRock Z77 Pro3 Motherboard However, please do not clear the CMOS right after you do the clear-CMOS action. Jumper Clear CMOS Jumper (CLRCMOS1) (see p.2, No. 27) Setting Default Clear CMOS Description Note: CLRCMOS1 allows you to clear the CMOS when you just finish updating...
... be noted that the password, date, time, user default profile, 1394 GUID and MAC address will be cleared only if the CMOS battery is placed on CLRCMOS1 for 15 seconds, use a jumper cap to default setup, please turn off the computer and unplug the power cord... need to clear the data in CMOS. English 28 ASRock Z77 Pro3 Motherboard However, please do not clear the CMOS right after you do the clear-CMOS action. Jumper Clear CMOS Jumper (CLRCMOS1) (see p.2, No. 27) Setting Default Clear CMOS Description Note: CLRCMOS1 allows you to clear the CMOS when you just finish updating...
Quick Installation Guide
Page 134
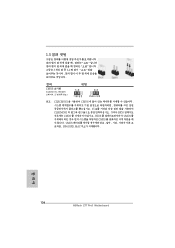
1.3 3 1-2 점퍼 CMOS 초기화 (CLRCMOS1, 3 2 27 세팅 CMOS 삭제 참고 : CLRCMOS1 CMOS 15 CLRCMOS1 의 핀 2 와 핀 3 을 5 BIOS CMOS BIOS CMOS CMOS CMOS 1394 GUID, MAC 한 국 어 134 ASRock Z77 Pro3 Motherboard
1.3 3 1-2 점퍼 CMOS 초기화 (CLRCMOS1, 3 2 27 세팅 CMOS 삭제 참고 : CLRCMOS1 CMOS 15 CLRCMOS1 의 핀 2 와 핀 3 을 5 BIOS CMOS BIOS CMOS CMOS CMOS 1394 GUID, MAC 한 국 어 134 ASRock Z77 Pro3 Motherboard

Quick Installation Guide
Page 149
1.3 1-2 CMOS CLRCMOS1 2 27 参照) 設定 説明 CMOS の消去 注 : CLRCMOS1 CMOS 15 CLRCMOS1 のピン 2 とピン 3 を 5 BIOS CMOS BIOS CMOS CMOS 1394 GUID と MAC CMOS 日本語 149 ASRock Z77 Pro3 Motherboard
1.3 1-2 CMOS CLRCMOS1 2 27 参照) 設定 説明 CMOS の消去 注 : CLRCMOS1 CMOS 15 CLRCMOS1 のピン 2 とピン 3 を 5 BIOS CMOS BIOS CMOS CMOS 1394 GUID と MAC CMOS 日本語 149 ASRock Z77 Pro3 Motherboard

Quick Installation Guide
Page 177
1.3 3 1 和針腳 2 CMOS (CLRCMOS1, 3 2 頁第 27 項 ) 設定 默認設置 清除 CMOS 註: C L R C M O S1 C M O S 15 CLRCMOS1 的 pin2 及 pin3 短路 5 BIOS CMOS BIOS CMOS CMOS C M O S 1394 GUID 及 MAC 繁體中文 177 ASRock Z77 Pro3 Motherboard
1.3 3 1 和針腳 2 CMOS (CLRCMOS1, 3 2 頁第 27 項 ) 設定 默認設置 清除 CMOS 註: C L R C M O S1 C M O S 15 CLRCMOS1 的 pin2 及 pin3 短路 5 BIOS CMOS BIOS CMOS CMOS C M O S 1394 GUID 及 MAC 繁體中文 177 ASRock Z77 Pro3 Motherboard

