User Manual
Page 15
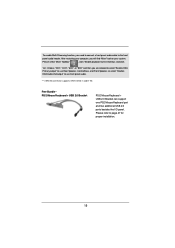
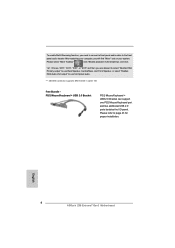
After restarting your system. Free Bundle PS/2 Mouse/Keyboard + USB 2.0 Bracket PS/2 Mouse/Keyboard + USB 2.0 Bracket can support one PS2 Mouse/Keyboard port and two additional USB 2.0 ports besides the I/O panel. Please refer to use front panel audio. *** eSATA3 connector supports SATA Gen3 in cable 1M. To enable Multi-Streaming function, you will...
After restarting your system. Free Bundle PS/2 Mouse/Keyboard + USB 2.0 Bracket PS/2 Mouse/Keyboard + USB 2.0 Bracket can support one PS2 Mouse/Keyboard port and two additional USB 2.0 ports besides the I/O panel. Please refer to use front panel audio. *** eSATA3 connector supports SATA Gen3 in cable 1M. To enable Multi-Streaming function, you will...
User Manual
Page 31
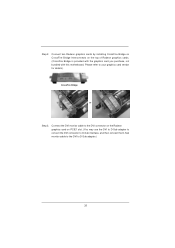
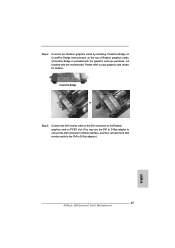
... DVI connector on the Radeon graphics card on the top of Radeon graphics cards. (CrossFire Bridge is provided with the graphics card you purchase, not bundled with this motherboard. Step 2. Please refer to D-Sub adapter.) 31 Connect two Radeon graphics cards by installing CrossFire Bridge on CrossFire Bridge Interconnects on PCIE1...
... DVI connector on the Radeon graphics card on the top of Radeon graphics cards. (CrossFire Bridge is provided with the graphics card you purchase, not bundled with this motherboard. Step 2. Please refer to D-Sub adapter.) 31 Connect two Radeon graphics cards by installing CrossFire Bridge on CrossFire Bridge Interconnects on PCIE1...
User Manual
Page 32
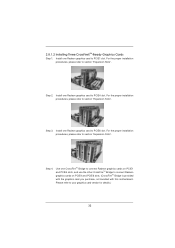
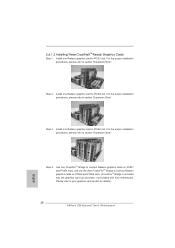
.... Install one CrossFireTM Bridge to connect Radeon graphics cards on PCIE4 and PCIE6 slots. (CrossFireTM Bridge is provided with the graphics card you purchase, not bundled with this motherboard. For the proper installation procedures, please refer to section "Expansion Slots". Use one Radeon graphics card to connect Radeon graphics cards on...
.... Install one CrossFireTM Bridge to connect Radeon graphics cards on PCIE4 and PCIE6 slots. (CrossFireTM Bridge is provided with the graphics card you purchase, not bundled with this motherboard. For the proper installation procedures, please refer to section "Expansion Slots". Use one Radeon graphics card to connect Radeon graphics cards on...
User Manual
Page 48
... chassis screws. Step 5 Plug the Front USB 3.0 cable into the 2.5" drive bay of the chassis. The Installation Guide of Front USB 3.0 Panel Step 1 Prepare the bundled Front USB 3.0 Panel, four Step 2 Screw the 2.5" HDD/SSD to use.
... chassis screws. Step 5 Plug the Front USB 3.0 cable into the 2.5" drive bay of the chassis. The Installation Guide of Front USB 3.0 Panel Step 1 Prepare the bundled Front USB 3.0 Panel, four Step 2 Screw the 2.5" HDD/SSD to use.
Quick Installation Guide
Page 4
...;nd "Mixer" tool on your system. English 4 ASRock Z68 Extreme7 Gen3 Motherboard To enable Multi-Streaming function, you need to connect a front panel audio cable to use Rear Speaker, Central/Bass, and Front Speaker, or select "Realtek HDA Audio 2nd output" to the front panel audio header. Free Bundle PS/2 Mouse/Keyboard + USB 2.0 Bracket PS...
...;nd "Mixer" tool on your system. English 4 ASRock Z68 Extreme7 Gen3 Motherboard To enable Multi-Streaming function, you need to connect a front panel audio cable to use Rear Speaker, Central/Bass, and Front Speaker, or select "Realtek HDA Audio 2nd output" to the front panel audio header. Free Bundle PS/2 Mouse/Keyboard + USB 2.0 Bracket PS...
Quick Installation Guide
Page 27
... 27 ASRock Z68 Extreme7 Gen3 Motherboard Step 2. Connect the DVI monitor cable to your graphics card vendor for details.) CrossFire Bridge or Step 3. Please refer to the DVI connector on the Radeon graphics card on the top of Radeon graphics cards. (CrossFire Bridge is provided with the graphics card you purchase, not bundled with this...
... 27 ASRock Z68 Extreme7 Gen3 Motherboard Step 2. Connect the DVI monitor cable to your graphics card vendor for details.) CrossFire Bridge or Step 3. Please refer to the DVI connector on the Radeon graphics card on the top of Radeon graphics cards. (CrossFire Bridge is provided with the graphics card you purchase, not bundled with this...
Quick Installation Guide
Page 28
... purchase, not bundled with this motherboard. Install one Radeon graphics card to section "Expansion Slots". English Step 4. For the proper installation procedures, please refer to PCIE6 slot. 2.6.1.2 Installing Three CrossFireXTM-Ready Graphics Cards Step 1. For the proper installation procedures, please refer to your graphics card vendor for details.) 28 ASRock Z68 Extreme7 Gen3 Motherboard Please...
... purchase, not bundled with this motherboard. Install one Radeon graphics card to section "Expansion Slots". English Step 4. For the proper installation procedures, please refer to PCIE6 slot. 2.6.1.2 Installing Three CrossFireXTM-Ready Graphics Cards Step 1. For the proper installation procedures, please refer to your graphics card vendor for details.) 28 ASRock Z68 Extreme7 Gen3 Motherboard Please...
Quick Installation Guide
Page 44
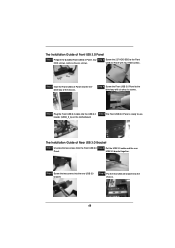
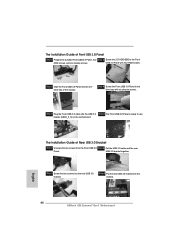
Step 3 Screw the two screws into the 2.5" drive bay of the chassis. The Installation Guide of Front USB 3.0 Panel Step 1 Prepare the bundled Front USB 3.0 Panel, four Step 2 Screw the 2.5" HDD/SSD to the Front HDD screws, and six chassis screws. Step 3 Intall the ...the rear USB 3.0 bracket into the USB 3.0 Step 6 The Front USB 3.0 Panel is ready to the drive bay with four HDD screws. English 44 ASRock Z68 Extreme7 Gen3 Motherboard Step 4 Screw the Front USB 3.0 Panel to use. header (USB3_5_6) on the motherboard. USB 3.0 Panel with six chassis screws. The Installation ...
Step 3 Screw the two screws into the 2.5" drive bay of the chassis. The Installation Guide of Front USB 3.0 Panel Step 1 Prepare the bundled Front USB 3.0 Panel, four Step 2 Screw the 2.5" HDD/SSD to the Front HDD screws, and six chassis screws. Step 3 Intall the ...the rear USB 3.0 bracket into the USB 3.0 Step 6 The Front USB 3.0 Panel is ready to the drive bay with four HDD screws. English 44 ASRock Z68 Extreme7 Gen3 Motherboard Step 4 Screw the Front USB 3.0 Panel to use. header (USB3_5_6) on the motherboard. USB 3.0 Panel with six chassis screws. The Installation ...