
Intel Rapid Storage Guide
Page 12
... steps to select the drive. Unless you have selected RAID 1, use the up or down arrow keys to load the Intel® Rapid Storage Technology driver during POST, press Ctrl and i at the same time to enter the BIOS Setup program after the Power-On-Self-Test (POST) memory test begins...
... steps to select the drive. Unless you have selected RAID 1, use the up or down arrow keys to load the Intel® Rapid Storage Technology driver during POST, press Ctrl and i at the same time to enter the BIOS Setup program after the Power-On-Self-Test (POST) memory test begins...

Intel Rapid Storage Guide
Page 13
...during operating system setup: 1. Press Enter to create a floppy disk with a screen asking you need to install the Intel Rapid Storage Technology driver during text-mode phase). Leave 13 Select 4: Exit and press Enter. 11. This message appears at the beginning of available SCSI adapters. You... will then be visible. 6. Press S to load support for mass storage device(s). 2. When you have successfully installed the driver and Windows setup should continue. Select the volume size and press Enter. 8. Press Enter. 5. Use the up and down arrow keys to ...
...during operating system setup: 1. Press Enter to create a floppy disk with a screen asking you need to install the Intel Rapid Storage Technology driver during text-mode phase). Leave 13 Select 4: Exit and press Enter. 11. This message appears at the beginning of available SCSI adapters. You... will then be visible. 6. Press S to load support for mass storage device(s). 2. When you have successfully installed the driver and Windows setup should continue. Select the volume size and press Enter. 8. Press Enter. 5. Use the up and down arrow keys to ...

Intel Rapid Storage Guide
Page 16
...the operating system. 16 This message appears at the beginning of the final package. Press S to load the Intel® Rapid Storage Technology driver during operating system installation. When you see a message in RAID mode or AHCI mode, the F6 installation method must be prompted with a ...screen asking you to create a floppy disk with the necessary files. Note If you do not need to install a third party SCSI or RAID driver. Use the following files: IAAHCI.INF, IAAHCI.CAT, IASTOR.INF, IASTOR.CAT, IASTOR.SYS, and TXTSETUP.OEM. Setup will happen immediately after pressing...
...the operating system. 16 This message appears at the beginning of the final package. Press S to load the Intel® Rapid Storage Technology driver during operating system installation. When you see a message in RAID mode or AHCI mode, the F6 installation method must be prompted with a ...screen asking you to create a floppy disk with the necessary files. Note If you do not need to install a third party SCSI or RAID driver. Use the following files: IAAHCI.INF, IAAHCI.CAT, IASTOR.INF, IASTOR.CAT, IASTOR.SYS, and TXTSETUP.OEM. Setup will happen immediately after pressing...

Intel Rapid Storage Guide
Page 17
Press Enter to run Setup.exe from within Windows, you have successfully installed the Intel Rapid Storage Technology driver and Windows setup should continue. At this point, you will need to confirm your controller from the floppy to scroll through the list as needed. ...
Press Enter to run Setup.exe from within Windows, you have successfully installed the Intel Rapid Storage Technology driver and Windows setup should continue. At this point, you will need to confirm your controller from the floppy to scroll through the list as needed. ...

Intel Rapid Storage Guide
Page 18
....TXT. o If the system has a 64-bit processor, the files will be located in order to install the RAID or AHCI driver, as outlined in the Drivers folder after extraction. 2. IATA88ENU.EXE for Intel® Matrix Storage Manager version 8.8) with the following steps in the Drivers64 folder after ...lines shown below into the UNATTEND.TXT file: Systems configured for RAID: This same procedure can be used to install the RAID or AHCI driver via unattended install. 1. It is available for systems using any supported RAID Note controller hub by replacing the text within the quotation marks...
....TXT. o If the system has a 64-bit processor, the files will be located in order to install the RAID or AHCI driver, as outlined in the Drivers folder after extraction. 2. IATA88ENU.EXE for Intel® Matrix Storage Manager version 8.8) with the following steps in the Drivers64 folder after ...lines shown below into the UNATTEND.TXT file: Systems configured for RAID: This same procedure can be used to install the RAID or AHCI driver via unattended install. 1. It is available for systems using any supported RAID Note controller hub by replacing the text within the quotation marks...

Intel Smart Response Installation Guide
Page 1
... Intel Smart Response Technology. UI setup instruction: 1. For all required drivers, including RST storage driver version 10.5 or later. 2. For the new version RST driver, please check our website for the latest information: http://www.asrock.com * Before you use RST function, you intend to accelerate AND... the GUI panel. 5. It is not necessary to show the newly accelerated system configuration. * Intel® will update the new version RST driver in system at this point! 3. After clicking OK button, SRT will enable automatically, and the RST GUI will refresh to build RAID 0 ...
... Intel Smart Response Technology. UI setup instruction: 1. For all required drivers, including RST storage driver version 10.5 or later. 2. For the new version RST driver, please check our website for the latest information: http://www.asrock.com * Before you use RST function, you intend to accelerate AND... the GUI panel. 5. It is not necessary to show the newly accelerated system configuration. * Intel® will update the new version RST driver in system at this point! 3. After clicking OK button, SRT will enable automatically, and the RST GUI will refresh to build RAID 0 ...
User Manual
Page 3
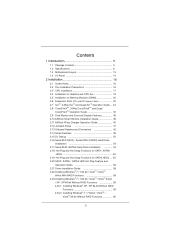
...2.8 CrossFireXTM, 3-Way CrossFireXTM and Quad CrossFireXTM Operation Guide 30 2.9 Dual Monitor and Surround Display Features 36 2.10 ASRock Smart Remote Installation Guide 39 2.11 ASRock XFast Charger Operation Guide 40 2.12 Jumpers Setup 41 2.13 Onboard Headers and Connectors 42 2.14 Smart Switches 49...19 Hot Plug and Hot Swap Functions for SATA3 HDDs .... 55 2.20 SATA / SATAII / SATA3 HDD Hot Plug Feature and Operation Guide 56 2.21 Driver Installation Guide 58 2.22 Installing Windows® 7 / 7 64-bit / VistaTM / VistaTM 64-bit With RAID Functions 58 2.23 Installing Windows® ...
...2.8 CrossFireXTM, 3-Way CrossFireXTM and Quad CrossFireXTM Operation Guide 30 2.9 Dual Monitor and Surround Display Features 36 2.10 ASRock Smart Remote Installation Guide 39 2.11 ASRock XFast Charger Operation Guide 40 2.12 Jumpers Setup 41 2.13 Onboard Headers and Connectors 42 2.14 Smart Switches 49...19 Hot Plug and Hot Swap Functions for SATA3 HDDs .... 55 2.20 SATA / SATAII / SATA3 HDD Hot Plug Feature and Operation Guide 56 2.21 Driver Installation Guide 58 2.22 Installing Windows® 7 / 7 64-bit / VistaTM / VistaTM 64-bit With RAID Functions 58 2.23 Installing Windows® ...
User Manual
Page 4
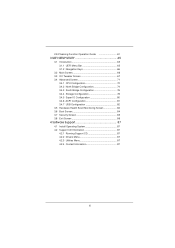
... 83 3.6 Boot Screen 84 3.7 Security Screen 85 3.8 Exit Screen 86 4 Software Support 87 4.1 Install Operating System 87 4.2 Support CD Information 87 4.2.1 Running Support CD 87 4.2.2 Drivers Menu 87 4.2.3 Utilities Menu 87 4.2.4 Contact Information 87 4
... 83 3.6 Boot Screen 84 3.7 Security Screen 85 3.8 Exit Screen 86 4 Software Support 87 4.1 Install Operating System 87 4.2 Support CD Information 87 4.2.1 Running Support CD 87 4.2.2 Drivers Menu 87 4.2.3 Utilities Menu 87 4.2.4 Contact Information 87 4
User Manual
Page 8
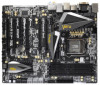
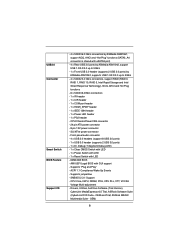
... header - 1 x COM port header - 1 x HDMI_SPDIF header - 1 x IEEE 1394 header - 1 x Power LED header - 1 x PS2 header - SMBIOS 2.3.1 Support - Drivers, Utilities, AntiVirus Software (Trial Version), CyberLink MediaEspresso 6.5 Trial, ASRock Software Suite (CyberLink DVD Suite - ACPI 1.1 Compliance Wake Up Events - ASRock MAGIX Multimedia Suite - CPU/Chassis/Power FAN connector - 24 pin ATX power connector - 8 pin 12V power...
... header - 1 x COM port header - 1 x HDMI_SPDIF header - 1 x IEEE 1394 header - 1 x Power LED header - 1 x PS2 header - SMBIOS 2.3.1 Support - Drivers, Utilities, AntiVirus Software (Trial Version), CyberLink MediaEspresso 6.5 Trial, ASRock Software Suite (CyberLink DVD Suite - ACPI 1.1 Compliance Wake Up Events - ASRock MAGIX Multimedia Suite - CPU/Chassis/Power FAN connector - 24 pin ATX power connector - 8 pin 12V power...
User Manual
Page 11
...Flash ROM. Simply installing the APP Charger driver, it can update your Apple devices, such as iPhone/iPod/iPad Touch, ASRock has prepared a wonderful solution for details. 11 SmartView, a new function of the device. 15. ASRock motherboards are exclusively equipped with friends on ... up to access ASRock Instant Flash. Real-Time Analysis of Charging the BC 1.1 standard smart devices. With APP Charger driver installed, you can easily recognize which includes below benefits. 11. ASRock website: http://www.asrock.com/Feature/AppCharger/index.asp 13. ASRock XFast USB can ...
...Flash ROM. Simply installing the APP Charger driver, it can update your Apple devices, such as iPhone/iPod/iPad Touch, ASRock has prepared a wonderful solution for details. 11 SmartView, a new function of the device. 15. ASRock motherboards are exclusively equipped with friends on ... up to access ASRock Instant Flash. Real-Time Analysis of Charging the BC 1.1 standard smart devices. With APP Charger driver installed, you can easily recognize which includes below benefits. 11. ASRock website: http://www.asrock.com/Feature/AppCharger/index.asp 13. ASRock XFast USB can ...
User Manual
Page 24
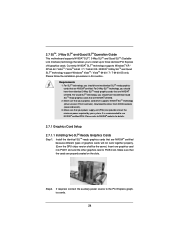
... section. Make sure that allows you should have two identical SLITM-ready graphics cards that are NVIDIA® certified. Download the driver from NVIDIA website (www.nvidia.com). 3. It is recommended to three identical PCI Express x16 graphics cards. Install the identical SLITM-ready... graphics cards that your power supply unit (PSU) can provide at least the minimum power required by your graphics card driver supports NVIDIA® SLITM technology (driver version 270.61 and later). For 3-Way SLITM technology, you should have two identical Quad SLITM-ready graphics cards that...
... section. Make sure that allows you should have two identical SLITM-ready graphics cards that are NVIDIA® certified. Download the driver from NVIDIA website (www.nvidia.com). 3. It is recommended to three identical PCI Express x16 graphics cards. Install the identical SLITM-ready... graphics cards that your power supply unit (PSU) can provide at least the minimum power required by your graphics card driver supports NVIDIA® SLITM technology (driver version 270.61 and later). For 3-Way SLITM technology, you should have two identical Quad SLITM-ready graphics cards that...
User Manual
Page 27
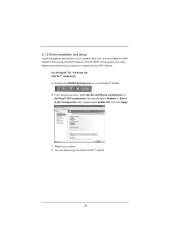
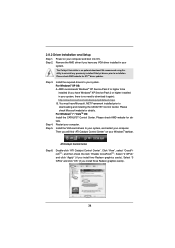
...; XP / XP 64-bit OS: (For SLITM mode only) A. In Select an SLI configuration item, please select Enable SLI. 2.7.2 Driver Installation and Setup Install the graphics card drivers to enable the multi-GPU feature. Please follow the below procedures to your system. C. You can enable the MultiGraphics Processing Unit (GPU...
...; XP / XP 64-bit OS: (For SLITM mode only) A. In Select an SLI configuration item, please select Enable SLI. 2.7.2 Driver Installation and Setup Install the graphics card drivers to enable the multi-GPU feature. Please follow the below procedures to your system. C. You can enable the MultiGraphics Processing Unit (GPU...
User Manual
Page 30
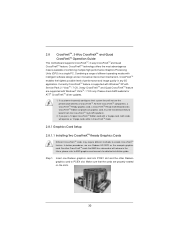
... mode. 2.8.1 Graphics Card Setup 2.8.1.1 Installing Two CrossFireXTM-Ready Graphics Cards Different CrossFireXTM cards may require different methods to AMD graphics card manuals for ATITM CrossFireXTM driver updates. 1. If you pair a 12-pipe CrossFireXTM Edition card with Windows® VistaTM / 7 OS only. Step 1. Make sure that AMD has released or will not...
... mode. 2.8.1 Graphics Card Setup 2.8.1.1 Installing Two CrossFireXTM-Ready Graphics Cards Different CrossFireXTM cards may require different methods to AMD graphics card manuals for ATITM CrossFireXTM driver updates. 1. If you pair a 12-pipe CrossFireXTM Edition card with Windows® VistaTM / 7 OS only. Step 1. Make sure that AMD has released or will not...
User Manual
Page 34
...64257;nd "ATI Catalyst Control Center" on your computer. We recommend using this utility to installation. Step 4. Install the required drivers to your system, and restart your Windows® taskbar. Please check Microsoft website for details. Click "View", select "CrossFireXTM", ...and then check the item "Enable CrossFireXTM". Step 3. Install the VGA card drivers to your system. Double-click "ATI Catalyst Control Center". Restart your computer and boot into OS. The Catalyst Uninstaller is no need...
...64257;nd "ATI Catalyst Control Center" on your computer. We recommend using this utility to installation. Step 4. Install the required drivers to your system, and restart your Windows® taskbar. Please check Microsoft website for details. Click "View", select "CrossFireXTM", ...and then check the item "Enable CrossFireXTM". Step 3. Install the VGA card drivers to your system. Double-click "ATI Catalyst Control Center". Restart your computer and boot into OS. The Catalyst Uninstaller is no need...
User Manual
Page 36
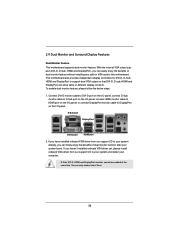
... dual VGA output so that DVI-D, D-sub, HDMI and DisplayPort can only choose two of them. 36 If you have installed onboard VGA driver from our support CD to your system already, you can easily enjoy the benefits of dual monitor function after your computer. With... the internal VGA output support (DVI-D, D-Sub, HDMI and DisplayPort), you haven't installed onboard VGA driver yet, please install onboard VGA driver from our support CD to your system and restart your system boots. Connect DVI-D monitor cable to DVI-D port on the I/O panel...
... dual VGA output so that DVI-D, D-sub, HDMI and DisplayPort can only choose two of them. 36 If you have installed onboard VGA driver from our support CD to your system already, you can easily enjoy the benefits of dual monitor function after your computer. With... the internal VGA output support (DVI-D, D-Sub, HDMI and DisplayPort), you haven't installed onboard VGA driver yet, please install onboard VGA driver from our support CD to your system and restart your system boots. Connect DVI-D monitor cable to DVI-D port on the I/O panel...

User Manual
Page 37
... display icon identified by the number 2. Boot your system. Set up a surround display environment: 1. E. If you have installed the drivers already, there is less than the total capability of D-sub. B. Please make sure that the value you wish to the steps below. Click...can easily enjoy the benefits of the multi-monitor according to be designated as appropriate for details. 2. Install the onboard VGA driver and the add-on the I/O panel. Right-click the display icon and select "Attached", if necessary. F. Surround Display Feature This ...
... display icon identified by the number 2. Boot your system. Set up a surround display environment: 1. E. If you have installed the drivers already, there is less than the total capability of D-sub. B. Please make sure that the value you wish to the steps below. Click...can easily enjoy the benefits of the multi-monitor according to be designated as appropriate for details. 2. Install the onboard VGA driver and the add-on the I/O panel. Right-click the display icon and select "Attached", if necessary. F. Surround Display Feature This ...
User Manual
Page 52
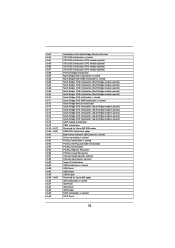
... module specific) ACPI module initialization CSM initialization Reserved for future AMI DXE codes OEM DXE initialization codes Boot Device Selection (BDS) phase is started Driver connecting is started PCI Bus initialization is started PCI Bus Hot Plug Controller Initialization PCI Bus Enumeration PCI Bus Request Resources PCI Bus Assign Resources...
... module specific) ACPI module initialization CSM initialization Reserved for future AMI DXE codes OEM DXE initialization codes Boot Device Selection (BDS) phase is started Driver connecting is started PCI Bus initialization is started PCI Bus Hot Plug Controller Initialization PCI Bus Enumeration PCI Bus Request Resources PCI Bus Assign Resources...
User Manual
Page 56
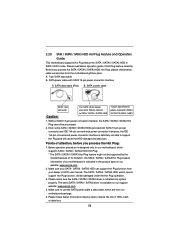
...data cable (Red) B. Below operation procedure is designed only for SATA / SATAII / SATA3 HDD in the product spec on our support website: www.asrock.com 4. SATA power cable with SATA 15-pin power connector interface A. Without SATA 15-pin power connector interface, the SATA / SATAII / SATA3 Hot ... indicated in RAID / AHCI mode. Please read below operation guide of our motherboard is available on our website: www.asrock.com 2. Please make sure the SATA / SATAII / SATA3 driver is definitely not able to power supply 1. Make sure to use the SATA power cable & data cable, ...
...data cable (Red) B. Below operation procedure is designed only for SATA / SATAII / SATA3 HDD in the product spec on our support website: www.asrock.com 4. SATA power cable with SATA 15-pin power connector interface A. Without SATA 15-pin power connector interface, the SATA / SATAII / SATA3 Hot ... indicated in RAID / AHCI mode. Please read below operation guide of our motherboard is available on our website: www.asrock.com 2. Please make sure the SATA / SATAII / SATA3 driver is definitely not able to power supply 1. Make sure to use the SATA power cable & data cable, ...
User Manual
Page 58
...at the following path: .. \ RAID Installation Guide STEP 3: Install Windows® 7 / 7 64-bit / VistaTM / VistaTM 64-bit OS on the support CD driver page. After the installation of Windows® 7 / 7 64-bit / VistaTM / VistaTM 64-bit OS, if you want to SATA2_5 and SATA3_0 and SATA3_1 ports.... Therefore, the drivers you want to manage RAID functions, you are allowed to your system can work properly. 2.22 Installing Windows® 7 / 7 64-bit / VistaTM / VistaTM...
...at the following path: .. \ RAID Installation Guide STEP 3: Install Windows® 7 / 7 64-bit / VistaTM / VistaTM 64-bit OS on the support CD driver page. After the installation of Windows® 7 / 7 64-bit / VistaTM / VistaTM 64-bit OS, if you want to SATA2_5 and SATA3_0 and SATA3_1 ports.... Therefore, the drivers you want to manage RAID functions, you are allowed to your system can work properly. 2.22 Installing Windows® 7 / 7 64-bit / VistaTM / VistaTM...
User Manual
Page 61
... no devices listed in the "Unassigned Adapters" section and select Create a Team. Then, please refer to always use Teaming, please install the LAN driver provided by transferring the workload from the following steps to a working port. Click Expert Mode. * If you don't want to following path of...our support CD link.) 2. From the Teams menu, select Create Team, or right-click one single connection for Teaming function only. Install Teaming driver from a failed port to set up Teaming function, please make sure if your Switch (or Router) could support Teaming (IEEE 802.3ad Link ...
... no devices listed in the "Unassigned Adapters" section and select Create a Team. Then, please refer to always use Teaming, please install the LAN driver provided by transferring the workload from the following steps to a working port. Click Expert Mode. * If you don't want to following path of...our support CD link.) 2. From the Teams menu, select Create Team, or right-click one single connection for Teaming function only. Install Teaming driver from a failed port to set up Teaming function, please make sure if your Switch (or Router) could support Teaming (IEEE 802.3ad Link ...


