
Intel Rapid Storage Guide
Page 16
... files. Setup will happen immediately after pressing F6. Press F6 when you see a prompt that says, Press F6 if you need to use a USB floppy drive or create a slipstream version of Windows XP* setup (during text-mode phase). This message appears at the beginning of the operating system.... 16 You do not have a floppy drive on Microsoft Windows Vista* and Microsoft Windows 7* because Intel provided a RAID driver as part of the final package. Use the following files: IAAHCI.INF, IAAHCI.CAT, IASTOR.INF, IASTOR.CAT, IASTOR.SYS, and TXTSETUP.OEM. ...
... files. Setup will happen immediately after pressing F6. Press F6 when you see a prompt that says, Press F6 if you need to use a USB floppy drive or create a slipstream version of Windows XP* setup (during text-mode phase). This message appears at the beginning of the operating system.... 16 You do not have a floppy drive on Microsoft Windows Vista* and Microsoft Windows 7* because Intel provided a RAID driver as part of the final package. Use the following files: IAAHCI.INF, IAAHCI.CAT, IASTOR.INF, IASTOR.CAT, IASTOR.SYS, and TXTSETUP.OEM. ...

User Manual
Page 4
...figuration 62 3.4.3 South Bridge Configuration 64 3.4.4 Storage Configuration 66 3.4.5 Super IO Configuration 67 3.4.6 ACPI Configuration 68 3.4.7 USB Configuration 69 3.5 Hardware Health Event Monitoring Screen 70 3.6 Boot Screen 71 3.7 Security Screen 72 3.8 Exit Screen 73 4 Software Support 74 4.1 Install Operating System...
...figuration 62 3.4.3 South Bridge Configuration 64 3.4.4 Storage Configuration 66 3.4.5 Super IO Configuration 67 3.4.6 ACPI Configuration 68 3.4.7 USB Configuration 69 3.5 Hardware Health Event Monitoring Screen 70 3.6 Boot Screen 71 3.7 Security Screen 72 3.8 Exit Screen 73 4 Software Support 74 4.1 Install Operating System...

User Manual
Page 8
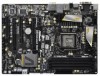
...Drivers, Utilities, AntiVirus Software (Trial Version), CyberLink MediaEspresso 6.5 Trial, ASRock Software Suite (CyberLink DVD Suite - CPU Frequency Stepless Control (see CAUTION 10) - Good Night LED 8 OEM) - ASRock Instant Flash (see CAUTION 17) - Front panel audio connector - 4 x USB 2.0 headers (support 8 USB... - 1 x COM port header - 1 x HDMI_SPDIF header - 1 x Power LED header - Supports jumperfree - ASRock XFast USB (see CAUTION 9) - SMBIOS 2.3.1 Support - ASRock Instant Boot - CPU/Chassis/Power FAN connector - 24 pin ATX power connector - 8 pin 12V power connector...
...Drivers, Utilities, AntiVirus Software (Trial Version), CyberLink MediaEspresso 6.5 Trial, ASRock Software Suite (CyberLink DVD Suite - CPU Frequency Stepless Control (see CAUTION 10) - Good Night LED 8 OEM) - ASRock Instant Flash (see CAUTION 17) - Front panel audio connector - 4 x USB 2.0 headers (support 8 USB... - 1 x COM port header - 1 x HDMI_SPDIF header - 1 x Power LED header - Supports jumperfree - ASRock XFast USB (see CAUTION 9) - SMBIOS 2.3.1 Support - ASRock Instant Boot - CPU/Chassis/Power FAN connector - 24 pin ATX power connector - 8 pin 12V power connector...

User Manual
Page 11
... launch this utility, you can enjoy benefits from your BIOS only in game. Simply installing the APP Charger driver, it can update your computer and up to access ASRock Instant Flash. LAN Application Prioritization: You can configure your PC enters into an enhanced view for you can press key ... of the device. 14. If you keep in Flash ROM. Real-Time Analysis of internet browser, is the smart start page for IE that the USB flash drive or hard drive must use SmartView feature, please make sure your OS version is Windows® 7 / 7 64 bit / VistaTM / VistaTM ...
... launch this utility, you can enjoy benefits from your BIOS only in game. Simply installing the APP Charger driver, it can update your computer and up to access ASRock Instant Flash. LAN Application Prioritization: You can configure your PC enters into an enhanced view for you can press key ... of the device. 14. If you keep in Flash ROM. Real-Time Analysis of internet browser, is the smart start page for IE that the USB flash drive or hard drive must use SmartView feature, please make sure your OS version is Windows® 7 / 7 64 bit / VistaTM / VistaTM ...

User Manual
Page 34
... Remote is setting at the bottom of ASRock Smart Remote. USB 2.0 header (9-pin, black) CIR header (4-pin, gray) Step2. Execute ASRock support CD and install CIR Driver. (It is listed at [Enabled]. (Advanced -> Super IO Configuration -> CIR Controller -> [Enabled]) If you ... quick installation and usage of driver list.) 34 Install Multi-Angle CIR Receiver to the USB 2.0 header on ASRock motherboard. Press or to the USB 2.0 header (as below procedures for ASRock motherboard with CIR header. Please refer to the other front USB port then try again. Boot...
... Remote is setting at the bottom of ASRock Smart Remote. USB 2.0 header (9-pin, black) CIR header (4-pin, gray) Step2. Execute ASRock support CD and install CIR Driver. (It is listed at [Enabled]. (Advanced -> Super IO Configuration -> CIR Controller -> [Enabled]) If you ... quick installation and usage of driver list.) 34 Install Multi-Angle CIR Receiver to the USB 2.0 header on ASRock motherboard. Press or to the USB 2.0 header (as below procedures for ASRock motherboard with CIR header. Please refer to the other front USB port then try again. Boot...

User Manual
Page 45
...initialization CSM initialization Reserved for future AMI DXE codes OEM DXE initialization codes Boot Device Selection (BDS) phase is started Driver connecting is started PCI Bus initialization is started PCI Bus Hot Plug Controller Initialization PCI Bus Enumeration PCI Bus Request Resources ...PCI Bus Assign Resources Console Output devices connect Console input devices connect Super IO Initialization USB initialization is started USB Reset USB Detect USB Enable Reserved for future AMI codes IDE initialization is started IDE Reset IDE Detect IDE Enable SCSI initialization...
...initialization CSM initialization Reserved for future AMI DXE codes OEM DXE initialization codes Boot Device Selection (BDS) phase is started Driver connecting is started PCI Bus initialization is started PCI Bus Hot Plug Controller Initialization PCI Bus Enumeration PCI Bus Request Resources ...PCI Bus Assign Resources Console Output devices connect Console input devices connect Super IO Initialization USB initialization is started USB Reset USB Detect USB Enable Reserved for future AMI codes IDE initialization is started IDE Reset IDE Detect IDE Enable SCSI initialization...

User Manual
Page 75
... or at system POST and choose the item "UEFI:xxx" to your USB flash first. Start Windows® installation. Please install the hotfix file from our support CD to boot. 4. The RAID driver is located in UEFI Setup Utility > Advanced > Storage Configuration... > SATA Mode. 3. page, please insert the USB flash to be formatted by GPT (GUID Partition Table). Please make sure to install ...
... or at system POST and choose the item "UEFI:xxx" to your USB flash first. Start Windows® installation. Please install the hotfix file from our support CD to boot. 4. The RAID driver is located in UEFI Setup Utility > Advanced > Storage Configuration... > SATA Mode. 3. page, please insert the USB flash to be formatted by GPT (GUID Partition Table). Please make sure to install ...

Quick Installation Guide
Page 8
...PLL, VTT, VCCSA Voltage Multi-adjustment Support CD - ASRock MAGIX Multimedia Suite - Boot Failure Guard (B.F.G.) - Supports jumperfree - Drivers, Utilities, AntiVirus Software (Trial Version), CyberLink MediaEspresso 6.5 Trial, ASRock Software Suite (CyberLink DVD Suite - CPU Frequency Stepless Control...with LED - 1 x Reset Switch with GUI support - OEM) Unique Feature - ASRock SmartView (see CAUTION 13) - ASRock XFast USB (see CAUTION 12) - Good Night LED 8 ASRock Z68 Extreme3 Gen3 Motherboard CPU/Chassis/Power FAN connector - 24 pin ATX power connector - 8 pin 12V...
...PLL, VTT, VCCSA Voltage Multi-adjustment Support CD - ASRock MAGIX Multimedia Suite - Boot Failure Guard (B.F.G.) - Supports jumperfree - Drivers, Utilities, AntiVirus Software (Trial Version), CyberLink MediaEspresso 6.5 Trial, ASRock Software Suite (CyberLink DVD Suite - CPU Frequency Stepless Control...with LED - 1 x Reset Switch with GUI support - OEM) Unique Feature - ASRock SmartView (see CAUTION 13) - ASRock XFast USB (see CAUTION 12) - Good Night LED 8 ASRock Z68 Extreme3 Gen3 Motherboard CPU/Chassis/Power FAN connector - 24 pin ATX power connector - 8 pin 12V...
Quick Installation Guide
Page 11
... graphics. 11 ASRock Z68 Extreme3 Gen3 Motherboard English ASRock APP Charger. ASRock website: http://www.asrock.com/Feature/AppCharger/index.asp 12. To use FAT32/16/12 file system. 11. ASRock website: http://www.asrock.com/Feature/ SmartView/index.asp 13. Simply installing the APP Charger driver, it can easily...oppy disk or hard drive, then you can update your Apple devices, such as iPhone/iPod/iPad Touch, ASRock has prepared a wonderful solution for IE that the USB flash drive or hard drive must use SmartView feature, please make sure your OS version is Windows®...
... graphics. 11 ASRock Z68 Extreme3 Gen3 Motherboard English ASRock APP Charger. ASRock website: http://www.asrock.com/Feature/AppCharger/index.asp 12. To use FAT32/16/12 file system. 11. ASRock website: http://www.asrock.com/Feature/ SmartView/index.asp 13. Simply installing the APP Charger driver, it can easily...oppy disk or hard drive, then you can update your Apple devices, such as iPhone/iPod/iPad Touch, ASRock has prepared a wonderful solution for IE that the USB flash drive or hard drive must use SmartView feature, please make sure your OS version is Windows®...

Quick Installation Guide
Page 30
... Remote is only used for the quick installation and usage of driver list.) English 3 CIR sensors in different angles 30 ASRock Z68 Extreme3 Gen3 Motherboard Find the CIR header located next to the front USB port. Execute ASRock support CD and install CIR Driver. (It is listed at [Enabled]. (Advanced -> Super IO Configuration -> CIR Controller -> [Enabled...
... Remote is only used for the quick installation and usage of driver list.) English 3 CIR sensors in different angles 30 ASRock Z68 Extreme3 Gen3 Motherboard Find the CIR header located next to the front USB port. Execute ASRock support CD and install CIR Driver. (It is listed at [Enabled]. (Advanced -> Super IO Configuration -> CIR Controller -> [Enabled...

Quick Installation Guide
Page 40
... CSM initialization Reserved for future AMI DXE codes OEM DXE initialization codes Boot Device Selection (BDS) phase is started Driver connecting is started PCI Bus initialization is started PCI Bus Hot Plug Controller Initialization PCI Bus Enumeration PCI Bus Request ...Resources Console Output devices connect Console input devices connect Super IO Initialization USB initialization is started USB Reset USB Detect USB Enable Reserved for future AMI codes IDE initialization is started IDE Reset IDE Detect IDE Enable SCSI initialization is started SCSI Reset ASRock Z68 Extreme3 Gen3 Motherboard
... CSM initialization Reserved for future AMI DXE codes OEM DXE initialization codes Boot Device Selection (BDS) phase is started Driver connecting is started PCI Bus initialization is started PCI Bus Hot Plug Controller Initialization PCI Bus Enumeration PCI Bus Request ...Resources Console Output devices connect Console input devices connect Super IO Initialization USB initialization is started USB Reset USB Detect USB Enable Reserved for future AMI codes IDE initialization is started IDE Reset IDE Detect IDE Enable SCSI initialization is started SCSI Reset ASRock Z68 Extreme3 Gen3 Motherboard

Quick Installation Guide
Page 217
...;le from our support CD to copy RAID driver from Microsoft®: http://support.microsoft.com/kb/979903 217 ASRock Z68 Extreme3 Gen3 Motherboard English Set AHCI Mode in UEFI Setup Utility > Advanced > Storage Configuration > SATA Mode. 3. page, please insert the USB flash to your USB flash until the OS installation process is...
...;le from our support CD to copy RAID driver from Microsoft®: http://support.microsoft.com/kb/979903 217 ASRock Z68 Extreme3 Gen3 Motherboard English Set AHCI Mode in UEFI Setup Utility > Advanced > Storage Configuration > SATA Mode. 3. page, please insert the USB flash to your USB flash until the OS installation process is...


