RAID Installation Guide
Page 6
... / VistaTM / VistaTM 64-bit OS, if you want to manage RAID functions, you need to check the installation guide in Windows® environment, install "SATA2 driver" from the Support CD again so that "Intel Rapid Storage" will be installed to [RAID]. Please refer to the document in the Support CD, "Guide...
... / VistaTM / VistaTM 64-bit OS, if you want to manage RAID functions, you need to check the installation guide in Windows® environment, install "SATA2 driver" from the Support CD again so that "Intel Rapid Storage" will be installed to [RAID]. Please refer to the document in the Support CD, "Guide...

Intel Rapid Storage Guide
Page 12
... in the system BIOS, a RAID volume must be created, and the F6 installation method must be used to load the Intel® Rapid Storage Technology driver during POST, press Ctrl and i at the same time to enter the option ROM user interface. 2. When the Intel Rapid Storage Technology option ROM status...
... in the system BIOS, a RAID volume must be created, and the F6 installation method must be used to load the Intel® Rapid Storage Technology driver during POST, press Ctrl and i at the same time to enter the option ROM user interface. 2. When the Intel Rapid Storage Technology option ROM status...

Intel Rapid Storage Guide
Page 13
... IAAHCI.INF, IAAHCI.CAT, IASTOR.INF, IASTOR.CAT, IASTOR.SYS, and TXTSETUP.OEM. Press Enter. 5. 7. Nothing will temporarily continue loading drivers. Setup will happen immediately after pressing F6. Press S to create the volume. 9. Leave 13 Press F6 when you to confirm your exit....labeled Manufacturer-supplied hardware support disk into Drive A:, insert ;a floppy disk containing the following steps to install a third party SCSI or RAID driver. Select the volume size and press Enter. 8. Press Y to confirm volume creation. 10. Select your controller from the list of ...
... IAAHCI.INF, IAAHCI.CAT, IASTOR.INF, IASTOR.CAT, IASTOR.SYS, and TXTSETUP.OEM. Press Enter. 5. 7. Nothing will temporarily continue loading drivers. Setup will happen immediately after pressing F6. Press S to create the volume. 9. Leave 13 Press F6 when you to confirm your exit....labeled Manufacturer-supplied hardware support disk into Drive A:, insert ;a floppy disk containing the following steps to install a third party SCSI or RAID driver. Select the volume size and press Enter. 8. Press Y to confirm volume creation. 10. Select your controller from the list of ...

Intel Rapid Storage Guide
Page 16
... Manufacturer-supplied hardware support disk into Drive A:, insert a floppy disk containing the following steps to install the Intel® Rapid Storage Technology driver using F6 when in AHCI/RAID mode In order to install an operating system onto a single Serial ATA hard drive when the system is... for mass storage device(s). 2. Note If you do not need to install a third party SCSI or RAID driver. Setup will happen immediately after pressing F6. How to load the driver during OS installation using the F6 installation method. 1. You will then be used to load the Intel®...
... Manufacturer-supplied hardware support disk into Drive A:, insert a floppy disk containing the following steps to install the Intel® Rapid Storage Technology driver using F6 when in AHCI/RAID mode In order to install an operating system onto a single Serial ATA hard drive when the system is... for mass storage device(s). 2. Note If you do not need to install a third party SCSI or RAID driver. Setup will happen immediately after pressing F6. How to load the driver during OS installation using the F6 installation method. 1. You will then be used to load the Intel®...

Intel Rapid Storage Guide
Page 17
Press Enter. 5. Use the up and down arrow keys to confirm your controller from within Windows, you have successfully installed the Intel Rapid Storage Technology driver and Windows setup should continue. Once Windows setup has copied these files again, remove the floppy disk so that Windows setup can reboot as all ...
Press Enter. 5. Use the up and down arrow keys to confirm your controller from within Windows, you have successfully installed the Intel Rapid Storage Technology driver and Windows setup should continue. Once Windows setup has copied these files again, remove the floppy disk so that Windows setup can reboot as all ...

Intel Rapid Storage Guide
Page 18
... and Windows Server 2003*. o If the system has a 64-bit processor, the files will be used to install the RAID or AHCI driver, as outlined in the Drivers64 folder after extraction. To extract these files, run the executable (e.g. IATA88ENU.EXE for Intel® Matrix Storage Manager... version 8.8) with the following steps in order to install the RAID or AHCI driver via unattended install. 1. o If the system has a 32-bit processor, the files will be located in the Microsoft document Deployment Guide ...
... and Windows Server 2003*. o If the system has a 64-bit processor, the files will be used to install the RAID or AHCI driver, as outlined in the Drivers64 folder after extraction. To extract these files, run the executable (e.g. IATA88ENU.EXE for Intel® Matrix Storage Manager... version 8.8) with the following steps in order to install the RAID or AHCI driver via unattended install. 1. o If the system has a 32-bit processor, the files will be located in the Microsoft document Deployment Guide ...
User Manual
Page 3
...2.4 Installation of Heatsink and CPU fan 18 2.5 Installation of Memory Modules (DIMM 19 2.6 Expansion Slots (PCI and PCI Express Slots 21 2.7 ASRock Game Blaster Configuration 23 2.8 SLITM, 3-Way SLITM, 4-Way SLITM and Quad SLITM Operation Guide 33 2.9 CrossFireXTM, 3-Way CrossFireXTM, 4-Way CrossFireXTM...2.19 Hot Plug and Hot Swap Functions for SATA3 HDDs...... 62 2.20 SATA / SATA2 / SATA3 HDD Hot Plug Feature and Operation Guide 63 2.21 Driver Installation Guide 65 2.22 Installing Windows® 7 / 7 64-bit / VistaTM / VistaTM 64-bit With RAID Functions 65 2.23 Installing Windows®...
...2.4 Installation of Heatsink and CPU fan 18 2.5 Installation of Memory Modules (DIMM 19 2.6 Expansion Slots (PCI and PCI Express Slots 21 2.7 ASRock Game Blaster Configuration 23 2.8 SLITM, 3-Way SLITM, 4-Way SLITM and Quad SLITM Operation Guide 33 2.9 CrossFireXTM, 3-Way CrossFireXTM, 4-Way CrossFireXTM...2.19 Hot Plug and Hot Swap Functions for SATA3 HDDs...... 62 2.20 SATA / SATA2 / SATA3 HDD Hot Plug Feature and Operation Guide 63 2.21 Driver Installation Guide 65 2.22 Installing Windows® 7 / 7 64-bit / VistaTM / VistaTM 64-bit With RAID Functions 65 2.23 Installing Windows®...
User Manual
Page 4
... 93 3.7 Boot Screen 94 3.8 Security Screen 95 3.9 Exit Screen 96 4 Software Support 97 4.1 Install Operating System 97 4.2 Support CD Information 97 4.2.1 Running Support CD 97 4.2.2 Drivers Menu 97 4.2.3 Utilities Menu 97 4.2.4 Contact Information 97 4
... 93 3.7 Boot Screen 94 3.8 Security Screen 95 3.9 Exit Screen 96 4 Software Support 97 4.1 Install Operating System 97 4.2 Support CD Information 97 4.2.1 Running Support CD 97 4.2.2 Drivers Menu 97 4.2.3 Utilities Menu 97 4.2.4 Contact Information 97 4
User Manual
Page 8
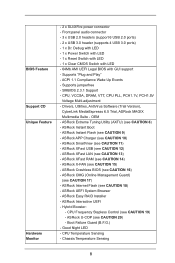
... Tuning Utility (AXTU) (see CAUTION 13) - ASRock XFast LAN (see CAUTION 8) - ASRock X-FAN (see CAUTION 18) - ASRock Internet Flash (see CAUTION 15) - ASRock UEFI System Browser - ASRock Easy RAID Installer - ASRock U-COP (see CAUTION 17) - CPU Temperature Sensing Monitor - Drivers, Utilities, AntiVirus Software (Trial Version), CyberLink MediaEspresso 6.5 Trial, ASRock MAGIX Multimedia Suite - ASRock OMG (Online Management Guard) (see CAUTION...
... Tuning Utility (AXTU) (see CAUTION 13) - ASRock XFast LAN (see CAUTION 8) - ASRock X-FAN (see CAUTION 18) - ASRock Internet Flash (see CAUTION 15) - ASRock UEFI System Browser - ASRock Easy RAID Installer - ASRock U-COP (see CAUTION 17) - CPU Temperature Sensing Monitor - Drivers, Utilities, AntiVirus Software (Trial Version), CyberLink MediaEspresso 6.5 Trial, ASRock MAGIX Multimedia Suite - ASRock OMG (Online Management Guard) (see CAUTION...

User Manual
Page 10
...tool allows you are idle without preparing an additional floppy diskette or other complicated flash utility. Simply install the APP Charger driver, it shows the major readings of ASRock Extreme Tuning Utility (AXTU). Please check the table on page 14 for information on Intel's CPU to adjust. With ...or the key to enter into Standby mode (S1), Suspend to improve efficiency when the CPU cores are allowed to access ASRock Instant Flash. With APP Charger driver installed, you can easily enjoy the marvelous charging experience. It depends on future CPU updates and releases...
...tool allows you are idle without preparing an additional floppy diskette or other complicated flash utility. Simply install the APP Charger driver, it shows the major readings of ASRock Extreme Tuning Utility (AXTU). Please check the table on page 14 for information on Intel's CPU to adjust. With ...or the key to enter into Standby mode (S1), Suspend to improve efficiency when the CPU cores are allowed to access ASRock Instant Flash. With APP Charger driver installed, you can easily enjoy the marvelous charging experience. It depends on future CPU updates and releases...
User Manual
Page 18
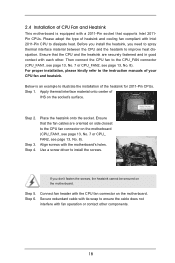
... cables are securely fastened and in good contact with a 2011-Pin socket that the CPU and the heatsink are oriented on the motherboard. Use a screw driver to the instruction manuals of the heatsink for 2011-Pin CPUs. If you need to spray thermal interface material between the CPU and the heatsink...
... cables are securely fastened and in good contact with a 2011-Pin socket that the CPU and the heatsink are oriented on the motherboard. Use a screw driver to the instruction manuals of the heatsink for 2011-Pin CPUs. If you need to spray thermal interface material between the CPU and the heatsink...
User Manual
Page 33
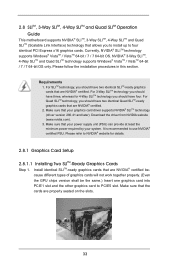
...Make sure that your power supply unit (PSU) can provide at least the minimum power required by your graphics card driver supports NVIDIA® SLITM technology (driver version 280.41 and later). Install identical SLITM-ready graphics cards that are NVIDIA® certified. 2. NVIDIA® ...sure that your system. Make sure that the cards are NVIDIA® certified. Please follow the installation procedures in this section. Download the driver from NVIDIA website (www.nvidia.com). 3. Please refer to four identical PCI Express x16 graphics cards. Requirements 1. 2.8 SLITM, 3-Way ...
...Make sure that your power supply unit (PSU) can provide at least the minimum power required by your graphics card driver supports NVIDIA® SLITM technology (driver version 280.41 and later). Install identical SLITM-ready graphics cards that are NVIDIA® certified. 2. NVIDIA® ...sure that your system. Make sure that the cards are NVIDIA® certified. Please follow the installation procedures in this section. Download the driver from NVIDIA website (www.nvidia.com). 3. Please refer to four identical PCI Express x16 graphics cards. Requirements 1. 2.8 SLITM, 3-Way ...
User Manual
Page 37
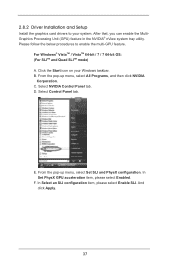
... Set SLI and PhysX configuration. From the pop-up menu, select All Programs, and then click NVIDIA Corporation. F. D. Click the Start icon on your system. B. 2.8.2 Driver Installation and Setup Install the graphics card drivers to enable the multi-GPU feature. Select NVIDIA Control Panel tab.
... Set SLI and PhysX configuration. From the pop-up menu, select All Programs, and then click NVIDIA Corporation. F. D. Click the Start icon on your system. B. 2.8.2 Driver Installation and Setup Install the graphics card drivers to enable the multi-GPU feature. Select NVIDIA Control Panel tab.

User Manual
Page 39
... CrossFireXTM mode. 2.9.1 Graphics Card Setup 2.9.1.1 Installing Two CrossFireXTM-Ready Graphics Cards Different CrossFireXTM cards may require different methods to AMD graphics card manuals for CrossFireXTM driver updates. 1. All three CrossFireXTM components, a CrossFireXTM Ready graphics card, a CrossFireXTM Ready motherboard and a CrossFireXTM Edition co-processor graphics card, must be installed correctly to PCIE5...
... CrossFireXTM mode. 2.9.1 Graphics Card Setup 2.9.1.1 Installing Two CrossFireXTM-Ready Graphics Cards Different CrossFireXTM cards may require different methods to AMD graphics card manuals for CrossFireXTM driver updates. 1. All three CrossFireXTM components, a CrossFireXTM Ready graphics card, a CrossFireXTM Ready motherboard and a CrossFireXTM Edition co-processor graphics card, must be installed correctly to PCIE5...

User Manual
Page 43
... Restart your computer and boot into OS. Select "4 GPUs" and click "OK" (if you have any previously installed Catalyst drivers prior to your system. 2.9.2 Driver Installation and Setup Step 1. Step 3. For Windows® 7 / VistaTM OS: Install the CATALYST Control Center. You will find... "AMD Catalyst Control Center" on your computer. Install the VGA card drivers to your system, and restart your Windows® taskbar. We recommend using this utility to uninstall any VGA drivers installed in your system. Please check AMD's website for details. Click "...
... Restart your computer and boot into OS. Select "4 GPUs" and click "OK" (if you have any previously installed Catalyst drivers prior to your system. 2.9.2 Driver Installation and Setup Step 1. Step 3. For Windows® 7 / VistaTM OS: Install the CATALYST Control Center. You will find... "AMD Catalyst Control Center" on your computer. Install the VGA card drivers to your system, and restart your Windows® taskbar. We recommend using this utility to uninstall any VGA drivers installed in your system. Please check AMD's website for details. Click "...

User Manual
Page 45
...header on your system. Install the Multi-Angle CIR Receiver to enter the BIOS Setup Utility. Execute ASRock's support CD and install the CIR Driver. (It is listed at the bottom of ASRock Smart Remote. Make sure the option "CIR Controller" is only used for the quick installation and... usage of driver list.) 45 Press or to the front USB port. Enter Windows. Please refer to the USB_PWR USB 2.0 header (as below for ASRock motherboards with a CIR header. Connect the front USB cable to the procedures...
...header on your system. Install the Multi-Angle CIR Receiver to enter the BIOS Setup Utility. Execute ASRock's support CD and install the CIR Driver. (It is listed at the bottom of ASRock Smart Remote. Make sure the option "CIR Controller" is only used for the quick installation and... usage of driver list.) 45 Press or to the front USB port. Enter Windows. Please refer to the USB_PWR USB 2.0 header (as below for ASRock motherboards with a CIR header. Connect the front USB cable to the procedures...

User Manual
Page 59
... Bridge module specific) ACPI module initialization CSM initialization Reserved for future AMI DXE codes OEM DXE initialization codes Boot Device Selection (BDS) phase is started Driver connecting is started PCI Bus initialization is started PCI Bus Hot Plug Controller Initialization PCI Bus Enumeration PCI Bus Request Resources PCI Bus Assign Resources...
... Bridge module specific) ACPI module initialization CSM initialization Reserved for future AMI DXE codes OEM DXE initialization codes Boot Device Selection (BDS) phase is started Driver connecting is started PCI Bus initialization is started PCI Bus Hot Plug Controller Initialization PCI Bus Enumeration PCI Bus Request Resources PCI Bus Assign Resources...
User Manual
Page 63
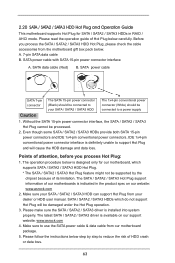
...connector (White) should be connected to reduce the risk of HDD crash or data loss. 63 The latest SATA / SATA2 / SATA3 driver is indicated in RAID / AHCI mode. The operation procedure below step by the chipset because of our motherboards is available on our website: ...can support Hot Plug from our motherboard package. 5. Please make sure the SATA / SATA2 / SATA3 driver is designed only for SATA / SATA2 / SATA3 HDDs in the product spec on our support website: www.asrock.com 4. Please follow the instructions below is installed into system properly. 2.20 SATA / SATA2 / ...
...connector (White) should be connected to reduce the risk of HDD crash or data loss. 63 The latest SATA / SATA2 / SATA3 driver is indicated in RAID / AHCI mode. The operation procedure below step by the chipset because of our motherboards is available on our website: ...can support Hot Plug from our motherboard package. 5. Please make sure the SATA / SATA2 / SATA3 driver is designed only for SATA / SATA2 / SATA3 HDDs in the product spec on our support website: www.asrock.com 4. Please follow the instructions below is installed into system properly. 2.20 SATA / SATA2 / ...

User Manual
Page 65
... RAID functions, you are allowed to use both "RAID Installation Guide" and "Intel Rapid Storage Information" for proper configuration. Therefore, the drivers you need to check the installation guide in the folder at the following path: .. \ Intel Rapid Storage Information 65 Please refer to... in the support CD, "Guide to Intel Rapid Storage", which is located in the Support CD for RAID configuration. B. A. Then, the drivers compatible to your SATA / SATA2 / SATA3 HDDs with RAID functions, please follow the order from top to bottom to set RAID configuration. STEP...
... RAID functions, you are allowed to use both "RAID Installation Guide" and "Intel Rapid Storage Information" for proper configuration. Therefore, the drivers you need to check the installation guide in the folder at the following path: .. \ Intel Rapid Storage Information 65 Please refer to... in the support CD, "Guide to Intel Rapid Storage", which is located in the Support CD for RAID configuration. B. A. Then, the drivers compatible to your SATA / SATA2 / SATA3 HDDs with RAID functions, please follow the order from top to bottom to set RAID configuration. STEP...
User Manual
Page 68
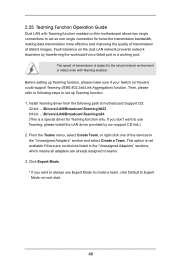
...no devices listed in the "Unassigned Adapters" sections, which means all adapters are already assigned to always use Teaming, please install the LAN driver provided by transferring the workload from the following steps to a working port. From the Teams menu, select Create Team, or right-click... one single connection for Teaming function only. Click Expert Mode. * If you don't want to teams. 3. Install Teaming driver from a failed port to set up Teaming function, please make sure if your Switch (or Router) could support Teaming (IEEE 802.3ad Link ...
...no devices listed in the "Unassigned Adapters" sections, which means all adapters are already assigned to always use Teaming, please install the LAN driver provided by transferring the workload from the following steps to a working port. From the Teams menu, select Create Team, or right-click... one single connection for Teaming function only. Click Expert Mode. * If you don't want to teams. 3. Install Teaming driver from a failed port to set up Teaming function, please make sure if your Switch (or Router) could support Teaming (IEEE 802.3ad Link ...


