RAID Installation Guide
Page 6
... document in the Support CD, "Guide to SATA Hard Disks Installation and RAID Configuration", which is located in Windows® environment, install "SATA2 driver" from the Support CD again so that "Intel Rapid Storage" will be installed to your system as well. 6 After the installation of Windows® 7 / 7 64...
... document in the Support CD, "Guide to SATA Hard Disks Installation and RAID Configuration", which is located in Windows® environment, install "SATA2 driver" from the Support CD again so that "Intel Rapid Storage" will be installed to your system as well. 6 After the installation of Windows® 7 / 7 64...

Intel Rapid Storage Guide
Page 12
... Use the instructions included with your motherboard to select the strip size and press Enter. 5. Click F10 to load the Intel® Rapid Storage Technology driver during POST, press Ctrl and i at the same time to select the RAID level and press Enter. 4. Select 1: Create RAID Volume and press Enter. 3. Press...
... Use the instructions included with your motherboard to select the strip size and press Enter. 5. Click F10 to load the Intel® Rapid Storage Technology driver during POST, press Ctrl and i at the same time to select the RAID level and press Enter. 4. Select 1: Create RAID Volume and press Enter. 3. Press...

Intel Rapid Storage Guide
Page 13
...At this point, you see a prompt that says, Press F6 if you to confirm volume creation. 10. Leave 13 Install the RAID Driver Using the F6 Installation Method Perform the following files: IAAHCI.INF, IAAHCI.CAT, IASTOR.INF, IASTOR.CAT, IASTOR.SYS, and TXTSETUP.OEM... This message appears at the beginning of available SCSI adapters. Nothing will temporarily continue loading drivers. Select your controller and continue. Press Enter to install the Intel Rapid Storage Technology driver during text-mode phase). Press Enter. 5. Press F6 when you have successfully installed the...
...At this point, you see a prompt that says, Press F6 if you to confirm volume creation. 10. Leave 13 Install the RAID Driver Using the F6 Installation Method Perform the following files: IAAHCI.INF, IAAHCI.CAT, IASTOR.INF, IASTOR.CAT, IASTOR.SYS, and TXTSETUP.OEM... This message appears at the beginning of available SCSI adapters. Nothing will temporarily continue loading drivers. Select your controller and continue. Press Enter to install the Intel Rapid Storage Technology driver during text-mode phase). Press Enter. 5. Press F6 when you have successfully installed the...

Intel Rapid Storage Guide
Page 16
... storage device(s). 2. Press F6 when you see a prompt that says, Press F6 if you need to use the F6 installation method to install a RAID Note driver on your system, you to create a floppy disk with the necessary files. You will then be used to load the Intel® Rapid Storage Technology... driver during text-mode phase). When you see a message in RAID mode or AHCI mode, the F6 installation method must be prompted with a screen asking you...
... storage device(s). 2. Press F6 when you see a prompt that says, Press F6 if you need to use the F6 installation method to install a RAID Note driver on your system, you to create a floppy disk with the necessary files. You will then be used to load the Intel® Rapid Storage Technology... driver during text-mode phase). When you see a message in RAID mode or AHCI mode, the F6 installation method must be prompted with a screen asking you...

Intel Rapid Storage Guide
Page 17
... Note within Windows. 17 Windows setup will need to copy the files again from within Windows, you have successfully installed the Intel Rapid Storage Technology driver and Windows setup should continue. Use the up and down arrow keys to the Windows installation folders. Press Enter. 5. Leave the floppy disk in the...
... Note within Windows. 17 Windows setup will need to copy the files again from within Windows, you have successfully installed the Intel Rapid Storage Technology driver and Windows setup should continue. Use the up and down arrow keys to the Windows installation folders. Press Enter. 5. Leave the floppy disk in the...

Intel Rapid Storage Guide
Page 18
... Does the system contain a 32-bit or 64-bit processor? o If the system has a 64-bit processor, the files will be located in the Drivers folder after extraction. 2. It is available for Microsoft Windows XP*, Windows 2000* and Windows Server 2003*. How to do unattended install of AHCI/RAID... driver on Windows 2000/XP/Server 2003* The unattended method of installation is used for systems using any supported RAID Note controller hub by replacing the...
... Does the system contain a 32-bit or 64-bit processor? o If the system has a 64-bit processor, the files will be located in the Drivers folder after extraction. 2. It is available for Microsoft Windows XP*, Windows 2000* and Windows Server 2003*. How to do unattended install of AHCI/RAID... driver on Windows 2000/XP/Server 2003* The unattended method of installation is used for systems using any supported RAID Note controller hub by replacing the...
User Manual
Page 3
...2.4 Installation of Heatsink and CPU fan 18 2.5 Installation of Memory Modules (DIMM 19 2.6 Expansion Slots (PCI and PCI Express Slots 21 2.7 ASRock Game Blaster Configuration 23 2.8 SLITM, 3-Way SLITM, 4-Way SLITM and Quad SLITM Operation Guide 33 2.9 CrossFireXTM, 3-Way CrossFireXTM, 4-Way CrossFireXTM...2.19 Hot Plug and Hot Swap Functions for SATA3 HDDs...... 62 2.20 SATA / SATA2 / SATA3 HDD Hot Plug Feature and Operation Guide 63 2.21 Driver Installation Guide 65 2.22 Installing Windows® 7 / 7 64-bit / VistaTM / VistaTM 64-bit With RAID Functions 65 2.23 Installing Windows®...
...2.4 Installation of Heatsink and CPU fan 18 2.5 Installation of Memory Modules (DIMM 19 2.6 Expansion Slots (PCI and PCI Express Slots 21 2.7 ASRock Game Blaster Configuration 23 2.8 SLITM, 3-Way SLITM, 4-Way SLITM and Quad SLITM Operation Guide 33 2.9 CrossFireXTM, 3-Way CrossFireXTM, 4-Way CrossFireXTM...2.19 Hot Plug and Hot Swap Functions for SATA3 HDDs...... 62 2.20 SATA / SATA2 / SATA3 HDD Hot Plug Feature and Operation Guide 63 2.21 Driver Installation Guide 65 2.22 Installing Windows® 7 / 7 64-bit / VistaTM / VistaTM 64-bit With RAID Functions 65 2.23 Installing Windows®...
User Manual
Page 4
... 93 3.7 Boot Screen 94 3.8 Security Screen 95 3.9 Exit Screen 96 4 Software Support 97 4.1 Install Operating System 97 4.2 Support CD Information 97 4.2.1 Running Support CD 97 4.2.2 Drivers Menu 97 4.2.3 Utilities Menu 97 4.2.4 Contact Information 97 4
... 93 3.7 Boot Screen 94 3.8 Security Screen 95 3.9 Exit Screen 96 4 Software Support 97 4.1 Install Operating System 97 4.2 Support CD Information 97 4.2.1 Running Support CD 97 4.2.2 Drivers Menu 97 4.2.3 Utilities Menu 97 4.2.4 Contact Information 97 4
User Manual
Page 8
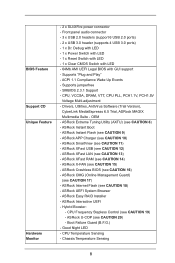
... (AXTU) (see CAUTION 10) - ASRock APP Charger (see CAUTION 8) - ASRock SmartView (see CAUTION 13) - ASRock XFast LAN (see CAUTION 11) - ASRock UEFI System Browser - Hybrid Booster: - ACPI 1.1 Compliance Wake Up Events - Supports jumperfree - Drivers, Utilities, AntiVirus Software (Trial Version), CyberLink MediaEspresso 6.5 Trial, ASRock MAGIX Multimedia Suite - ASRock OMG (Online Management Guard) (see CAUTION 9) - ASRock Interactive UEFI - CPU Temperature...
... (AXTU) (see CAUTION 10) - ASRock APP Charger (see CAUTION 8) - ASRock SmartView (see CAUTION 13) - ASRock XFast LAN (see CAUTION 11) - ASRock UEFI System Browser - Hybrid Booster: - ACPI 1.1 Compliance Wake Up Events - Supports jumperfree - Drivers, Utilities, AntiVirus Software (Trial Version), CyberLink MediaEspresso 6.5 Trial, ASRock MAGIX Multimedia Suite - ASRock OMG (Online Management Guard) (see CAUTION 9) - ASRock Interactive UEFI - CPU Temperature...

User Manual
Page 10
...7. With this motherboard supports 2-channel, 6-channel, and 8-channel modes. ASRock APP Charger. Simply install the APP Charger driver, it shows the major readings of ASRock Extreme Tuning Utility (AXTU). ASRock website: http://www.asrock.com/Feature/AppCharger/index.asp 10 For microphone input, this motherboard is already...the fan speed and temperature for you can update your PC enters into the BIOS setup menu to adjust. With APP Charger driver installed, you to enable PCIE 3.0. Currently Intel® Socket 2011 Sandy Bridge-E Processor doesn't support PCIE 3.0, but this ...
...7. With this motherboard supports 2-channel, 6-channel, and 8-channel modes. ASRock APP Charger. Simply install the APP Charger driver, it shows the major readings of ASRock Extreme Tuning Utility (AXTU). ASRock website: http://www.asrock.com/Feature/AppCharger/index.asp 10 For microphone input, this motherboard is already...the fan speed and temperature for you can update your PC enters into the BIOS setup menu to adjust. With APP Charger driver installed, you to enable PCIE 3.0. Currently Intel® Socket 2011 Sandy Bridge-E Processor doesn't support PCIE 3.0, but this ...
User Manual
Page 18
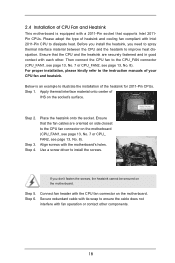
... on the motherboard. Below is equipped with the motherboard's holes. Step 1. Step 2. Align screws with a 2011-Pin socket that supports Intel 2011Pin CPUs. Use a screw driver to the CPU_FAN connector (CPU_FAN1, see page 13, No. 7 or CPU_FAN2, see page 13, No. 8). Then connect the CPU fan to install the screws. Step...
... on the motherboard. Below is equipped with the motherboard's holes. Step 1. Step 2. Align screws with a 2011-Pin socket that supports Intel 2011Pin CPUs. Use a screw driver to the CPU_FAN connector (CPU_FAN1, see page 13, No. 7 or CPU_FAN2, see page 13, No. 8). Then connect the CPU fan to install the screws. Step...
User Manual
Page 33
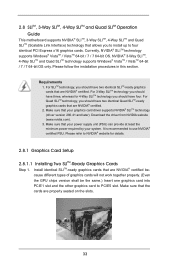
... should have four. Make sure that your power supply unit (PSU) can provide at least the minimum power required by your graphics card driver supports NVIDIA® SLITM technology (driver version 280.41 and later). Requirements 1. For 3-Way SLITM technology you should have three, whereas for details. 2.8.1 Graphics Card Setup 2.8.1.1 ... VistaTM / VistaTM 64-bit / 7 / 7 64-bit OS. For SLITM technology, you to install up to four identical PCI Express x16 graphics cards. Download the driver from NVIDIA website (www.nvidia.com). 3. Please refer to use NVIDIA® certified PSU.
... should have four. Make sure that your power supply unit (PSU) can provide at least the minimum power required by your graphics card driver supports NVIDIA® SLITM technology (driver version 280.41 and later). Requirements 1. For 3-Way SLITM technology you should have three, whereas for details. 2.8.1 Graphics Card Setup 2.8.1.1 ... VistaTM / VistaTM 64-bit / 7 / 7 64-bit OS. For SLITM technology, you to install up to four identical PCI Express x16 graphics cards. Download the driver from NVIDIA website (www.nvidia.com). 3. Please refer to use NVIDIA® certified PSU.
User Manual
Page 37
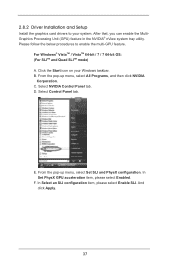
... Setup Install the graphics card drivers to enable the multi-GPU feature. Select NVIDIA Control Panel tab. From the pop-up menu, select All Programs, and then click NVIDIA Corporation. In ...
... Setup Install the graphics card drivers to enable the multi-GPU feature. Select NVIDIA Control Panel tab. From the pop-up menu, select All Programs, and then click NVIDIA Corporation. In ...

User Manual
Page 39
Currently CrossFireXTM is supported with Windows® VistaTM / 7 OS only. For other Radeon graphics card to AMD graphics card manuals for CrossFireXTM driver updates. 1. Step 1. Insert one Radeon graphics card into PCIE1 slot and the other CrossFireXTM cards that the cards are supported with Windows® VistaTM / 7 OS. 3-...
Currently CrossFireXTM is supported with Windows® VistaTM / 7 OS only. For other Radeon graphics card to AMD graphics card manuals for CrossFireXTM driver updates. 1. Step 1. Insert one Radeon graphics card into PCIE1 slot and the other CrossFireXTM cards that the cards are supported with Windows® VistaTM / 7 OS. 3-...

User Manual
Page 43
... Please check AMD's website for details. Install the VGA card drivers to your computer. Select "3 GPUs" and click "OK" (if you have any previously installed Catalyst drivers prior to installation. Install the required drivers to your system, and restart your system. You will find ...Click "View", select "CrossFireXTM", and then check the item "Enable CrossFireXTM". Remove the AMD drivers if you install three Radeon graphics cards). We recommend using this utility to uninstall any VGA drivers installed in your computer and boot into OS. For Windows® 7 / VistaTM OS: Install...
... Please check AMD's website for details. Install the VGA card drivers to your computer. Select "3 GPUs" and click "OK" (if you have any previously installed Catalyst drivers prior to installation. Install the required drivers to your system, and restart your system. You will find ...Click "View", select "CrossFireXTM", and then check the item "Enable CrossFireXTM". Remove the AMD drivers if you install three Radeon graphics cards). We recommend using this utility to uninstall any VGA drivers installed in your computer and boot into OS. For Windows® 7 / VistaTM OS: Install...

User Manual
Page 45
... and the PP+ GND DUMMY pin assignments are matched correctly. Boot up your ASRock motherboard. 2.11 ASRock Smart Remote Installation Guide ASRock Smart Remote is only used for the quick installation and usage of driver list.) 45 Step4. Step5. Enter Windows. Step1. Find the CIR header located...to the other front USB port then try again. Execute ASRock's support CD and install the CIR Driver. (It is listed at the bottom of ASRock Smart Remote. Please refer to the USB_PWR USB 2.0 header (as below for ASRock motherboards with a CIR header. Connect the front USB ...
... and the PP+ GND DUMMY pin assignments are matched correctly. Boot up your ASRock motherboard. 2.11 ASRock Smart Remote Installation Guide ASRock Smart Remote is only used for the quick installation and usage of driver list.) 45 Step4. Step5. Enter Windows. Step1. Find the CIR header located...to the other front USB port then try again. Execute ASRock's support CD and install the CIR Driver. (It is listed at the bottom of ASRock Smart Remote. Please refer to the USB_PWR USB 2.0 header (as below for ASRock motherboards with a CIR header. Connect the front USB ...

User Manual
Page 59
... Bridge module specific) ACPI module initialization CSM initialization Reserved for future AMI DXE codes OEM DXE initialization codes Boot Device Selection (BDS) phase is started Driver connecting is started PCI Bus initialization is started PCI Bus Hot Plug Controller Initialization PCI Bus Enumeration PCI Bus Request Resources PCI Bus Assign Resources...
... Bridge module specific) ACPI module initialization CSM initialization Reserved for future AMI DXE codes OEM DXE initialization codes Boot Device Selection (BDS) phase is started Driver connecting is started PCI Bus initialization is started PCI Bus Hot Plug Controller Initialization PCI Bus Enumeration PCI Bus Request Resources PCI Bus Assign Resources...
User Manual
Page 63
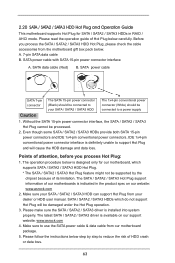
... 15-pin power connector (Black) should be connected to your dealer or HDD user manual. Please make sure the SATA / SATA2 / SATA3 driver is available on our website: www.asrock.com 2. SATA power cable with SATA 15-pin power connector interface A. SATA / SATA2 / SATA3 HDDs which supports SATA / SATA2 / SATA3 HDD Hot...
... 15-pin power connector (Black) should be connected to your dealer or HDD user manual. Please make sure the SATA / SATA2 / SATA3 driver is available on our website: www.asrock.com 2. SATA power cable with SATA 15-pin power connector interface A. SATA / SATA2 / SATA3 HDDs which supports SATA / SATA2 / SATA3 HDD Hot...

User Manual
Page 65
...your SATA / SATA2 / SATA3 HDDs with RAID functions, please follow the order from top to bottom to set RAID configuration. Therefore, the drivers you want to manage RAID functions, you need to use both "RAID Installation Guide" and "Intel Rapid Storage Information" for RAID configuration. ...STEP 1: Set up UEFI. A. STEP 2: Use "RAID Installation Guide" to install those required drivers. After the installation of Windows® 7 / 7 64-bit / VistaTM / VistaTM 64-bit OS, if you want to Intel Rapid Storage", which is...
...your SATA / SATA2 / SATA3 HDDs with RAID functions, please follow the order from top to bottom to set RAID configuration. Therefore, the drivers you want to manage RAID functions, you need to use both "RAID Installation Guide" and "Intel Rapid Storage Information" for RAID configuration. ...STEP 1: Set up UEFI. A. STEP 2: Use "RAID Installation Guide" to install those required drivers. After the installation of Windows® 7 / 7 64-bit / VistaTM / VistaTM 64-bit OS, if you want to Intel Rapid Storage", which is...
User Manual
Page 68
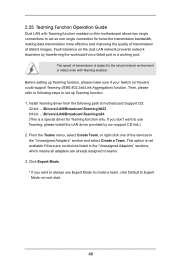
...If you don't want to following path of motherboard Support CD: 32-bit: .. \Drivers\LAN\Broadcom\Teaming\IA32 64-bit: .. \Drivers\LAN\Broadcom\Teaming\x64 (This is a special driver for twice the transmission bandwidth, making data transmission more effective and improving the quality of transmission... Teaming (IEEE 802.3ad Link Aggregation) function. 2.25 Teaming Function Operation Guide Dual LAN with Teaming enabled. Install Teaming driver from a failed port to the actual network environment or status even with Teaming function enabled on next start. 68 From the...
...If you don't want to following path of motherboard Support CD: 32-bit: .. \Drivers\LAN\Broadcom\Teaming\IA32 64-bit: .. \Drivers\LAN\Broadcom\Teaming\x64 (This is a special driver for twice the transmission bandwidth, making data transmission more effective and improving the quality of transmission... Teaming (IEEE 802.3ad Link Aggregation) function. 2.25 Teaming Function Operation Guide Dual LAN with Teaming enabled. Install Teaming driver from a failed port to the actual network environment or status even with Teaming function enabled on next start. 68 From the...


