
RAID Installation Guide
Page 1
Guide to SATA Hard Disks Installation 2 1.1 Serial ATA (SATA) Hard Disks Installation 2 2. Guide to RAID Configurations 3 2.1 Introduction of RAID 3 2.2 RAID Configuration Precautions 5 2.3 Installing Windows® XP / XP 64-bit / VistaTM / VistaTM 64-bit With RAID Functions 6 2.4 Setting the BIOS RAID Items 11 2.5 Configuring the Intel RAID BIOS 11 2.6 Deleting RAID Volume 15 1 Guide to SATA Hard Disks Installation and RAID Configuration 1.
Guide to SATA Hard Disks Installation 2 1.1 Serial ATA (SATA) Hard Disks Installation 2 2. Guide to RAID Configurations 3 2.1 Introduction of RAID 3 2.2 RAID Configuration Precautions 5 2.3 Installing Windows® XP / XP 64-bit / VistaTM / VistaTM 64-bit With RAID Functions 6 2.4 Setting the BIOS RAID Items 11 2.5 Configuring the Intel RAID BIOS 11 2.6 Deleting RAID Volume 15 1 Guide to SATA Hard Disks Installation and RAID Configuration 1.
RAID Installation Guide
Page 6
... 6 Please select CD-ROM as ", please set RAID configuration. E. STEP 3: Use "RAID Installation Guide" to format and copy files [YN]? Enter BIOS SETUP UTILITY Advanced screen IDE Configuration. When you see these messages, Please insert a diskette into the floppy diskette. Formatting the floppy diskette will see the...Configure SATAII as the boot device. A. A. Then you will lose ALL data in the folder at the beginning of system boot-up BIOS. Start to set the option to format the floppy diskette and copy SATA / SATAII drivers into the floppy drive. WARNING! Before you ...
... 6 Please select CD-ROM as ", please set RAID configuration. E. STEP 3: Use "RAID Installation Guide" to format and copy files [YN]? Enter BIOS SETUP UTILITY Advanced screen IDE Configuration. When you see these messages, Please insert a diskette into the floppy diskette. Formatting the floppy diskette will see the...Configure SATAII as the boot device. A. A. Then you will lose ALL data in the folder at the beginning of system boot-up BIOS. Start to set the option to format the floppy diskette and copy SATA / SATAII drivers into the floppy drive. WARNING! Before you ...
RAID Installation Guide
Page 7
... Ready" system. 1. The following path: .. \ Intel Matrix Storage Manager Information If you want to your system as step 1 of Intel Matrix Storage. Set up system BIOS as well. 2.3.2 Setting Up a "RAID Ready" System You can also set RAID configuration, you can be installed to manage RAID functions, you install. Make a SATA...
... Ready" system. 1. The following path: .. \ Intel Matrix Storage Manager Information If you want to your system as step 1 of Intel Matrix Storage. Set up system BIOS as well. 2.3.2 Setting Up a "RAID Ready" System You can also set RAID configuration, you can be installed to manage RAID functions, you install. Make a SATA...
RAID Installation Guide
Page 9
... in the folder at the following path: .. \ RAID Installation Guide and the document in the support CD, "Guide to install Windows?" STEP 1: Set up BIOS. Before you start to configure the RAID function, you want to install Windows® VistaTM / VistaTM 64-bit OS on the bottom to SATA Hard... UTILITY Advanced screen IDE Configuration. STEP 2: Use "RAID Installation Guide" to set the option to continue the installation. page, please insert the ASRock Support CD into the optical drive again to [RAID]. When you see "Where do you need to use both "RAID Installation Guide" and "Intel ...
... in the folder at the following path: .. \ RAID Installation Guide and the document in the support CD, "Guide to install Windows?" STEP 1: Set up BIOS. Before you start to configure the RAID function, you want to install Windows® VistaTM / VistaTM 64-bit OS on the bottom to SATA Hard... UTILITY Advanced screen IDE Configuration. STEP 2: Use "RAID Installation Guide" to set the option to continue the installation. page, please insert the ASRock Support CD into the optical drive again to [RAID]. When you see "Where do you need to use both "RAID Installation Guide" and "Intel ...
RAID Installation Guide
Page 11
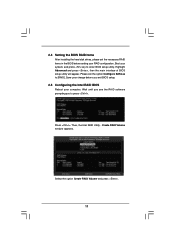
...RAID Utility - Highlight Advanced and press , then the main interface of BIOS setup utility will appear. Create RAID Volume window appears. Boot your RAID configuration. Please set the necessary RAID items in the BIOS before you to press . Select the option Create RAID Volume and press...until you see the RAID software prompting you exit BIOS setup. 2.5 Configuring the Intel RAID BIOS Reboot your change before setting your system, and press key to enter BIOS setup utility. Save your computer. Press . 2.4 Setting the BIOS RAID Items After installing the hard disk drives, ...
...RAID Utility - Highlight Advanced and press , then the main interface of BIOS setup utility will appear. Create RAID Volume window appears. Boot your RAID configuration. Please set the necessary RAID items in the BIOS before you to press . Select the option Create RAID Volume and press...until you see the RAID software prompting you exit BIOS setup. 2.5 Configuring the Intel RAID BIOS Reboot your change before setting your system, and press key to enter BIOS setup utility. Save your computer. Press . 2.4 Setting the BIOS RAID Items After installing the hard disk drives, ...
RAID Installation Guide
Page 15
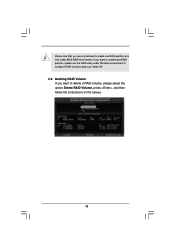
Please note that you want to create extra RAID partition, please use the RAID utility under BIOS RAID environment. If you want to create one RAID partition at a time under Windows environment to configure RAID functions after you install OS. 2.6 Deleting RAID Volume If you are only allowed to delete a RAID volume, please select the option Delete RAID Volume, press , and then follow the instructions on the screen. 15
Please note that you want to create extra RAID partition, please use the RAID utility under BIOS RAID environment. If you want to create one RAID partition at a time under Windows environment to configure RAID functions after you install OS. 2.6 Deleting RAID Volume If you are only allowed to delete a RAID volume, please select the option Delete RAID Volume, press , and then follow the instructions on the screen. 15
User Manual
Page 4
... RAID Functions 52 2.21.2 Installing Windows® 7 / 7 64-bit / VistaTM / VistaTM 64-bit Without RAID Functions 53 2.22 Untied Overclocking Technology 53 3 BIOS SETUP UTILITY 54 3.1 Introduction 54 3.1.1 BIOS Menu Bar 54 3.1.2 Navigation Keys 55 3.2 Main Screen 55 3.3 Smart Screen 56 3.4 Advanced Screen 57 3.4.1 CPU Configuration 58 3.4.2 Chipset Configuration 61 3.4.3 ACPI Configuration...
... RAID Functions 52 2.21.2 Installing Windows® 7 / 7 64-bit / VistaTM / VistaTM 64-bit Without RAID Functions 53 2.22 Untied Overclocking Technology 53 3 BIOS SETUP UTILITY 54 3.1 Introduction 54 3.1.1 BIOS Menu Bar 54 3.1.2 Navigation Keys 55 3.2 Main Screen 55 3.3 Smart Screen 56 3.4 Advanced Screen 57 3.4.1 CPU Configuration 58 3.4.2 Chipset Configuration 61 3.4.3 ACPI Configuration...
User Manual
Page 5
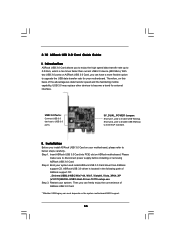
... for a 3.5-in , 30.5 cm x 24.4 cm) ASRock X58 Deluxe3 Quick Installation Guide ASRock X58 Deluxe3 Support CD 1 x 80-conductor Ultra ATA 66/100/133 IDE Ribbon Cable 1 x Ribbon Cable for specific information about the model you are using. It delivers excellent performance with robust design conforming to ASRock's commitment to BIOS setup and information of the Support CD...
... for a 3.5-in , 30.5 cm x 24.4 cm) ASRock X58 Deluxe3 Quick Installation Guide ASRock X58 Deluxe3 Support CD 1 x 80-conductor Ultra ATA 66/100/133 IDE Ribbon Cable 1 x Ribbon Cable for specific information about the model you are using. It delivers excellent performance with robust design conforming to ASRock's commitment to BIOS setup and information of the Support CD...

User Manual
Page 7
... Trial Version) - HD Audio Jack: Side Speaker/Rear Speaker/Central/Bass/ Line in header - ASRock U-COP (see CAUTION 6) - 1 x ATA133 IDE connector (supports 2 x IDE devices) - 1 x Floppy connector - 1 x IR header - 1 x COM port header - 1 x HDMI_SPDIF header - 1 x IEEE 1394 header - Connector BIOS Feature Support CD Unique Feature - 1 x Powered eSATAII/USB Connector - 1 x RJ-45 LAN Port with...
... Trial Version) - HD Audio Jack: Side Speaker/Rear Speaker/Central/Bass/ Line in header - ASRock U-COP (see CAUTION 6) - 1 x ATA133 IDE connector (supports 2 x IDE devices) - 1 x Floppy connector - 1 x IR header - 1 x COM port header - 1 x HDMI_SPDIF header - 1 x IEEE 1394 header - Connector BIOS Feature Support CD Unique Feature - 1 x Powered eSATAII/USB Connector - 1 x RJ-45 LAN Port with...

User Manual
Page 8
...12V, +5V, +3.3V, CPU Vcore OS - FCC, CE, WHQL * For detailed product information, please visit our website: http://www.asrock.com WARNING Please realize that there is no such limitation. 5. Be- fore you to surveil your system. This motherboard supports Untied Overclocking ... For Windows® OS with 64-bit CPU, there is a certain risk involved with overclocking, including adjusting the setting in the BIOS, applying Untied Overclocking Technology, or using the thirdparty overclocking tools. CPU Temperature Sensing Monitor - Please visit our website for proper installation. ...
...12V, +5V, +3.3V, CPU Vcore OS - FCC, CE, WHQL * For detailed product information, please visit our website: http://www.asrock.com WARNING Please realize that there is no such limitation. 5. Be- fore you to surveil your system. This motherboard supports Untied Overclocking ... For Windows® OS with 64-bit CPU, there is a certain risk involved with overclocking, including adjusting the setting in the BIOS, applying Untied Overclocking Technology, or using the thirdparty overclocking tools. CPU Temperature Sensing Monitor - Please visit our website for proper installation. ...
User Manual
Page 9
...is detected, the system will automatically shutdown. OC DNA literally tells you can press key during the POST or press key to BIOS setup menu to access ASRock Instant Flash. Your friends then can save your OC settings as yours! In other words, it is a revolutionary technology that delivers...to their own system to update system BIOS without entering operating systems first like MS-DOS or Windows®. With OC DNA, you to get the same OC settings as a profile and share with others. OC DNA, an exclusive utility developed by ASRock, provides a convenient way for the ...
...is detected, the system will automatically shutdown. OC DNA literally tells you can press key during the POST or press key to BIOS setup menu to access ASRock Instant Flash. Your friends then can save your OC settings as yours! In other words, it is a revolutionary technology that delivers...to their own system to update system BIOS without entering operating systems first like MS-DOS or Windows®. With OC DNA, you to get the same OC settings as a profile and share with others. OC DNA, an exclusive utility developed by ASRock, provides a convenient way for the ...

User Manual
Page 12
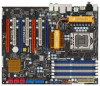
... Top: LINE IN Center: FRONT Bottom: MIC IN LAN PHY AUDIO CODEC CD1 Super I/O FLOPPY1 HDMI_SPDIF1 1 Intel X58 CPU_FAN1 Chipset PWR_FAN1 PCIE1 CHA_FAN2 NB_FAN1 CHA_FAN1 RoHS PCI1 3-WaySLI PCIE2 PCI2 X58 Deluxe3 PCI Express 2.0 1394a 8Mb BIOS VIA VT6330 IDE1 PCIE3 PCI3 CMOS Battery Intel ICH10R PCIE4 RAID 1 COM1 1 IR1 CLRCMOS1 1 USB10 1 SPEAKER1 1 28...
... Top: LINE IN Center: FRONT Bottom: MIC IN LAN PHY AUDIO CODEC CD1 Super I/O FLOPPY1 HDMI_SPDIF1 1 Intel X58 CPU_FAN1 Chipset PWR_FAN1 PCIE1 CHA_FAN2 NB_FAN1 CHA_FAN1 RoHS PCI1 3-WaySLI PCIE2 PCI2 X58 Deluxe3 PCI Express 2.0 1394a 8Mb BIOS VIA VT6330 IDE1 PCIE3 PCI3 CMOS Battery Intel ICH10R PCIE4 RAID 1 COM1 1 IR1 CLRCMOS1 1 USB10 1 SPEAKER1 1 28...
User Manual
Page 35
Step 1. Insert ASRock USB 3.0 Card into PCIE slot on the system motherboard BIOS support. 35 Therefore, on this basis of the advantageous data transfer speed and the facilitating mobile capability, USB 3.0 may replace other devices to become a trend ... USB 3.0 ports. 3V_DUAL_POWER Jumper: Short pin1, pin2 to meet EuP standard. Boot your system. Short pin2, pin3 to disable USB Wakeup to enable USB Wakeup. ASRock USB 3.0 driver is ten times faster than current USB 2.0 device (480 Mb/s). Then you can freely enjoy the convenience of...
Step 1. Insert ASRock USB 3.0 Card into PCIE slot on the system motherboard BIOS support. 35 Therefore, on this basis of the advantageous data transfer speed and the facilitating mobile capability, USB 3.0 may replace other devices to become a trend ... USB 3.0 ports. 3V_DUAL_POWER Jumper: Short pin1, pin2 to meet EuP standard. Boot your system. Short pin2, pin3 to disable USB Wakeup to enable USB Wakeup. ASRock USB 3.0 driver is ten times faster than current USB 2.0 device (480 Mb/s). Then you can freely enjoy the convenience of...

User Manual
Page 36
... clearCMOS action. 36 2.11 Surround Display Feature This motherboard supports Surround Display upgrade. With the external add-on PCI Express VGA cards, you update the BIOS. Jumper Setting Description PS2_USB_PWR1 1_2 (see p.12, No. 23) 1_2 2_3 Default Clear CMOS Note: CLRCMOS1 allows you must boot up events. The...the jumper cap is placed on pins, the jumper is "Short". If you need to clear the CMOS when you just finish updating the BIOS, you to default setup, please turn off the computer and unplug the power cord from the power supply. If no jumper cap is placed ...
... clearCMOS action. 36 2.11 Surround Display Feature This motherboard supports Surround Display upgrade. With the external add-on PCI Express VGA cards, you update the BIOS. Jumper Setting Description PS2_USB_PWR1 1_2 (see p.12, No. 23) 1_2 2_3 Default Clear CMOS Note: CLRCMOS1 allows you must boot up events. The...the jumper cap is placed on pins, the jumper is "Short". If you need to clear the CMOS when you just finish updating the BIOS, you to default setup, please turn off the computer and unplug the power cord from the power supply. If no jumper cap is placed ...

User Manual
Page 39
.... Set the Front Panel Control option from [Auto] to MIC2_L. Connect Mic_IN (MIC) to [Enabled]. B. Please follow the instruction in the Realtek Control panel. D. Enter BIOS Setup Utility. For Windows® 7 / 7 64-bit / VistaTM / VistaTM 64-bit OS: Go to this header. 39 System Panel Header (9-pin PANEL1) (see p.12 No...
.... Set the Front Panel Control option from [Auto] to MIC2_L. Connect Mic_IN (MIC) to [Enabled]. B. Please follow the instruction in the Realtek Control panel. D. Enter BIOS Setup Utility. For Windows® 7 / 7 64-bit / VistaTM / VistaTM 64-bit OS: Go to this header. 39 System Panel Header (9-pin PANEL1) (see p.12 No...

User Manual
Page 48
... a diskette into the floppy drive, and press . Then you will lose ALL data in the folder at the beginning of system boot-up BIOS. WARNING! Please refer to the document in the Support CD, "Guide to SATA Hard Disks Installation and RAID Configuration", which is located in it... Functions If you start to format the floppy diskette and copy SATA / SATAII drivers into your optical drive to boot your optical drive first. Enter BIOS SETUP UTILITY Advanced screen IDE Configuration. C. Before you want to generate Serial ATA driver diskette [YN]?", press . STEP 1: Set up , press key,...
... a diskette into the floppy drive, and press . Then you will lose ALL data in the folder at the beginning of system boot-up BIOS. WARNING! Please refer to the document in the Support CD, "Guide to SATA Hard Disks Installation and RAID Configuration", which is located in it... Functions If you start to format the floppy diskette and copy SATA / SATAII drivers into your optical drive to boot your optical drive first. Enter BIOS SETUP UTILITY Advanced screen IDE Configuration. C. Before you want to generate Serial ATA driver diskette [YN]?", press . STEP 1: Set up , press key,...

User Manual
Page 49
... presented. After reading the floppy disk, the driver will be installed to your system as step 1 of Windows setup, press F6 to set up system BIOS as well. 2.20.2 Setting Up a "RAID Ready" System You can be seamlessly upgraded to build an Intel "RAID Ready" system. 1. You may select: "Intel(R) ICH10R...
... presented. After reading the floppy disk, the driver will be installed to your system as step 1 of Windows setup, press F6 to set up system BIOS as well. 2.20.2 Setting Up a "RAID Ready" System You can be seamlessly upgraded to build an Intel "RAID Ready" system. 1. You may select: "Intel(R) ICH10R...

User Manual
Page 51
... that "Intel Matrix Storage Manager" will be installed to continue the installation. page, please insert the ASRock Support CD into the optical drive again to your system. STEP 1: Set up BIOS. B. Please refer to the document in the Support CD, "Guide to SATA Hard Disks Installation and...located in the folder at the following path: .. \ RAID Installation Guide and the document in the support CD, "Guide to [RAID]. Enter BIOS SETUP UTILITY Advanced screen IDE Configuration. STEP 2: Use "RAID Installation Guide" to set the option to Intel Matrix Storage Manager", which is located ...
... that "Intel Matrix Storage Manager" will be installed to continue the installation. page, please insert the ASRock Support CD into the optical drive again to your system. STEP 1: Set up BIOS. B. Please refer to the document in the Support CD, "Guide to SATA Hard Disks Installation and...located in the folder at the following path: .. \ RAID Installation Guide and the document in the support CD, "Guide to [RAID]. Enter BIOS SETUP UTILITY Advanced screen IDE Configuration. STEP 2: Use "RAID Installation Guide" to set the option to Intel Matrix Storage Manager", which is located ...
User Manual
Page 52
... Windows® XP / XP 64-bit OS on your SATA / SATAII HDDs without NCQ function STEP 1: Set up BIOS. B. STEP 3: Install Windows® XP / XP 64-bit OS on your system. 52 A. STEP 2: Install Windows...; AHCI driver. Windows XP)" for Windows® XP 64-bit. Enter BIOS SETUP UTILITY Advanced screen IDE Configuration. Using SATA / SATAII HDDs and eSATAII devices with NCQ function STEP 1: ...Set Up BIOS. A. STEP 2: Make a SATA / SATAII driver diskette. Windows XP64)" for Windows® XP or...
... Windows® XP / XP 64-bit OS on your SATA / SATAII HDDs without NCQ function STEP 1: Set up BIOS. B. STEP 3: Install Windows® XP / XP 64-bit OS on your system. 52 A. STEP 2: Install Windows...; AHCI driver. Windows XP)" for Windows® XP 64-bit. Enter BIOS SETUP UTILITY Advanced screen IDE Configuration. Using SATA / SATAII HDDs and eSATAII devices with NCQ function STEP 1: ...Set Up BIOS. A. STEP 2: Make a SATA / SATAII driver diskette. Windows XP64)" for Windows® XP or...
User Manual
Page 53
... 64-bit optical disk into the optical drive to boot your system. B. Before you enable Untied Overclocking function, please enter "Overclock Mode" option of BIOS setup to set the option to install Windows® 7 / 7 64-bit / VistaTM / VistaTM 64-bit OS on your SATA / SATAII HDDs...follow below steps. Please refer to continue the installation. page, please insert the ASRock Support CD into the optical drive again to the warning on the bottom to fixed PCI / PCIE buses. Enter BIOS SETUP UTILITY Advanced screen IDE Configuration. Using SATA / SATAII HDDs and eSATAII devices ...
... 64-bit optical disk into the optical drive to boot your system. B. Before you enable Untied Overclocking function, please enter "Overclock Mode" option of BIOS setup to set the option to install Windows® 7 / 7 64-bit / VistaTM / VistaTM 64-bit OS on your SATA / SATAII HDDs...follow below steps. Please refer to continue the installation. page, please insert the ASRock Support CD into the optical drive again to the warning on the bottom to fixed PCI / PCIE buses. Enter BIOS SETUP UTILITY Advanced screen IDE Configuration. Using SATA / SATAII HDDs and eSATAII devices ...


