User Manual
Page 3
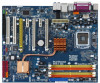
... Requirement Table for Windows® VistaTM Premium 2008 and Basic Logo 9 1.4 Supported PCI Express VGA Card List for SLITM Mode .. 10 1.5 Supported PCI Express VGA Card List for 3-Way SLITM Mode 11 1.6 Motherboard Layout 11 1.7 ASRock WiFi_eSATAII I/O Plus 12 1.8 ASRock WiFi-802.11g Module Specifications 13 2 Installation 14 2.1 Screw Holes 14 2.2 Pre-installation Precautions 14...
... Requirement Table for Windows® VistaTM Premium 2008 and Basic Logo 9 1.4 Supported PCI Express VGA Card List for SLITM Mode .. 10 1.5 Supported PCI Express VGA Card List for 3-Way SLITM Mode 11 1.6 Motherboard Layout 11 1.7 ASRock WiFi_eSATAII I/O Plus 12 1.8 ASRock WiFi-802.11g Module Specifications 13 2 Installation 14 2.1 Screw Holes 14 2.2 Pre-installation Precautions 14...
User Manual
Page 5
... Ribbon Cable One Ribbon Cable for purchasing ASRock Penryn1600SLIX3-WiFi motherboard, a reliable motherboard produced under ASRock's consistently stringent quality control. In this manual, chapter 1 and 2 contain introduction of this manual will be subject to the hardware installation. You may find the latest VGA cards and CPU support lists on ASRock website without notice. Chapter 1 Introduction Thank...
... Ribbon Cable One Ribbon Cable for purchasing ASRock Penryn1600SLIX3-WiFi motherboard, a reliable motherboard produced under ASRock's consistently stringent quality control. In this manual, chapter 1 and 2 contain introduction of this manual will be subject to the hardware installation. You may find the latest VGA cards and CPU support lists on ASRock website without notice. Chapter 1 Introduction Thank...
User Manual
Page 8
...information, please visit our website: http://www.asrock.com WARNING Please realize that there is a multi-channel digital surround sound format. We are not responsible for details. 8. Before you want to use SLITM function, please install two identical SLITM graphics cards on page 18 for details. 4. If...no such limitation. 6. To enable DTS function, you want to use 3-Way SLITM function, please install three identical 3-Way SLITM support graphics cards on page 36 to adjust your SATAII hard disk drive to page 10. Please refer to SATAII connector directly. 8 For audio output, this...
...information, please visit our website: http://www.asrock.com WARNING Please realize that there is a multi-channel digital surround sound format. We are not responsible for details. 8. Before you want to use SLITM function, please install two identical SLITM graphics cards on page 18 for details. 4. If...no such limitation. 6. To enable DTS function, you want to use 3-Way SLITM function, please install three identical 3-Way SLITM support graphics cards on page 36 to adjust your SATAII hard disk drive to page 10. Please refer to SATAII connector directly. 8 For audio output, this...
User Manual
Page 10
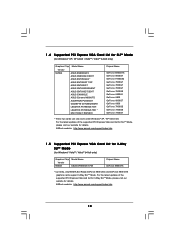
...7900GS GeForce 7300GS GeForce 7300GT * These two cards can only work under Windows® XP / XP 64-bit OS. ASRock website: http://www.asrock.com/support/index.htm 10 ASRock website: http://www.asrock.com/support/index.htm 1 . 5 Supported PCI Express VGA Card List for 3-Way SLITM Mode (for details.... 1.4 Supported PCI Express VGA Card List for SLITM Mode (for details. ...
...7900GS GeForce 7300GS GeForce 7300GT * These two cards can only work under Windows® XP / XP 64-bit OS. ASRock website: http://www.asrock.com/support/index.htm 10 ASRock website: http://www.asrock.com/support/index.htm 1 . 5 Supported PCI Express VGA Card List for 3-Way SLITM Mode (for details.... 1.4 Supported PCI Express VGA Card List for SLITM Mode (for details. ...
User Manual
Page 20
... technology. If you want to the chassis with the slot and press firmly until the card is already installed in a chassis). If you want to use ASRock DeskExpress function on this motherboard. Align the card connector with screws. PCI Slots: PCI slots are 2 PCI slots and 5 PCI Express... documentation of the compatible SLITM or 3-Way SLITM Mode PCI Express VGA cards, please refer to install only one PCI Express VGA card on this motherboard, please install it on this motherboard, please install ASRock PCIE_DE card on the slot. Keep the screws for 3-Way SLITM Mode" on ...
... technology. If you want to the chassis with the slot and press firmly until the card is already installed in a chassis). If you want to use ASRock DeskExpress function on this motherboard. Align the card connector with screws. PCI Slots: PCI slots are 2 PCI slots and 5 PCI Express... documentation of the compatible SLITM or 3-Way SLITM Mode PCI Express VGA cards, please refer to install only one PCI Express VGA card on this motherboard, please install it on this motherboard, please install ASRock PCIE_DE card on the slot. Keep the screws for 3-Way SLITM Mode" on ...
User Manual
Page 21
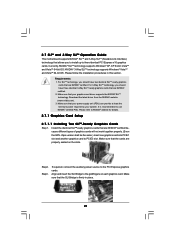
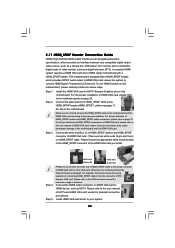
... NVIDIA® SLITM and 3-Way SLITM (Scalable Link Interface) technology that allows you should have three identical 3-Way SLITM-ready graphics cards that are NVIDIA® certified. Currently, NVIDIA® SLITM technology supports Windows® XP, XP 64-bit, VistaTM and VistaTM 64... auxiliary power source to NVIDIA® website for details. 2.7.1 Graphics Card Setup 2.7.1.1 Installing Two SLITM-Ready Graphics Cards Step 1. Make sure that the cards are NVIDIA® certified because different types of graphics cards will not work together properly. (Even the GPU chips version shall ...
... NVIDIA® SLITM and 3-Way SLITM (Scalable Link Interface) technology that allows you should have three identical 3-Way SLITM-ready graphics cards that are NVIDIA® certified. Currently, NVIDIA® SLITM technology supports Windows® XP, XP 64-bit, VistaTM and VistaTM 64... auxiliary power source to NVIDIA® website for details. 2.7.1 Graphics Card Setup 2.7.1.1 Installing Two SLITM-Ready Graphics Cards Step 1. Make sure that the cards are NVIDIA® certified because different types of graphics cards will not work together properly. (Even the GPU chips version shall ...
User Manual
Page 22
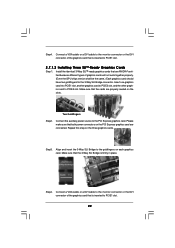
... Please make sure that the 3-Way SLI Bridge is inserted to the PCI Express graphics card. Step3. Step4. Connect a VGA cable or a DVI cable to the monitor connector or the DVI connector of graphics cards will not work together properly. (Even the GPU chips version shall be the same.) Each... graphics card should have two goldfingers for the 3-Way SLI Bridge connector. Align and insert the 3-Way SLI ...
... Please make sure that the 3-Way SLI Bridge is inserted to the PCI Express graphics card. Step3. Step4. Connect a VGA cable or a DVI cable to the monitor connector or the DVI connector of graphics cards will not work together properly. (Even the GPU chips version shall be the same.) Each... graphics card should have two goldfingers for the 3-Way SLI Bridge connector. Align and insert the 3-Way SLI ...
User Manual
Page 23
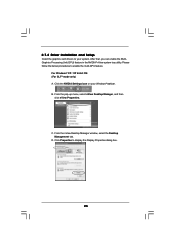
... Manager, and then click nView Properties. For Windows® XP / XP 64-bit OS: (For SLITM mode only) A. C. 2.7.2 Driver Installation and Setup Install the graphics card drivers to your Windows® taskbar. Please follow the below procedures to display the Display Properties dialog box. 23 D.
... Manager, and then click nView Properties. For Windows® XP / XP 64-bit OS: (For SLITM mode only) A. C. 2.7.2 Driver Installation and Setup Install the graphics card drivers to your Windows® taskbar. Please follow the below procedures to display the Display Properties dialog box. 23 D.
User Manual
Page 26
... CMOS includes system setup information such as system password, date, time, and system setup parameters. If no jumper cap is placed on PCI Express VGA card, you update the BIOS. The il- lustration shows a 3-pin jumper whose pin1 and pin2 are setup. However, please do the clearCMOS action. 26 With the...
... CMOS includes system setup information such as system password, date, time, and system setup parameters. If no jumper cap is placed on PCI Express VGA card, you update the BIOS. The il- lustration shows a 3-pin jumper whose pin1 and pin2 are setup. However, please do the clearCMOS action. 26 With the...
User Manual
Page 29
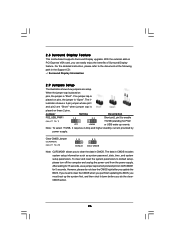
... on the lower right hand taskbar to [Enabled]. You don't need to the front panel audio header as a CD-ROM, DVD-ROM, TV tuner card, or MPEG card. Enter Windows system. MIC_RET and OUT_RET are for AC'97 audio panel. Connect Mic_IN (MIC) to Ground (GND). Internal Audio Connector (4-pin CD1) (CD1...
... on the lower right hand taskbar to [Enabled]. You don't need to the front panel audio header as a CD-ROM, DVD-ROM, TV tuner card, or MPEG card. Enter Windows system. MIC_RET and OUT_RET are for AC'97 audio panel. Connect Mic_IN (MIC) to Ground (GND). Internal Audio Connector (4-pin CD1) (CD1...

User Manual
Page 31
...Then connect the white end (B or C) of HDMI_SPDIF cable to the HDMI_SPDIF connector of HDMI VGA card to this connector. A. HDMI_SPDIF header, providing SPDIF audio output to HDMI VGA card, allows the system to con nect HDMI Digital TV/ projector/LCD devices. Please connect the black ... white end (3-pin) +5V SPDIFOUT GND blue black SPDIFOUT GND blue black SPDIFOUT GND blue black 31 Please connect the HDMI_SPDIF connector of HDMI VGA card. ATX 12V Power Connector (8-pin ATX12V1) (see p.11 No. 28) HDMI_SPDIF Cable (Optional) RXTPAM_0 GND RXTPBM_0 +12V GND 1 +12V RXTPBP_0 ...
...Then connect the white end (B or C) of HDMI_SPDIF cable to the HDMI_SPDIF connector of HDMI VGA card to this connector. A. HDMI_SPDIF header, providing SPDIF audio output to HDMI VGA card, allows the system to con nect HDMI Digital TV/ projector/LCD devices. Please connect the black ... white end (3-pin) +5V SPDIFOUT GND blue black SPDIFOUT GND blue black SPDIFOUT GND blue black 31 Please connect the HDMI_SPDIF connector of HDMI VGA card. ATX 12V Power Connector (8-pin ATX12V1) (see p.11 No. 28) HDMI_SPDIF Cable (Optional) RXTPAM_0 GND RXTPBM_0 +12V GND 1 +12V RXTPBP_0 ...
User Manual
Page 32
... cable to the HDMI_SPDIF header (HDMI_SPDIF1, yellow, see page 11, No. 28) on HDMI_SPDIF cable. A complete HDMI system requires a HDMI VGA card and a HDMI ready motherboard with a HDMI_SPDIF header, which provides an interface between any compatible digital audio/ video source, such as a set-top ... HDTV. Connect the white end (B or C) of HDMI_SPDIF cable to the HDMI_SPDIF connector of HDMI_SPDIF cable to the wrong connector of the HDMI VGA card you install. Step 5. Please refer to page 31. white end (2-pin) (B) white end (3-pin) (C) Step 4. 2.11 HDMI_SPDIF Header Connection ...
... cable to the HDMI_SPDIF header (HDMI_SPDIF1, yellow, see page 11, No. 28) on HDMI_SPDIF cable. A complete HDMI system requires a HDMI VGA card and a HDMI ready motherboard with a HDMI_SPDIF header, which provides an interface between any compatible digital audio/ video source, such as a set-top ... HDTV. Connect the white end (B or C) of HDMI_SPDIF cable to the HDMI_SPDIF connector of HDMI_SPDIF cable to the wrong connector of the HDMI VGA card you install. Step 5. Please refer to page 31. white end (2-pin) (B) white end (3-pin) (C) Step 4. 2.11 HDMI_SPDIF Header Connection ...
User Manual
Page 52
...]. SB Voltage Use this to select SB Voltage. OnBoard 1394 This allows you select [Auto], the onboard HD Audio will be disabled when PCI Sound Card is [Auto]. 52 NB Voltage Use this to select NB Voltage. VTT Voltage Use this to select VTT Voltage. GTL Reference Level Use this to...
...]. SB Voltage Use this to select SB Voltage. OnBoard 1394 This allows you select [Auto], the onboard HD Audio will be disabled when PCI Sound Card is [Auto]. 52 NB Voltage Use this to select NB Voltage. VTT Voltage Use this to select VTT Voltage. GTL Reference Level Use this to...
User Manual
Page 56
... disable the S.M.A.R.T. (Self-Monitoring, Analysis, and Reporting Technology) feature. PCI IDE BusMaster Use this item to keep the default value unless the installed PCI expansion cards' specifications require other settings.
... disable the S.M.A.R.T. (Self-Monitoring, Analysis, and Reporting Technology) feature. PCI IDE BusMaster Use this item to keep the default value unless the installed PCI expansion cards' specifications require other settings.

Quick Installation Guide
Page 5
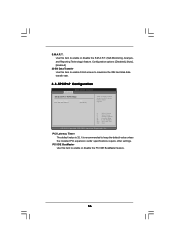
...cards and CPU support lists on ASRock website without notice. www.asrock.com/support/index.asp 1.1 Package Contents ASRock Penryn1600SLIX3-WiFi Motherboard (ATX Form Factor: 12.0-in x 9.6-in, 30.5 cm x 24.4 cm) ASRock Penryn1600SLIX3-WiFi Quick Installation Guide ASRock Penryn1600SLIX3-WiFi Support CD ASRock WiFi-802.11g Module Operation Guide Motherboard Accessories One ASRock SLI Bridge One ASRock... Cable (Optional) One "ASRock WiFi_eSATAII I/O Plus" I/O Shield WiFi Accessories One ASRock WiFi-802.11g Module One Antenna 5 ASRock Penryn1600SLIX3-WiFi Motherboard English 1. Because the...
...cards and CPU support lists on ASRock website without notice. www.asrock.com/support/index.asp 1.1 Package Contents ASRock Penryn1600SLIX3-WiFi Motherboard (ATX Form Factor: 12.0-in x 9.6-in, 30.5 cm x 24.4 cm) ASRock Penryn1600SLIX3-WiFi Quick Installation Guide ASRock Penryn1600SLIX3-WiFi Support CD ASRock WiFi-802.11g Module Operation Guide Motherboard Accessories One ASRock SLI Bridge One ASRock... Cable (Optional) One "ASRock WiFi_eSATAII I/O Plus" I/O Shield WiFi Accessories One ASRock WiFi-802.11g Module One Antenna 5 ASRock Penryn1600SLIX3-WiFi Motherboard English 1. Because the...
Quick Installation Guide
Page 8
... / VistaTM 64-bit compliant (see CAUTION 16) Certifications - FCC, CE, WHQL * For detailed product information, please visit our website: http://www.asrock.com WARNING Please realize that there is a certain risk involved with 64-bit CPU, there is a multi-channel digital surround sound format. Overclocking may ... including adjusting the setting in overclocking mode. 2. If you need to use SLITM function, please install two identical SLITM graphics cards on page 14 for details. 4. Please refer to SATAII connector directly. 8 ASRock Penryn1600SLIX3-WiFi Motherboard English
... / VistaTM 64-bit compliant (see CAUTION 16) Certifications - FCC, CE, WHQL * For detailed product information, please visit our website: http://www.asrock.com WARNING Please realize that there is a certain risk involved with 64-bit CPU, there is a multi-channel digital surround sound format. Overclocking may ... including adjusting the setting in overclocking mode. 2. If you need to use SLITM function, please install two identical SLITM graphics cards on page 14 for details. 4. Please refer to SATAII connector directly. 8 ASRock Penryn1600SLIX3-WiFi Motherboard English

Quick Installation Guide
Page 10
... 3-Way SLITM Mode, please visit our website for details. ASRock website: http://www.asrock.com/support/index.htm English 10 ASRock Penryn1600SLIX3-WiFi Motherboard For the latest updates of the supported PCI Express VGA card list for SLITM Mode, please visit our website for details. ASRock website: http://www.asrock.com/support/index.htm 1 . 5 Supported PCI Express VGA...
... 3-Way SLITM Mode, please visit our website for details. ASRock website: http://www.asrock.com/support/index.htm English 10 ASRock Penryn1600SLIX3-WiFi Motherboard For the latest updates of the supported PCI Express VGA card list for SLITM Mode, please visit our website for details. ASRock website: http://www.asrock.com/support/index.htm 1 . 5 Supported PCI Express VGA...
Quick Installation Guide
Page 16
...bracket facing the slot that you plan to use ASRock DeskExpress function on this motherboard. Replace the system cover. 16 ASRock Penryn1600SLIX3-WiFi Motherboard English For the information of the compatible SLITM or 3-Way SLITM Mode PCI Express VGA cards, please refer to use . If you want ...to install expansion cards that the power supply is switched off or...
...bracket facing the slot that you plan to use ASRock DeskExpress function on this motherboard. Replace the system cover. 16 ASRock Penryn1600SLIX3-WiFi Motherboard English For the information of the compatible SLITM or 3-Way SLITM Mode PCI Express VGA cards, please refer to use . If you want ...to install expansion cards that the power supply is switched off or...
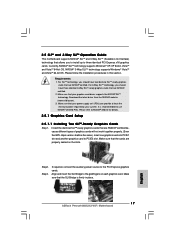
Quick Installation Guide
Page 17
... to the goldfingers on the slots. Step2. Step3. Align and insert the SLI Bridge to three identical PCI Express x16 graphics cards. Make sure that the SLI Bridge is recommended to PCIE3 slot. Make sure that your power supply unit (PSU) can provide...your system. If required, connect the auxiliary power source to NVIDIA® website for details. 2.5.1 Graphics Card Setup 2.5.1.1 Installing Two SLITM-Ready Graphics Cards Step 1. English 17 ASRock Penryn1600SLIX3-WiFi Motherboard NVIDIA® 3-Way SLITM technology supports Windows® VistaTM and VistaTM 64-bit OS. Please follow ...
... to the goldfingers on the slots. Step2. Step3. Align and insert the SLI Bridge to three identical PCI Express x16 graphics cards. Make sure that the SLI Bridge is recommended to PCIE3 slot. Make sure that your power supply unit (PSU) can provide...your system. If required, connect the auxiliary power source to NVIDIA® website for details. 2.5.1 Graphics Card Setup 2.5.1.1 Installing Two SLITM-Ready Graphics Cards Step 1. English 17 ASRock Penryn1600SLIX3-WiFi Motherboard NVIDIA® 3-Way SLITM technology supports Windows® VistaTM and VistaTM 64-bit OS. Please follow ...
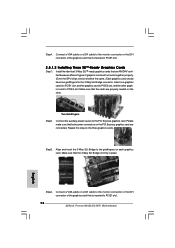
Quick Installation Guide
Page 18
... DVI connector of the graphics card that the cards are connected. Make sure that is firmly in place. Please make sure that is inserted to PCIE5 slot. Step3. Connect a VGA cable or a DVI cable to PCIE1 slot. 18 ASRock Penryn1600SLIX3-WiFi Motherboard Align and insert the ...3-Way SLI Bridge to the PCI Express graphics card. English Step4. Install the identical 3-Way SLITM-ready graphics cards that are NVIDIA® certified because different types of the graphics...
... DVI connector of the graphics card that the cards are connected. Make sure that is firmly in place. Please make sure that is inserted to PCIE5 slot. Step3. Connect a VGA cable or a DVI cable to PCIE1 slot. 18 ASRock Penryn1600SLIX3-WiFi Motherboard Align and insert the ...3-Way SLI Bridge to the PCI Express graphics card. English Step4. Install the identical 3-Way SLITM-ready graphics cards that are NVIDIA® certified because different types of the graphics...

