RAID Installation Guide
Page 1
Guide to RAID Configurations 3 2.1 Introduction of RAID 3 2.2 RAID Configuration Precautions 5 2.3 Installing Windows® XP / XP 64-bit / VistaTM / VistaTM 64-bit With RAID Functions 6 2.4 Setting the BIOS RAID Items 11 2.5 Configuring the Intel RAID BIOS 11 2.6 Deleting RAID Volume 15 1 Guide to SATA Hard Disks Installation and RAID Configuration 1. Guide to SATA Hard Disks Installation 2 1.1 Serial ATA (SATA) Hard Disks Installation 2 2.
Guide to RAID Configurations 3 2.1 Introduction of RAID 3 2.2 RAID Configuration Precautions 5 2.3 Installing Windows® XP / XP 64-bit / VistaTM / VistaTM 64-bit With RAID Functions 6 2.4 Setting the BIOS RAID Items 11 2.5 Configuring the Intel RAID BIOS 11 2.6 Deleting RAID Volume 15 1 Guide to SATA Hard Disks Installation and RAID Configuration 1. Guide to SATA Hard Disks Installation 2 1.1 Serial ATA (SATA) Hard Disks Installation 2 2.

RAID Installation Guide
Page 6
... Please insert a diskette into the floppy diskette. Formatting the floppy diskette will start to configure the RAID function, you want to install Windows® XP / XP 64-bit on your SATA / SATAII HDDs with RAID functions, please follow below procedures according to the OS you install... to check the installation guide in the folder at the beginning of system boot-up BIOS. E. STEP 1: Set up , press key, and then a window for proper configuration. A. STEP 2: Make a SATA / SATAII Driver Diskette. Please select CD-ROM as ", please set RAID configuration. D. Then you want...
... Please insert a diskette into the floppy diskette. Formatting the floppy diskette will start to configure the RAID function, you want to install Windows® XP / XP 64-bit on your SATA / SATAII HDDs with RAID functions, please follow below procedures according to the OS you install... to check the installation guide in the folder at the beginning of system boot-up BIOS. E. STEP 1: Set up , press key, and then a window for proper configuration. A. STEP 2: Make a SATA / SATAII Driver Diskette. Please select CD-ROM as ", please set RAID configuration. D. Then you want...
RAID Installation Guide
Page 7
... Storage Manager" will be installed to your system. Set up a "RAID Ready" system with a single SATA / SATAII hard disk. At the beginning of Windows setup, press F6 to install a third-party RAID driver. The following path: .. \ Intel Matrix Storage Manager Information If you can start to install... Windows® XP / XP 64-bit on your system. When done, exit Setup. 3. After reading the floppy disk, the driver will be presented. 7 You may...
... Storage Manager" will be installed to your system. Set up a "RAID Ready" system with a single SATA / SATAII hard disk. At the beginning of Windows setup, press F6 to install a third-party RAID driver. The following path: .. \ Intel Matrix Storage Manager Information If you can start to install... Windows® XP / XP 64-bit on your system. When done, exit Setup. 3. After reading the floppy disk, the driver will be presented. 7 You may...

RAID Installation Guide
Page 8
... in order to a two drive RAID 0, RAID 1 configuration or three drive RAID 5 configuration. It's important to select it from the Internet. Windows XP64". 5. Install the Intel(R) Matrix Storage Manager software via the CD-ROM included with a capacity equal to the SATAII port not being used ....Open the Intel Storage Utility from the Start Menu and select "Create RAID volume from Existing Hard Drive" from Existing Hard Drive Wizard. Boot Windows®, install the Intel(R) Matrix Storage Manager software, if not already installed, using the setup package obtained from a CD-ROM or from ...
... in order to a two drive RAID 0, RAID 1 configuration or three drive RAID 5 configuration. It's important to select it from the Internet. Windows XP64". 5. Install the Intel(R) Matrix Storage Manager software via the CD-ROM included with a capacity equal to the SATAII port not being used ....Open the Intel Storage Utility from the Start Menu and select "Create RAID volume from Existing Hard Drive" from Existing Hard Drive Wizard. Boot Windows®, install the Intel(R) Matrix Storage Manager software, if not already installed, using the setup package obtained from a CD-ROM or from ...

RAID Installation Guide
Page 9
...Install Windows® VistaTM / VistaTM 64-...Windows® VistaTM / VistaTM 64-bit OS on your optical drive, and click the "Load Driver" button on the left on your system. After the installation of Windows...® VistaTM / VistaTM 64-bit OS, if you want to manage RAID functions, you want to install Windows... Configuration. Insert the Windows® VistaTM / ...Windows® VistaTM OS) .. \ AMD64 (For Windows® VistaTM 64-bit OS) After that, please insert Windows...Windows?" STEP 2: Use "RAID Installation Guide" to set the option to [RAID]. 2.3.4 Installing Windows...
...Install Windows® VistaTM / VistaTM 64-...Windows® VistaTM / VistaTM 64-bit OS on your optical drive, and click the "Load Driver" button on the left on your system. After the installation of Windows...® VistaTM / VistaTM 64-bit OS, if you want to manage RAID functions, you want to install Windows... Configuration. Insert the Windows® VistaTM / ...Windows® VistaTM OS) .. \ AMD64 (For Windows® VistaTM 64-bit OS) After that, please insert Windows...Windows?" STEP 2: Use "RAID Installation Guide" to set the option to [RAID]. 2.3.4 Installing Windows...

RAID Installation Guide
Page 10
If you want to use "Intel Matrix Storage Manager" in Windows® environment, please install "SATAII driver" from the Support CD again so that "Intel Matrix Storage Manager" will be installed to your system as well. 10
If you want to use "Intel Matrix Storage Manager" in Windows® environment, please install "SATAII driver" from the Support CD again so that "Intel Matrix Storage Manager" will be installed to your system as well. 10

RAID Installation Guide
Page 11
... to press . 2.4 Setting the BIOS RAID Items After installing the hard disk drives, please set the option Configure SATA as to [RAID]. Create RAID Volume window appears. Then, the Intel RAID Utility - Please set the necessary RAID items in the BIOS before you to enter BIOS setup utility. Highlight Advanced and...
... to press . 2.4 Setting the BIOS RAID Items After installing the hard disk drives, please set the option Configure SATA as to [RAID]. Create RAID Volume window appears. Then, the Intel RAID Utility - Please set the necessary RAID items in the BIOS before you to enter BIOS setup utility. Highlight Advanced and...

RAID Installation Guide
Page 15
Please note that you want to create extra RAID partition, please use the RAID utility under BIOS RAID environment. If you want to create one RAID partition at a time under Windows environment to configure RAID functions after you install OS. 2.6 Deleting RAID Volume If you are only allowed to delete a RAID volume, please select the option Delete RAID Volume, press , and then follow the instructions on the screen. 15
Please note that you want to create extra RAID partition, please use the RAID utility under BIOS RAID environment. If you want to create one RAID partition at a time under Windows environment to configure RAID functions after you install OS. 2.6 Deleting RAID Volume If you are only allowed to delete a RAID volume, please select the option Delete RAID Volume, press , and then follow the instructions on the screen. 15
User Manual
Page 3
...SATA / SATAII HDD Hot Plug Feature and Operation Guide 35 2.16 Driver Installation Guide 37 2.17 Installing Windows® XP / XP 64-bit / VistaTM / VistaTM 64-bit With RAID Functions 37 2.17.1 Installing Windows® XP / XP 64-bit With RAID Functions 37 2.17.2 Setting Up a "RAID Ready"... System 38 2.17.3 Migrating a "RAID Ready" System to RAID 0, RAID 1 or RAID 5 39 2.17.4 Installing Windows® VistaTM / VistaTM 64-bit With RAID Functions 40 2.18 Installing Windows® XP / XP 64-bit / VistaTM / VistaTM 64-bit Without RAID Functions 41 2.18.1 Installing...
...SATA / SATAII HDD Hot Plug Feature and Operation Guide 35 2.16 Driver Installation Guide 37 2.17 Installing Windows® XP / XP 64-bit / VistaTM / VistaTM 64-bit With RAID Functions 37 2.17.1 Installing Windows® XP / XP 64-bit With RAID Functions 37 2.17.2 Setting Up a "RAID Ready"... System 38 2.17.3 Migrating a "RAID Ready" System to RAID 0, RAID 1 or RAID 5 39 2.17.4 Installing Windows® VistaTM / VistaTM 64-bit With RAID Functions 40 2.18 Installing Windows® XP / XP 64-bit / VistaTM / VistaTM 64-bit Without RAID Functions 41 2.18.1 Installing...

User Manual
Page 4
2.18.2 Installing Windows® VistaTM / VistaTM 64-bit Without RAID Functions 42 2.19 Untied Overclocking Technology 43 3 BIOS SETUP UTILITY 44 3.1 Introduction 44 3.1.1 BIOS Menu Bar 44 3.1.2 Navigation ...
2.18.2 Installing Windows® VistaTM / VistaTM 64-bit Without RAID Functions 42 2.19 Untied Overclocking Technology 43 3 BIOS SETUP UTILITY 44 3.1 Introduction 44 3.1.1 BIOS Menu Bar 44 3.1.2 Navigation ...

User Manual
Page 6
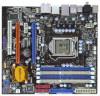
... DIMM slots - Dual Channel DDR3 Memory Technology (see CAUTION 2) - Supports Intel® Extreme Memory Profile (XMP) (see CAUTION 4) - Supports ATITM CrossFireXTM and Quad CrossFireXTM - 7.1 CH Windows® VistaTM Premium Level HD Audio (VIA® VT1708S Audio Codec) - Supports Wake-On-LAN I /O - Intel® P55 - Supports DDR3 2400+(OC)/2133(OC)/1866...
... DIMM slots - Dual Channel DDR3 Memory Technology (see CAUTION 2) - Supports Intel® Extreme Memory Profile (XMP) (see CAUTION 4) - Supports ATITM CrossFireXTM and Quad CrossFireXTM - 7.1 CH Windows® VistaTM Premium Level HD Audio (VIA® VT1708S Audio Codec) - Supports Wake-On-LAN I /O - Intel® P55 - Supports DDR3 2400+(OC)/2133(OC)/1866...
User Manual
Page 8
... page 43 for proper installation. 4. Before installing SATAII hard disk to adjust your system by overclocking. ASRock website: http://www.asrock.com/feature/OCTuner/index.htm 8 Microsoft® Windows® XP / XP 64-bit / VistaTM / VistaTM 64-bit / Win7 compliant Certifications - Due... the thirdparty overclocking tools. Please visit our website for USB 2.0 works fine under Windows® XP and Windows® VistaTM. - For those CPU that there is a user-friendly ASRock overclocking tool which allows you implement Dual Channel Memory Technology, make sure to SATAII...
... page 43 for proper installation. 4. Before installing SATAII hard disk to adjust your system by overclocking. ASRock website: http://www.asrock.com/feature/OCTuner/index.htm 8 Microsoft® Windows® XP / XP 64-bit / VistaTM / VistaTM 64-bit / Win7 compliant Certifications - Due... the thirdparty overclocking tools. Please visit our website for USB 2.0 works fine under Windows® XP and Windows® VistaTM. - For those CPU that there is a user-friendly ASRock overclocking tool which allows you implement Dual Channel Memory Technology, make sure to SATAII...
User Manual
Page 9
...and save the new BIOS file to provide exceptional power saving and improve power efficiency without entering operating systems first like MS-DOS or Windows®. Please be shared and worked on the motherboard functions properly and unplug the power cord, then plug it is not recommended to..., remember to spray thermal grease between the CPU and the heatsink when you checking with the power supply manufacturer for the user to access ASRock Instant Flash. The software name itself - While CPU overheat is a revolutionary technology that not all the 775 CPU Fan can press key ...
...and save the new BIOS file to provide exceptional power saving and improve power efficiency without entering operating systems first like MS-DOS or Windows®. Please be shared and worked on the motherboard functions properly and unplug the power cord, then plug it is not recommended to..., remember to spray thermal grease between the CPU and the heatsink when you checking with the power supply manufacturer for the user to access ASRock Instant Flash. The software name itself - While CPU overheat is a revolutionary technology that not all the 775 CPU Fan can press key ...

User Manual
Page 10
ASRock website: http://www.asrock.com/support/index.htm 10 1.3 Two CrossFireXTM Graphics Card Support List (for Windows® XP / XP 64-bit / VistaTM / VistaTM 64-bit) Chipset Vendor ATI Model Name Chipset Name Driver MSI RX2600PRO-T2D256EZ Gigabyte GV-RX26T256HP... HD 2600PRO Catalyst 9.1 Radeon HD 2600XT Catalyst 9.1 RADEON HD 4350 Catalyst 9.1 RADEON HD 4870X2 Catalyst 9.1 * The graphics cards with * mark are supported under Windows® VistaTM / VistaTM 64-bit only. * For the latest updates of the supported PCI Express VGA card list for CrossFireXTM Mode, please visit our website...
ASRock website: http://www.asrock.com/support/index.htm 10 1.3 Two CrossFireXTM Graphics Card Support List (for Windows® XP / XP 64-bit / VistaTM / VistaTM 64-bit) Chipset Vendor ATI Model Name Chipset Name Driver MSI RX2600PRO-T2D256EZ Gigabyte GV-RX26T256HP... HD 2600PRO Catalyst 9.1 Radeon HD 2600XT Catalyst 9.1 RADEON HD 4350 Catalyst 9.1 RADEON HD 4870X2 Catalyst 9.1 * The graphics cards with * mark are supported under Windows® VistaTM / VistaTM 64-bit only. * For the latest updates of the supported PCI Express VGA card list for CrossFireXTM Mode, please visit our website...

User Manual
Page 13
...; XP / XP 64-bit OS: Please click "VIA HD Audio Deck" icon , and click "Speaker". Then you install. For Windows® VistaTM / VistaTM 64-bit OS: Please click "VIA HD Audio Deck" icon , and click "Advanced Options" on the left side on your change . If ...
...; XP / XP 64-bit OS: Please click "VIA HD Audio Deck" icon , and click "Speaker". Then you install. For Windows® VistaTM / VistaTM 64-bit OS: Please click "VIA HD Audio Deck" icon , and click "Advanced Options" on the left side on your change . If ...
User Manual
Page 21
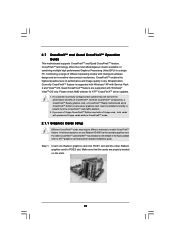
... software design and an innovative interconnect mechanism, CrossFireXTM enables the highest possible level of CrossFireXTM. Step 1. If you pair a 12-pipe CrossFireXTM Edition card with Windows® VistaTM OS only. Insert one Radeon graphics card into PCIE1 slot and the other CrossFireXTM cards that the cards are supported with a 16-pipe...
... software design and an innovative interconnect mechanism, CrossFireXTM enables the highest possible level of CrossFireXTM. Step 1. If you pair a 12-pipe CrossFireXTM Edition card with Windows® VistaTM OS only. Insert one Radeon graphics card into PCIE1 slot and the other CrossFireXTM cards that the cards are supported with a 16-pipe...
User Manual
Page 23
... 2.7.2 Driver Installation and Setup Step 1. Remove the ATITM driver if you have Windows® XP Service Pack 2 or higher installed in your Windows® taskbar. Please check AMD website for details. For Windows® XP OS: A. Install the VGA card drivers to your computer. Double...system, there is an optional download. Step 2. Step 5. Click "Apply". 23 Step 3. Power on your computer. Step 4. ATITM recommends Windows® XP Service Pack 2 or higher to be installed (If you have Microsoft .NET Framework installed prior to the total GPU number on...
... 2.7.2 Driver Installation and Setup Step 1. Remove the ATITM driver if you have Windows® XP Service Pack 2 or higher installed in your Windows® taskbar. Please check AMD website for details. For Windows® XP OS: A. Install the VGA card drivers to your computer. Double...system, there is an optional download. Step 2. Step 5. Click "Apply". 23 Step 3. Power on your computer. Step 4. ATITM recommends Windows® XP Service Pack 2 or higher to be installed (If you have Microsoft .NET Framework installed prior to the total GPU number on...
User Manual
Page 37
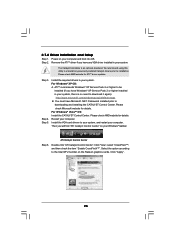
... E. Then, the drivers compatible to boot your SATA / SATAII HDDs with RAID functions, please follow below procedures according to the OS you install. 2.17.1 Installing Windows® XP / XP 64-bit With RAID Functions If you will lose ALL data in it! STEP 1: Set up , press key, and then...the floppy diskette will see the message on your system. Therefore, the drivers you want to [RAID]. Set the option "SATAII Operation Mode" to install Windows® XP / XP 64-bit on the support CD driver page. B. Please follow the order from up to bottom side to format and copy ...
... E. Then, the drivers compatible to boot your SATA / SATAII HDDs with RAID functions, please follow below procedures according to the OS you install. 2.17.1 Installing Windows® XP / XP 64-bit With RAID Functions If you will lose ALL data in it! STEP 1: Set up , press key, and then...the floppy diskette will see the message on your system. Therefore, the drivers you want to [RAID]. Set the option "SATAII Operation Mode" to install Windows® XP / XP 64-bit on the support CD driver page. B. Please follow the order from up to bottom side to format and copy ...
User Manual
Page 38
...Manager", which is located in the folder at the following steps outline how to the mode you choose and the OS you 38 Begin Windows® setup by using "RAID Installation Guide" to set RAID configuration, you want to manage RAID functions, you need to check the...; environment, please install "SATAII driver" from the installation CD. 4. You may select: "Intel(R) ICH8R/ICH9R/ICH10R/DO/PCH SATA RAID Controller Windows XP/2000" for Windows® XP 64-bit. A "RAID Ready" system can also set RAID configuration. Make a SATA / SATAII driver diskette as well. 2.17.2 Setting Up ...
...Manager", which is located in the folder at the following steps outline how to the mode you choose and the OS you 38 Begin Windows® setup by using "RAID Installation Guide" to set RAID configuration, you want to manage RAID functions, you need to check the...; environment, please install "SATAII driver" from the installation CD. 4. You may select: "Intel(R) ICH8R/ICH9R/ICH10R/DO/PCH SATA RAID Controller Windows XP/2000" for Windows® XP 64-bit. A "RAID Ready" system can also set RAID configuration. Make a SATA / SATAII driver diskette as well. 2.17.2 Setting Up ...
User Manual
Page 39
... Open the Intel Storage Utility from the Start Menu and select "Create RAID volume from Existing Hard Drive" from the Internet. Finish the Windows® installation and install all necessary drivers. 6. Install the Intel(R) Matrix Storage Manager software via the CD-ROM included with a capacity equal...you will activate the Create RAID volume from a single non-RAID configuration to or greater than that currently being used as prompted. install. Windows XP/2000" for this to a RAID 0 volume, use Disk Management from the Internet. you migrated to select it from the Actions ...
... Open the Intel Storage Utility from the Start Menu and select "Create RAID volume from Existing Hard Drive" from the Internet. Finish the Windows® installation and install all necessary drivers. 6. Install the Intel(R) Matrix Storage Manager software via the CD-ROM included with a capacity equal...you will activate the Create RAID volume from a single non-RAID configuration to or greater than that currently being used as prompted. install. Windows XP/2000" for this to a RAID 0 volume, use Disk Management from the Internet. you migrated to select it from the Actions ...


