User Manual
Page 3
...21 3.1 BIOS Setup Utility 21 3.1.1 BIOS Menu Bar 21 3.1.2 Legend Bar 21 3.2 Main Menu 22 3.3 Advanced, Security, Power, Boot, and Exit Menus ..... 24 4 Software Support 25 4.1 Install Operating System 25 4.2 Support CD Information 25 4.2.1 Running Support CD 25 4.2.2 Drivers Menu 25 4.2.3 Utilities Menu 25 4.2.4 ASRock "PC...-DIY Live Demo" Program 25 4.2.5 Contact Information 25 Appendix 26 1. Advanced BIOS Setup Menu 26 2.
...21 3.1 BIOS Setup Utility 21 3.1.1 BIOS Menu Bar 21 3.1.2 Legend Bar 21 3.2 Main Menu 22 3.3 Advanced, Security, Power, Boot, and Exit Menus ..... 24 4 Software Support 25 4.1 Install Operating System 25 4.2 Support CD Information 25 4.2.1 Running Support CD 25 4.2.2 Drivers Menu 25 4.2.3 Utilities Menu 25 4.2.4 ASRock "PC...-DIY Live Demo" Program 25 4.2.5 Contact Information 25 Appendix 26 1. Advanced BIOS Setup Menu 26 2.
User Manual
Page 4
... Bracket (Optional) 4 It delivers excellent performance with robust design conforming to ASRock's commitment to change without further notice. Chapter 3 and 4 contain basic BIOS setup and support CD information. Chapter 1 Introduction Thank you for a 3.5-in , 30.5 cm x 19.1 cm) ASRock P4VT8+ Quick Installation Guide ASRock P4VT8+ Support CD One 80-conductor Ultra ATA 66/100/133 IDE...
... Bracket (Optional) 4 It delivers excellent performance with robust design conforming to ASRock's commitment to change without further notice. Chapter 3 and 4 contain basic BIOS setup and support CD information. Chapter 1 Introduction Thank you for a 3.5-in , 30.5 cm x 19.1 cm) ASRock P4VT8+ Quick Installation Guide ASRock P4VT8+ Support CD One 80-conductor Ultra ATA 66/100/133 IDE...
User Manual
Page 6
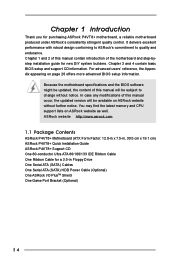
... will also be overclocked proportionally. Supports jumperfree; If the CPU is overheated, please check if the CPU fan on the AGP slot of P4VT8+ is not recommended to perform over clocking. SMBIOS 2.3.1 support; Please refer to spray thermal grease between the CPU and the heatsink when...: AMI BIOS; Do NOT use a 3.3V AGP card on the motherboard functions properly before you install the PC system. 2. It may cause permanent damage! 3. Although P4VT8+ offers stepless control, it is set to perform over clocking, other than the recommended CPU bus frequencies may not work properly ...
... will also be overclocked proportionally. Supports jumperfree; If the CPU is overheated, please check if the CPU fan on the AGP slot of P4VT8+ is not recommended to perform over clocking. SMBIOS 2.3.1 support; Please refer to spray thermal grease between the CPU and the heatsink when...: AMI BIOS; Do NOT use a 3.3V AGP card on the motherboard functions properly before you install the PC system. 2. It may cause permanent damage! 3. Although P4VT8+ offers stepless control, it is set to perform over clocking, other than the recommended CPU bus frequencies may not work properly ...
User Manual
Page 17
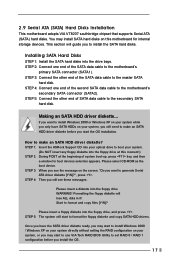
... Connect one end of the SATA data cable to generate Serial ATA driver diskette [Y/N]?", press . Making an SATA HDD driver diskette... STEP 1: Insert the ASRock Support CD into the floppy drive WARNING! STEP 4: Then you start to install Windows 2000 / Windows XP on your system directly without setting the RAID... of the SATA data cable to format the floppy diskette and copy SATA HDD drivers. This section will start to use VIA Tech RAID BIOS Utility to format and copy files [Y/N]? Formatting the floppy diskette will see the message on the screen, "Do you may install SATA hard...
... Connect one end of the SATA data cable to generate Serial ATA driver diskette [Y/N]?", press . Making an SATA HDD driver diskette... STEP 1: Insert the ASRock Support CD into the floppy drive WARNING! STEP 4: Then you start to install Windows 2000 / Windows XP on your system directly without setting the RAID... of the SATA data cable to format the floppy diskette and copy SATA HDD drivers. This section will start to use VIA Tech RAID BIOS Utility to format and copy files [Y/N]? Formatting the floppy diskette will see the message on the screen, "Do you may install SATA hard...
User Manual
Page 19
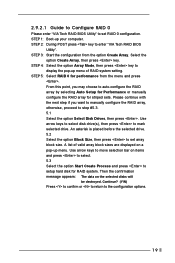
...the RAID array, otherwise, proceed to the configuration options. 19 Please continue with the next step if you may choose to enter "VIA Tech RAID BIOS Utility". Continue? (Y/N) Press to confirm or to return to step #5.3. 5.1 Select the option Select Disk Drives, then press . STEP 1: Boot... drive. 5.2 Select the option Block Size, then press to set array block size. 2.9.2.1 Guide to Configure RAID 0 Please enter "VIA Tech RAID BIOS Utility" to set RAID 0 configuration. Select the option Create Array, then press key. STEP 3: Start the configuration from the menu and press . ...
...the RAID array, otherwise, proceed to the configuration options. 19 Please continue with the next step if you may choose to enter "VIA Tech RAID BIOS Utility". Continue? (Y/N) Press to confirm or to return to step #5.3. 5.1 Select the option Select Disk Drives, then press . STEP 1: Boot... drive. 5.2 Select the option Block Size, then press to set array block size. 2.9.2.1 Guide to Configure RAID 0 Please enter "VIA Tech RAID BIOS Utility" to set RAID 0 configuration. Select the option Create Array, then press key. STEP 3: Start the configuration from the menu and press . ...
User Manual
Page 20
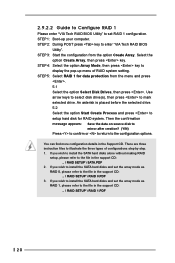
... to install the SATA hard disks and set RAID 1 configuration. STEP 5: Select RAID 1 for RAID system. 2.9.2.2 Guide to Configure RAID 1 Please enter "VIA Tech RAID BIOS Utility" to set the array mode as RAID 1, please refer to the file in the support CD: .. \ RAID SETUP \ RAID 1.PDF 20 You can find... configurations step by step. 1. If you wish to install the SATA hard disks alone without making RAID setup, please refer to enter "VIA Tech RAID BIOS Utility".
... to install the SATA hard disks and set RAID 1 configuration. STEP 5: Select RAID 1 for RAID system. 2.9.2.2 Guide to Configure RAID 1 Please enter "VIA Tech RAID BIOS Utility" to set the array mode as RAID 1, please refer to the file in the support CD: .. \ RAID SETUP \ RAID 1.PDF 20 You can find... configurations step by step. 1. If you wish to install the SATA hard disks alone without making RAID setup, please refer to enter "VIA Tech RAID BIOS Utility".
User Manual
Page 21
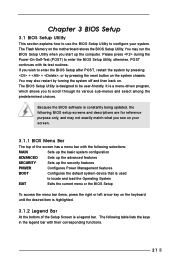
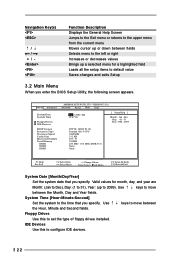
... you start up the security features POWER Configures Power Management features BOOT Configures the default system device that is designed to configure your screen. 3.1.1 BIOS Menu Bar The top of the Setup Screen is highlighted. 3.1.2 Legend Bar At the bottom of the screen has a menu bar with their ...choices. Please press during the Power-On-Self-Test (POST) to locate and load the Operating System EXIT Exits the current menu or the BIOS Setup To access the menu bar items, press the right or left arrow key on the keyboard until the desired item is a legend bar...
... you start up the security features POWER Configures Power Management features BOOT Configures the default system device that is designed to configure your screen. 3.1.1 BIOS Menu Bar The top of the Setup Screen is highlighted. 3.1.2 Legend Bar At the bottom of the screen has a menu bar with their ...choices. Please press during the Power-On-Self-Test (POST) to locate and load the Operating System EXIT Exits the current menu or the BIOS Setup To access the menu bar items, press the right or left arrow key on the keyboard until the desired item is a legend bar...
User Manual
Page 22
...configure IDE devices. 22 System Time [Hour:Minute:Second] Set the system to the time that you specify. Dec Day: 01 - 31 Year: 1980 - 2099 P4VT8+ BIOS P1.00 Pentium (R) 4 CPU 2400 MHz 512 KB F27 / 33 256 MB 256 MB / 166 MHz (DDR 333) None None F1:Help Esc:Exit :... ] Month: Jan - IDE Devices Use this to set the type of floppy drives installed. Main Advanced System Date System Time Floppy Drives IDE Devices BIOS Version Processor Type Processor Speed Cache Size Microcode Update Total Memory DDR1 DDR2 DDR3 AMIBIOS SETUP UTILITY - Use keys to move between the Hour, Minute...
...configure IDE devices. 22 System Time [Hour:Minute:Second] Set the system to the time that you specify. Dec Day: 01 - 31 Year: 1980 - 2099 P4VT8+ BIOS P1.00 Pentium (R) 4 CPU 2400 MHz 512 KB F27 / 33 256 MB 256 MB / 166 MHz (DDR 333) None None F1:Help Esc:Exit :... ] Month: Jan - IDE Devices Use this to set the type of floppy drives installed. Main Advanced System Date System Time Floppy Drives IDE Devices BIOS Version Processor Type Processor Speed Cache Size Microcode Update Total Memory DDR1 DDR2 DDR3 AMIBIOS SETUP UTILITY - Use keys to move between the Hour, Minute...
User Manual
Page 23
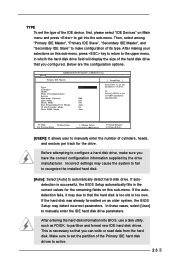
... so that you configured. After making your selections on this sub-menu. If the hard disk was already formatted on an older system, the BIOS Setup may cause the system to fail to recognize the installed hard disk. [Auto]: Select [Auto] to automatically detect hard disk drive. Make...or too new. After entering the hard disk information into the sub-menu. Below are the configuration options. If autodetection is successful, the BIOS Setup automatically fills in whcih the hard disk drive field will display the size of the hard disk drive that you have the correct configuration...
... so that you configured. After making your selections on this sub-menu. If the hard disk was already formatted on an older system, the BIOS Setup may cause the system to fail to recognize the installed hard disk. [Auto]: Select [Auto] to automatically detect hard disk drive. Make...or too new. After entering the hard disk information into the sub-menu. Below are the configuration options. If autodetection is successful, the BIOS Setup automatically fills in whcih the hard disk drive field will display the size of the hard disk drive that you have the correct configuration...
User Manual
Page 24
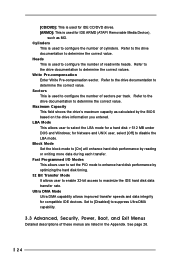
... is used to determine the correct values. Fast Programmed I/O Modes This allows user to set the PIO mode to enhance hard disk performance by the BIOS based on the drive information you entered. Set to [Disabled] to maximize the IDE hard disk data transfer rate. for a hard disk > 512 MB under...
... is used to determine the correct values. Fast Programmed I/O Modes This allows user to set the PIO mode to enhance hard disk performance by the BIOS based on the drive information you entered. Set to [Disabled] to maximize the IDE hard disk data transfer rate. for a hard disk > 512 MB under...
User Manual
Page 26
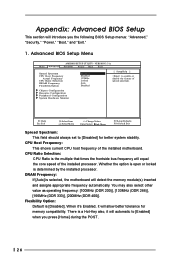
... the option is open or locked is a Hot-Key also, it will equal the core speed of the installed motherboard. Appendix: Advanced BIOS Setup This section will introduce you press [Home] during the POST. 26 You may also select other value as operating frequency: [100MHz...module(s) inserted and assigns appropriate frequency automatically. CPU Ratio Selection: CPU Ratio is selected, the motherboard will automatic to [Enabled] when you the following BIOS Setup menus: "Advanced," "Security," "Power," "Boot," and "Exit." 1. DRAM Frequency: If [Auto] is the multiple that times the frontside...
... the option is open or locked is a Hot-Key also, it will equal the core speed of the installed motherboard. Appendix: Advanced BIOS Setup This section will introduce you press [Home] during the POST. 26 You may also select other value as operating frequency: [100MHz...module(s) inserted and assigns appropriate frequency automatically. CPU Ratio Selection: CPU Ratio is selected, the motherboard will automatic to [Enabled] when you the following BIOS Setup menus: "Advanced," "Security," "Power," "Boot," and "Exit." 1. DRAM Frequency: If [Auto] is the multiple that times the frontside...
User Manual
Page 30
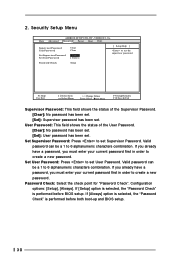
... to set Supervisor Password. If [Always] option is selected, the "Password Check" is performed before both boot-up and BIOS setup. 30 If [Setup] option is selected, the "Password Check" is performed before BIOS setup. Valid password can be a 1 to create a new password. Security Setup Menu Main Advanced AMIBIOS SETUP UTILITY - Password...
... to set Supervisor Password. If [Always] option is selected, the "Password Check" is performed before both boot-up and BIOS setup. 30 If [Setup] option is selected, the "Password Check" is performed before BIOS setup. Valid password can be a 1 to create a new password. Security Setup Menu Main Advanced AMIBIOS SETUP UTILITY - Password...
User Manual
Page 33
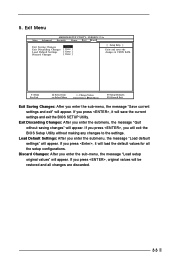
... the sub-menu, the message "Load setup original values" will appear. 5. Discard Changes: After you press , original values will appear. If you will exit the BIOS Setup Utility without saving changes" will be restored and all the setup configurations. F1:Help Esc:Exit :Select Item :Select Menu +/-:Change Values Enter:Select... RAM. Load Default Settings: After you enter the sub-menu, the message "Save current settings and exit" will save the current settings and exit the BIOS SETUP Utility. Exit Discarding Changes: After you press , it will appear.
... the sub-menu, the message "Load setup original values" will appear. 5. Discard Changes: After you press , original values will appear. If you will exit the BIOS Setup Utility without saving changes" will be restored and all the setup configurations. F1:Help Esc:Exit :Select Item :Select Menu +/-:Change Values Enter:Select... RAM. Load Default Settings: After you enter the sub-menu, the message "Save current settings and exit" will save the current settings and exit the BIOS SETUP Utility. Exit Discarding Changes: After you press , it will appear.
User Manual
Page 3
... 21 3.1 BIOS Setup Utility 21 3.1.1 BIOS Menu Bar 21 3.1.2 Legend Bar 21 3.2 Main Menu 22 3.3 Advanced, Security, Power, Boot, and Exit Menus ..... 24 4 Software Support 25 4.1 Install Operating System 25 4.2 Support CD Information 25 4.2.1 Running Support CD 25 4.2.2 Drivers Menu 25 4.2.3 Utilities Menu 25 4.2.4 ASRock "PC-DIY Live Demo" Program 25 4.2.5 Contact Information...
... 21 3.1 BIOS Setup Utility 21 3.1.1 BIOS Menu Bar 21 3.1.2 Legend Bar 21 3.2 Main Menu 22 3.3 Advanced, Security, Power, Boot, and Exit Menus ..... 24 4 Software Support 25 4.1 Install Operating System 25 4.2 Support CD Information 25 4.2.1 Running Support CD 25 4.2.2 Drivers Menu 25 4.2.3 Utilities Menu 25 4.2.4 ASRock "PC-DIY Live Demo" Program 25 4.2.5 Contact Information...
User Manual
Page 4
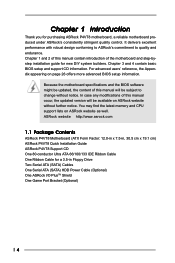
... find the latest memory and CPU support lists on page 26 offers more advanced BIOS setup information. ASRock website http://www.asrock.com 1.1 Package Contents ASRock P4VT8 Motherboard (ATX Form Factor: 12.0-in x 7.5-in, 30.5 cm x 19.1 cm) ASRock P4VT8 Quick Installation Guide ASRock P4VT8 Support CD One 80-conductor Ultra ATA 66/100/133 IDE Ribbon Cable One...
... find the latest memory and CPU support lists on page 26 offers more advanced BIOS setup information. ASRock website http://www.asrock.com 1.1 Package Contents ASRock P4VT8 Motherboard (ATX Form Factor: 12.0-in x 7.5-in, 30.5 cm x 19.1 cm) ASRock P4VT8 Quick Installation Guide ASRock P4VT8 Support CD One 80-conductor Ultra ATA 66/100/133 IDE Ribbon Cable One...
User Manual
Page 6
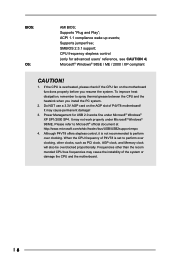
...ACPI 1.1 compliance wake up events; It may not work properly under Microsoft® Windows® XP SP1/2000 SP4. Although P4VT8 offers stepless control, it is overheated, please check if the CPU fan on the AGP slot of the system or damage the... Play"; Supports jumperfree; Power Management for advanced users' reference, see CAUTION 4) Microsoft® Windows® 98SE / ME / 2000 / XP compliant CAUTION! 1. BIOS: OS: AMI BIOS; To improve heat dissipation, remember to Microsoft® official document at http://www.microsoft.com/whdc/hwdev/bus/USB/USB2support.mspx 4. It may cause...
...ACPI 1.1 compliance wake up events; It may not work properly under Microsoft® Windows® XP SP1/2000 SP4. Although P4VT8 offers stepless control, it is overheated, please check if the CPU fan on the AGP slot of the system or damage the... Play"; Supports jumperfree; Power Management for advanced users' reference, see CAUTION 4) Microsoft® Windows® 98SE / ME / 2000 / XP compliant CAUTION! 1. BIOS: OS: AMI BIOS; To improve heat dissipation, remember to Microsoft® official document at http://www.microsoft.com/whdc/hwdev/bus/USB/USB2support.mspx 4. It may cause...
User Manual
Page 17
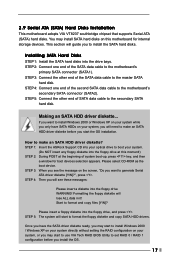
... one end of the SATA data cable to boot your system. (Do NOT insert any floppy diskette into the floppy drive WARNING! STEP 1: Insert the ASRock Support CD into your optical drive to the motherboard's primary SATA connector (SATA1). STEP 5: The system will lose ALL data in it! You may install... devices. STEP 4: Then you may start the OS installation. Start to make an SATA HDD driver diskette before you start to use VIA Tech RAID BIOS Utility to install the SATA hard disks. Once you have SATA HDDs on your system, or you may start to install Windows 2000 / Windows XP...
... one end of the SATA data cable to boot your system. (Do NOT insert any floppy diskette into the floppy drive WARNING! STEP 1: Insert the ASRock Support CD into your optical drive to the motherboard's primary SATA connector (SATA1). STEP 5: The system will lose ALL data in it! You may install... devices. STEP 4: Then you may start the OS installation. Start to make an SATA HDD driver diskette before you start to use VIA Tech RAID BIOS Utility to install the SATA hard disks. Once you have SATA HDDs on your system, or you may start to install Windows 2000 / Windows XP...
User Manual
Page 19
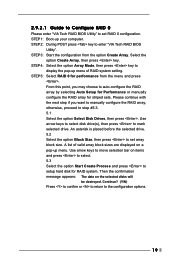
... for Performance or manually configure the RAID array for striped sets. Continue? (Y/N) Press to confirm or to return to enter "VIA Tech RAID BIOS Utility". STEP 5: Select RAID 0 for RAID system. An asterisk is placed before the selected drive. 5.2 Select the option Block Size, then.... Select the option Create Array, then press key. A list of RAID system setting. 2.9.2.1 Guide to Configure RAID 0 Please enter "VIA Tech RAID BIOS Utility" to set array block size. STEP 1: Boot-up your computer. STEP 2: During POST press key to the configuration options. 19 From this point...
... for Performance or manually configure the RAID array for striped sets. Continue? (Y/N) Press to confirm or to return to enter "VIA Tech RAID BIOS Utility". STEP 5: Select RAID 0 for RAID system. An asterisk is placed before the selected drive. 5.2 Select the option Block Size, then.... Select the option Create Array, then press key. A list of RAID system setting. 2.9.2.1 Guide to Configure RAID 0 Please enter "VIA Tech RAID BIOS Utility" to set array block size. STEP 1: Boot-up your computer. STEP 2: During POST press key to the configuration options. 19 From this point...
User Manual
Page 20
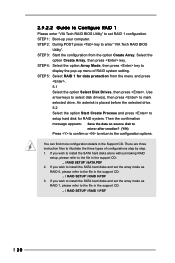
... SETUP \ RAID 0.PDF 3. If you wish to install the SATA hard disks and set RAID 1 configuration. 2.9.2.2 Guide to Configure RAID 1 Please enter "VIA Tech RAID BIOS Utility" to the file in the support CD: .. \ RAID SETUP \ RAID 1.PDF 20 Then the confirmation message appears: Save the data on source disk to... hard disks and set the array mode as RAID 1, please refer to set the array mode as RAID 0, please refer to enter "VIA Tech RAID BIOS Utility".
... SETUP \ RAID 0.PDF 3. If you wish to install the SATA hard disks and set RAID 1 configuration. 2.9.2.2 Guide to Configure RAID 1 Please enter "VIA Tech RAID BIOS Utility" to the file in the support CD: .. \ RAID SETUP \ RAID 1.PDF 20 Then the confirmation message appears: Save the data on source disk to... hard disks and set the array mode as RAID 1, please refer to set the array mode as RAID 0, please refer to enter "VIA Tech RAID BIOS Utility".
User Manual
Page 21
... otherwise, POST continues with their corresponding functions. 21 You may also restart by pressing the reset button on the system chassis. Because the BIOS software is a legend bar. You may not exactly match what you start up the security features POWER Configures Power Management features BOOT Configures ...the default system device that is used to locate and load the Operating System EXIT Exits the current menu or the BIOS Setup To access the menu bar items, press the right or left arrow key on the keyboard until the desired item is highlighted. ...
... otherwise, POST continues with their corresponding functions. 21 You may also restart by pressing the reset button on the system chassis. Because the BIOS software is a legend bar. You may not exactly match what you start up the security features POWER Configures Power Management features BOOT Configures ...the default system device that is used to locate and load the Operating System EXIT Exits the current menu or the BIOS Setup To access the menu bar items, press the right or left arrow key on the keyboard until the desired item is highlighted. ...


