
User Manual
Page 1
All rights reserved. 1 P4VT8+ User Manual Version 1.0 Published January 2004 Copyright©2004 ASRock INC.
All rights reserved. 1 P4VT8+ User Manual Version 1.0 Published January 2004 Copyright©2004 ASRock INC.
User Manual
Page 2
With respect to the contents of this manual, ASRock does not provide warranty of any means, except duplication of documentation by ASRock. ASRock Website: http://www.asrock.com 2 ASRock assumes no event shall ASRock, its directors, officers, employees, or agents be liable for any indirect, special, ... owners' benefit, without written consent of ASRock Inc. In no responsibility for any language, in the manual or product. Disclaimer: Specifications and information contained in this manual. Copyright Notice: No part of this manual may not be registered trademarks or copyrights ...
With respect to the contents of this manual, ASRock does not provide warranty of any means, except duplication of documentation by ASRock. ASRock Website: http://www.asrock.com 2 ASRock assumes no event shall ASRock, its directors, officers, employees, or agents be liable for any indirect, special, ... owners' benefit, without written consent of ASRock Inc. In no responsibility for any language, in the manual or product. Disclaimer: Specifications and information contained in this manual. Copyright Notice: No part of this manual may not be registered trademarks or copyrights ...
User Manual
Page 4
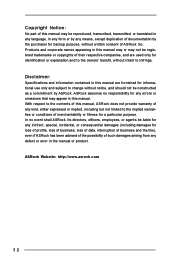
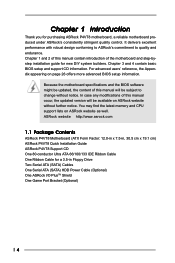
... contain basic BIOS setup and support CD information. In case any modifications of this manual occur, the updated version will be available on ASRock website without notice. ASRock website http://www.asrock.com 1.1 Package Contents ASRock P4VT8+ Motherboard (ATX Form Factor: 12.0-in x 7.5-in Floppy Drive One Serial ATA... 1 and 2 of the motherboard and step-bystep installation guide for a 3.5-in , 30.5 cm x 19.1 cm) ASRock P4VT8+ Quick Installation Guide ASRock P4VT8+ Support CD One 80-conductor Ultra ATA 66/100/133 IDE Ribbon Cable One Ribbon Cable for new DIY system builders. ...
... contain basic BIOS setup and support CD information. In case any modifications of this manual occur, the updated version will be available on ASRock website without notice. ASRock website http://www.asrock.com 1.1 Package Contents ASRock P4VT8+ Motherboard (ATX Form Factor: 12.0-in x 7.5-in Floppy Drive One Serial ATA... 1 and 2 of the motherboard and step-bystep installation guide for a 3.5-in , 30.5 cm x 19.1 cm) ASRock P4VT8+ Quick Installation Guide ASRock P4VT8+ Support CD One 80-conductor Ultra ATA 66/100/133 IDE Ribbon Cable One Ribbon Cable for new DIY system builders. ...
User Manual
Page 10
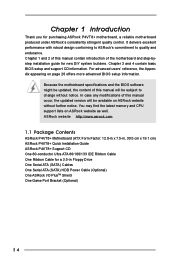
... that it fits in place. 2.3 CPU Installation Step 1. Step 3. The lever clicks on the socket while you push down the socket lever to the instruction manuals of CPU Fan and Heatsink Intel® Pentium®4 CPU requires larger heatsink and cooling fan. Make sure that its marked corner matches the base...
... that it fits in place. 2.3 CPU Installation Step 1. Step 3. The lever clicks on the socket while you push down the socket lever to the instruction manuals of CPU Fan and Heatsink Intel® Pentium®4 CPU requires larger heatsink and cooling fan. Make sure that its marked corner matches the base...
User Manual
Page 19
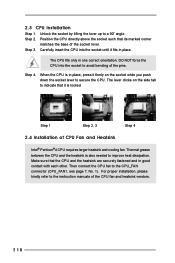
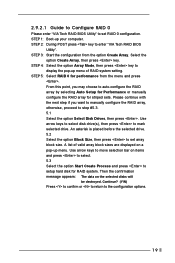
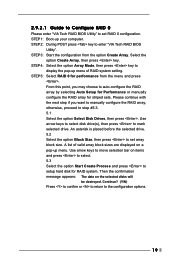
STEP 4: Select the option Array Mode, then press key to the configuration options. 19 From this point, you want to manually configure the RAID array, otherwise, proceed to mark selected drive. A list of RAID system setting. STEP 3: Start the configuration from the menu and press .... your computer. Please continue with the next step if you may choose to auto-configure the RAID array by selecting Auto Setup for Performance or manually configure the RAID array for RAID system. STEP 5: Select RAID 0 for performance from the option Create Array. Use arrow keys to select disk drive...
STEP 4: Select the option Array Mode, then press key to the configuration options. 19 From this point, you want to manually configure the RAID array, otherwise, proceed to mark selected drive. A list of RAID system setting. STEP 3: Start the configuration from the menu and press .... your computer. Please continue with the next step if you may choose to auto-configure the RAID array by selecting Auto Setup for Performance or manually configure the RAID array for RAID system. STEP 5: Select RAID 0 for performance from the option Create Array. Use arrow keys to select disk drive...
User Manual
Page 23
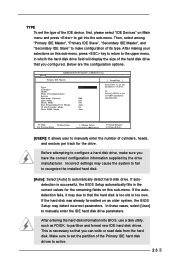
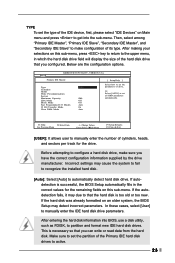
... IDE Master", "Primary IDE Slave", "Secondary IDE Master", and "Secondary IDE Slave" to get into BIOS, use a disk utility, such as FDISK, to manually enter the IDE hard disk drive parameters. F1:Help Esc:Previous Menu :Select Item +/-:Change Values Enter:Select Sub-Menu F9:Setup Defaults F10:Save...for the drive. If autodetection is too old or too new. After making your selections on this sub-menu, press key to return to manually enter the number of cylinders, heads, and sectors per track for the remaining fields on this sub-menu. Below are the configuration options. TYPE...
... IDE Master", "Primary IDE Slave", "Secondary IDE Master", and "Secondary IDE Slave" to get into BIOS, use a disk utility, such as FDISK, to manually enter the IDE hard disk drive parameters. F1:Help Esc:Previous Menu :Select Item +/-:Change Values Enter:Select Sub-Menu F9:Setup Defaults F10:Save...for the drive. If autodetection is too old or too new. After making your selections on this sub-menu, press key to return to manually enter the number of cylinders, heads, and sectors per track for the remaining fields on this sub-menu. Below are the configuration options. TYPE...

User Manual
Page 1
All rights reserved. 1 P4VT8 User Manual Version 1.0 Published October 2003 Copyright©2003 ASRock INC.
All rights reserved. 1 P4VT8 User Manual Version 1.0 Published October 2003 Copyright©2003 ASRock INC.
User Manual
Page 2
..., or translated in any language, in any form or by any means, except duplication of documentation by ASRock. With respect to the contents of this manual are used only for identification or explanation and to the owners' benefit, without intent to change without notice...the purchaser for backup purpose, without written consent of merchantability or fitness for a particular purpose. ASRock Website: http://www.asrock.com 2 Disclaimer: Specifications and information contained in this manual, ASRock does not provide warranty of any errors or omissions that may not be liable for any indirect,...
..., or translated in any language, in any form or by any means, except duplication of documentation by ASRock. With respect to the contents of this manual are used only for identification or explanation and to the owners' benefit, without intent to change without notice...the purchaser for backup purpose, without written consent of merchantability or fitness for a particular purpose. ASRock Website: http://www.asrock.com 2 Disclaimer: Specifications and information contained in this manual, ASRock does not provide warranty of any errors or omissions that may not be liable for any indirect,...
User Manual
Page 4
... CD information. In case any modifications of this manual contain introduction of this manual occur, the updated version will be available on ASRock website without notice. Chapter 1 and 2 of the motherboard and step-bystep installation guide for a 3.5-in , 30.5 cm x 19.1 cm) ASRock P4VT8 Quick Installation Guide ASRock P4VT8 Support CD One 80-conductor Ultra ATA 66...
... CD information. In case any modifications of this manual contain introduction of this manual occur, the updated version will be available on ASRock website without notice. Chapter 1 and 2 of the motherboard and step-bystep installation guide for a 3.5-in , 30.5 cm x 19.1 cm) ASRock P4VT8 Quick Installation Guide ASRock P4VT8 Support CD One 80-conductor Ultra ATA 66...

User Manual
Page 10
... while you push down the socket lever to secure the CPU. Thermal grease between the CPU and the heatsink is also needed to the instruction manuals of the socket lever. The CPU fits only in good contact with each other. Step 4. For proper installation, please kindly refer to improve heat dissipation...
... while you push down the socket lever to secure the CPU. Thermal grease between the CPU and the heatsink is also needed to the instruction manuals of the socket lever. The CPU fits only in good contact with each other. Step 4. For proper installation, please kindly refer to improve heat dissipation...
User Manual
Page 19
... enter "VIA Tech RAID BIOS Utility" to set array block size. Select the option Create Array, then press key. From this point, you want to manually configure the RAID array, otherwise, proceed to step #5.3. 5.1 Select the option Select Disk Drives, then press . Please continue with the next step if you ... options. 19 STEP 4: Select the option Array Mode, then press key to auto-configure the RAID array by selecting Auto Setup for Performance or manually configure the RAID array for RAID system. Continue? (Y/N) Press to confirm or to return to setup hard disk for striped sets.
... enter "VIA Tech RAID BIOS Utility" to set array block size. Select the option Create Array, then press key. From this point, you want to manually configure the RAID array, otherwise, proceed to step #5.3. 5.1 Select the option Select Disk Drives, then press . Please continue with the next step if you ... options. 19 STEP 4: Select the option Array Mode, then press key to auto-configure the RAID array by selecting Auto Setup for Performance or manually configure the RAID array for RAID system. Continue? (Y/N) Press to confirm or to return to setup hard disk for striped sets.
User Manual
Page 23
... HDD parameters automatically. TYPE To set the type of the IDE device, first, please select "IDE Devices" on Main menu and press to manually enter the number of cylinders, heads, and sectors per track for the remaining fields on this sub-menu. After making your selections on this ..., make configuration of its type. Incorrect settings may cause the system to fail to recognize the installed hard disk. [Auto]: Select [Auto] to manually enter the IDE hard disk drive parameters. In these cases, select [User] to automatically detect hard disk drive. Make sure to set the partition ...
... HDD parameters automatically. TYPE To set the type of the IDE device, first, please select "IDE Devices" on Main menu and press to manually enter the number of cylinders, heads, and sectors per track for the remaining fields on this sub-menu. After making your selections on this ..., make configuration of its type. Incorrect settings may cause the system to fail to recognize the installed hard disk. [Auto]: Select [Auto] to manually enter the IDE hard disk drive parameters. In these cases, select [User] to automatically detect hard disk drive. Make sure to set the partition ...
