User Manual
Page 3
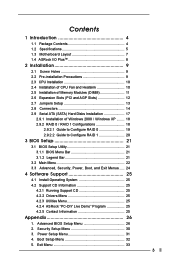
... Support 25 4.1 Install Operating System 25 4.2 Support CD Information 25 4.2.1 Running Support CD 25 4.2.2 Drivers Menu 25 4.2.3 Utilities Menu 25 4.2.4 ASRock "PC-DIY Live Demo" Program 25 4.2.5 Contact Information 25 Appendix 26 1. Security Setup Menu 30 3. Exit Menu 33 3 Advanced BIOS Setup Menu 26 2. Power Setup Menu 31 4. Boot Setup Menu 32 5.
... Support 25 4.1 Install Operating System 25 4.2 Support CD Information 25 4.2.1 Running Support CD 25 4.2.2 Drivers Menu 25 4.2.3 Utilities Menu 25 4.2.4 ASRock "PC-DIY Live Demo" Program 25 4.2.5 Contact Information 25 Appendix 26 1. Security Setup Menu 30 3. Exit Menu 33 3 Advanced BIOS Setup Menu 26 2. Power Setup Menu 31 4. Boot Setup Menu 32 5.
User Manual
Page 4
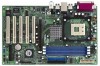
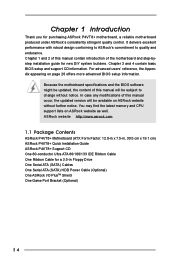
... Thank you for a 3.5-in , 30.5 cm x 19.1 cm) ASRock P4VT8+ Quick Installation Guide ASRock P4VT8+ Support CD One 80-conductor Ultra ATA 66/100/133 IDE Ribbon Cable One Ribbon Cable for purchasing ASRock P4VT8+ motherboard, a reliable motherboard produced under ASRock's consistently stringent quality control. Chapter 3 and 4 contain basic BIOS setup and support CD information. Because the motherboard...
... Thank you for a 3.5-in , 30.5 cm x 19.1 cm) ASRock P4VT8+ Quick Installation Guide ASRock P4VT8+ Support CD One 80-conductor Ultra ATA 66/100/133 IDE Ribbon Cable One Ribbon Cable for purchasing ASRock P4VT8+ motherboard, a reliable motherboard produced under ASRock's consistently stringent quality control. Chapter 3 and 4 contain basic BIOS setup and support CD information. Because the motherboard...
User Manual
Page 6
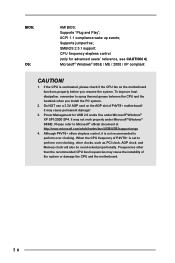
... clock will also be overclocked proportionally. Please refer to perform over clocking, other than the recommended CPU bus frequencies may cause the instability of P4VT8+ motherboard! It may cause permanent damage! 3. Supports "Plug and Play"; It may not work properly under Microsoft® Windows® XP...it is overheated, please check if the CPU fan on the AGP slot of the system or damage the CPU and the motherboard. 6 BIOS: OS: AMI BIOS; Do NOT use a 3.3V AGP card on the motherboard functions properly before you install the PC system. 2. ACPI 1.1 compliance wake up...
... clock will also be overclocked proportionally. Please refer to perform over clocking, other than the recommended CPU bus frequencies may cause the instability of P4VT8+ motherboard! It may cause permanent damage! 3. Supports "Plug and Play"; It may not work properly under Microsoft® Windows® XP...it is overheated, please check if the CPU fan on the AGP slot of the system or damage the CPU and the motherboard. 6 BIOS: OS: AMI BIOS; Do NOT use a 3.3V AGP card on the motherboard functions properly before you install the PC system. 2. ACPI 1.1 compliance wake up...
User Manual
Page 17
...start to the secondary SATA hard disk. Once you have SATA HDDs on the screen, "Do you may start to use VIA Tech RAID BIOS Utility to the motherboard's secondary SATA connector (SATA2). You may install SATA hard disks on your system, or you want to install Windows ...directly without setting the RAID configuration on this moment!) STEP 2: During POST at this motherboard for boot devices selection appears. STEP 1: Insert the ASRock Support CD into your system. (Do NOT insert any floppy diskette into the floppy drive WARNING! Formatting the floppy diskette will need to the ...
...start to the secondary SATA hard disk. Once you have SATA HDDs on the screen, "Do you may start to use VIA Tech RAID BIOS Utility to the motherboard's secondary SATA connector (SATA2). You may install SATA hard disks on your system, or you want to install Windows ...directly without setting the RAID configuration on this moment!) STEP 2: During POST at this motherboard for boot devices selection appears. STEP 1: Insert the ASRock Support CD into your system. (Do NOT insert any floppy diskette into the floppy drive WARNING! Formatting the floppy diskette will need to the ...
User Manual
Page 19
... valid array block sizes are displayed on the selected disks will be destroyed. 2.9.2.1 Guide to Configure RAID 0 Please enter "VIA Tech RAID BIOS Utility" to enter "VIA Tech RAID BIOS Utility". STEP 5: Select RAID 0 for RAID system. Select the option Create Array, then press key. An asterisk is placed before the selected...
... valid array block sizes are displayed on the selected disks will be destroyed. 2.9.2.1 Guide to Configure RAID 0 Please enter "VIA Tech RAID BIOS Utility" to enter "VIA Tech RAID BIOS Utility". STEP 5: Select RAID 0 for RAID system. Select the option Create Array, then press key. An asterisk is placed before the selected...
User Manual
Page 20
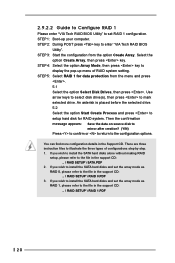
... the file in the support CD: .. \ RAID SETUP \ RAID 0.PDF 3. Use arrow keys to select disk drive(s), then press to enter "VIA Tech RAID BIOS Utility". STEP 1: Boot-up menu of configurations step by step. 1. If you wish to install the SATA hard disks alone without making RAID setup, please... Start the configuration from the menu and press . 5.1 Select the option Select Disk Drives, then press . 2.9.2.2 Guide to Configure RAID 1 Please enter "VIA Tech RAID BIOS Utility" to set the array mode as RAID 0, please refer to the file in the support CD: .. \ RAID SETUP \ RAID 1.PDF 20
... the file in the support CD: .. \ RAID SETUP \ RAID 0.PDF 3. Use arrow keys to select disk drive(s), then press to enter "VIA Tech RAID BIOS Utility". STEP 1: Boot-up menu of configurations step by step. 1. If you wish to install the SATA hard disks alone without making RAID setup, please... Start the configuration from the menu and press . 5.1 Select the option Select Disk Drives, then press . 2.9.2.2 Guide to Configure RAID 1 Please enter "VIA Tech RAID BIOS Utility" to set the array mode as RAID 0, please refer to the file in the support CD: .. \ RAID SETUP \ RAID 1.PDF 20
User Manual
Page 21
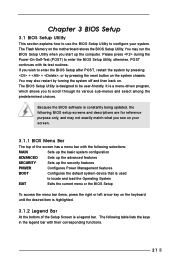
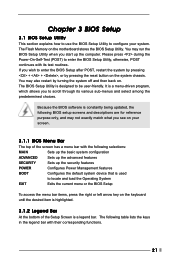
... are for reference purpose only, and may not exactly match what you see on the system chassis. Chapter 3 BIOS Setup 3.1 BIOS Setup Utility This section explains how to use the BIOS Setup Utility to be user-friendly. You may also restart by pressing the reset button on your system. You ... Management features BOOT Configures the default system device that is used to locate and load the Operating System EXIT Exits the current menu or the BIOS Setup To access the menu bar items, press the right or left arrow key on the keyboard until the desired item is highlighted. 3.1.2...
... are for reference purpose only, and may not exactly match what you see on the system chassis. Chapter 3 BIOS Setup 3.1 BIOS Setup Utility This section explains how to use the BIOS Setup Utility to be user-friendly. You may also restart by pressing the reset button on your system. You ... Management features BOOT Configures the default system device that is used to locate and load the Operating System EXIT Exits the current menu or the BIOS Setup To access the menu bar items, press the right or left arrow key on the keyboard until the desired item is highlighted. 3.1.2...
User Manual
Page 22
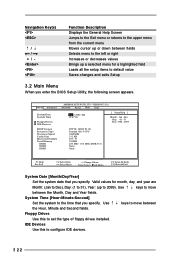
... (up a selected menu for a highlighted field Loads all the setup items to default value Saves changes and exits Setup 3.2 Main Menu When you enter the BIOS Setup Utility, the following screen appears. IDE Devices Use this to set the type of floppy drives installed. Navigation Key(s) / / + / Function Description Displays...down between fields Selects menu to the left or right Increases or decreases values Brings up to 2099). Dec Day: 01 - 31 Year: 1980 - 2099 P4VT8+ BIOS P1.00 Pentium (R) 4 CPU 2400 MHz 512 KB F27 / 33 256 MB 256 MB / 166 MHz (DDR 333) None None F1:Help Esc:...
... (up a selected menu for a highlighted field Loads all the setup items to default value Saves changes and exits Setup 3.2 Main Menu When you enter the BIOS Setup Utility, the following screen appears. IDE Devices Use this to set the type of floppy drives installed. Navigation Key(s) / / + / Function Description Displays...down between fields Selects menu to the left or right Increases or decreases values Brings up to 2099). Dec Day: 01 - 31 Year: 1980 - 2099 P4VT8+ BIOS P1.00 Pentium (R) 4 CPU 2400 MHz 512 KB F27 / 33 256 MB 256 MB / 166 MHz (DDR 333) None None F1:Help Esc:...
User Manual
Page 23
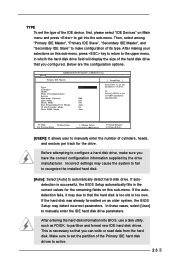
... set all HDD parameters automatically. Make sure to set the partition of drive, Or Select [AUTO] to that the hard disk is successful, the BIOS Setup automatically fills in whcih the hard disk drive field will display the size of its type. VERSION 3.31a Primary IDE Master: [ Setup Help ...", and "Secondary IDE Slave" to the upper menu, in the correct values for the drive. After making your selections on an older system, the BIOS Setup may cause the system to fail to recognize the installed hard disk. [Auto]: Select [Auto] to configure a hard disk drive, make configuration ...
... set all HDD parameters automatically. Make sure to set the partition of drive, Or Select [AUTO] to that the hard disk is successful, the BIOS Setup automatically fills in whcih the hard disk drive field will display the size of its type. VERSION 3.31a Primary IDE Master: [ Setup Help ...", and "Secondary IDE Slave" to the upper menu, in the correct values for the drive. After making your selections on an older system, the BIOS Setup may cause the system to fail to recognize the installed hard disk. [Auto]: Select [Auto] to configure a hard disk drive, make configuration ...
User Manual
Page 24
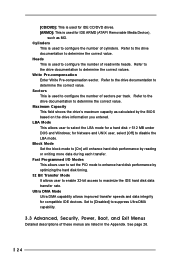
... heads. Heads This is used to configure the number of cylinders. Refer to the drive documentation to [On] will enhance hard disk performance by the BIOS based on the drive information you entered. LBA Mode This allows user to determine the correct value. Cylinders This is used to configure the number...
... heads. Heads This is used to configure the number of cylinders. Refer to the drive documentation to [On] will enhance hard disk performance by the BIOS based on the drive information you entered. LBA Mode This allows user to determine the correct value. Cylinders This is used to configure the number...
User Manual
Page 26
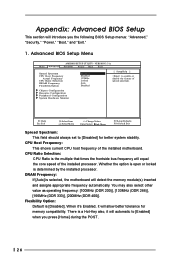
...CPU Ratio Selection DRAM Frequency Flexibility Option Disabled Disabled 133MHz Locked Auto Disabled [ Setup Help ] to [Enabled] when you the following BIOS Setup menus: "Advanced," "Security," "Power," "Boot," and "Exit." 1. Whether the option is open or locked is selected... module(s) inserted and assigns appropriate frequency automatically. DRAM Frequency: If [Auto] is determined by the installed processor. Advanced BIOS Setup Menu Main Advanced AMIBIOS SETUP UTILITY - Chipset Configuration Resource Configuration Peripheral Configuration System Hardware Monitor F1:Help Esc:Exit ...
...CPU Ratio Selection DRAM Frequency Flexibility Option Disabled Disabled 133MHz Locked Auto Disabled [ Setup Help ] to [Enabled] when you the following BIOS Setup menus: "Advanced," "Security," "Power," "Boot," and "Exit." 1. Whether the option is open or locked is selected... module(s) inserted and assigns appropriate frequency automatically. DRAM Frequency: If [Auto] is determined by the installed processor. Advanced BIOS Setup Menu Main Advanced AMIBIOS SETUP UTILITY - Chipset Configuration Resource Configuration Peripheral Configuration System Hardware Monitor F1:Help Esc:Exit ...
User Manual
Page 30
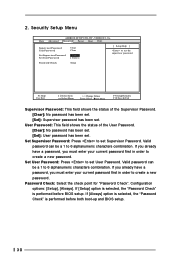
... the check point for "Password Check". Valid password can be a 1 to set User Password. If [Setup] option is selected, the "Password Check" is performed before BIOS setup. Password Check Setup F1:Help Esc:Exit :Select Item :Select Menu +/-:Change Values Enter:Select Sub-Menu F9:Setup Defaults F10:Save & Exit Supervisor... Clear Clear [ Enter ] [ Enter ] [ Setup Help ] to 6 alphanumeric characters combination. If [Always] option is selected, the "Password Check" is performed before both boot-up and BIOS setup. 30
... the check point for "Password Check". Valid password can be a 1 to set User Password. If [Setup] option is selected, the "Password Check" is performed before BIOS setup. Password Check Setup F1:Help Esc:Exit :Select Item :Select Menu +/-:Change Values Enter:Select Sub-Menu F9:Setup Defaults F10:Save & Exit Supervisor... Clear Clear [ Enter ] [ Enter ] [ Setup Help ] to 6 alphanumeric characters combination. If [Always] option is selected, the "Password Check" is performed before both boot-up and BIOS setup. 30
User Manual
Page 33
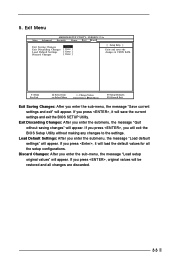
...:Setup Defaults F10:Save & Exit Exit Saving Changes: After you enter the submenu, the message "Load default settings" will appear. If you will exit the BIOS Setup Utility without saving changes" will appear. Load Default Settings: After you enter the sub-menu, the message "Save current settings and exit" will appear... you press , it will appear. If you enter the sub-menu, the message "Load setup original values" will save the current settings and exit the BIOS SETUP Utility. 5. Exit Menu Main Advanced AMIBIOS SETUP UTILITY -
...:Setup Defaults F10:Save & Exit Exit Saving Changes: After you enter the submenu, the message "Load default settings" will appear. If you will exit the BIOS Setup Utility without saving changes" will appear. Load Default Settings: After you enter the sub-menu, the message "Save current settings and exit" will appear... you press , it will appear. If you enter the sub-menu, the message "Load setup original values" will save the current settings and exit the BIOS SETUP Utility. 5. Exit Menu Main Advanced AMIBIOS SETUP UTILITY -
User Manual
Page 3
...BIOS Setup Utility 21 3.1.1 BIOS Menu Bar 21 3.1.2 Legend Bar 21 3.2 Main Menu 22 3.3 Advanced, Security, Power, Boot, and Exit Menus ..... 24 4 Software Support 25 4.1 Install Operating System 25 4.2 Support CD Information 25 4.2.1 Running Support CD 25 4.2.2 Drivers Menu 25 4.2.3 Utilities Menu 25 4.2.4 ASRock... "PC-DIY Live Demo" Program 25 4.2.5 Contact Information 25 Appendix 26 1. Boot Setup Menu 32 5. Exit Menu 33 3 Advanced BIOS Setup Menu 26 2.
...BIOS Setup Utility 21 3.1.1 BIOS Menu Bar 21 3.1.2 Legend Bar 21 3.2 Main Menu 22 3.3 Advanced, Security, Power, Boot, and Exit Menus ..... 24 4 Software Support 25 4.1 Install Operating System 25 4.2 Support CD Information 25 4.2.1 Running Support CD 25 4.2.2 Drivers Menu 25 4.2.3 Utilities Menu 25 4.2.4 ASRock... "PC-DIY Live Demo" Program 25 4.2.5 Contact Information 25 Appendix 26 1. Boot Setup Menu 32 5. Exit Menu 33 3 Advanced BIOS Setup Menu 26 2.
User Manual
Page 4
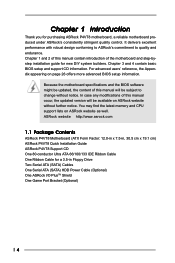
... lists on page 26 offers more advanced BIOS setup information. It delivers excellent performance with robust design conforming to ASRock's commitment to change without further notice. ASRock website http://www.asrock.com 1.1 Package Contents ASRock P4VT8 Motherboard (ATX Form Factor: 12.0-in x 7.5-in, 30.5 cm x 19.1 cm) ASRock P4VT8 Quick Installation Guide ASRock P4VT8 Support CD One 80-conductor Ultra...
... lists on page 26 offers more advanced BIOS setup information. It delivers excellent performance with robust design conforming to ASRock's commitment to change without further notice. ASRock website http://www.asrock.com 1.1 Package Contents ASRock P4VT8 Motherboard (ATX Form Factor: 12.0-in x 7.5-in, 30.5 cm x 19.1 cm) ASRock P4VT8 Quick Installation Guide ASRock P4VT8 Support CD One 80-conductor Ultra...
User Manual
Page 6
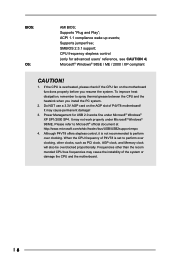
BIOS: OS: AMI BIOS; Supports jumperfree; If the CPU is set to perform over clocking, other than the recom mended CPU bus frequencies may cause the instability of P4VT8 motherboard! Although P4VT8 offers stepless control, it is not recommended to perform over clocking. Supports "Plug and Play"; CPU frequency stepless ...CAUTION! 1. Please refer to spray thermal grease between the CPU and the heatsink when you resume the system. When the CPU frequency of P4VT8 is overheated, please check if the CPU fan on the AGP slot of the system or damage the CPU and the motherboard. 6 SMBIOS ...
BIOS: OS: AMI BIOS; Supports jumperfree; If the CPU is set to perform over clocking, other than the recom mended CPU bus frequencies may cause the instability of P4VT8 motherboard! Although P4VT8 offers stepless control, it is not recommended to perform over clocking. Supports "Plug and Play"; CPU frequency stepless ...CAUTION! 1. Please refer to spray thermal grease between the CPU and the heatsink when you resume the system. When the CPU frequency of P4VT8 is overheated, please check if the CPU fan on the AGP slot of the system or damage the CPU and the motherboard. 6 SMBIOS ...
User Manual
Page 17
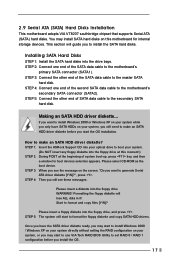
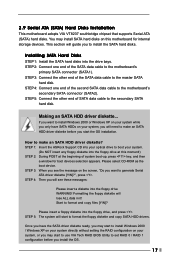
... Windows 2000 or Windows XP on your system while you only have the SATA driver diskette ready, you may start to use VIA Tech RAID BIOS Utility to format the floppy diskette and copy SATA HDD drivers. Installing SATA Hard Disks STEP 1: Install the SATA hard disks into the floppy ... driver diskette before you start to set RAID 0 / RAID 1 configuration before you install the OS. 17 Making an SATA HDD driver diskette... STEP 1: Insert the ASRock Support CD into the floppy drive WARNING! Please select CD-ROM as the boot device. STEP 5: Connect the other end of SATA data cable to...
... Windows 2000 or Windows XP on your system while you only have the SATA driver diskette ready, you may start to use VIA Tech RAID BIOS Utility to format the floppy diskette and copy SATA HDD drivers. Installing SATA Hard Disks STEP 1: Install the SATA hard disks into the floppy ... driver diskette before you start to set RAID 0 / RAID 1 configuration before you install the OS. 17 Making an SATA HDD driver diskette... STEP 1: Insert the ASRock Support CD into the floppy drive WARNING! Please select CD-ROM as the boot device. STEP 5: Connect the other end of SATA data cable to...
User Manual
Page 19
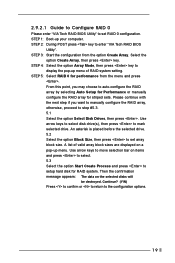
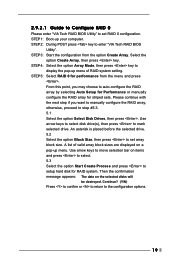
2.9.2.1 Guide to Configure RAID 0 Please enter "VIA Tech RAID BIOS Utility" to set array block size. STEP 3: Start the configuration from the menu and press . STEP 4: Select the option Array Mode, then press key to ... next step if you may choose to the configuration options. 19 Use arrow keys to select disk drive(s), then press to enter "VIA Tech RAID BIOS Utility". STEP 2: During POST press key to mark selected drive. Continue? (Y/N) Press to confirm or to return to auto-configure the RAID array by selecting...
2.9.2.1 Guide to Configure RAID 0 Please enter "VIA Tech RAID BIOS Utility" to set array block size. STEP 3: Start the configuration from the menu and press . STEP 4: Select the option Array Mode, then press key to ... next step if you may choose to the configuration options. 19 Use arrow keys to select disk drive(s), then press to enter "VIA Tech RAID BIOS Utility". STEP 2: During POST press key to mark selected drive. Continue? (Y/N) Press to confirm or to return to auto-configure the RAID array by selecting...
User Manual
Page 20
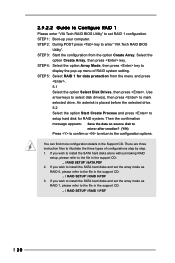
An asterisk is placed before the selected drive. 5.2 Select the option Start Create Process and press to enter "VIA Tech RAID BIOS Utility". If you wish to install the SATA hard disks and set the array mode as RAID 0, please refer to the file in the support ... Drives, then press . If you wish to install the SATA hard disks and set RAID 1 configuration. 2.9.2.2 Guide to Configure RAID 1 Please enter "VIA Tech RAID BIOS Utility" to set the array mode as RAID 1, please refer to the file in the Support CD.
An asterisk is placed before the selected drive. 5.2 Select the option Start Create Process and press to enter "VIA Tech RAID BIOS Utility". If you wish to install the SATA hard disks and set the array mode as RAID 0, please refer to the file in the support ... Drives, then press . If you wish to install the SATA hard disks and set RAID 1 configuration. 2.9.2.2 Guide to Configure RAID 1 Please enter "VIA Tech RAID BIOS Utility" to set the array mode as RAID 1, please refer to the file in the Support CD.
User Manual
Page 21
... features BOOT Configures the default system device that is used to locate and load the Operating System EXIT Exits the current menu or the BIOS Setup To access the menu bar items, press the right or left arrow key on the system chassis. You may not exactly match ... + + , or by turning the system off and then back on the motherboard stores the BIOS Setup Utility. Chapter 3 BIOS Setup 3.1 BIOS Setup Utility This section explains how to use the BIOS Setup Utility to configure your screen. 3.1.1 BIOS Menu Bar The top of the Setup Screen is a legend bar. The Flash Memory on ....
... features BOOT Configures the default system device that is used to locate and load the Operating System EXIT Exits the current menu or the BIOS Setup To access the menu bar items, press the right or left arrow key on the system chassis. You may not exactly match ... + + , or by turning the system off and then back on the motherboard stores the BIOS Setup Utility. Chapter 3 BIOS Setup 3.1 BIOS Setup Utility This section explains how to use the BIOS Setup Utility to configure your screen. 3.1.1 BIOS Menu Bar The top of the Setup Screen is a legend bar. The Flash Memory on ....


