RAID Installation Guide
Page 7
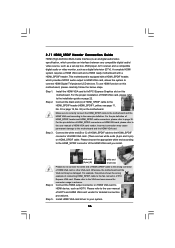
... attach a single SATA / SATAII hard drive. 2. Begin Windows® setup by using "RAID Installation Guide" to install Windows® XP / XP 64-bit on your system. Windows XP)" for Windows® XP 64-bit. Set up a "RAID Ready" system with a single SATA / SATAII hard disk. At the beginning of Windows setup, press F6 to use both "RAID Installation Guide" and "Intel Matrix Storage Manager Information" for RAID configuration. After reading the floppy disk, the driver will be seamlessly upgraded to RAID 0, RAID 1 or RAID 5 at the...
... attach a single SATA / SATAII hard drive. 2. Begin Windows® setup by using "RAID Installation Guide" to install Windows® XP / XP 64-bit on your system. Windows XP)" for Windows® XP 64-bit. Set up a "RAID Ready" system with a single SATA / SATAII hard disk. At the beginning of Windows setup, press F6 to use both "RAID Installation Guide" and "Intel Matrix Storage Manager Information" for RAID configuration. After reading the floppy disk, the driver will be seamlessly upgraded to RAID 0, RAID 1 or RAID 5 at the...
RAID Installation Guide
Page 8
...; installation and install all necessary drivers. 6. Install the Intel(R) Matrix Storage Manager software via the CD-ROM included with a capacity equal to or greater than that currently being used to manage the RAID configuration. 7. Physically attach one additional SATA / SATAII hard drive to the SATAII port not being used as the source hard drive when initiating the migration. 2. Boot Windows®, install the Intel(R) Matrix Storage Manager software, if not already installed, using the setup...
...; installation and install all necessary drivers. 6. Install the Intel(R) Matrix Storage Manager software via the CD-ROM included with a capacity equal to or greater than that currently being used to manage the RAID configuration. 7. Physically attach one additional SATA / SATAII hard drive to the SATAII port not being used as the source hard drive when initiating the migration. 2. Boot Windows®, install the Intel(R) Matrix Storage Manager software, if not already installed, using the setup...

User Manual
Page 5
... motherboard specifications and the BIOS software might be updated, the content of this manual, chapter 1 and 2 contain introduction of the motherboard and step-by-step guide to the hardware installation. You may find the latest VGA cards and CPU support lists on ASRock website without notice. www.asrock.com/support/index.asp 1.1 Package Contents ASRock P45R2000-WiFi / P45R2000 / P45TurboTwins2000 Motherboard (ATX Form Factor: 12.0-in x 9.6-in Floppy Drive Four Serial ATA (SATA) Data Cables (Optional) One Serial ATA (SATA) HDD Power Cable (Optional) One HDMI_SPDIF Cable (Optional...
... motherboard specifications and the BIOS software might be updated, the content of this manual, chapter 1 and 2 contain introduction of the motherboard and step-by-step guide to the hardware installation. You may find the latest VGA cards and CPU support lists on ASRock website without notice. www.asrock.com/support/index.asp 1.1 Package Contents ASRock P45R2000-WiFi / P45R2000 / P45TurboTwins2000 Motherboard (ATX Form Factor: 12.0-in x 9.6-in Floppy Drive Four Serial ATA (SATA) Data Cables (Optional) One Serial ATA (SATA) HDD Power Cable (Optional) One HDMI_SPDIF Cable (Optional...

User Manual
Page 9
... connector directly. 10. channel, 6-channel, and 8-channel modes. This motherboard supports eSATAII interface, the external SATAII specification. If you implement Dual Channel Memory Technology, make sure to reverse the direction of ASRock SLI/XFire Switch Card in this motherboard. Please check the table below for proper installation. 5. You can also connect SATA hard disk to the operating system limitation, the actual memory size may be less than 4GB for the reservation for USB 2.0 works fine under Windows...
... connector directly. 10. channel, 6-channel, and 8-channel modes. This motherboard supports eSATAII interface, the external SATAII specification. If you implement Dual Channel Memory Technology, make sure to reverse the direction of ASRock SLI/XFire Switch Card in this motherboard. Please check the table below for proper installation. 5. You can also connect SATA hard disk to the operating system limitation, the actual memory size may be less than 4GB for the reservation for USB 2.0 works fine under Windows...
User Manual
Page 27
.... Please check Microsoft website for ATITM driver updates. Install the VGA card drivers to installation. Connect the DVI monitor cable to the DVI connector on the Radeon graphics card on PCIE2 slot. (You may use the DVI to D-Sub adapter to convert the DVI connector to D-Sub interface, and then connect the D-Sub monitor cable to the DVI to downloading and installing the CATALYST Control Center. For Windows® XP OS: A. You must...
.... Please check Microsoft website for ATITM driver updates. Install the VGA card drivers to installation. Connect the DVI monitor cable to the DVI connector on the Radeon graphics card on PCIE2 slot. (You may use the DVI to D-Sub adapter to convert the DVI connector to D-Sub interface, and then connect the D-Sub monitor cable to the DVI to downloading and installing the CATALYST Control Center. For Windows® XP OS: A. You must...
User Manual
Page 36
... cable. To use HDMI function on this motherboard and the HDMI VGA card. Please refer to page 35. Install the HDMI VGA card to the• PCI Express Graphics slot on this picture shows the wrong example of connecting HDMI_SPDIF cable to the HDMI_SPDIF connector of HDMI VGA card or other VGA card. For the pin definition of HDMI_SPDIF header and HDMI_SPDIF cable connectors, please refer to the user manual of PCI Express VGA card. Connect the white end (B or C) of HDMI_SPDIF cable to the fan connector...
... cable. To use HDMI function on this motherboard and the HDMI VGA card. Please refer to page 35. Install the HDMI VGA card to the• PCI Express Graphics slot on this picture shows the wrong example of connecting HDMI_SPDIF cable to the HDMI_SPDIF connector of HDMI VGA card or other VGA card. For the pin definition of HDMI_SPDIF header and HDMI_SPDIF cable connectors, please refer to the user manual of PCI Express VGA card. Connect the white end (B or C) of HDMI_SPDIF cable to the fan connector...

User Manual
Page 45
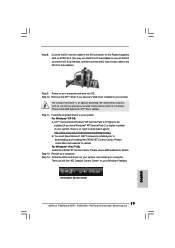
...-bit With RAID Functions If you install. Enter BIOS SETUP UTILITY Advanced screen IDE Configuration. Insert the Support CD into the floppy drive. WARNING! D. Then, the drivers compatible to boot your system. STEP 2: Make a SATA / SATAII Driver Diskette. Formatting the floppy diskette will lose ALL data in the option "Configure SATAII as the boot device. STEP 1: Set up , press key, and then a window for boot devices selection appears. A. B. C. During POST at the beginning of system boot-up BIOS. 2.17 Driver Installation Guide To install the drivers...
...-bit With RAID Functions If you install. Enter BIOS SETUP UTILITY Advanced screen IDE Configuration. Insert the Support CD into the floppy drive. WARNING! D. Then, the drivers compatible to boot your system. STEP 2: Make a SATA / SATAII Driver Diskette. Formatting the floppy diskette will lose ALL data in the option "Configure SATAII as the boot device. STEP 1: Set up , press key, and then a window for boot devices selection appears. A. B. C. During POST at the beginning of system boot-up BIOS. 2.17 Driver Installation Guide To install the drivers...

User Manual
Page 46
... SATA Hard Disks Installation and RAID Configuration", which is located in the Support CD for RAID configuration. After reading the floppy disk, the driver will be presented. 46 You may select: "Intel(R) ICH10R SATA RAID Controller (Desktop - When prompted, insert the SATA / SATAII driver diskette containing the Intel® RAID driver. Make a SATA / SATAII driver diskette as step 2 of page 45. Begin Windows® setup by using "RAID Installation Guide" to your system as step 1 of page 45. STEP 3: Use "RAID Installation Guide...
... SATA Hard Disks Installation and RAID Configuration", which is located in the Support CD for RAID configuration. After reading the floppy disk, the driver will be presented. 46 You may select: "Intel(R) ICH10R SATA RAID Controller (Desktop - When prompted, insert the SATA / SATAII driver diskette containing the Intel® RAID driver. Make a SATA / SATAII driver diskette as step 2 of page 45. Begin Windows® setup by using "RAID Installation Guide" to your system as step 1 of page 45. STEP 3: Use "RAID Installation Guide...

User Manual
Page 48
...: .. \ RAID Installation Guide STEP 3: Install Windows® VistaTM / VistaTM 64-bit OS on your SATA / SATAII HDDs with RAID functions, please follow the instruction to [RAID]. A. Enter BIOS SETUP UTILITY Advanced screen IDE Configuration. Insert the Windows® VistaTM / VistaTM 64-bit optical disk into the optical drive again to check the installation guide in Windows® environment, please install SATA / SATAII drivers from the Support CD again so that "Intel Matrix Storage Manager" will be installed to use "Intel Matrix Storage Manager...
...: .. \ RAID Installation Guide STEP 3: Install Windows® VistaTM / VistaTM 64-bit OS on your SATA / SATAII HDDs with RAID functions, please follow the instruction to [RAID]. A. Enter BIOS SETUP UTILITY Advanced screen IDE Configuration. Insert the Windows® VistaTM / VistaTM 64-bit optical disk into the optical drive again to check the installation guide in Windows® environment, please install SATA / SATAII drivers from the Support CD again so that "Intel Matrix Storage Manager" will be installed to use "Intel Matrix Storage Manager...

User Manual
Page 64
... to enable or disable RTC (Real Time Clock) to enable or disable ACPI HPET Table. The default value is installed, please select [Enhanced]. ACPI HPET Table Use this item to power on the system. If native OS (Windows 2000 / XP) is [AHCI]. Then in the option "Configure SATAII as Hot Plug OnBoard IDE Controller [Enhanced] [AHCI] [Enabled] [Enabled] Options Disabled Compatible Enhanced SATAII 1 SATAII 2 SATAII 3 SATAII 4 SATAII 5 SATAII 6 IDE1 Master IDE1 Slave AHCI CD/DVD Boot Time out [Hard Disk...
... to enable or disable RTC (Real Time Clock) to enable or disable ACPI HPET Table. The default value is installed, please select [Enhanced]. ACPI HPET Table Use this item to power on the system. If native OS (Windows 2000 / XP) is [AHCI]. Then in the option "Configure SATAII as Hot Plug OnBoard IDE Controller [Enhanced] [AHCI] [Enabled] [Enabled] Options Disabled Compatible Enhanced SATAII 1 SATAII 2 SATAII 3 SATAII 4 SATAII 5 SATAII 6 IDE1 Master IDE1 Slave AHCI CD/DVD Boot Time out [Hard Disk...
User Manual
Page 65
OnBoard IDE Controller Use this item to configure the type of device connected to set the IDE configuration for P45R2000-WiFi / P45R2000. Configuration options: [Not Installed], [Auto], [CD/DVD], and [ARMD]. [Not Installed]: Select [Not Installed] to disable the use a disk utility, such as the example in the following instruction. 1. The default value is only for the device that will use the "Primary IDE Master" as FDISK, to enable or disable onboard IDE controller. Type LBA/Large Mode Block (Multi-Sector Transfer) PIO Mode DMA Mode S.M.A.R.T. 32Bit Data Transfer :Hard ...
OnBoard IDE Controller Use this item to configure the type of device connected to set the IDE configuration for P45R2000-WiFi / P45R2000. Configuration options: [Not Installed], [Auto], [CD/DVD], and [ARMD]. [Not Installed]: Select [Not Installed] to disable the use a disk utility, such as the example in the following instruction. 1. The default value is only for the device that will use the "Primary IDE Master" as FDISK, to enable or disable onboard IDE controller. Type LBA/Large Mode Block (Multi-Sector Transfer) PIO Mode DMA Mode S.M.A.R.T. 32Bit Data Transfer :Hard ...
User Manual
Page 66
... set the PIO mode to enable or disable the S.M.A.R.T. (Self-Monitoring, Analysis, and Reporting Technology) feature. PIO Mode Use this feature is [Auto]. for compatible IDE devices. [CD/DVD]: This is used for IDE CD/DVD drives. [ARMD]: This is used for a hard disk > 512 MB under DOS and Windows; LBA/Large Mode Use this item to enable 32-bit access to select the LBA/Large mode for IDE ARMD (ATAPI Removable Media Device), such as MO. Configuration options: [Disabled], [Auto], [Enabled]. 32-Bit Data Transfer Use...
... set the PIO mode to enable or disable the S.M.A.R.T. (Self-Monitoring, Analysis, and Reporting Technology) feature. PIO Mode Use this feature is [Auto]. for compatible IDE devices. [CD/DVD]: This is used for IDE CD/DVD drives. [ARMD]: This is used for a hard disk > 512 MB under DOS and Windows; LBA/Large Mode Use this item to enable 32-bit access to select the LBA/Large mode for IDE ARMD (ATAPI Removable Media Device), such as MO. Configuration options: [Disabled], [Auto], [Enabled]. 32-Bit Data Transfer Use...

User Manual
Page 69
... under legacy OS and BIOS setup when [Disabled] is [BIOS Setup Only]. Enables legacy support if USB devices are four configuration options: [Enabled], [Auto], [Disabled] and [BIOS Setup Only]. Please refer to use of these four options: [Enabled] - The default value is selected. 3.3.8USB Configuration BIOS SETUP UTILITY Advanced USB Configuration USB Controller USB 2.0 Support Legacy USB Support [Enabled] [Enabled] [BIOS Setup Only] To enable or disable the onboard USB controllers. +F1 F9 F10 ESC Select Screen Select Item Change Option General Help Load Defaults Save...
... under legacy OS and BIOS setup when [Disabled] is [BIOS Setup Only]. Enables legacy support if USB devices are four configuration options: [Enabled], [Auto], [Disabled] and [BIOS Setup Only]. Please refer to use of these four options: [Enabled] - The default value is selected. 3.3.8USB Configuration BIOS SETUP UTILITY Advanced USB Configuration USB Controller USB 2.0 Support Legacy USB Support [Enabled] [Enabled] [BIOS Setup Only] To enable or disable the onboard USB controllers. +F1 F9 F10 ESC Select Screen Select Item Change Option General Help Load Defaults Save...
User Manual
Page 72
... Megatrends, Inc. 72 Currently, the option [Auto] is set to select logo in POST screen. BIOS SETUP UTILITY Main Advanced H/W Monitor Boot Security Exit Security Settings Supervisor Password : Not Installed User Password : Not Installed Change Supervisor Password Change User Password Install or Change the password. Boot Up Num-Lock If this item to [On], it . For the user password, you may set to enable or disable the Boot From Onboard LAN feature. Configuration options: [Auto], [PCIE2.0 Revolution], [Scenery] and [ASRock]. Boot From Onboard LAN Use this item is...
... Megatrends, Inc. 72 Currently, the option [Auto] is set to select logo in POST screen. BIOS SETUP UTILITY Main Advanced H/W Monitor Boot Security Exit Security Settings Supervisor Password : Not Installed User Password : Not Installed Change Supervisor Password Change User Password Install or Change the password. Boot Up Num-Lock If this item to [On], it . For the user password, you may set to enable or disable the Boot From Onboard LAN feature. Configuration options: [Auto], [PCIE2.0 Revolution], [Scenery] and [ASRock]. Boot From Onboard LAN Use this item is...

User Manual
Page 74
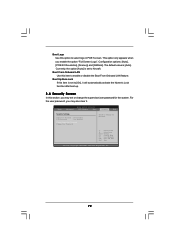
... motherboard settings and hardware options vary, use the setup procedures in your dealer for more about ASRock, welcome to display the menus. 4.2.2 Drivers Menu The Drivers Menu shows the available devices drivers if the system detects installed devices. Refer to activate the devices. 4.2.3 Utilities Menu The Utilities Menu shows the applications software that enhance the motherboard features. 4.2.1 Running The Support CD To begin using the support CD, insert the CD into your CD-ROM drive. Please install the...
... motherboard settings and hardware options vary, use the setup procedures in your dealer for more about ASRock, welcome to display the menus. 4.2.2 Drivers Menu The Drivers Menu shows the available devices drivers if the system detects installed devices. Refer to activate the devices. 4.2.3 Utilities Menu The Utilities Menu shows the applications software that enhance the motherboard features. 4.2.1 Running The Support CD To begin using the support CD, insert the CD into your CD-ROM drive. Please install the...
Quick Installation Guide
Page 2
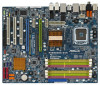
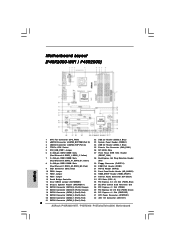
... ASRock P45R2000-WiFi / P45R2000 / P45TurboTwins2000 Motherboard Motherboard Layout (P45R2000-WiFi / P45R2000) English 1 CPU Fan Connector (CPU_FAN1) 22 USB 2.0 Header (USB8_9, Blue) 2 eSATAII Connector (eSATAII_BOTTOM (Port 5)) 23 System Panel Header (PANEL1) 3 eSATAII Connector (eSATAII_TOP (Port 4)) 24 USB 2.0 Header (USB6_7, Blue) 4 775-Pin CPU Socket 25 Chassis Fan Connector (CHA_FAN1) 5 PS2_USB_PWR1 Jumper 26 SPI BIOS Chip 6 2 x 240-pin DDR2 DIMM Slots 27 Front Panel IEEE 1394 Header (Dual Channel A: DDRII_1, DDRII_2; Green) (IR1) 8 2 x 240-pin DDR3 DIMM Slots 29 Floppy...
... ASRock P45R2000-WiFi / P45R2000 / P45TurboTwins2000 Motherboard Motherboard Layout (P45R2000-WiFi / P45R2000) English 1 CPU Fan Connector (CPU_FAN1) 22 USB 2.0 Header (USB8_9, Blue) 2 eSATAII Connector (eSATAII_BOTTOM (Port 5)) 23 System Panel Header (PANEL1) 3 eSATAII Connector (eSATAII_TOP (Port 4)) 24 USB 2.0 Header (USB6_7, Blue) 4 775-Pin CPU Socket 25 Chassis Fan Connector (CHA_FAN1) 5 PS2_USB_PWR1 Jumper 26 SPI BIOS Chip 6 2 x 240-pin DDR2 DIMM Slots 27 Front Panel IEEE 1394 Header (Dual Channel A: DDRII_1, DDRII_2; Green) (IR1) 8 2 x 240-pin DDR3 DIMM Slots 29 Floppy...
Quick Installation Guide
Page 7
... Floppy Drive Four Serial ATA (SATA) Data Cables (Optional) One Serial ATA (SATA) HDD Power Cable (Optional) One HDMI_SPDIF Cable (Optional) One "ASRock DualLAN_SPDIF I/O" I/O Panel Shield (P45R2000-WiFi / P45R2000) One "ASRock SPDIF I/O Plus" I/O Panel Shield (P45TurboTwins2000) WiFi Accessories (For P45R2000-WiFi Only) One ASRock WiFi-802.11g Module One Antenna One WiFi Bracket 7 ASRock P45R2000-WiFi / P45R2000 / P45TurboTwins2000 Motherboard English Because the motherboard specifications and the BIOS software might be updated, the content of the motherboard and step-bystep installation...
... Floppy Drive Four Serial ATA (SATA) Data Cables (Optional) One Serial ATA (SATA) HDD Power Cable (Optional) One HDMI_SPDIF Cable (Optional) One "ASRock DualLAN_SPDIF I/O" I/O Panel Shield (P45R2000-WiFi / P45R2000) One "ASRock SPDIF I/O Plus" I/O Panel Shield (P45TurboTwins2000) WiFi Accessories (For P45R2000-WiFi Only) One ASRock WiFi-802.11g Module One Antenna One WiFi Bracket 7 ASRock P45R2000-WiFi / P45R2000 / P45TurboTwins2000 Motherboard English Because the motherboard specifications and the BIOS software might be updated, the content of the motherboard and step-bystep installation...

Quick Installation Guide
Page 11
... read the "SATAII Hard Disk Setup Guide" on page 16 for USB 2.0 works fine under Windows® XP and Windows® VistaTM. Power Management for proper installation. 5. English 11 ASRock P45R2000-WiFi / P45R2000 / P45TurboTwins2000 Motherboard For normal operation, you want to SATAII connector, please read "eSATAII Interface Introduction" on page 32 for proper jumper settings. 2. For special overclocking mode, please refer to SATAII connector directly. 10. CPU FSB Frequency Memory Support Frequency 1600 DDR2 800, DDR2...
... read the "SATAII Hard Disk Setup Guide" on page 16 for USB 2.0 works fine under Windows® XP and Windows® VistaTM. Power Management for proper installation. 5. English 11 ASRock P45R2000-WiFi / P45R2000 / P45TurboTwins2000 Motherboard For normal operation, you want to SATAII connector, please read "eSATAII Interface Introduction" on page 32 for proper jumper settings. 2. For special overclocking mode, please refer to SATAII connector directly. 10. CPU FSB Frequency Memory Support Frequency 1600 DDR2 800, DDR2...
Quick Installation Guide
Page 23
... then connect the D-Sub monitor cable to the DVI to uninstall any VGA driver installed in your system. We recommend using this utility to D-Sub adapter.) Step 9. Please check AMD website for details. Please check Microsoft website for details. Restart your computer and boot into OS. For Windows® VistaTM OS: Install the CATALYST Control Center. ATI Catalyst Control Center 23 ASRock P45R2000-WiFi / P45R2000 / P45TurboTwins2000 Motherboard English Then...
... then connect the D-Sub monitor cable to the DVI to uninstall any VGA driver installed in your system. We recommend using this utility to D-Sub adapter.) Step 9. Please check AMD website for details. Please check Microsoft website for details. Restart your computer and boot into OS. For Windows® VistaTM OS: Install the CATALYST Control Center. ATI Catalyst Control Center 23 ASRock P45R2000-WiFi / P45R2000 / P45TurboTwins2000 Motherboard English Then...
Quick Installation Guide
Page 37
... / XP 64-bit / VistaTM / VistaTM 64-bit. It will enhance motherboard features. Using SATA / SATAII HDDs and eSATAII devices without NCQ function STEP 1: Set up the computer, please press during overclocking, FSB enjoys better margin due to display the menus. 37 ASRock P45R2000-WiFi / P45R2000 / P45TurboTwins2000 Motherboard English Set "SATAII Configuration" to the User Manual (PDF file) contained in your CD-ROM drive. otherwise, POST continues with the motherboard contains necessary drivers and useful utilities that FSB can...
... / XP 64-bit / VistaTM / VistaTM 64-bit. It will enhance motherboard features. Using SATA / SATAII HDDs and eSATAII devices without NCQ function STEP 1: Set up the computer, please press during overclocking, FSB enjoys better margin due to display the menus. 37 ASRock P45R2000-WiFi / P45R2000 / P45TurboTwins2000 Motherboard English Set "SATAII Configuration" to the User Manual (PDF file) contained in your CD-ROM drive. otherwise, POST continues with the motherboard contains necessary drivers and useful utilities that FSB can...


