User Manual
Page 3
... Plug and Hot Swap Functions for SATA / SATAII HDDs and eSATAII Devices 39 2.16 SATA / SATAII HDD Hot Plug Feature and Operation Guide 40 2.17 Driver Installation Guide 42 2.18 Installing Windows® 2000 / XP / XP 64-bit / VistaTM / VistaTM 64-bit Without RAID Functions 42 2.18.1 Installing Windows® 2000...
... Plug and Hot Swap Functions for SATA / SATAII HDDs and eSATAII Devices 39 2.16 SATA / SATAII HDD Hot Plug Feature and Operation Guide 40 2.17 Driver Installation Guide 42 2.18 Installing Windows® 2000 / XP / XP 64-bit / VistaTM / VistaTM 64-bit Without RAID Functions 42 2.18.1 Installing Windows® 2000...

User Manual
Page 4
... 3.6.1 Boot Settings Configuration 61 3.7 Security Screen 62 3.8 Exit Screen 63 4 Software Support 64 4.1 Install Operating System 64 4.2 Support CD Information 64 4.2.1 Running Support CD 64 4.2.2 Drivers Menu 64 4.2.3 Utilities Menu 64 4.2.4 Contact Information 64 4
... 3.6.1 Boot Settings Configuration 61 3.7 Security Screen 62 3.8 Exit Screen 63 4 Software Support 64 4.1 Install Operating System 64 4.2 Support CD Information 64 4.2.1 Running Support CD 64 4.2.2 Drivers Menu 64 4.2.3 Utilities Menu 64 4.2.4 Contact Information 64 4
User Manual
Page 7
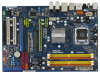
... panel audio connector - 2 x USB 2.0 headers (support 4 USB 2.0 ports) (see CAUTION 9) - 1 x USB/WiFi header (see CAUTION 14) - ASRock U-COP (see CAUTION 10) - 8Mb AMI BIOS - CPU Quiet Fan - CPU, DRAM, NB, VTT Voltage Multi-adjustment - CPU/Chassis FAN connector - 24...8 pin 12V power connector - Drivers, Utilities, AntiVirus Software (Trial Version) - Chassis Fan Tachometer - CPU Temperature Sensing - Chassis Temperature Sensing - SLI/XFIRE power connector - AMI Legal BIOS - Supports "Plug and Play" - ACPI 1.1 Compliance Wake Up Events - ASRock OC Tuner (see CAUTION 13) ...
... panel audio connector - 2 x USB 2.0 headers (support 4 USB 2.0 ports) (see CAUTION 9) - 1 x USB/WiFi header (see CAUTION 14) - ASRock U-COP (see CAUTION 10) - 8Mb AMI BIOS - CPU Quiet Fan - CPU, DRAM, NB, VTT Voltage Multi-adjustment - CPU/Chassis FAN connector - 24...8 pin 12V power connector - Drivers, Utilities, AntiVirus Software (Trial Version) - Chassis Fan Tachometer - CPU Temperature Sensing - Chassis Temperature Sensing - SLI/XFIRE power connector - AMI Legal BIOS - Supports "Plug and Play" - ACPI 1.1 Compliance Wake Up Events - ASRock OC Tuner (see CAUTION 13) ...
User Manual
Page 21
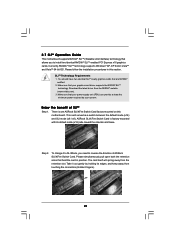
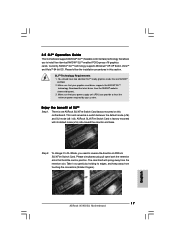
... motherboard. Enjoy the benefit of ASRock SLI/XFire Switch Card. Make sure that your system. ASRock SLI/XFire Switch Card is one ASRock SLI/XFire Switch Card factory-mounted on this section. To change it out gently by your graphics card driver supports the NVIDIA® SLITM technology.... Download the latest driver from the retention slot. There...
... motherboard. Enjoy the benefit of ASRock SLI/XFire Switch Card. Make sure that your system. ASRock SLI/XFire Switch Card is one ASRock SLI/XFire Switch Card factory-mounted on this section. To change it out gently by your graphics card driver supports the NVIDIA® SLITM technology.... Download the latest driver from the retention slot. There...
User Manual
Page 23
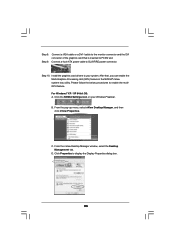
Step 8. Install the graphics card drivers to enable the multiGPU feature. Step 10. After that is inserted to PCIE2 slot. Please follow the below procedures to your Windows® taskbar. From ... tab. Connect a 4-pin ATX power cable to display the Display Properties dialog box. 23 For Windows® XP / XP 64-bit OS: A. Click Properties to SLI/XFIRE power connector. From the pop-up menu, select nView Desktop Manager, and then click nView Properties. D. Step 9. Connect a VGA cable or a DVI-I cable to...
Step 8. Install the graphics card drivers to enable the multiGPU feature. Step 10. After that is inserted to PCIE2 slot. Please follow the below procedures to your Windows® taskbar. From ... tab. Connect a 4-pin ATX power cable to display the Display Properties dialog box. 23 For Windows® XP / XP 64-bit OS: A. Click Properties to SLI/XFIRE power connector. From the pop-up menu, select nView Desktop Manager, and then click nView Properties. D. Step 9. Connect a VGA cable or a DVI-I cable to...
User Manual
Page 33
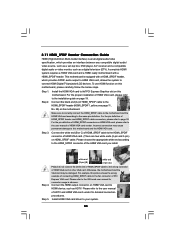
... HDMI VGA card according to your system. 33 Step 3. Please refer to the• PCI Express Graphics slot on page 19. Install HDMI VGA card driver to the same pin definition. Incorrect connection may be damaged. Please choose the appropriate white end according to the fan connector of the HDMI VGA...
... HDMI VGA card according to your system. 33 Step 3. Please refer to the• PCI Express Graphics slot on page 19. Install HDMI VGA card driver to the same pin definition. Incorrect connection may be damaged. Please choose the appropriate white end according to the fan connector of the HDMI VGA...

User Manual
Page 40
... IDE 1x4-pin conventional power connector interface is designed only for SATA / SATAII HDD in the product spec on our support website: www.asrock.com 4. The latest SATA / SATAII driver is installed into system properly. 2.16 SATA / SATAII HDD Hot Plug Feature and Operation Guide This motherboard supports Hot Plug feature for... Caution 1. Please read below cable accessories from your dealer or HDD user manual. Before you process the Hot Plug: 1. Please make sure the SATA / SATAII driver is available on our website: www.asrock.com 2.
... IDE 1x4-pin conventional power connector interface is designed only for SATA / SATAII HDD in the product spec on our support website: www.asrock.com 4. The latest SATA / SATAII driver is installed into system properly. 2.16 SATA / SATAII HDD Hot Plug Feature and Operation Guide This motherboard supports Hot Plug feature for... Caution 1. Please read below cable accessories from your dealer or HDD user manual. Before you process the Hot Plug: 1. Please make sure the SATA / SATAII driver is available on our website: www.asrock.com 2.

User Manual
Page 42
... to your SATA / SATAII HDDs without RAID functions, please follow below steps. Insert the ASRock Support CD into the floppy drive. C. Generate RAID Driver diskette for WindowsXP64 4. When you install. Generate RAID Driver diskette for WindowsXP 3. Then, the drivers compatible to your SATA / SATAII HDDs without RAID functions, please follow below procedures according to...
... to your SATA / SATAII HDDs without RAID functions, please follow below steps. Insert the ASRock Support CD into the floppy drive. C. Generate RAID Driver diskette for WindowsXP64 4. When you install. Generate RAID Driver diskette for WindowsXP 3. Then, the drivers compatible to your SATA / SATAII HDDs without RAID functions, please follow below procedures according to...

User Manual
Page 43
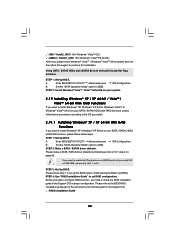
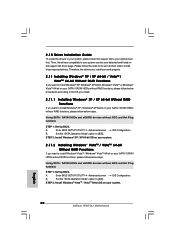
...® XP in AHCI mode. A. STEP 2: Install Windows® XP / XP 64-bit OS on the bottom to install Windows? " page, please insert the ASRock Support CD into your SATA / SATAII HDDs without NCQ and Hot Plug functions STEP 1: Set Up BIOS. At the beginning of Windows® setup, press...install according to the OS you want to install Windows® VistaTM / Windows® VistaTM 64-bit on your optical drive, and click the "Load Driver" button on the left on your system. 2.18.2 Installing Windows® VistaTM / VistaTM 64-bit Without RAID Functions If you want to load the NVIDIA...
...® XP in AHCI mode. A. STEP 2: Install Windows® XP / XP 64-bit OS on the bottom to install Windows? " page, please insert the ASRock Support CD into your SATA / SATAII HDDs without NCQ and Hot Plug functions STEP 1: Set Up BIOS. At the beginning of Windows® setup, press...install according to the OS you want to install Windows® VistaTM / Windows® VistaTM 64-bit on your optical drive, and click the "Load Driver" button on the left on your system. 2.18.2 Installing Windows® VistaTM / VistaTM 64-bit Without RAID Functions If you want to load the NVIDIA...
User Manual
Page 44
... 1 to set up the BIOS option "SATA Operation Mode" to set RAID configuration. A. B. STEP 1: Set Up BIOS. STEP 2: Make a SATA / SATAII driver diskette. STEP 2: Install Windows® VistaTM / VistaTM 64-bit OS on your system. 2.19 Installing Windows® XP / XP 64-bit / VistaTM / VistaTM... Set the "SATA Operation Mode" option to check the RAID installation guide in the Support CD for proper configuration. Please make a SATA / SATAII driver diskette by following path in the following section 2.18.1 step 2 on IDE HDD, please skip step 1 and 2. STEP 3: Set Up BIOS....
... 1 to set up the BIOS option "SATA Operation Mode" to set RAID configuration. A. B. STEP 1: Set Up BIOS. STEP 2: Make a SATA / SATAII driver diskette. STEP 2: Install Windows® VistaTM / VistaTM 64-bit OS on your system. 2.19 Installing Windows® XP / XP 64-bit / VistaTM / VistaTM... Set the "SATA Operation Mode" option to check the RAID installation guide in the Support CD for proper configuration. Please make a SATA / SATAII driver diskette by following path in the following section 2.18.1 step 2 on IDE HDD, please skip step 1 and 2. STEP 3: Set Up BIOS....
User Manual
Page 45
... / Windows® VistaTM 64-bit optical disk into the optical drive to boot your system, and follow below : A. A. B. " page, please insert the ASRock Support CD into the optical drive again to install Windows? If you install Windows® XP / Windows® XP 64-bit on IDE HDDs and...Windows® VistaTM / VistaTM 64-bit With RAID Functions If you have to set up "SATA Operation Mode" to load the NVIDIA® RAID drivers. The drivers are in the following path in the Support CD: .. \ RAID Installation Guide STEP 3: Install Windows® VistaTM / VistaTM 64-bit OS on ...
... / Windows® VistaTM 64-bit optical disk into the optical drive to boot your system, and follow below : A. A. B. " page, please insert the ASRock Support CD into the optical drive again to install Windows? If you install Windows® XP / Windows® XP 64-bit on IDE HDDs and...Windows® VistaTM / VistaTM 64-bit With RAID Functions If you have to set up "SATA Operation Mode" to load the NVIDIA® RAID drivers. The drivers are in the following path in the Support CD: .. \ RAID Installation Guide STEP 3: Install Windows® VistaTM / VistaTM 64-bit OS on ...
User Manual
Page 64
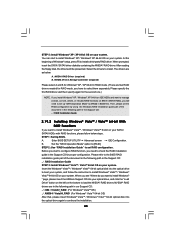
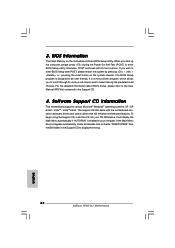
..., locate and double click on a specific item then follow the installation wizard to visit ASRock's website at http://www.asrock.com; or you need to contact ASRock or want to your computer. Because motherboard settings and hardware options vary, use the setup... Support CD Information The Support CD that came with the motherboard contains necessary drivers and useful utilities that the motherboard supports. Please install the necessary drivers to display the menus. 4.2.2 Drivers Menu The Drivers Menu shows the available devices drivers if the system detects installed devices.
..., locate and double click on a specific item then follow the installation wizard to visit ASRock's website at http://www.asrock.com; or you need to contact ASRock or want to your computer. Because motherboard settings and hardware options vary, use the setup... Support CD Information The Support CD that came with the motherboard contains necessary drivers and useful utilities that the motherboard supports. Please install the necessary drivers to display the menus. 4.2.2 Drivers Menu The Drivers Menu shows the available devices drivers if the system detects installed devices.

Quick Installation Guide
Page 6
... ports) (see CAUTION 9) - 1 x USB/WiFi header (see CAUTION 12) - Drivers, Utilities, AntiVirus Software (Trial Version) - Instant Boot - Voltage Monitoring: +12V, +5V, +3.3V, CPU Vcore ASRock N7AD-SLI Motherboard SLI/XFIRE power connector - Chassis Temperature Sensing - Chassis Fan Tachometer - CPU Quiet Fan - ... connector - AMBIOS 2.3.1 Support - Hybrid Booster: - ACPI 1.1 Compliance Wake Up Events - ASRock OC Tuner (see CAUTION 14) - AMI Legal BIOS - Supports "Plug and Play" - ASRock U-COP (see CAUTION 11) - CD in header - Supports Smart BIOS - Boot Failure ...
... ports) (see CAUTION 9) - 1 x USB/WiFi header (see CAUTION 12) - Drivers, Utilities, AntiVirus Software (Trial Version) - Instant Boot - Voltage Monitoring: +12V, +5V, +3.3V, CPU Vcore ASRock N7AD-SLI Motherboard SLI/XFIRE power connector - Chassis Temperature Sensing - Chassis Fan Tachometer - CPU Quiet Fan - ... connector - AMBIOS 2.3.1 Support - Hybrid Booster: - ACPI 1.1 Compliance Wake Up Events - ASRock OC Tuner (see CAUTION 14) - AMI Legal BIOS - Supports "Plug and Play" - ASRock U-COP (see CAUTION 11) - CD in header - Supports Smart BIOS - Boot Failure ...
Quick Installation Guide
Page 17
... SLITM-ready graphics cards that hold the card in this motherboard. Enjoy the benefit of ASRock SLI/XFire Switch Card. English 17 ASRock N7AD-SLI Motherboard The card itself will spring away from the NVIDIA® website (www.nvidia.com...). 3. Make sure that allows you need to install two identical NVIDIA® SLITM enabled PCI Express x16 graphics cards. To change it out gently by your system. SLITM Technology Requirements 1. Download the latest driver...
... SLITM-ready graphics cards that hold the card in this motherboard. Enjoy the benefit of ASRock SLI/XFire Switch Card. English 17 ASRock N7AD-SLI Motherboard The card itself will spring away from the NVIDIA® website (www.nvidia.com...). 3. Make sure that allows you need to install two identical NVIDIA® SLITM enabled PCI Express x16 graphics cards. To change it out gently by your system. SLITM Technology Requirements 1. Download the latest driver...

Quick Installation Guide
Page 19
... tray utility. Step 10. Install the graphics card drivers to PCIE2 slot. After that is inserted to your Windows® taskbar. Click the NVIDIA Settings icon on your system. From the nView Desktop Manager window, select the Desktop Management tab. English 19 ASRock N7AD-SLI Motherboard Please follow the below procedures to display the...
... tray utility. Step 10. Install the graphics card drivers to PCIE2 slot. After that is inserted to your Windows® taskbar. Click the NVIDIA Settings icon on your system. From the nView Desktop Manager window, select the Desktop Management tab. English 19 ASRock N7AD-SLI Motherboard Please follow the below procedures to display the...
Quick Installation Guide
Page 30
... Operation Mode" option to install Windows® VistaTM / Windows® VistaTM 64-bit on your optical drive first. English 30 ASRock N7AD-SLI Motherboard Therefore, the drivers you install can be auto-detected and listed on your SATA / SATAII HDDs without NCQ and Hot Plug functions STEP 1: Set Up...Install Windows® XP / XP 64-bit OS on your SATA / SATAII HDDs without RAID functions, please follow below steps. Then, the drivers compatible to install Windows® XP / Windows® XP 64-bit on your system. Please follow below procedures according to the OS you...
... Operation Mode" option to install Windows® VistaTM / Windows® VistaTM 64-bit on your optical drive first. English 30 ASRock N7AD-SLI Motherboard Therefore, the drivers you install can be auto-detected and listed on your SATA / SATAII HDDs without NCQ and Hot Plug functions STEP 1: Set Up...Install Windows® XP / XP 64-bit OS on your SATA / SATAII HDDs without RAID functions, please follow below steps. Then, the drivers compatible to install Windows® XP / Windows® XP 64-bit on your system. Please follow below procedures according to the OS you...

Quick Installation Guide
Page 31
Please refer to the warning on your SATA / SATAII HDDs with NCQ and Hot Plug functions STEP 1: Set Up BIOS. English 31 ASRock N7AD-SLI Motherboard A. STEP 2: Install Windows® VistaTM / VistaTM 64-bit OS on page 7 for detailed procedures: ..\ RAID Installation Guide 2 . 1 3 Untied...® VistaTM 64-bit optical disk into your system. When you see "Where do you apply Untied Overclocking Technology. NVIDIA® AHCI drivers are in the Support CD for the possible overclocking risk before you want to install Windows? Set the "SATA Operation Mode" option to ...
Please refer to the warning on your SATA / SATAII HDDs with NCQ and Hot Plug functions STEP 1: Set Up BIOS. English 31 ASRock N7AD-SLI Motherboard A. STEP 2: Install Windows® VistaTM / VistaTM 64-bit OS on page 7 for detailed procedures: ..\ RAID Installation Guide 2 . 1 3 Untied...® VistaTM 64-bit optical disk into your system. When you see "Where do you apply Untied Overclocking Technology. NVIDIA® AHCI drivers are in the Support CD for the possible overclocking risk before you want to install Windows? Set the "SATA Operation Mode" option to ...
Quick Installation Guide
Page 32
...system chassis. To begin using the Support CD, insert the CD into your computer. otherwise, POST continues with the motherboard contains necessary drivers and useful utilities that will display the Main Menu automatically if "AUTORUN" is designed to scroll through its test routines. If you ...the BIN folder in the Support CD. 4. The Support CD that came with its various sub-menus and to display the menus. 32 ASRock N7AD-SLI Motherboard English It will enhance motherboard features. It is a menu-driven program, which allows you start up the computer, please press during ...
...system chassis. To begin using the Support CD, insert the CD into your computer. otherwise, POST continues with the motherboard contains necessary drivers and useful utilities that will display the Main Menu automatically if "AUTORUN" is designed to scroll through its test routines. If you ...the BIN folder in the Support CD. 4. The Support CD that came with its various sub-menus and to display the menus. 32 ASRock N7AD-SLI Motherboard English It will enhance motherboard features. It is a menu-driven program, which allows you start up the computer, please press during ...

RAID Installation Guide
Page 2
1. For optimal performance, please install identical drives of the data in our support CD or "Quick Installation Guide", you make a SATA / SATAII driver diskette, press to enter BIOS setup to set . Although RAID 0 function can start to use RAID 0, RAID 1, RAID 0+1, JBOD, or RAID 5 function with your motherboard ...
1. For optimal performance, please install identical drives of the data in our support CD or "Quick Installation Guide", you make a SATA / SATAII driver diskette, press to enter BIOS setup to set . Although RAID 0 function can start to use RAID 0, RAID 1, RAID 0+1, JBOD, or RAID 5 function with your motherboard ...

RAID Installation Guide
Page 5
... on IDE HDD, please skip step 1 and 2. Set the "SATA Operation Mode" option to format the floppy diskette and copy SATA / SATAII drivers into the floppy diskette. Insert the ASRock Support CD into the floppy drive. B. Exit Reboot system now Press any key. Enter BIOS SETUP UTILITY Advanced screen B. A. Please select CD...
... on IDE HDD, please skip step 1 and 2. Set the "SATA Operation Mode" option to format the floppy diskette and copy SATA / SATAII drivers into the floppy diskette. Insert the ASRock Support CD into the floppy drive. B. Exit Reboot system now Press any key. Enter BIOS SETUP UTILITY Advanced screen B. A. Please select CD...


