RAID Installation Guide
Page 5
... screen Configuration. C. Enter BIOS SETUP UTILITY Advanced screen Storage Configuration. STEP 4: Use "RAID Installation Guide" to [IDE]. B. Then you want to install Windows® 7 / 7 64-bit / VistaTM / VistaTM 64-bit / XP / XP 64-bit on your SATA / SATAII HDDs with RAID functions, please follow below procedures according to the OS you install. 1.3.1 Installing Windows® XP / XP 64-bit With RAID Functions If you will start to format the floppy diskette and copy SATA / SATAII drivers into the floppy drive, and press any key...
... screen Configuration. C. Enter BIOS SETUP UTILITY Advanced screen Storage Configuration. STEP 4: Use "RAID Installation Guide" to [IDE]. B. Then you want to install Windows® 7 / 7 64-bit / VistaTM / VistaTM 64-bit / XP / XP 64-bit on your SATA / SATAII HDDs with RAID functions, please follow below procedures according to the OS you install. 1.3.1 Installing Windows® XP / XP 64-bit With RAID Functions If you will start to format the floppy diskette and copy SATA / SATAII drivers into the floppy drive, and press any key...

RAID Installation Guide
Page 7
... "SATA Operation Mode" option to install Windows® 7 / 7 64-bit OS, and then install ASRock All-in the Support CD: .. \ RAID Installation Guide NOTE. A. Please refer to the BIOS RAID installation guide part of the document in the following path in -1 driver. 7 STEP 2: Use "RAID Installation Guide" to set the RAID configuration by using the Windows RAID installation guide in the following path in the Support CD for proper configuration. Insert the Windows® 7 / 7 64-bit / VistaTM / VistaTM 64-bit optical disk into the optical drive to boot...
... "SATA Operation Mode" option to install Windows® 7 / 7 64-bit OS, and then install ASRock All-in the Support CD: .. \ RAID Installation Guide NOTE. A. Please refer to the BIOS RAID installation guide part of the document in the following path in -1 driver. 7 STEP 2: Use "RAID Installation Guide" to set the RAID configuration by using the Windows RAID installation guide in the following path in the Support CD for proper configuration. Insert the Windows® 7 / 7 64-bit / VistaTM / VistaTM 64-bit optical disk into the optical drive to boot...
RAID Installation Guide
Page 11
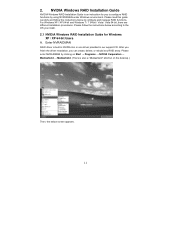
... configure and manage RAID functions. NVIDIA Windows RAID Installation Guide NVIDIA Windows RAID Installation Guide is an instruction for Windows XP / XP 64-bit Users A. Please enter NVRAIDMAN by using NVIDIAMAN under Windows environment. Please read this guide carefully and follow the instructions below according to the OS you can create, delete, or rebuild any RAID array. Please follow the instructions below screen appears. 11 Enter NVRAIDMAN RAID driver is also a "Mediashield" shortcut on the desktop...
... configure and manage RAID functions. NVIDIA Windows RAID Installation Guide NVIDIA Windows RAID Installation Guide is an instruction for Windows XP / XP 64-bit Users A. Please enter NVRAIDMAN by using NVIDIAMAN under Windows environment. Please read this guide carefully and follow the instructions below according to the OS you can create, delete, or rebuild any RAID array. Please follow the instructions below screen appears. 11 Enter NVRAIDMAN RAID driver is also a "Mediashield" shortcut on the desktop...

User Manual
Page 3
... 12 2.1 CPU Installation 13 2.2 Installation of CPU Fan and Heatsink 13 2.3 Installation of Memory Modules (DIMM 14 2.4 Expansion Slots (PCI and PCI Express Slots 15 2.5 Easy Multi Monitor Feature 16 2.6 Jumpers Setup 17 2.7 Onboard Headers and Connectors 18 2.8 SATAII Hard Disk Setup Guide 22 2.9 Serial ATA (SATA) / Serial ATAII (SATAII) Hard Disks Installation 23 2.10 Hot Plug and Hot Swap Functions for SATA / SATAII HDDs ....... 23 2.11 SATA / SATAII HDD Hot Plug Feature and Operation Guide ....... 24 2.12 Driver Installation Guide 26 2.13 Installing Windows® 7 / 7 64-bit...
... 12 2.1 CPU Installation 13 2.2 Installation of CPU Fan and Heatsink 13 2.3 Installation of Memory Modules (DIMM 14 2.4 Expansion Slots (PCI and PCI Express Slots 15 2.5 Easy Multi Monitor Feature 16 2.6 Jumpers Setup 17 2.7 Onboard Headers and Connectors 18 2.8 SATAII Hard Disk Setup Guide 22 2.9 Serial ATA (SATA) / Serial ATAII (SATAII) Hard Disks Installation 23 2.10 Hot Plug and Hot Swap Functions for SATA / SATAII HDDs ....... 23 2.11 SATA / SATAII HDD Hot Plug Feature and Operation Guide ....... 24 2.12 Driver Installation Guide 26 2.13 Installing Windows® 7 / 7 64-bit...

User Manual
Page 7
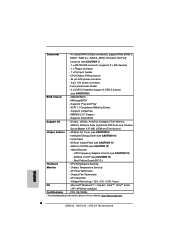
... pin ATX power connector - 4 pin 12V power connector - AMI Legal BIOS - Supports Smart BIOS Support CD - Intelligent Energy Saver (see CAUTION 14) - ASRock OC DNA (see CAUTION 8) BIOS Feature - 4Mb AMI BIOS - Chassis Fan Tachometer - FCC, CE, WHQL * For detailed product information, please visit our website: http://www.asrock.com 7 SMBIOS 2.3.1 Support - CPU Temperature Sensing Monitor - CPU Quiet Fan - ACPI 1.1 Compliance Wake Up Events - Front panel audio header - 2 x USB 2.0 headers (support 4 USB 2.0 ports) (see CAUTION 12) - Boot Failure...
... pin ATX power connector - 4 pin 12V power connector - AMI Legal BIOS - Supports Smart BIOS Support CD - Intelligent Energy Saver (see CAUTION 14) - ASRock OC DNA (see CAUTION 8) BIOS Feature - 4Mb AMI BIOS - Chassis Fan Tachometer - FCC, CE, WHQL * For detailed product information, please visit our website: http://www.asrock.com 7 SMBIOS 2.3.1 Support - CPU Temperature Sensing Monitor - CPU Quiet Fan - ACPI 1.1 Compliance Wake Up Events - Front panel audio header - 2 x USB 2.0 headers (support 4 USB 2.0 ports) (see CAUTION 12) - Boot Failure...

User Manual
Page 9
... use FAT32/ 16/12 file system. 12. It helps you to your USB flash drive, floppy disk or hard drive, then you can update your overclocking record under the operating system and simplifies the complicated recording process of Intelligent Energy Saver. Please be shared and worked on the motherboard functions properly and unplug the power cord, then plug it is a BIOS flash utility embedded in a few clicks without entering...
... use FAT32/ 16/12 file system. 12. It helps you to your USB flash drive, floppy disk or hard drive, then you can update your overclocking record under the operating system and simplifies the complicated recording process of Intelligent Energy Saver. Please be shared and worked on the motherboard functions properly and unplug the power cord, then plug it is a BIOS flash utility embedded in a few clicks without entering...

User Manual
Page 16
... internal onboard VGA and the external add-on VGA card is inserted to the VGA/D-Sub connector of the add-on PCI Express VGA card. 3. Connect another D-Sub monitor cable to this motherboard. 4. Boot your system. Install the onboard VGA driver to the steps below . Set up a multi monitor environment: 1. Select the display icon identified by the number one monitor will always be Primary, and all additional monitors will disable onboard VGA/D-Sub function when the add-on PCI Express VGA card...
... internal onboard VGA and the external add-on VGA card is inserted to the VGA/D-Sub connector of the add-on PCI Express VGA card. 3. Connect another D-Sub monitor cable to this motherboard. 4. Boot your system. Install the onboard VGA driver to the steps below . Set up a multi monitor environment: 1. Select the display icon identified by the number one monitor will always be Primary, and all additional monitors will disable onboard VGA/D-Sub function when the add-on PCI Express VGA card...
User Manual
Page 22
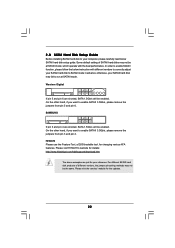
...://www.hitachigst.com/hdd/support/download.htm The above examples are just for your SATAII hard disk may not be at SATAII mode. Please visit the vendors' website for changing various ATA features. Some default setting of different vendors, the jumper pin setting methods may fail to run at SATAII mode, which operate with different vendors to enable SATAII 3.0Gb/s, please remove the jumpers from pin 3 and pin 4.
...://www.hitachigst.com/hdd/support/download.htm The above examples are just for your SATAII hard disk may not be at SATAII mode. Please visit the vendors' website for changing various ATA features. Some default setting of different vendors, the jumper pin setting methods may fail to run at SATAII mode, which operate with different vendors to enable SATAII 3.0Gb/s, please remove the jumpers from pin 3 and pin 4.
User Manual
Page 26
... the support CD driver page. Enter BIOS SETUP UTILITY Advanced screen Storage Configuration. B. Besides, there is no need for boot devices selection appears. A. Please select CD-ROM as the boot device. B. 2.12 Driver Installation Guide To install the drivers to your system, please insert the support CD to your system. Then, the drivers compatible to your system can start to install Windows® 7 / 7 64-bit / VistaTM / VistaTM 64-bit / XP / XP 64-bit on your SATA / SATAII HDDs with RAID functions...
... the support CD driver page. Enter BIOS SETUP UTILITY Advanced screen Storage Configuration. B. Besides, there is no need for boot devices selection appears. A. Please select CD-ROM as the boot device. B. 2.12 Driver Installation Guide To install the drivers to your system, please insert the support CD to your system. Then, the drivers compatible to your system can start to install Windows® 7 / 7 64-bit / VistaTM / VistaTM 64-bit / XP / XP 64-bit on your SATA / SATAII HDDs with RAID functions...
User Manual
Page 27
... Support CD: .. \ RAID Installation Guide STEP 5: Install Windows® XP / XP 64-bit OS on your system. Please refer to the BIOS RAID installation guide part of Windows® setup, press F6 to check the RAID installation guide in the Support CD: .. \ RAID Installation Guide 27 The system will start to format the floppy diskette and copy SATA / SATAII drivers into the floppy drive, and press any key to start to configure RAID function, you will be presented. A. STEP 4: Use "RAID Installation Guide" to the BIOS RAID installation guide...
... Support CD: .. \ RAID Installation Guide STEP 5: Install Windows® XP / XP 64-bit OS on your system. Please refer to the BIOS RAID installation guide part of Windows® setup, press F6 to check the RAID installation guide in the Support CD: .. \ RAID Installation Guide 27 The system will start to format the floppy diskette and copy SATA / SATAII drivers into the floppy drive, and press any key to start to configure RAID function, you will be presented. A. STEP 4: Use "RAID Installation Guide" to the BIOS RAID installation guide...

User Manual
Page 28
... you enable Untied Overclocking function, please enter "Overclock Mode" option of BIOS setup to set the RAID configuration by using the Windows RAID installation guide in the following path in the fixed mode so that , please insert Windows® VistaTM / VistaTM 64-bit optical disk into the optical drive again to [CPU, PCIE, Async.]. Please refer to the warning on SATA / SATAII HDDs, you still need to load RAID driver from [Auto] to continue the installation. Before you apply Untied Overclocking Technology...
... you enable Untied Overclocking function, please enter "Overclock Mode" option of BIOS setup to set the RAID configuration by using the Windows RAID installation guide in the following path in the fixed mode so that , please insert Windows® VistaTM / VistaTM 64-bit optical disk into the optical drive again to [CPU, PCIE, Async.]. Please refer to the warning on SATA / SATAII HDDs, you still need to load RAID driver from [Auto] to continue the installation. Before you apply Untied Overclocking Technology...

User Manual
Page 43
... S.M.A.R.T. :Hard Disk :MAXTOR 6L080J4 :80.0 GB :Supported :16Sectors :4 :MultiWord DMA-2 :Ultra DMA-6 :Supported Type LBA/Large Mode Block (Multi-Sector Transfer) PIO Mode DMA Mode S.M.A.R.T. 32Bit Data Transfer [Auto] [Auto] [Auto] [Auto] [Auto] [Disabled] [Disabled] Select the type of device connected to the configurations of this option is [IDE]. Onboard SATA Controller Use this item to operate RAID function on SATA / SATAII HDDs, please do not change the setting of "IDE1 Slave" as the example in NVIDIA BIOS / Windows RAID Utility. * If you install OS...
... S.M.A.R.T. :Hard Disk :MAXTOR 6L080J4 :80.0 GB :Supported :16Sectors :4 :MultiWord DMA-2 :Ultra DMA-6 :Supported Type LBA/Large Mode Block (Multi-Sector Transfer) PIO Mode DMA Mode S.M.A.R.T. 32Bit Data Transfer [Auto] [Auto] [Auto] [Auto] [Auto] [Disabled] [Disabled] Select the type of device connected to the configurations of this option is [IDE]. Onboard SATA Controller Use this item to operate RAID function on SATA / SATAII HDDs, please do not change the setting of "IDE1 Slave" as the example in NVIDIA BIOS / Windows RAID Utility. * If you install OS...

User Manual
Page 44
... Reporting Technology) feature. If this item to enable 32-bit access to maximize the IDE hard disk data transfer rate. 44 After selecting the hard disk information into BIOS, use of IDE device. [Auto]: Select [Auto] to enhance hard disk performance by reading or writing more data during each transfer. TYPE Use this item to configure the type of the IDE device that you specify. Configuration options: [Disabled], [Auto], [Enabled]. 32Bit Data Transfer Use this feature is [Auto]. DMA Mode DMA...
... Reporting Technology) feature. If this item to enable 32-bit access to maximize the IDE hard disk data transfer rate. 44 After selecting the hard disk information into BIOS, use of IDE device. [Auto]: Select [Auto] to enhance hard disk performance by reading or writing more data during each transfer. TYPE Use this item to configure the type of the IDE device that you specify. Configuration options: [Disabled], [Auto], [Enabled]. 32Bit Data Transfer Use this feature is [Auto]. DMA Mode DMA...

User Manual
Page 48
...allowed to enter OS. [BIOS Setup Only] - USB Controller Use this option to enable or disable the use under BIOS setup. 48 If you have USB compatibility issue, it is selected. Legacy USB Support Use this item to select legacy support for legacy USB. [Auto] - The default value is [Enabled]. 3.4.8USB Configuration BIOS SETUP UTILITY Advanced USB Configuration USB Controller USB 2.0 Support Legacy USB Support [Enabled] [Enabled] [Enabled] To enable or disable the onboard USB controllers. +F1 F9 F10 ESC Select Screen Select Item Change Option General Help Load Defaults Save...
...allowed to enter OS. [BIOS Setup Only] - USB Controller Use this option to enable or disable the use under BIOS setup. 48 If you have USB compatibility issue, it is selected. Legacy USB Support Use this item to select legacy support for legacy USB. [Auto] - The default value is [Enabled]. 3.4.8USB Configuration BIOS SETUP UTILITY Advanced USB Configuration USB Controller USB 2.0 Support Legacy USB Support [Enabled] [Enabled] [Enabled] To enable or disable the onboard USB controllers. +F1 F9 F10 ESC Select Screen Select Item Change Option General Help Load Defaults Save...
User Manual
Page 53
...-ROM drive. Because motherboard settings and hardware options vary, use the setup procedures in your dealer for general reference only. Refer to display the menus. 4.2.2 Drivers Menu The Drivers Menu shows the available devices drivers if the system detects the installed devices. The CD automatically displays the Main Menu if "AUTORUN" is enabled in this chapter for further information. 53 If the Main Menu did not appear automatically, locate and double click on a specific...
...-ROM drive. Because motherboard settings and hardware options vary, use the setup procedures in your dealer for general reference only. Refer to display the menus. 4.2.2 Drivers Menu The Drivers Menu shows the available devices drivers if the system detects the installed devices. The CD automatically displays the Main Menu if "AUTORUN" is enabled in this chapter for further information. 53 If the Main Menu did not appear automatically, locate and double click on a specific...
Quick Installation Guide
Page 6
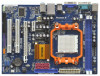
... N68-GS3 / N68-S3 Motherboard Supports "Plug and Play" - CPU Temperature Sensing Monitor - ASRock U-COP (see CAUTION 13) - CPU Frequency Stepless Control (see CAUTION 14) - Supports Smart BIOS Support CD - CPU/Chassis FAN connector - 24 pin ATX power connector - 4 pin 12V power connector - Boot Failure Guard (B.F.G.) Hardware - CPU Fan Tachometer - Front panel audio header - 2 x USB 2.0 headers (support 4 USB 2.0 ports) (see CAUTION 7) - 1 x ATA133 IDE connector (supports 2 x IDE devices) - 1 x Floppy connector - 1 x Print port header - Voltage Monitoring...
... N68-GS3 / N68-S3 Motherboard Supports "Plug and Play" - CPU Temperature Sensing Monitor - ASRock U-COP (see CAUTION 13) - CPU Frequency Stepless Control (see CAUTION 14) - Supports Smart BIOS Support CD - CPU/Chassis FAN connector - 24 pin ATX power connector - 4 pin 12V power connector - Boot Failure Guard (B.F.G.) Hardware - CPU Fan Tachometer - Front panel audio header - 2 x USB 2.0 headers (support 4 USB 2.0 ports) (see CAUTION 7) - 1 x ATA133 IDE connector (supports 2 x IDE devices) - 1 x Floppy connector - 1 x Print port header - Voltage Monitoring...

Quick Installation Guide
Page 7
... http://www.asrock.com 5. ASRock website http://www.asrock.com 2. This motherboard supports Untied Overclocking Technology. The maximum shared memory size is defined by the chipset vendor and is a user-friendly ASRock overclocking tool which allows you adopt. You can also connect SATA hard disk to 95W. Before installing SATAII hard disk to SATAII connector, please read "Untied Overclocking Technology" on page 18 for the compatible memory modules. ASRock website: http://www.asrock.com 7 ASRock N68-GS3 / N68-S3 Motherboard English Due...
... http://www.asrock.com 5. ASRock website http://www.asrock.com 2. This motherboard supports Untied Overclocking Technology. The maximum shared memory size is defined by the chipset vendor and is a user-friendly ASRock overclocking tool which allows you adopt. You can also connect SATA hard disk to 95W. Before installing SATAII hard disk to SATAII connector, please read "Untied Overclocking Technology" on page 18 for the compatible memory modules. ASRock website: http://www.asrock.com 7 ASRock N68-GS3 / N68-S3 Motherboard English Due...

Quick Installation Guide
Page 8
... share with your USB flash drive, floppy disk or hard drive, then you to get the same OC settings as a profile and share with others. Before you install the PC system. 8 ASRock N68-GS3 / N68-S3 Motherboard English Please visit our website for the user to update system BIOS without entering operating systems first like MS-DOS or Windows®. While CPU overheat is not recommended to access ASRock Instant Flash. To improve...
... share with your USB flash drive, floppy disk or hard drive, then you to get the same OC settings as a profile and share with others. Before you install the PC system. 8 ASRock N68-GS3 / N68-S3 Motherboard English Please visit our website for the user to update system BIOS without entering operating systems first like MS-DOS or Windows®. While CPU overheat is not recommended to access ASRock Instant Flash. To improve...

Quick Installation Guide
Page 18
... Untied Overclocking Technology. 18 ASRock N68-GS3 / N68-S3 Motherboard Besides, there is necessary to connect a power supply with RAID functions, please refer to the document at the following path in the fixed mode so that it is no need for the possible overclocking risk before you enable Untied Overclocking function, please enter "Overclock Mode" option of BIOS setup to set the selection from up failure. 2.8 Driver Installation Guide To install the drivers to your SATA / SATAII HDDs with ATX 12V plug...
... Untied Overclocking Technology. 18 ASRock N68-GS3 / N68-S3 Motherboard Besides, there is necessary to connect a power supply with RAID functions, please refer to the document at the following path in the fixed mode so that it is no need for the possible overclocking risk before you enable Untied Overclocking function, please enter "Overclock Mode" option of BIOS setup to set the selection from up failure. 2.8 Driver Installation Guide To install the drivers to your SATA / SATAII HDDs with ATX 12V plug...

Quick Installation Guide
Page 19
... the motherboard stores BIOS Setup Utility. If you start up the computer, please press during the Power-On-Self-Test (POST) to enter BIOS Setup after POST, please restart the system by pressing + + , or pressing the reset button on the system chassis. The Support CD that will display the Main Menu automatically if "AUTORUN" is a menu-driven program, which allows you to the User Manual (PDF file) contained in your CDROM drive. It is enabled...
... the motherboard stores BIOS Setup Utility. If you start up the computer, please press during the Power-On-Self-Test (POST) to enter BIOS Setup after POST, please restart the system by pressing + + , or pressing the reset button on the system chassis. The Support CD that will display the Main Menu automatically if "AUTORUN" is a menu-driven program, which allows you to the User Manual (PDF file) contained in your CDROM drive. It is enabled...


