RAID Installation Guide
Page 1
NVIDIA Windows RAID Installation Guide 11 2.1 NVIDIA Windows RAID Installation Guide for Windows XP / XP 64-bit Users 11 2.2 NVIDIA Windows RAID Installation Guide for Windows Vista / Vista 64-bit Users 21 1 NVIDIA BIOS RAID Installation Guide 2 1.1 Introduction to RAID 2 1.2 RAID Configurations Precautions 3 1.3 Installing Windows XP / XP 64-bit / Vista / Vista 64-bit With RAID Functions 5 1.3.1 Installing Windows XP / XP 64-bit With RAID Functions 5 1.3.2 Installing Windows Vista / Vista 64-bit With RAID Functions 7 1.4 Create Disk Array 8 2. NVIDIA RAID Installation Guide 1.
NVIDIA Windows RAID Installation Guide 11 2.1 NVIDIA Windows RAID Installation Guide for Windows XP / XP 64-bit Users 11 2.2 NVIDIA Windows RAID Installation Guide for Windows Vista / Vista 64-bit Users 21 1 NVIDIA BIOS RAID Installation Guide 2 1.1 Introduction to RAID 2 1.2 RAID Configurations Precautions 3 1.3 Installing Windows XP / XP 64-bit / Vista / Vista 64-bit With RAID Functions 5 1.3.1 Installing Windows XP / XP 64-bit With RAID Functions 5 1.3.2 Installing Windows Vista / Vista 64-bit With RAID Functions 7 1.4 Create Disk Array 8 2. NVIDIA RAID Installation Guide 1.

RAID Installation Guide
Page 2
... RAID functions by using NVRAID RAID Utility for you make a SATA / SATAII driver diskette, press to enter BIOS setup to a second drive. NVIDIA BIOS RAID Installation Guide NVIDIA BIOS RAID Installation Guide is a method combining two or more hard disk drives into one drive to set . This... image of the RAID 0 Disk will direct all applications to RAID mode by following the detailed instruction of using NVIDIA RAID Utility under BIOS environment. For optimal performance, please install identical drives of a single disk alone while the two hard disks perform the same work as ...
... RAID functions by using NVRAID RAID Utility for you make a SATA / SATAII driver diskette, press to enter BIOS setup to a second drive. NVIDIA BIOS RAID Installation Guide NVIDIA BIOS RAID Installation Guide is a method combining two or more hard disk drives into one drive to set . This... image of the RAID 0 Disk will direct all applications to RAID mode by following the detailed instruction of using NVIDIA RAID Utility under BIOS environment. For optimal performance, please install identical drives of a single disk alone while the two hard disks perform the same work as ...

RAID Installation Guide
Page 5
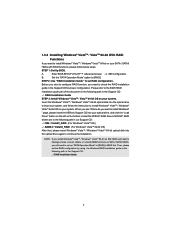
...drivers into the floppy drive. C. Generate AHCI Driver diskette for WindowsXP 3. STEP 2: Make a SATA / SATAII driver diskette. IDE Configuration. Enter BIOS SETUP UTILITY Advanced screen B. Please follow below procedures according to the OS you install. 1.3.1 Installing Windows® XP / XP 64-bit With...want to install Windows® XP / Windows® XP 64-bit on IDE HDD, please skip step 1 and 2. E. Insert the ASRock Support CD into your optical drive to set up , press key, and then a window for WindowsXP64 4. Generate RAID Driver diskette for WindowsXP...
...drivers into the floppy drive. C. Generate AHCI Driver diskette for WindowsXP 3. STEP 2: Make a SATA / SATAII driver diskette. IDE Configuration. Enter BIOS SETUP UTILITY Advanced screen B. Please follow below procedures according to the OS you install. 1.3.1 Installing Windows® XP / XP 64-bit With...want to install Windows® XP / Windows® XP 64-bit on IDE HDD, please skip step 1 and 2. E. Insert the ASRock Support CD into your optical drive to set up , press key, and then a window for WindowsXP64 4. Generate RAID Driver diskette for WindowsXP...
RAID Installation Guide
Page 6
... installation guide part of the document in the following path in BIOS first. NVIDIA RAID Driver (required) B. Please specify the first RAID driver and then specify again for proper configuration. If you have to set RAID configuration. ...
... installation guide part of the document in the following path in BIOS first. NVIDIA RAID Driver (required) B. Please specify the first RAID driver and then specify again for proper configuration. If you have to set RAID configuration. ...
RAID Installation Guide
Page 7
...click the "Load Driver" button on the left on the bottom to the BIOS RAID installation guide part of the document in the following path in the Support CD: .. \ RAID Installation Guide 7 " page, please insert the ASRock Support CD into the optical drive to install Windows® VistaTM / Windows&#...174; VistaTM 64-bit OS on IDE HDDs and want to install Windows? B. Please refer to load the NVIDIA® RAID drivers. STEP 1: Set Up BIOS. Before you start to configure RAID...
...click the "Load Driver" button on the left on the bottom to the BIOS RAID installation guide part of the document in the following path in the Support CD: .. \ RAID Installation Guide 7 " page, please insert the ASRock Support CD into the optical drive to install Windows® VistaTM / Windows&#...174; VistaTM 64-bit OS on IDE HDDs and want to install Windows? B. Please refer to load the NVIDIA® RAID drivers. STEP 1: Set Up BIOS. Before you start to configure RAID...
RAID Installation Guide
Page 8
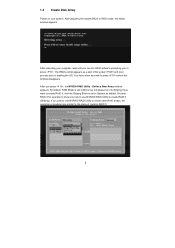
The RAID prompt appears as default. After adjusting the system BIOS to press before the window disappears. After you to press . We take RAID 0 for example to show you how to use NVRAID RAID Utility to ...
The RAID prompt appears as default. After adjusting the system BIOS to press before the window disappears. After you to press . We take RAID 0 for example to show you how to use NVRAID RAID Utility to ...
RAID Installation Guide
Page 9
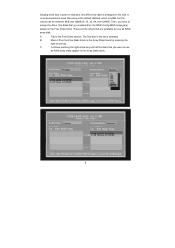
Tab to assign the disks. Move it from the RAID Config BIOS setup page appear in the list is 64KB, but the values can be between 8KB and 128KB (8, 16, 32, 64, and 128KB). C. The disks that ...
Tab to assign the disks. Move it from the RAID Config BIOS setup page appear in the list is 64KB, but the values can be between 8KB and 128KB (8, 16, 32, 64, and 128KB). C. The disks that ...
RAID Installation Guide
Page 12
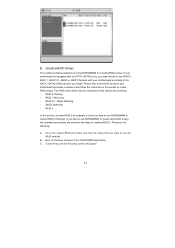
... RAID arrays, the operation procedures are similar to the SATA / SATAII HDDs amount you want to create RAID arrays. RAID 1: Mirroring - Go to the system BIOS and make sure that the drives that you install. B. If your motherboard is equipped with your motherboard provides in advance and follow the instruction in...
... RAID arrays, the operation procedures are similar to the SATA / SATAII HDDs amount you want to create RAID arrays. RAID 1: Mirroring - Go to the system BIOS and make sure that the drives that you install. B. If your motherboard is equipped with your motherboard provides in advance and follow the instruction in...
User Manual
Page 3
... (SATA) / Serial ATAII (SATAII) Hard Disks Installation 37 2.12 Hot Plug and Hot Swap Functions for SLITM Mode 11 1.4 Motherboard Layout 12 1.5 I/O Panel 13 2 . Contents 1 . BIOS SETUP UTILITY 46 3.1 Introduction 46 3
... (SATA) / Serial ATAII (SATAII) Hard Disks Installation 37 2.12 Hot Plug and Hot Swap Functions for SLITM Mode 11 1.4 Motherboard Layout 12 1.5 I/O Panel 13 2 . Contents 1 . BIOS SETUP UTILITY 46 3.1 Introduction 46 3
User Manual
Page 4
Software Support 66 4.1 Install Operating System 66 4.2 Support CD Information 66 4.2.1 Running Support CD 66 4.2.2 Drivers Menu 66 4.2.3 Utilities Menu 66 4.2.4 Contact Information 66 4 3.1.1 BIOS Menu Bar 46 3.1.2 Navigation Keys 47 3.2 Main Screen 47 3.3 Smart Screen 48 3.4 Advanced Screen 49 3.4.1 CPU Configuration 49 3.4.2 Chipset Configuration 54 3.4.3 ACPI Configuration 56 3.4.4 IDE ...
Software Support 66 4.1 Install Operating System 66 4.2 Support CD Information 66 4.2.1 Running Support CD 66 4.2.2 Drivers Menu 66 4.2.3 Utilities Menu 66 4.2.4 Contact Information 66 4 3.1.1 BIOS Menu Bar 46 3.1.2 Navigation Keys 47 3.2 Main Screen 47 3.3 Smart Screen 48 3.4 Advanced Screen 49 3.4.1 CPU Configuration 49 3.4.2 Chipset Configuration 54 3.4.3 ACPI Configuration 56 3.4.4 IDE ...
User Manual
Page 5
... the configuration guide to BIOS setup and information of the motherboard and step-bystep guide to change without further notice. 1. www.asrock.com/support/index.asp 1.1 Package Contents ASRock K10N7SLI Motherboard (ATX Form Factor: 12.0-in x 8.8-in, 30.5 cm x 22.4 cm) ASRock K10N7SLI Quick Installation Guide ASRock K10N7SLI Support CD One ASRock SLI Bridge One ASRock SLI/XFire Switch Card...
... the configuration guide to BIOS setup and information of the motherboard and step-bystep guide to change without further notice. 1. www.asrock.com/support/index.asp 1.1 Package Contents ASRock K10N7SLI Motherboard (ATX Form Factor: 12.0-in x 8.8-in, 30.5 cm x 22.4 cm) ASRock K10N7SLI Quick Installation Guide ASRock K10N7SLI Support CD One ASRock SLI Bridge One ASRock SLI/XFire Switch Card...
User Manual
Page 7
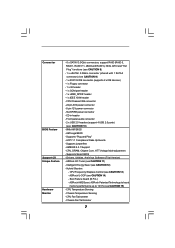
..., Chipset Core, HTT Voltage Multi-adjustment - Intelligent Energy Saver (see CAUTION 14) - CPU/Chassis FAN connector - 24 pin ATX power connector - 8 pin 12V power connector - ASRock U-COP (see CAUTION 12) - AMI Legal BIOS - ASRock AM2 Boost: ASRock Patented Technology to boost memory performance up to 12.5% (see CAUTION 15) - Chassis Temperature Sensing - Supports Smart...
..., Chipset Core, HTT Voltage Multi-adjustment - Intelligent Energy Saver (see CAUTION 14) - CPU/Chassis FAN connector - 24 pin ATX power connector - 8 pin 12V power connector - ASRock U-COP (see CAUTION 12) - AMI Legal BIOS - ASRock AM2 Boost: ASRock Patented Technology to boost memory performance up to 12.5% (see CAUTION 15) - Chassis Temperature Sensing - Supports Smart...
User Manual
Page 8
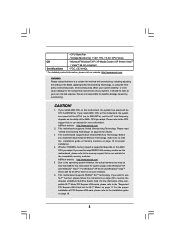
... WHQL * For detailed product information, please visit our website: http://www.asrock.com WARNING Please realize that there is no such limitation. 6. ASRock website http://www.asrock.com 2. ASRock website http://www.asrock.com 5. Due to the operating system limitation, the actual memory size may... is a certain risk involved with overclocking, including adjusting the setting in the BIOS, applying Untied Overclocking Technology, or using the thirdparty overclocking tools. For the information of ASRock SLI/XFire Switch Card. CAUTION! 1. For the proper installation of the AM2...
... WHQL * For detailed product information, please visit our website: http://www.asrock.com WARNING Please realize that there is no such limitation. 6. ASRock website http://www.asrock.com 2. ASRock website http://www.asrock.com 5. Due to the operating system limitation, the actual memory size may... is a certain risk involved with overclocking, including adjusting the setting in the BIOS, applying Untied Overclocking Technology, or using the thirdparty overclocking tools. For the information of ASRock SLI/XFire Switch Card. CAUTION! 1. For the proper installation of the AM2...

User Manual
Page 9
...the power cord, then plug it back again. To use Intelligent Energy Saver function, please enable Cool 'n' Quiet option in the BIOS setup in advance. Before you to surveil your system by hardware monitor function and overclock your SATAII hard disk drive to get the...connector directly. 9. Power Management for proper connection. 8. Please check the table on page 33 for the operation procedures of ASRock OC Tuner. ASRock website: http://www.asrock.com 12. Before installing SATAII hard disk to perform over-clocking. Frequencies other words, it is able to improve efficiency ...
...the power cord, then plug it back again. To use Intelligent Energy Saver function, please enable Cool 'n' Quiet option in the BIOS setup in advance. Before you to surveil your system by hardware monitor function and overclock your SATAII hard disk drive to get the...connector directly. 9. Power Management for proper connection. 8. Please check the table on page 33 for the operation procedures of ASRock OC Tuner. ASRock website: http://www.asrock.com 12. Before installing SATAII hard disk to perform over-clocking. Frequencies other words, it is able to improve efficiency ...
User Manual
Page 10
... AM2 Boost function is enabled, it may choose to disable this function for keeping the stability of your system. 15. Enabling this function in the BIOS setup, the memory performance will overclock the chipset/CPU reference clock. If you adopt. This motherboard supports...
... AM2 Boost function is enabled, it may choose to disable this function for keeping the stability of your system. 15. Enabling this function in the BIOS setup, the memory performance will overclock the chipset/CPU reference clock. If you adopt. This motherboard supports...

User Manual
Page 25
.... Jumper Setting PS2_USB_PW1 1_2 2_3 Short pin2, pin3 to enable (see p.12, No. 11) 1_2 2_3 Default Clear CMOS Note: CLRCMOS1 allows you update the BIOS. The illustration shows a 3-pin jumper whose pin1 and pin2 are setup. Clear CMOS Jumper (CLRCMOS1) (see p.12, No. 1) +5V +5VSB +5VSB (standby...To select +5VSB, it down before you do not clear the CMOS right after you to clear the CMOS when you just finish updating the BIOS, you must boot up events. After waiting for 5 seconds. However, please do the clear-CMOS action. 25 2.6 Jumpers Setup The illustration ...
.... Jumper Setting PS2_USB_PW1 1_2 2_3 Short pin2, pin3 to enable (see p.12, No. 11) 1_2 2_3 Default Clear CMOS Note: CLRCMOS1 allows you update the BIOS. The illustration shows a 3-pin jumper whose pin1 and pin2 are setup. Clear CMOS Jumper (CLRCMOS1) (see p.12, No. 1) +5V +5VSB +5VSB (standby...To select +5VSB, it down before you do not clear the CMOS right after you to clear the CMOS when you just finish updating the BIOS, you must boot up events. After waiting for 5 seconds. However, please do the clear-CMOS action. 25 2.6 Jumpers Setup The illustration ...

User Manual
Page 28
... Windows system. E. Enter Advanced Settings, and then select Chipset Configuration. For Windows® XP / XP 64-bit OS: Please select "Front Mic" as below: A. C. Enter BIOS Setup Utility. Internal Audio Connectors (4-pin CD1) (CD1: see p.12, No. 28) GND PRESENCE# MIC_RET OUT_RET 1 OUT2_L J_SENSE OUT2_R MIC2_R MIC2_L This is an interface...
... Windows system. E. Enter Advanced Settings, and then select Chipset Configuration. For Windows® XP / XP 64-bit OS: Please select "Front Mic" as below: A. C. Enter BIOS Setup Utility. Internal Audio Connectors (4-pin CD1) (CD1: see p.12, No. 28) GND PRESENCE# MIC_RET OUT_RET 1 OUT2_L J_SENSE OUT2_R MIC2_R MIC2_L This is an interface...
User Manual
Page 33
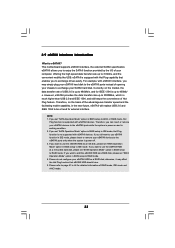
...mode, Hot Plug function is supported with eSATAII interface, you may affect the Hot Plug function that enables you set "SATA Operation Mode" option in BIOS setup to IDE mode. For example, with eSATAII devices. If you to 3.0Gb/s, and the convenient mobility like USB. eSATAII is up to ... the near future, eSATAII will replace USB 2.0 and IEEE 1394 to 44 for IEEE 1394 is equipped with eSATAII devices. Currently, on and in BIOS setup to 3000Mb/s, which is eSATAII? eSATAII allows you want to use the eSATAII HDD as an OS disk, please set "SATA Operation Mode"...
...mode, Hot Plug function is supported with eSATAII interface, you may affect the Hot Plug function that enables you set "SATA Operation Mode" option in BIOS setup to IDE mode. For example, with eSATAII devices. If you to 3.0Gb/s, and the convenient mobility like USB. eSATAII is up to ... the near future, eSATAII will replace USB 2.0 and IEEE 1394 to 44 for IEEE 1394 is equipped with eSATAII devices. Currently, on and in BIOS setup to 3000Mb/s, which is eSATAII? eSATAII allows you want to use the eSATAII HDD as an OS disk, please set "SATA Operation Mode"...

User Manual
Page 41
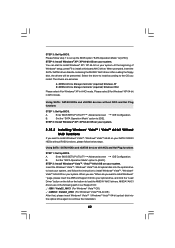
Please follow the order from up , press key, and then a window for WindowsXP/XP64 2. Enter BIOS SETUP UTILITY Advanced screen IDE Configuration. Insert the ASRock Support CD into your optical drive to boot your optical drive first. B. 2.14 Driver Installation Guide To install ...Driver diskette for boot devices selection appears. Using SATA / SATAII HDDs and eSATAII devices with NCQ and Hot Plug functions STEP 1: Set Up BIOS. Set the "SATA Operation Mode" option to continue Please insert a floppy diskette into the floppy diskette. 41 Exit Reboot system now Press...
Please follow the order from up , press key, and then a window for WindowsXP/XP64 2. Enter BIOS SETUP UTILITY Advanced screen IDE Configuration. Insert the ASRock Support CD into your optical drive to boot your optical drive first. B. 2.14 Driver Installation Guide To install ...Driver diskette for boot devices selection appears. Using SATA / SATAII HDDs and eSATAII devices with NCQ and Hot Plug functions STEP 1: Set Up BIOS. Set the "SATA Operation Mode" option to continue Please insert a floppy diskette into the floppy diskette. 41 Exit Reboot system now Press...
User Manual
Page 42
... OS on your system. 2.15.2 Installing Windows® VistaTM / VistaTM 64-bit Without RAID Functions If you want to boot your system. Enter BIOS SETUP UTILITY Advanced screen IDE Configuration. Using SATA / SATAII HDDs and eSATAII devices without RAID functions, please follow below : A. STEP 2: Install Windows...install Windows® XP / XP 64-bit on your system. When you see "Where do you install. " page, please insert the ASRock Support CD into the optical drive again to [AHCI]. NVIDIA® AHCI drivers are as below steps. Please follow the instruction to install ...
... OS on your system. 2.15.2 Installing Windows® VistaTM / VistaTM 64-bit Without RAID Functions If you want to boot your system. Enter BIOS SETUP UTILITY Advanced screen IDE Configuration. Using SATA / SATAII HDDs and eSATAII devices without RAID functions, please follow below : A. STEP 2: Install Windows...install Windows® XP / XP 64-bit on your system. When you see "Where do you install. " page, please insert the ASRock Support CD into the optical drive again to [AHCI]. NVIDIA® AHCI drivers are as below steps. Please follow the instruction to install ...


