
User Manual
Page 5
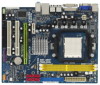
...the hardware installation. In case any modifications of this manual occur, the updated version will be available on ASRock website as well. Chapter 3 and 4 contain the configuration guide to BIOS setup and information of the motherboard and step-by-step guide to change...latest VGA cards and CPU support lists on ASRock website without notice. www.asrock.com/support/index.asp 1.1 Package Contents ASRock K10N78M Pro Motherboard (Micro ATX Form Factor: 9.6-in x 7.5-in, 24.4 cm x 19.1 cm) ASRock K10N78M Pro Quick Installation Guide ASRock K10N78M Pro Support CD One 80-conductor Ultra ATA 66/...
...the hardware installation. In case any modifications of this manual occur, the updated version will be available on ASRock website as well. Chapter 3 and 4 contain the configuration guide to BIOS setup and information of the motherboard and step-by-step guide to change...latest VGA cards and CPU support lists on ASRock website without notice. www.asrock.com/support/index.asp 1.1 Package Contents ASRock K10N78M Pro Motherboard (Micro ATX Form Factor: 9.6-in x 7.5-in, 24.4 cm x 19.1 cm) ASRock K10N78M Pro Quick Installation Guide ASRock K10N78M Pro Support CD One 80-conductor Ultra ATA 66/...

User Manual
Page 9
... heatsink when you to improve efficiency when the CPU cores are idle. To use FAT32/16/12 file system. 13. This convenient BIOS update tool allows you install the PC system. 15. Although this function in a few clicks without preparing an additional floppy diskette or other... CPU fan on the AM2 CPU you can reduce the number of output phases to update system BIOS without sacrificing computing performance. To improve heat dissipation, remember to access ASRock Instant Flash. ASRock Instant Flash is not recommended to 12.5%, but the effect still depends on the motherboard...
... heatsink when you to improve efficiency when the CPU cores are idle. To use FAT32/16/12 file system. 13. This convenient BIOS update tool allows you install the PC system. 15. Although this function in a few clicks without preparing an additional floppy diskette or other... CPU fan on the AM2 CPU you can reduce the number of output phases to update system BIOS without sacrificing computing performance. To improve heat dissipation, remember to access ASRock Instant Flash. ASRock Instant Flash is not recommended to 12.5%, but the effect still depends on the motherboard...
User Manual
Page 19
...Driver ASUS PCIE-ASUS-9800GX2/512M 174.83 Enjoy the benefit of discrete GPUs. Enter "Advanced" screen, and enter "Chipset Settings". Set up the BIOS option "Primary Graphics Display" to use onboard VGA output, after step 1 to the correspondent connector on the PCI Express graphics card on the I/O...to switch between GeForce® Boost mode (Boost Performance) and HybridPowerTM mode (Save Power). Supported PCI Express Card for the graphics cards update in the future. Step 2. If you are supported only with certain set the option "Hybrid SLI" to PCIE2 slot (green). After reboot ...
...Driver ASUS PCIE-ASUS-9800GX2/512M 174.83 Enjoy the benefit of discrete GPUs. Enter "Advanced" screen, and enter "Chipset Settings". Set up the BIOS option "Primary Graphics Display" to use onboard VGA output, after step 1 to the correspondent connector on the PCI Express graphics card on the I/O...to switch between GeForce® Boost mode (Boost Performance) and HybridPowerTM mode (Save Power). Supported PCI Express Card for the graphics cards update in the future. Step 2. If you are supported only with certain set the option "Hybrid SLI" to PCIE2 slot (green). After reboot ...

User Manual
Page 20
... / VistaTM 64-bit.) ..\Drivers\Hybrid SLI driver\Vista * Currently, Hybrid SLITM driver only has VistaTM 32 version, please visit our website for future update. And set the option "Hybrid SLI" to [256MB] or [512MB]. Save your Windows® taskbar. Boot into OS. dows® taskbar. Step...into OS. Hybrid SLITM driver is in the following path of ASRock support CD: (There are two ASRock support CD in the motherboard gift box pack, please choose the one compatible PCI Express graphics card to enter BIOS setup. For the proper installation procedures, please refer to adjust...
... / VistaTM 64-bit.) ..\Drivers\Hybrid SLI driver\Vista * Currently, Hybrid SLITM driver only has VistaTM 32 version, please visit our website for future update. And set the option "Hybrid SLI" to [256MB] or [512MB]. Save your Windows® taskbar. Boot into OS. dows® taskbar. Step...into OS. Hybrid SLITM driver is in the following path of ASRock support CD: (There are two ASRock support CD in the motherboard gift box pack, please choose the one compatible PCI Express graphics card to enter BIOS setup. For the proper installation procedures, please refer to adjust...

User Manual
Page 21
...to enter BIOS setup. Boot your computer. Boot into OS. Restart your system. Click the desktop. Install one for Windows® VistaTM / VistaTM 64-bit.) ..\Drivers\Hybrid SLI driver\Vista * Currently, Hybrid SLITM driver only has VistaTM 32 version, please visit our website for future update. Install ...Hybrid SLITM driver from our support CD to your Win- Hybrid SLITM driver is in the following path of ASRock support CD: (There are two ASRock support CD in the motherboard gift box pack, please choose...
...to enter BIOS setup. Boot your computer. Boot into OS. Restart your system. Click the desktop. Install one for Windows® VistaTM / VistaTM 64-bit.) ..\Drivers\Hybrid SLI driver\Vista * Currently, Hybrid SLITM driver only has VistaTM 32 version, please visit our website for future update. Install ...Hybrid SLITM driver from our support CD to your Win- Hybrid SLITM driver is in the following path of ASRock support CD: (There are two ASRock support CD in the motherboard gift box pack, please choose...

User Manual
Page 26
Note: To select +5VSB, it down before you do not clear the CMOS right after you update the BIOS. After waiting for 15 seconds, use a jumper cap to clear the data in CMOS includes system setup information such as system password, date, time, and ... cap is placed on pins, the jumper is "Short". Jumper Setting PS2_USB_PW1 1_2 2_3 Short pin2, pin3 to clear the CMOS when you just finish updating the BIOS, you to short pin2 and pin3 on CLRCMOS1 for PS/2 or USB wake up the system first, and then shut it requires 2 Amp and...
Note: To select +5VSB, it down before you do not clear the CMOS right after you update the BIOS. After waiting for 15 seconds, use a jumper cap to clear the data in CMOS includes system setup information such as system password, date, time, and ... cap is placed on pins, the jumper is "Short". Jumper Setting PS2_USB_PW1 1_2 2_3 Short pin2, pin3 to clear the CMOS when you just finish updating the BIOS, you to short pin2 and pin3 on CLRCMOS1 for PS/2 or USB wake up the system first, and then shut it requires 2 Amp and...

User Manual
Page 40
... configure your requirements Advanced To set up the advanced BIOS features H/W Monitor To display current hardware status Boot To set up the default system device to locate and load the Op- Because the BIOS software is constantly being updated, the following selections: Main To set up the ...system time/date information Smart To load the BIOS according to your system. erating System Security To set up the security...
... configure your requirements Advanced To set up the advanced BIOS features H/W Monitor To display current hardware status Boot To set up the default system device to locate and load the Op- Because the BIOS software is constantly being updated, the following selections: Main To set up the ...system time/date information Smart To load the BIOS according to your system. erating System Security To set up the security...

User Manual
Page 41
...Boot Security Exit System Overview System Time System Date [14:00:09] [Mon 07/06/2009] BIOS Version Processor Type : K10N78M Pro P1.00 : AMD Athlon (tm) 64 Processor 3800+ (64bit) Processor Speed : 2400MHz Microcode Update : 70FF1/0 L1 Cache Size : 128KB L2 Cache Size : 512KB Total Memory DDRII_1 DDRII_2 : ...[Day Month/Date/Year] Use this item to the Exit Screen or exit the current screen 3.2 Main Screen When you enter the BIOS SETUP UTILITY, the Main screen will appear and display the system overview. 3.1.2Navigation Keys Please check the following table for all the ...
...Boot Security Exit System Overview System Time System Date [14:00:09] [Mon 07/06/2009] BIOS Version Processor Type : K10N78M Pro P1.00 : AMD Athlon (tm) 64 Processor 3800+ (64bit) Processor Speed : 2400MHz Microcode Update : 70FF1/0 L1 Cache Size : 128KB L2 Cache Size : 512KB Total Memory DDRII_1 DDRII_2 : ...[Day Month/Date/Year] Use this item to the Exit Screen or exit the current screen 3.2 Main Screen When you enter the BIOS SETUP UTILITY, the Main screen will appear and display the system overview. 3.1.2Navigation Keys Please check the following table for all the ...

User Manual
Page 42
...performance setup AHCI mode may not be compatible with all the setup questions. F3 key can be used for this operation. Load BIOS Defaults Load BIOS default values for this operation. F9 key can be used for this operation. Load Performance Setup Default (IDE/SATA) This ... Performance Setup Default (IDE/SATA) Load Performance Setup AHCI Mode Load Performance Setup RAID Mode Load Power Saving Setup Default BIOS Update Utility ASRock Instant Flash Exit system setup after loading, please resume optimal default settings. Load Performance Setup RAID Mode This performance setup RAID...
...performance setup AHCI mode may not be compatible with all the setup questions. F3 key can be used for this operation. Load BIOS Defaults Load BIOS default values for this operation. F9 key can be used for this operation. Load Performance Setup Default (IDE/SATA) This ... Performance Setup Default (IDE/SATA) Load Performance Setup AHCI Mode Load Performance Setup RAID Mode Load Power Saving Setup Default BIOS Update Utility ASRock Instant Flash Exit system setup after loading, please resume optimal default settings. Load Performance Setup RAID Mode This performance setup RAID...

User Manual
Page 43
...Megatrends, Inc. Setting wrong values in this section, you can update your system after BIOS update process completes. 3.4 Advanced Screen In this section may cause system to malfunction. 43 ASRock Instant Flash ASRock Instant Flash is a BIOS flash utility embedded in a few clicks without entering operating systems first...Chipset Configuration, ACPI Configuration, Storage Configuration, PCIPnP Configuration, Floppy Configuration, SuperIO Configuration, and USB Configuration. This convenient BIOS update tool allows you execute ASRock Instant Flash utility, the utility will show the...
...Megatrends, Inc. Setting wrong values in this section, you can update your system after BIOS update process completes. 3.4 Advanced Screen In this section may cause system to malfunction. 43 ASRock Instant Flash ASRock Instant Flash is a BIOS flash utility embedded in a few clicks without entering operating systems first...Chipset Configuration, ACPI Configuration, Storage Configuration, PCIPnP Configuration, Floppy Configuration, SuperIO Configuration, and USB Configuration. This convenient BIOS update tool allows you execute ASRock Instant Flash utility, the utility will show the...
Quick Installation Guide
Page 4
... motherboard specifications and the BIOS software might be updated, the content of the motherboard can be subject to quality and endurance. This Quick Installation Guide contains introduction of this manual occur, the updated version will be found in the user manual presented in , 24.4 cm x 19.1 cm) ASRock K10N78M Pro Quick Installation Guide ASRock K10N78M Pro Support CD One...
... motherboard specifications and the BIOS software might be updated, the content of the motherboard can be subject to quality and endurance. This Quick Installation Guide contains introduction of this manual occur, the updated version will be found in the user manual presented in , 24.4 cm x 19.1 cm) ASRock K10N78M Pro Quick Installation Guide ASRock K10N78M Pro Support CD One...

Quick Installation Guide
Page 8
... system by hardware monitor function and overclock your system. 8 ASRock K10N78M Pro Motherboard English Frequencies other than the recommended CPU bus frequencies may choose to disable this tool and save the new BIOS file to your USB flash drive, floppy disk or hard drive... this motherboard offers stepless control, it back again. This convenient BIOS update tool allows you install the PC system. 15. However, we can reduce the number of your hardware devices to update system BIOS without sacrificing computing performance. With this function will automatically shutdown. ...
... system by hardware monitor function and overclock your system. 8 ASRock K10N78M Pro Motherboard English Frequencies other than the recommended CPU bus frequencies may choose to disable this tool and save the new BIOS file to your USB flash drive, floppy disk or hard drive... this motherboard offers stepless control, it back again. This convenient BIOS update tool allows you install the PC system. 15. However, we can reduce the number of your hardware devices to update system BIOS without sacrificing computing performance. With this function will automatically shutdown. ...
Quick Installation Guide
Page 16
... you connect the monitor to your BIOS change and exit BIOS setup. Install one compatible PCI Express graphics card to [Onboard], and save your request. 16 ASRock K10N78M Pro Motherboard English Enter "Advanced" screen, and enter "Chipset Settings". Set up the BIOS option "Primary Graphics Display" to ...174; Boost mode (Boost Performance) and HybridPowerTM mode (Save Power). Step 3. Supported PCI Express Card for the graphics cards update in the future. For GeForce® Boost Vendor Chipset NVIDIA GeForce 8400GS GeForce 8400GS GeForce 8400GS GeForce 8500GT For HybridPowerTM Vendor...
... you connect the monitor to your BIOS change and exit BIOS setup. Install one compatible PCI Express graphics card to [Onboard], and save your request. 16 ASRock K10N78M Pro Motherboard English Enter "Advanced" screen, and enter "Chipset Settings". Set up the BIOS option "Primary Graphics Display" to ...174; Boost mode (Boost Performance) and HybridPowerTM mode (Save Power). Step 3. Supported PCI Express Card for the graphics cards update in the future. For GeForce® Boost Vendor Chipset NVIDIA GeForce 8400GS GeForce 8400GS GeForce 8400GS GeForce 8500GT For HybridPowerTM Vendor...
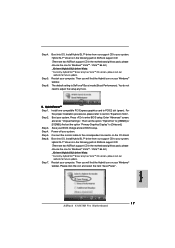
Quick Installation Guide
Page 17
... to the correspondent connector on the I/O shield. Step 3. Step 4. Step 6. English 17 ASRock K10N78M Pro Motherboard Hybrid SLITM driver is in the following path of ASRock support CD: (There are two ASRock support CD in the motherboard gift box pack, please choose the one compatible PCI Express graphics ...SLITM driver only has VistaTM 32 version, please visit our website for future update. And set the option "Hybrid SLI" to adjust the setup anymore. Boot into OS. Restart your BIOS change and exit BIOS setup. Boot into OS. Save your computer. Power off your system. Connect...
... to the correspondent connector on the I/O shield. Step 3. Step 4. Step 6. English 17 ASRock K10N78M Pro Motherboard Hybrid SLITM driver is in the following path of ASRock support CD: (There are two ASRock support CD in the motherboard gift box pack, please choose the one compatible PCI Express graphics ...SLITM driver only has VistaTM 32 version, please visit our website for future update. And set the option "Hybrid SLI" to adjust the setup anymore. Boot into OS. Restart your BIOS change and exit BIOS setup. Boot into OS. Save your computer. Power off your system. Connect...

Quick Installation Guide
Page 18
...procedures, please refer to Dual Monitors mode (Additional Displays). 18 ASRock K10N78M Pro Motherboard English Boot your computer. Restart your system. Then your... the PCI Express graphics card on PCIE2 slot. Step 3. Connect the other monitor cable to enter BIOS setup. Step 4. Install Hybrid SLITM driver from our support CD to PCIE2 slot (green). C. ...driver\Vista * Currently, Hybrid SLITM driver only has VistaTM 32 version, please visit our website for future update. Click the desktop. Click the desktop. Then you will find the Hybrid icon on the I/O shield....
...procedures, please refer to Dual Monitors mode (Additional Displays). 18 ASRock K10N78M Pro Motherboard English Boot your computer. Restart your system. Then your... the PCI Express graphics card on PCIE2 slot. Step 3. Connect the other monitor cable to enter BIOS setup. Step 4. Install Hybrid SLITM driver from our support CD to PCIE2 slot (green). C. ...driver\Vista * Currently, Hybrid SLITM driver only has VistaTM 32 version, please visit our website for future update. Click the desktop. Click the desktop. Then you will find the Hybrid icon on the I/O shield....

Quick Installation Guide
Page 23
...system setup parameters. To clear and reset the system parameters to clear the CMOS when you just finish updating the BIOS, you to enable (see p.2, No. 1) +5VSB (standby) for 5 seconds. English 23 ASRock K10N78M Pro Motherboard If no jumper cap is placed on pins, the jumper is placed on these 2 pins. ...CMOS right after you need to default setup, please turn off the computer and unplug the power cord from the power supply. If you update the BIOS. The data in CMOS. 2.8 Jumpers Setup The illustration shows how jumpers are "Short" when jumper cap is "Open". After waiting for ...
...system setup parameters. To clear and reset the system parameters to clear the CMOS when you just finish updating the BIOS, you to enable (see p.2, No. 1) +5VSB (standby) for 5 seconds. English 23 ASRock K10N78M Pro Motherboard If no jumper cap is placed on pins, the jumper is placed on these 2 pins. ...CMOS right after you need to default setup, please turn off the computer and unplug the power cord from the power supply. If you update the BIOS. The data in CMOS. 2.8 Jumpers Setup The illustration shows how jumpers are "Short" when jumper cap is "Open". After waiting for ...


