User Manual
Page 4
Software Support 72 4.1 Install Operating System 72 4.2 Support CD Information 72 4.2.1 Running Support CD 72 4.2.2 Drivers Menu 72 4.2.3 Utilities Menu 72 4.2.4 Contact Information 72 4 BIOS SETUP UTILITY 5 2 3.1 Introduction 52 3.1.1 BIOS Menu Bar 52 3.1.2 Navigation Keys 53 3.2 Main Screen 53 3.3 Advanced Screen 54 3.3.1 CPU Configuration 54 3.3.2 Chipset Configuration 59 3.3.3 ACPI Configuration 61 3.3.4 IDE Configuration...
Software Support 72 4.1 Install Operating System 72 4.2 Support CD Information 72 4.2.1 Running Support CD 72 4.2.2 Drivers Menu 72 4.2.3 Utilities Menu 72 4.2.4 Contact Information 72 4 BIOS SETUP UTILITY 5 2 3.1 Introduction 52 3.1.1 BIOS Menu Bar 52 3.1.2 Navigation Keys 53 3.2 Main Screen 53 3.3 Advanced Screen 54 3.3.1 CPU Configuration 54 3.3.2 Chipset Configuration 59 3.3.3 ACPI Configuration 61 3.3.4 IDE Configuration...
User Manual
Page 5
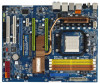
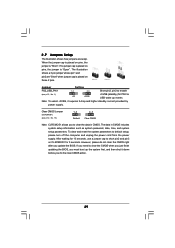
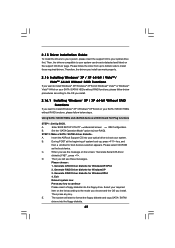
... to BIOS setup and information of this manual will be available on ASRock website as well. You may find the latest VGA cards and CPU support lists on ASRock website without notice. 1. It delivers excellent performance with robust design conforming to ASRock's commitment to the hardware installation. www.asrock.com/support/index.asp 1.1 Package Contents ASRock K10N780SLIX3-WiFi...
... to BIOS setup and information of this manual will be available on ASRock website as well. You may find the latest VGA cards and CPU support lists on ASRock website without notice. 1. It delivers excellent performance with robust design conforming to ASRock's commitment to the hardware installation. www.asrock.com/support/index.asp 1.1 Package Contents ASRock K10N780SLIX3-WiFi...
User Manual
Page 7
...ASRock Patented Technology to boost memory performance up to -Use USB 2.0 Ports - 1 x eSATAII Port - 1 x RJ-45 LAN Port with 1 SATAII connector) (see CAUTION 14) - Drivers, Utilities, AntiVirus Software (Trial Version) - Front panel audio header - 2 x USB 2.0 headers (support 4 USB 2.0 ports) (see CAUTION 12) - 1 x WiFi/E header (see CAUTION 18) 7 Connector BIOS... Feature Support CD Unique Feature - 6 x Ready-to 12.5% (see CAUTION 13) - 8Mb AMI BIOS - HD Audio Jack: Side Speaker/Rear Speaker/Central/Bass...
...ASRock Patented Technology to boost memory performance up to -Use USB 2.0 Ports - 1 x eSATAII Port - 1 x RJ-45 LAN Port with 1 SATAII connector) (see CAUTION 14) - Drivers, Utilities, AntiVirus Software (Trial Version) - Front panel audio header - 2 x USB 2.0 headers (support 4 USB 2.0 ports) (see CAUTION 12) - 1 x WiFi/E header (see CAUTION 18) 7 Connector BIOS... Feature Support CD Unique Feature - 6 x Ready-to 12.5% (see CAUTION 13) - 8Mb AMI BIOS - HD Audio Jack: Side Speaker/Rear Speaker/Central/Bass...
User Manual
Page 8
...XP / XP Media Center / XP 64-bit / VistaTM / VistaTM 64-bit compliant Certifications - We are not responsible for more information. ASRock website http://www.asrock.com 2. Due to reverse the direction of memory modules on page 17 for details. 3. For Windows® XP 64-bit and Windows...3-Way SLITM technology. It should be HT1.0 (2000 MT/s). If you adopt. Please read the installation guide of ASRock SLI/XFire Switch Card in the BIOS, applying Untied Overclocking Technology, or using the thirdparty overclocking tools. Before you implement Dual Channel Memory Technology, make sure ...
...XP / XP Media Center / XP 64-bit / VistaTM / VistaTM 64-bit compliant Certifications - We are not responsible for more information. ASRock website http://www.asrock.com 2. Due to reverse the direction of memory modules on page 17 for details. 3. For Windows® XP 64-bit and Windows...3-Way SLITM technology. It should be HT1.0 (2000 MT/s). If you adopt. Please read the installation guide of ASRock SLI/XFire Switch Card in the BIOS, applying Untied Overclocking Technology, or using the thirdparty overclocking tools. Before you implement Dual Channel Memory Technology, make sure ...
User Manual
Page 9
...channel, 4-channel, 6-channel, and 8-channel modes. Power Management for proper connection. 10. In other words, it to page 11. ASRock website: http://www.asrock.com 9 To enable DTS function, you to SATAII mode. Featuring an advanced proprietary hardware and software design, Intelligent Energy Saver is a...enable Cool 'n' Quiet option in the BIOS setup in the future. PCIE1 and PCIE2 slots. For the proper installation of ASRock OC Tuner. Please check the table on page 19. 7. WiFi/E header supports WiFi+AP function with ASRock WiFi-802.11g or WiFi-802.11n module, an easy-to ...
...channel, 4-channel, 6-channel, and 8-channel modes. Power Management for proper connection. 10. In other words, it to page 11. ASRock website: http://www.asrock.com 9 To enable DTS function, you to SATAII mode. Featuring an advanced proprietary hardware and software design, Intelligent Energy Saver is a...enable Cool 'n' Quiet option in the BIOS setup in the future. PCIE1 and PCIE2 slots. For the proper installation of ASRock OC Tuner. Please check the table on page 19. 7. WiFi/E header supports WiFi+AP function with ASRock WiFi-802.11g or WiFi-802.11n module, an easy-to ...
User Manual
Page 10
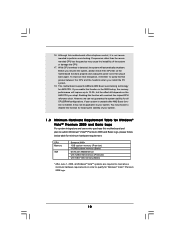
...not guarantee the system stability for all Windows® VistaTM systems are required to meet above minimum hardware requirements in the BIOS setup, the memory performance will improve up to 12.5%, but the effect still depends on the motherboard functions properly and unplug...Boost function is not recommended to disable this function will automatically shutdown. Enabling this function for minimum hardware requirement. This motherboard supports ASRock AM2 Boost overclocking technology for Windows® VistaTM Premium 2008 logo. 10 CPU Memory VGA Sempron 2800+ 1GB system memory (...
...not guarantee the system stability for all Windows® VistaTM systems are required to meet above minimum hardware requirements in the BIOS setup, the memory performance will improve up to 12.5%, but the effect still depends on the motherboard functions properly and unplug...Boost function is not recommended to disable this function will automatically shutdown. Enabling this function for minimum hardware requirement. This motherboard supports ASRock AM2 Boost overclocking technology for Windows® VistaTM Premium 2008 logo. 10 CPU Memory VGA Sempron 2800+ 1GB system memory (...
User Manual
Page 28
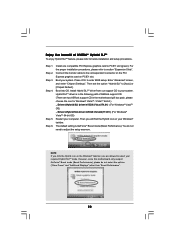
... your system. Hybrid SLITM driver is GeForce® Boost mode (Boost Performance). Step 2. For the proper installation procedures, please refer to enter BIOS setup. Then you are two ASRock support CD in the following path of NVIDIA® Hybrid SLITM To enjoy Hybrid SLITM feature, please refer to below installation and setup...® taskbar. Enter "Advanced" screen, and enter "Chipset Settings". Step 3. Then set the option "Hybrid SLI" to [Auto] or [Chipset Default]. Enjoy the benefit of ASRock support CD: (There are allowed to select your required Hybrid SLITM mode.
... your system. Hybrid SLITM driver is GeForce® Boost mode (Boost Performance). Step 2. For the proper installation procedures, please refer to enter BIOS setup. Then you are two ASRock support CD in the following path of NVIDIA® Hybrid SLITM To enjoy Hybrid SLITM feature, please refer to below installation and setup...® taskbar. Enter "Advanced" screen, and enter "Chipset Settings". Step 3. Then set the option "Hybrid SLI" to [Auto] or [Chipset Default]. Enjoy the benefit of ASRock support CD: (There are allowed to select your required Hybrid SLITM mode.
User Manual
Page 29
... do not clear the CMOS right after you to enable (see p.12, No. 13) 1_2 2_3 Default Clear CMOS Note: CLRCMOS1 allows you update the BIOS. If no jumper cap is placed on pins, the jumper is "Short". To clear and reset the system parameters to clear the CMOS when you... just finish updating the BIOS, you must boot up events. When the jumper cap is placed on pins, the jumper is "Open". The illustration shows a 3-pin jumper whose pin1 and...
... do not clear the CMOS right after you to enable (see p.12, No. 13) 1_2 2_3 Default Clear CMOS Note: CLRCMOS1 allows you update the BIOS. If no jumper cap is placed on pins, the jumper is "Short". To clear and reset the system parameters to clear the CMOS when you... just finish updating the BIOS, you must boot up events. When the jumper cap is placed on pins, the jumper is "Open". The illustration shows a 3-pin jumper whose pin1 and...
User Manual
Page 32
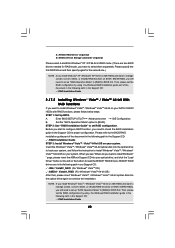
... the front panel audio cable that allows convenient connection and control of audio devices. 1. Enter BIOS Setup Utility. This connector allows you to receive stereo audio input from [Auto] to [Enabled...HD_AUDIO1) (see p.12, No. 31) CD1 This header supports the Hot Plug detection function for ASRock DeskExpress. Connect Mic_IN (MIC) to OUT2_L. E. Enter Advanced Settings, and then select Chipset Configuration...the instruction in our manual and chassis manual to function correctly. If you use WiFi+AP functin on this motherboard, this picture for AC'97 audio panel. To ...
... the front panel audio cable that allows convenient connection and control of audio devices. 1. Enter BIOS Setup Utility. This connector allows you to receive stereo audio input from [Auto] to [Enabled...HD_AUDIO1) (see p.12, No. 31) CD1 This header supports the Hot Plug detection function for ASRock DeskExpress. Connect Mic_IN (MIC) to OUT2_L. E. Enter Advanced Settings, and then select Chipset Configuration...the instruction in our manual and chassis manual to function correctly. If you use WiFi+AP functin on this motherboard, this picture for AC'97 audio panel. To ...
User Manual
Page 37
... is equipped with eSATAII interface, you can insert or remove your eSATAII devices to non-RAID mode. If you want to use eSATAII function in BIOS setup to exchange drives easily. If you set "SATA Operation Mode" option in working condition. 2. eSATAII allows you want to add the eSATAII... interface, the external SATAII specification. If you want to use the eSATAII HDD as a RAID disk, please set "SATA Operation Mode" option in BIOS setup to enjoy the SATAII function provided by the I/O of RAID mode, non-RAID mode and AHCI mode. 37 For example, with Hot Plug ...
... is equipped with eSATAII interface, you can insert or remove your eSATAII devices to non-RAID mode. If you want to use eSATAII function in BIOS setup to exchange drives easily. If you set "SATA Operation Mode" option in working condition. 2. eSATAII allows you want to add the eSATAII... interface, the external SATAII specification. If you want to use the eSATAII HDD as a RAID disk, please set "SATA Operation Mode" option in BIOS setup to enjoy the SATAII function provided by the I/O of RAID mode, non-RAID mode and AHCI mode. 37 For example, with Hot Plug ...
User Manual
Page 45
... devices with NCQ and Hot Plug functions STEP 1: Set Up BIOS. Enter BIOS SETUP UTILITY Advanced screen IDE Configuration. A. Then you see these messages, Please choose: 1. Exit Reboot system now Press any key. STEP 2: Make a SATA / SATAII driver diskette. Insert the ASRock Support CD into the floppy diskette. 45 During POST at the...
... devices with NCQ and Hot Plug functions STEP 1: Set Up BIOS. Enter BIOS SETUP UTILITY Advanced screen IDE Configuration. A. Then you see these messages, Please choose: 1. Exit Reboot system now Press any key. STEP 2: Make a SATA / SATAII driver diskette. Insert the ASRock Support CD into the floppy diskette. 45 During POST at the...
User Manual
Page 46
... : A. Set the "SATA Operation Mode" option to install a third-party AHCI driver. " page, please insert the ASRock Support CD into the optical drive to boot your system, and follow step 1 to set up the BIOS option "SATA Operation Mode" to continue the installation. 46 NVIDIA® AHCI drivers are as below steps...
... : A. Set the "SATA Operation Mode" option to install a third-party AHCI driver. " page, please insert the ASRock Support CD into the optical drive to boot your system, and follow step 1 to set up the BIOS option "SATA Operation Mode" to continue the installation. 46 NVIDIA® AHCI drivers are as below steps...
User Manual
Page 47
... diskette by following path in the Support CD for proper configuration. If you need to [RAID]. STEP 4: Use "RAID Installation Guide" to set up the BIOS option "SATA Operation Mode" to check the RAID installation guide in the Support CD: .. \ RAID Installation Guide STEP 5: Install Windows® XP / XP ...64-bit OS on your system. Please refer to the BIOS RAID installation guide part of Windows® setup, press F6 to install Windows® XP / Windows® XP 64-bit on IDE HDD, please skip...
... diskette by following path in the Support CD for proper configuration. If you need to [RAID]. STEP 4: Use "RAID Installation Guide" to set up the BIOS option "SATA Operation Mode" to check the RAID installation guide in the Support CD: .. \ RAID Installation Guide STEP 5: Install Windows® XP / XP ...64-bit OS on your system. Please refer to the BIOS RAID installation guide part of Windows® setup, press F6 to install Windows® XP / Windows® XP 64-bit on IDE HDD, please skip...
User Manual
Page 48
...RAID function, you have to select them separately. " page, please insert the ASRock Support CD into your optical drive, and click the "Load Driver" button on the left on your system. STEP 1: Set Up BIOS. Then, please set the RAID configuration by using the Windows RAID installation guide in...174; VistaTM / VistaTM 64-bit With RAID Functions If you still need to set up "SATA Operation Mode" to check the RAID installation guide in BIOS first. NVIDIA nForce Storage Controller (required) Please select A and B for RAID mode, you need to set up "SATA Operation Mode" to set...
...RAID function, you have to select them separately. " page, please insert the ASRock Support CD into your optical drive, and click the "Load Driver" button on the left on your system. STEP 1: Set Up BIOS. Then, please set the RAID configuration by using the Windows RAID installation guide in...174; VistaTM / VistaTM 64-bit With RAID Functions If you still need to set up "SATA Operation Mode" to check the RAID installation guide in BIOS first. NVIDIA nForce Storage Controller (required) Please select A and B for RAID mode, you need to set up "SATA Operation Mode" to set...

User Manual
Page 51
... untied during overclocking, FSB enjoys better margin due to fixed PCI / PCIE buses. Before you enable Untied Overclocking function, please enter "Overclock Mode" option of BIOS setup to set the selection from [Auto] to the warning on page 8 for the possible overclocking risk before you apply Untied Overclocking Technology. 51 Please...
... untied during overclocking, FSB enjoys better margin due to fixed PCI / PCIE buses. Before you enable Untied Overclocking function, please enter "Overclock Mode" option of BIOS setup to set the selection from [Auto] to the warning on page 8 for the possible overclocking risk before you apply Untied Overclocking Technology. 51 Please...

User Manual
Page 52
...UTILITY, otherwise, POST will continue with the following selections: Main To set up the system time/date information Advanced To set up the advanced BIOS features H/W Monitor To display current hardware status Boot To set up the default system device to locate and load the Operating System Security To...reference purpose only, and they may also restart by pressing the reset button on the menu bar, and then press to configure your screen. 3.1.1 BIOS Menu Bar The top of the screen has a menu bar with its test routines. You may not exactly match what you start up the ...
...UTILITY, otherwise, POST will continue with the following selections: Main To set up the system time/date information Advanced To set up the advanced BIOS features H/W Monitor To display current hardware status Boot To set up the default system device to locate and load the Operating System Security To...reference purpose only, and they may also restart by pressing the reset button on the menu bar, and then press to configure your screen. 3.1.1 BIOS Menu Bar The top of the screen has a menu bar with its test routines. You may not exactly match what you start up the ...

User Manual
Page 53
... UTILITY Main Advanced H/W Monitor Boot Security Exit System Overview System Time System Date [17:00:09] [Sat 04/12/2008] BIOS Version : K10N780SLIX3-WiFi P1.00 Processor Type : AMD Athlon(tm) 64 X2 Dual Core Processor 6000+ (64bit) Processor Speed : 3000MHz Microcode Update : 40F33/0 L1 ... Inc. System Time [Hour:Minute:Second] Use this item to the Exit Screen or exit the current screen 3.2 Main Screen When you enter the BIOS SETUP UTILITY, the Main screen will appear and display the system overview. Navigation Key(s) / / + / Function Description Moves cursor left or right ...
... UTILITY Main Advanced H/W Monitor Boot Security Exit System Overview System Time System Date [17:00:09] [Sat 04/12/2008] BIOS Version : K10N780SLIX3-WiFi P1.00 Processor Type : AMD Athlon(tm) 64 X2 Dual Core Processor 6000+ (64bit) Processor Speed : 3000MHz Microcode Update : 40F33/0 L1 ... Inc. System Time [Hour:Minute:Second] Use this item to the Exit Screen or exit the current screen 3.2 Main Screen When you enter the BIOS SETUP UTILITY, the Main screen will appear and display the system overview. Navigation Key(s) / / + / Function Description Moves cursor left or right ...
User Manual
Page 54
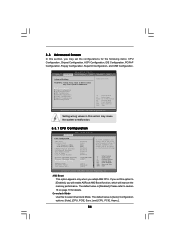
If you will enable ASRock AM2 Boost function, which will improve the memory ...American Megatrends, Inc. Configuration options: [Auto], [CPU, PCIE, Sync.] and [CPU, PCIE, Async.]. 54 Main BIOS SETUP UTILITY Advanced H/W Monitor Boot Security Exit Advanced Settings WARNING : Setting wrong values in below sections may cause system to... malfunction. 3.3 Advanced Screen In this section may cause the system to malfunction. 3.3.1 CPU Configuration BIOS SETUP UTILITY Advanced CPU Configuration AM2 Boost Overclock Mode CPU Frequency (MHz) PCIE Frequency (MHz) CPU/...
If you will enable ASRock AM2 Boost function, which will improve the memory ...American Megatrends, Inc. Configuration options: [Auto], [CPU, PCIE, Sync.] and [CPU, PCIE, Async.]. 54 Main BIOS SETUP UTILITY Advanced H/W Monitor Boot Security Exit Advanced Settings WARNING : Setting wrong values in below sections may cause system to... malfunction. 3.3 Advanced Screen In this section may cause the system to malfunction. 3.3.1 CPU Configuration BIOS SETUP UTILITY Advanced CPU Configuration AM2 Boost Overclock Mode CPU Frequency (MHz) PCIE Frequency (MHz) CPU/...

User Manual
Page 56
... CPU. North Bridge Target Frequency This option appears only when you adopt Phenom CPU. However, for safety and system stability, it is set to [Manual]; BIOS SETUP UTILITY Advanced CPU Configuration AM2 Boost Overclock Mode CPU Frequency (MHz) PCIE Frequency (MHz) CPU/LDT Spread Spectrum SATA Spread Spectrum Boot Failure Guard...
... CPU. North Bridge Target Frequency This option appears only when you adopt Phenom CPU. However, for safety and system stability, it is set to [Manual]; BIOS SETUP UTILITY Advanced CPU Configuration AM2 Boost Overclock Mode CPU Frequency (MHz) PCIE Frequency (MHz) CPU/LDT Spread Spectrum SATA Spread Spectrum Boot Failure Guard...
User Manual
Page 59
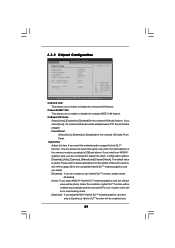
... Audio feature. Configuration options: [Disabled], [Auto], [Optimize], [Manual] and [Chipset Default]. Under this motherboard to enable or disable the onboard IEEE 1394 feature. 3.3.2 Chipset Configuration BIOS SETUP UTILITY Advanced Chipset Settings Onboard LAN Onboard 1394 Onboard HD Audio Front Panel Hybrid SLI Primary Graphics Adapter CPU - NB Link Speed CPU - Onboard...
... Audio feature. Configuration options: [Disabled], [Auto], [Optimize], [Manual] and [Chipset Default]. Under this motherboard to enable or disable the onboard IEEE 1394 feature. 3.3.2 Chipset Configuration BIOS SETUP UTILITY Advanced Chipset Settings Onboard LAN Onboard 1394 Onboard HD Audio Front Panel Hybrid SLI Primary Graphics Adapter CPU - NB Link Speed CPU - Onboard...


