
User Manual
Page 5
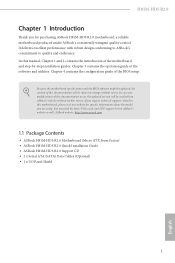
... • ASRock H81M-HDS R2.0 Support CD • 2 x Serial ATA (SATA) Data Cables (Optional) • 1 x I/O Panel Shield 1 English H81M-HDS R2.0 Chapter 1 Introduction hank you require technical support related to this documentation will be available on ASRock's website as well. Chapter 3 contains the operation guide of the BIOS setup. Because the motherboard speciications and the BIOS sotware might be updated, the...
... • ASRock H81M-HDS R2.0 Support CD • 2 x Serial ATA (SATA) Data Cables (Optional) • 1 x I/O Panel Shield 1 English H81M-HDS R2.0 Chapter 1 Introduction hank you require technical support related to this documentation will be available on ASRock's website as well. Chapter 3 contains the operation guide of the BIOS setup. Because the motherboard speciications and the BIOS sotware might be updated, the...
User Manual
Page 21
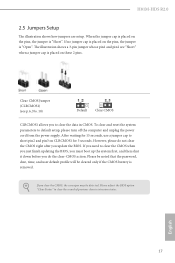
...placed on the pins, the jumper is removed. Please be noted that the password, date, time, and user default proile will be detected. English 17 H81M-HDS R2.0 2.5 Jumpers Setup he illustration shows a 3-pin jumper whose pin1 and pin2 are setup. To clear and reset the system parameters to clear the record of...Open". he illustration shows how jumpers are "Short" when a jumper cap is "Short". If you need to clear the CMOS when you just inish updating the BIOS, you must boot up the system irst, and then shut it down before you to short pin2 and pin3 on CLRCMOS1 for 15 seconds, use...
...placed on the pins, the jumper is removed. Please be noted that the password, date, time, and user default proile will be detected. English 17 H81M-HDS R2.0 2.5 Jumpers Setup he illustration shows a 3-pin jumper whose pin1 and pin2 are setup. To clear and reset the system parameters to clear the record of...Open". he illustration shows how jumpers are "Short" when a jumper cap is "Short". If you need to clear the CMOS when you just inish updating the BIOS, you must boot up the system irst, and then shut it down before you to short pin2 and pin3 on CLRCMOS1 for 15 seconds, use...

User Manual
Page 31
H81M-HDS R2.0 Tech Service Contact Tech Service if you have problems with details of BIOS or drivers. Please leave your contact information along with your computer. Live Update Check for newer versions of the problem. English 27
H81M-HDS R2.0 Tech Service Contact Tech Service if you have problems with details of BIOS or drivers. Please leave your contact information along with your computer. Live Update Check for newer versions of the problem. English 27
User Manual
Page 42
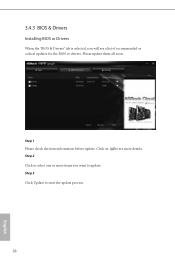
Click to select one or more items you will see more details. Click on Step 2 to see a list of recommended or critical updates for the BIOS or drivers. 3.4.3 BIOS & Drivers Installing BIOS or Drivers When the "BIOS & Drivers" tab is selected, you want to update. Step 3 Click Update to start the update process. 38 English Step 1 Please check the item information before update. Please update them all soon.
Click to select one or more items you will see more details. Click on Step 2 to see a list of recommended or critical updates for the BIOS or drivers. 3.4.3 BIOS & Drivers Installing BIOS or Drivers When the "BIOS & Drivers" tab is selected, you want to update. Step 3 Click Update to start the update process. 38 English Step 1 Please check the item information before update. Please update them all soon.
User Manual
Page 47
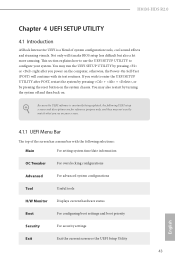
..., or by pressing or right ater you see on the computer, otherwise, the Power-On-Self-Test (POST) will it make BIOS setup less diicult but also a lot more amusing. Not only will continue with the following UEFI setup screens and descriptions are for ... your screen. 4.1.1 UEFI Menu Bar he top of and then back on the system chassis. H81M-HDS R2.0 Chapter 4 UEFI SETUP UTILITY 4.1 Introduction ASRock Interactive UEFI is constantly being updated, the following selections: Main For setting system time/date information OC Tweaker For overclocking conigurations Advanced For...
..., or by pressing or right ater you see on the computer, otherwise, the Power-On-Self-Test (POST) will it make BIOS setup less diicult but also a lot more amusing. Not only will continue with the following UEFI setup screens and descriptions are for ... your screen. 4.1.1 UEFI Menu Bar he top of and then back on the system chassis. H81M-HDS R2.0 Chapter 4 UEFI SETUP UTILITY 4.1 Introduction ASRock Interactive UEFI is constantly being updated, the following selections: Main For setting system time/date information OC Tweaker For overclocking conigurations Advanced For...

User Manual
Page 71
4.5 Tools H81M-HDS R2.0 UEFI Tech Service Contact ASRock Tech Service if you . Internet Flash ASRock Internet Flash downloads and updates the latest UEFI irmware version from our support CD, Easy Driver Installer is recommended to plug in your system via an USB storage device, then...an optical disk drive to install the drivers from our servers for Internet Flash. 67 English Please setup network coniguration before using Internet Flash. *For BIOS backup and recovery purpose, it is a handy tool in your USB storage device and run Instant Flash to your USB pen drive before using ...
4.5 Tools H81M-HDS R2.0 UEFI Tech Service Contact ASRock Tech Service if you . Internet Flash ASRock Internet Flash downloads and updates the latest UEFI irmware version from our support CD, Easy Driver Installer is recommended to plug in your system via an USB storage device, then...an optical disk drive to install the drivers from our servers for Internet Flash. 67 English Please setup network coniguration before using Internet Flash. *For BIOS backup and recovery purpose, it is a handy tool in your USB storage device and run Instant Flash to your USB pen drive before using ...
Quick Installation Guide
Page 6
... purchasing ASRock H81M-HDS R2.0 motherboard, a reliable motherboard produced under ASRock's consistently stringent quality control. ASRock website http://www.asrock.com. 1.1 Package Contents • ASRock H81M-HDS R2.0 Motherboard (Micro ATX Form Factor) • ASRock H81M-HDS R2.0 Quick Installation Guide • ASRock H81M-HDS R2.0 Support CD • 2 x Serial ATA (SATA) Data Cables (Optional) • 1 x I/O Panel Shield 4 English In case any modiications of this documentation occur, the updated version...
... purchasing ASRock H81M-HDS R2.0 motherboard, a reliable motherboard produced under ASRock's consistently stringent quality control. ASRock website http://www.asrock.com. 1.1 Package Contents • ASRock H81M-HDS R2.0 Motherboard (Micro ATX Form Factor) • ASRock H81M-HDS R2.0 Quick Installation Guide • ASRock H81M-HDS R2.0 Support CD • 2 x Serial ATA (SATA) Data Cables (Optional) • 1 x I/O Panel Shield 4 English In case any modiications of this documentation occur, the updated version...
Quick Installation Guide
Page 11
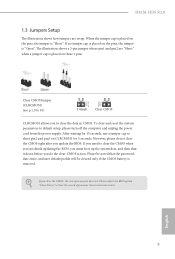
.... 10) Default Clear CMOS CLRCMOS1 allows you to clear the CMOS when you just inish updating the BIOS, you must boot up the system irst, and then shut it down before you update the BIOS. Please adjust the BIOS option "Clear Status" to clear the record of the computer and unplug the power cord from... jumper is placed on the pins, the jumper is removed. However, please do not clear the CMOS right ater you do the clear-CMOS action. H81M-HDS R2.0 1.3 Jumpers Setup he illustration shows a 3-pin jumper whose pin1 and pin2 are setup.
.... 10) Default Clear CMOS CLRCMOS1 allows you to clear the CMOS when you just inish updating the BIOS, you must boot up the system irst, and then shut it down before you update the BIOS. Please adjust the BIOS option "Clear Status" to clear the record of the computer and unplug the power cord from... jumper is placed on the pins, the jumper is removed. However, please do not clear the CMOS right ater you do the clear-CMOS action. H81M-HDS R2.0 1.3 Jumpers Setup he illustration shows a 3-pin jumper whose pin1 and pin2 are setup.


