
User Manual
Page 3
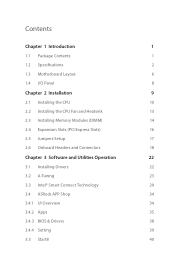
... Contents 1 1.2 Speciications 2 1.3 Motherboard Layout 6 1.4 I/O Panel 8 Chapter 2 Installation 9 2.1 Installing the CPU 10 2.2 Installing the CPU Fan and Heatsink 13 2.3 Installing Memory Modules (DIMM) 14 2.4 Expansion Slots (PCI Express Slots) 16 2.5 Jumpers Setup 17 2.6 Onboard Headers and Connectors 18 Chapter 3 Software and Utilities Operation 22 3.1 Installing Drivers 22 3.2 A-Tuning 23 3.3 Intel® Smart Connect Technology 29 3.4 ASRock APP Shop 34 3.4.1 UI Overview 34 3.4.2 Apps 35 3.4.3 BIOS & Drivers 38 3.4.4 Setting 39 3.5 Start8 40
... Contents 1 1.2 Speciications 2 1.3 Motherboard Layout 6 1.4 I/O Panel 8 Chapter 2 Installation 9 2.1 Installing the CPU 10 2.2 Installing the CPU Fan and Heatsink 13 2.3 Installing Memory Modules (DIMM) 14 2.4 Expansion Slots (PCI Express Slots) 16 2.5 Jumpers Setup 17 2.6 Onboard Headers and Connectors 18 Chapter 3 Software and Utilities Operation 22 3.1 Installing Drivers 22 3.2 A-Tuning 23 3.3 Intel® Smart Connect Technology 29 3.4 ASRock APP Shop 34 3.4.1 UI Overview 34 3.4.2 Apps 35 3.4.3 BIOS & Drivers 38 3.4.4 Setting 39 3.5 Start8 40
User Manual
Page 5
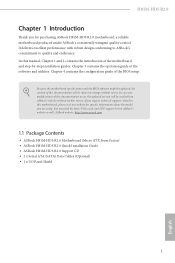
...'s consistently stringent quality control. You may ind the latest VGA cards and CPU support list on ASRock's website without notice. Because the motherboard speciications and the BIOS sotware might be updated, the content of the motherboard and step-by-step installation guides. ASRock website http://www.asrock.com. 1.1 Package Contents • ASRock H81M-HDS R2.0 Motherboard (Micro ATX Form Factor) • ASRock H81M-HDS R2.0 Quick Installation Guide • ASRock H81M-HDS R2.0 Support CD • 2 x Serial ATA (SATA) Data Cables (Optional) • 1 x I/O Panel Shield 1 English...
...'s consistently stringent quality control. You may ind the latest VGA cards and CPU support list on ASRock's website without notice. Because the motherboard speciications and the BIOS sotware might be updated, the content of the motherboard and step-by-step installation guides. ASRock website http://www.asrock.com. 1.1 Package Contents • ASRock H81M-HDS R2.0 Motherboard (Micro ATX Form Factor) • ASRock H81M-HDS R2.0 Quick Installation Guide • ASRock H81M-HDS R2.0 Support CD • 2 x Serial ATA (SATA) Data Cables (Optional) • 1 x I/O Panel Shield 1 English...
User Manual
Page 7
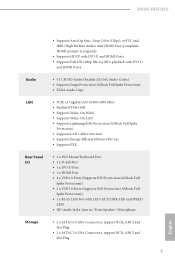
H81M-HDS R2.0 Audio LAN Rear Panel I/O Storage • Supports Auto Lip Sync, Deep Color (12bpc), xvYCC and HBR (High Bit Rate Audio) with HDMI Port (Compliant HDMI monitor is required) • Supports HDCP with DVI-D and HDMI Ports • Supports Full HD 1080p Blu-ray (BD) playback with DVI-D and HDMI Ports • 5.1 CH HD Audio (Realtek ALC662 Audio Codec) • Supports Surge Protection (ASRock Full Spike Protection) • ELNA Audio Caps • PCIE x1 Gigabit LAN 10/100/1000 Mb...
H81M-HDS R2.0 Audio LAN Rear Panel I/O Storage • Supports Auto Lip Sync, Deep Color (12bpc), xvYCC and HBR (High Bit Rate Audio) with HDMI Port (Compliant HDMI monitor is required) • Supports HDCP with DVI-D and HDMI Ports • Supports Full HD 1080p Blu-ray (BD) playback with DVI-D and HDMI Ports • 5.1 CH HD Audio (Realtek ALC662 Audio Codec) • Supports Surge Protection (ASRock Full Spike Protection) • ELNA Audio Caps • PCIE x1 Gigabit LAN 10/100/1000 Mb...
User Manual
Page 8
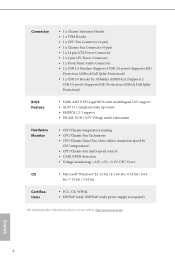
...x CPU Fan Connector (4-pin) • 1 x Chassis Fan Connector (4-pin) • 1 x 24 pin ATX Power Connector • 1 x 4 pin 12V Power Connector • 1 x Front Panel Audio Connector • 2 x USB 2.0 Headers (Support 4 USB 2.0 ports) (Supports ESD Protection (ASRock Full Spike Protection)) • 1 x USB 3.0 Header by ASMedia ASM1042A (Supports 2 USB 3.0 ports) (Supports ESD Protection (ASRock Full Spike Protection)) • 32Mb AMI UEFI Legal BIOS with multilingual GUI support • ACPI 1.1 Compliant wake up events • SMBIOS 2.3.1 support • DRAM, PCH 1.05V Voltage multi...
...x CPU Fan Connector (4-pin) • 1 x Chassis Fan Connector (4-pin) • 1 x 24 pin ATX Power Connector • 1 x 4 pin 12V Power Connector • 1 x Front Panel Audio Connector • 2 x USB 2.0 Headers (Support 4 USB 2.0 ports) (Supports ESD Protection (ASRock Full Spike Protection)) • 1 x USB 3.0 Header by ASMedia ASM1042A (Supports 2 USB 3.0 ports) (Supports ESD Protection (ASRock Full Spike Protection)) • 32Mb AMI UEFI Legal BIOS with multilingual GUI support • ACPI 1.1 Compliant wake up events • SMBIOS 2.3.1 support • DRAM, PCH 1.05V Voltage multi...
User Manual
Page 10
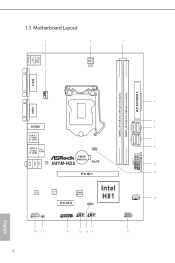
1.3 Motherboard Layout 1 2 3 USB 2.0 T: USB0 B: USB1 PS2 Keyboard/ Mouse ATX12V1 DVI1 AT X P W R 1 DDR3_B1 (64 bit, 240-pin module) DDR3_A1 (64 bit, 240-pin module) CPU_FAN1 4 VGA1 Top: LINE IN Center: FRONT Bottom: MIC IN 5 HDMI 6 SATA2_4 SATA2_5 SATA3_0 SATA3_1 USB 3.0 T: USB0 B: USB1 7 USB 2.0 T: USB2 Top: RJ-45 CLRCMOS1 1 8 B: USB3 CMOS Battery LAN H81M-HDS RoHS 9 USB3_2_3 1 Front USB 3.0 10 PCIE1 Audio CODEC Super I/O Intel 32Mb BIOS H81 PCIE2 SPEAKER1 1 CHA_FAN1 11...
1.3 Motherboard Layout 1 2 3 USB 2.0 T: USB0 B: USB1 PS2 Keyboard/ Mouse ATX12V1 DVI1 AT X P W R 1 DDR3_B1 (64 bit, 240-pin module) DDR3_A1 (64 bit, 240-pin module) CPU_FAN1 4 VGA1 Top: LINE IN Center: FRONT Bottom: MIC IN 5 HDMI 6 SATA2_4 SATA2_5 SATA3_0 SATA3_1 USB 3.0 T: USB0 B: USB1 7 USB 2.0 T: USB2 Top: RJ-45 CLRCMOS1 1 8 B: USB3 CMOS Battery LAN H81M-HDS RoHS 9 USB3_2_3 1 Front USB 3.0 10 PCIE1 Audio CODEC Super I/O Intel 32Mb BIOS H81 PCIE2 SPEAKER1 1 CHA_FAN1 11...
User Manual
Page 21
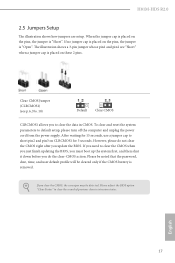
... from the power supply. Please adjust the BIOS option "Clear Status" to clear the data in CMOS. When the jumper cap is placed on the pins, the jumper is "Open". If you update the BIOS. If no jumper cap is placed on the pins, the jumper is "Short". Please be noted that the password, date, time, and user default proile will be detected. English 17 To clear and reset the system...
... from the power supply. Please adjust the BIOS option "Clear Status" to clear the data in CMOS. When the jumper cap is placed on the pins, the jumper is "Open". If you update the BIOS. If no jumper cap is placed on the pins, the jumper is "Short". Please be noted that the password, date, time, and user default proile will be detected. English 17 To clear and reset the system...
User Manual
Page 23
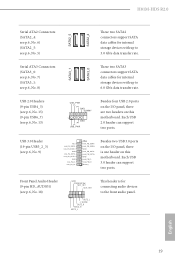
... there is for connecting audio devices to the front audio panel. Front Panel Audio Header (9-pin HD_AUDIO1) (see p.6, No. 9) Vbus IntA_PA_SSRXIntA_PA_SSRX+ GND IntA_PA_SSTXIntA_PA_SSTX+ GND IntA_PA_DIntA_PA_D+ Vbus IntA_PB_SSRXIntA_PB_SSRX+ GND IntA_PB_SSTXIntA_PB_SSTX+ GND IntA_PB_DIntA_PB_D+ Dummy 1 Besides two USB 3.0 ports on the I /O panel, there are two headers on this motherboard. H81M-HDS R2.0 Serial ATA2 Connectors (SATA2_4: see p.6, No. 6) (SATA2_5: see p.6, No. 5) SATA2_5 SATA2_4 hese two SATA2 connectors support SATA data cables for internal storage devices with up to...
... there is for connecting audio devices to the front audio panel. Front Panel Audio Header (9-pin HD_AUDIO1) (see p.6, No. 9) Vbus IntA_PA_SSRXIntA_PA_SSRX+ GND IntA_PA_SSTXIntA_PA_SSTX+ GND IntA_PA_DIntA_PA_D+ Vbus IntA_PB_SSRXIntA_PB_SSRX+ GND IntA_PB_SSTXIntA_PB_SSTX+ GND IntA_PB_DIntA_PB_D+ Dummy 1 Besides two USB 3.0 ports on the I /O panel, there are two headers on this motherboard. H81M-HDS R2.0 Serial ATA2 Connectors (SATA2_4: see p.6, No. 6) (SATA2_5: see p.6, No. 5) SATA2_5 SATA2_4 hese two SATA2 connectors support SATA data cables for internal storage devices with up to...
User Manual
Page 24
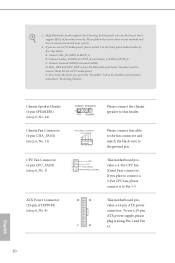
.... E. High Deinition Audio supports Jack Sensing, but the panel wire on the chassis must support HDA to install your system. 2. MIC_RET and OUT_RET are for the AC'97 audio panel. D. CPU Fan Connector (4-pin CPU_FAN1) (see p.6, No. 4) 12 24 1 13 his motherboard pro- 2 +12V 3 FAN_SPEED vides a 4-Pin CPU fan 4 FAN_SPEED_CONTROL (Quiet Fan) connector. To use an AC'97 audio panel, please install it to connect them for the HD audio panel only. Please follow the instructions in the Realtek Control panel and...
.... E. High Deinition Audio supports Jack Sensing, but the panel wire on the chassis must support HDA to install your system. 2. MIC_RET and OUT_RET are for the AC'97 audio panel. D. CPU Fan Connector (4-pin CPU_FAN1) (see p.6, No. 4) 12 24 1 13 his motherboard pro- 2 +12V 3 FAN_SPEED vides a 4-Pin CPU fan 4 FAN_SPEED_CONTROL (Quiet Fan) connector. To use an AC'97 audio panel, please install it to connect them for the HD audio panel only. Please follow the instructions in the Realtek Control panel and...

User Manual
Page 25
... Please connect an ATX 12V power supply to this connector. A TPM system also helps enhance network security, protects digital identities, and ensures platform integrity. his motherboard supports CASE OPEN detection feature that detects if the chassis cove has been removed. English 21 his feature requires a chassis with chassis intrusion detection design. his connector supports Trusted Platform Module (TPM) system, which can securely store keys, digital certiicates, passwords...
... Please connect an ATX 12V power supply to this connector. A TPM system also helps enhance network security, protects digital identities, and ensures platform integrity. his motherboard supports CASE OPEN detection feature that detects if the chassis cove has been removed. English 21 his feature requires a chassis with chassis intrusion detection design. his connector supports Trusted Platform Module (TPM) system, which can securely store keys, digital certiicates, passwords...
User Manual
Page 26
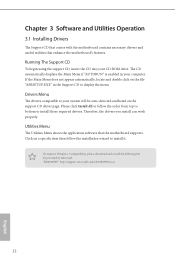
... the motherboard contains necessary drivers and useful utilities that the motherboard supports. Utilities Menu he CD automatically displays the Main Menu if "AUTORUN" is enabled in the Support CD to display the menu. "KB2720599": http://support.microsot.com/kb/2720599/en-us 22 English If the Main Menu does not appear automatically, locate and double click on the support CD driver page. herefore, the drivers you install can work properly. To improve Windows 7 compatibility, please download and install...
... the motherboard contains necessary drivers and useful utilities that the motherboard supports. Utilities Menu he CD automatically displays the Main Menu if "AUTORUN" is enabled in the Support CD to display the menu. "KB2720599": http://support.microsot.com/kb/2720599/en-us 22 English If the Main Menu does not appear automatically, locate and double click on the support CD driver page. herefore, the drivers you install can work properly. To improve Windows 7 compatibility, please download and install...
User Manual
Page 27
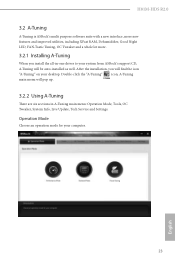
... pop up. 3.2.2 Using A-Tuning here are six sections in A-Tuning main menu: Operation Mode, Tools, OC Tweaker, System Info, Live Update, Tech Service and Settings. Double-click the "A-Tuning" icon, A-Tuning main menu will be auto-installed as well. H81M-HDS R2.0 3.2 A-Tuning A-Tuning is ASRock's multi purpose sotware suite with a new interface, more new features and improved utilities, including XFast RAM, Dehumidiier, Good Night LED, FAN-Tastic Tuning...
... pop up. 3.2.2 Using A-Tuning here are six sections in A-Tuning main menu: Operation Mode, Tools, OC Tweaker, System Info, Live Update, Tech Service and Settings. Double-click the "A-Tuning" icon, A-Tuning main menu will be auto-installed as well. H81M-HDS R2.0 3.2 A-Tuning A-Tuning is ASRock's multi purpose sotware suite with a new interface, more new features and improved utilities, including XFast RAM, Dehumidiier, Good Night LED, FAN-Tastic Tuning...
User Manual
Page 29
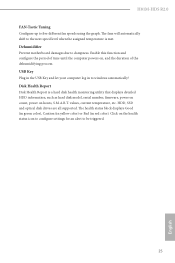
... color). HDD, SSD and optical disk drives are all supported. he fans will automatically shit to the next speed level when the assigned temperature is a hard disk health monitoring utility that displays detailed HDD information, such as hard disk model, serial number, irmware, power on count, power on , and the duration of the dehumidifying process. Dehumidiier Prevent motherboard damages due to windows automatically! Disk Health Report Disk Health Report is met. H81M-HDS R2.0 FAN-Tastic Tuning...
... color). HDD, SSD and optical disk drives are all supported. he fans will automatically shit to the next speed level when the assigned temperature is a hard disk health monitoring utility that displays detailed HDD information, such as hard disk model, serial number, irmware, power on count, power on , and the duration of the dehumidifying process. Dehumidiier Prevent motherboard damages due to windows automatically! Disk Health Report Disk Health Report is met. H81M-HDS R2.0 FAN-Tastic Tuning...
User Manual
Page 33
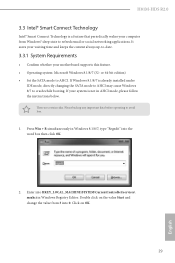
Press Win + R simultaneously in AHCI mode, please follow the instructions below. Click on the value Start and change the value from Windows® sleep state to avoid loss. 1. Please backup any important data before operating to refresh email or social networking applications. H81M-HDS R2.0 3.3 Intel® Smart Connect Technology Intel® Smart Connect Technology is a feature that periodically wakes your computer from 3 into 0. Double click on OK. 29 English...
Press Win + R simultaneously in AHCI mode, please follow the instructions below. Click on the value Start and change the value from Windows® sleep state to avoid loss. 1. Please backup any important data before operating to refresh email or social networking applications. H81M-HDS R2.0 3.3 Intel® Smart Connect Technology Intel® Smart Connect Technology is a feature that periodically wakes your computer from 3 into 0. Double click on OK. 29 English...
User Manual
Page 47
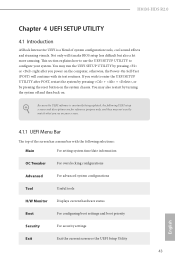
... by turning the system of system coniguration tools, cool sound efects and stunning visuals. You may not exactly match what you power on your system. H81M-HDS R2.0 Chapter 4 UEFI SETUP UTILITY 4.1 Introduction ASRock Interactive UEFI is constantly being updated, the following selections: Main For setting system time/date information OC Tweaker For overclocking conigurations Advanced For advanced system conigurations Tool Useful tools H/W Monitor Displays current hardware status Boot...
... by turning the system of system coniguration tools, cool sound efects and stunning visuals. You may not exactly match what you power on your system. H81M-HDS R2.0 Chapter 4 UEFI SETUP UTILITY 4.1 Introduction ASRock Interactive UEFI is constantly being updated, the following selections: Main For setting system time/date information OC Tweaker For overclocking conigurations Advanced For advanced system conigurations Tool Useful tools H/W Monitor Displays current hardware status Boot...
User Manual
Page 62
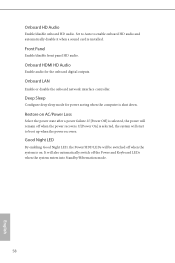
... sleep mode for the onboard digital outputs. If [Power On] is selected, the system will start to enable onboard HD audio and automatically disable it when a sound card is shut down. Onboard LAN Enable or disable the onboard network interface controller. Good Night LED By enabling Good Night LED, the Power/HDD LEDs will remain of when the power recovers. Set to Auto to boot up when the power recovers. Front Panel Enable/disable front panel HD audio. Onboard HDMI HD Audio Enable audio for power saving when the computer is installed. Onboard HD Audio Enable/disable onboard HD audio...
... sleep mode for the onboard digital outputs. If [Power On] is selected, the system will start to enable onboard HD audio and automatically disable it when a sound card is shut down. Onboard LAN Enable or disable the onboard network interface controller. Good Night LED By enabling Good Night LED, the Power/HDD LEDs will remain of when the power recovers. Set to Auto to boot up when the power recovers. Front Panel Enable/disable front panel HD audio. Onboard HDMI HD Audio Enable audio for power saving when the computer is installed. Onboard HD Audio Enable/disable onboard HD audio...
User Manual
Page 68
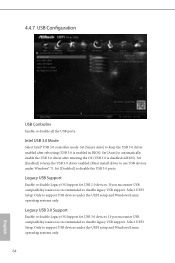
...enabled (Must install driver to disable legacy USB support. If you encounter USB compatibility issues it is disabled in BIOS). If you encounter USB compatibility issues it is enabled in BIOS). Set [Smart Auto] to disable legacy USB support. Set [Disabled] to support USB devices under the UEFI setup and Windows/Linux operating systems only. Legacy USB 3.0 Support Enable or disable Legacy OS Support for USB 2.0 devices. Select UEFI Setup Only to disable the USB 3.0 ports. 4.4.7 USB Coniguration USB Controller Enable or disable all the USB ports. Intel USB 3.0 Mode...
...enabled (Must install driver to disable legacy USB support. If you encounter USB compatibility issues it is disabled in BIOS). If you encounter USB compatibility issues it is enabled in BIOS). Set [Smart Auto] to disable legacy USB support. Set [Disabled] to support USB devices under the UEFI setup and Windows/Linux operating systems only. Legacy USB 3.0 Support Enable or disable Legacy OS Support for USB 2.0 devices. Select UEFI Setup Only to disable the USB 3.0 ports. 4.4.7 USB Coniguration USB Controller Enable or disable all the USB ports. Intel USB 3.0 Mode...

User Manual
Page 71
...'t have an optical disk drive to install the drivers from our servers for Internet Flash. 67 English Internet Flash ASRock Internet Flash downloads and updates the latest UEFI irmware version from our support CD, Easy Driver Installer is recommended to conigure internet connection settings for you are having trouble with your UEFI. Easy Driver Installer For users that installs the LAN driver to update your PC. 4.5 Tools H81M-HDS R2.0 UEFI Tech Service Contact ASRock Tech Service if you . Please setup network coniguration before using UEFI Tech Service.
...'t have an optical disk drive to install the drivers from our servers for Internet Flash. 67 English Internet Flash ASRock Internet Flash downloads and updates the latest UEFI irmware version from our support CD, Easy Driver Installer is recommended to conigure internet connection settings for you are having trouble with your UEFI. Easy Driver Installer For users that installs the LAN driver to update your PC. 4.5 Tools H81M-HDS R2.0 UEFI Tech Service Contact ASRock Tech Service if you . Please setup network coniguration before using UEFI Tech Service.
Quick Installation Guide
Page 6
... Installation Guide • ASRock H81M-HDS R2.0 Support CD • 2 x Serial ATA (SATA) Data Cables (Optional) • 1 x I/O Panel Shield 4 English It delivers excellent performance with robust design conforming to ASRock's commitment to this motherboard, please visit our website for purchasing ASRock H81M-HDS R2.0 motherboard, a reliable motherboard produced under ASRock's consistently stringent quality control. In case any modiications of this documentation occur, the updated version will be available on ASRock's website as well. If you are using...
... Installation Guide • ASRock H81M-HDS R2.0 Support CD • 2 x Serial ATA (SATA) Data Cables (Optional) • 1 x I/O Panel Shield 4 English It delivers excellent performance with robust design conforming to ASRock's commitment to this motherboard, please visit our website for purchasing ASRock H81M-HDS R2.0 motherboard, a reliable motherboard produced under ASRock's consistently stringent quality control. In case any modiications of this documentation occur, the updated version will be available on ASRock's website as well. If you are using...

Quick Installation Guide
Page 9
...x CPU Fan Connector (4-pin) • 1 x Chassis Fan Connector (4-pin) • 1 x 24 pin ATX Power Connector • 1 x 4 pin 12V Power Connector • 1 x Front Panel Audio Connector • 2 x USB 2.0 Headers (Support 4 USB 2.0 ports) (Supports ESD Protection (ASRock Full Spike Protection)) • 1 x USB 3.0 Header by ASMedia ASM1042A (Supports 2 USB 3.0 ports) (Supports ESD Protection (ASRock Full Spike Protection)) • 32Mb AMI UEFI Legal BIOS with multilingual GUI support • ACPI 1.1 Compliant wake up events • SMBIOS 2.3.1 support • DRAM, PCH 1.05V Voltage multi...
...x CPU Fan Connector (4-pin) • 1 x Chassis Fan Connector (4-pin) • 1 x 24 pin ATX Power Connector • 1 x 4 pin 12V Power Connector • 1 x Front Panel Audio Connector • 2 x USB 2.0 Headers (Support 4 USB 2.0 ports) (Supports ESD Protection (ASRock Full Spike Protection)) • 1 x USB 3.0 Header by ASMedia ASM1042A (Supports 2 USB 3.0 ports) (Supports ESD Protection (ASRock Full Spike Protection)) • 32Mb AMI UEFI Legal BIOS with multilingual GUI support • ACPI 1.1 Compliant wake up events • SMBIOS 2.3.1 support • DRAM, PCH 1.05V Voltage multi...
Quick Installation Guide
Page 11
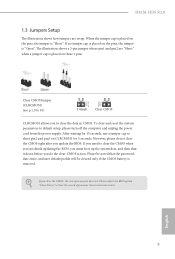
... CMOS, the case open may be cleared only if the CMOS battery is "Short". English 9 Please be noted that the password, date, time, and user default proile will be detected. Please adjust the BIOS option "Clear Status" to clear the data in CMOS. To clear and reset the system parameters to default setup, please turn of previous chassis intrusion status. When the jumper cap is placed on these 2 pins. H81M-HDS R2.0 1.3 Jumpers Setup he illustration shows a 3-pin jumper...
... CMOS, the case open may be cleared only if the CMOS battery is "Short". English 9 Please be noted that the password, date, time, and user default proile will be detected. Please adjust the BIOS option "Clear Status" to clear the data in CMOS. To clear and reset the system parameters to default setup, please turn of previous chassis intrusion status. When the jumper cap is placed on these 2 pins. H81M-HDS R2.0 1.3 Jumpers Setup he illustration shows a 3-pin jumper...


