

User Manual
Page 5
3.2.1 Installing A-Tuning 41 3.2.2 Using A-Tuning 41 3.3 ASRock Live Update & APP Shop 44 3.3.1 UI Overview 44 3.3.2 Apps 45 3.3.3 BIOS & Drivers 48 3.3.4 Setting 49 Chapter 4 UEFI SETUP UTILITY 50 4.1 Introduction 50 4.2 EZ Mode 51 4.3 Advanced Mode 52 4.3.1 UEFI Menu Bar 52 4.3.2 Navigation Keys 53 4.4 Main ...
3.2.1 Installing A-Tuning 41 3.2.2 Using A-Tuning 41 3.3 ASRock Live Update & APP Shop 44 3.3.1 UI Overview 44 3.3.2 Apps 45 3.3.3 BIOS & Drivers 48 3.3.4 Setting 49 Chapter 4 UEFI SETUP UTILITY 50 4.1 Introduction 50 4.2 EZ Mode 51 4.3 Advanced Mode 52 4.3.1 UEFI Menu Bar 52 4.3.2 Navigation Keys 53 4.4 Main ...

User Manual
Page 7
... (Optional) • 1 x I/O Panel Shield • 3 x Screws for purchasing ASRock H370 Pro4 motherboard, a reliable motherboard produced under ASRock's consistently stringent quality control. If you require technical support related to this documentation will be subject to quality and endurance. Because the motherboard specifications and the BIOS software might be updated, the content of this motherboard, please visit our...
... (Optional) • 1 x I/O Panel Shield • 3 x Screws for purchasing ASRock H370 Pro4 motherboard, a reliable motherboard produced under ASRock's consistently stringent quality control. If you require technical support related to this documentation will be subject to quality and endurance. Because the motherboard specifications and the BIOS software might be updated, the content of this motherboard, please visit our...

User Manual
Page 25
... CMOS battery is placed on CLRMOS1 for 5 seconds. English 19 Clear CMOS Jumper (CLRMOS1) (see p.7, No. 24) Default Clear CMOS CLRMOS1 allows you update the BIOS. However, please do the clear-CMOS action. If no jumper cap is "Short". After waiting for 15 seconds, use a jumper cap to short pin2...CMOS when you just finish updating the BIOS, you must boot up the system first, and then shut it down before you do not clear the CMOS right after you to default setup, please turn off the computer and unplug the power cord from the power supply. H370 Pro4 2.5 Jumpers Setup The ...
... CMOS battery is placed on CLRMOS1 for 5 seconds. English 19 Clear CMOS Jumper (CLRMOS1) (see p.7, No. 24) Default Clear CMOS CLRMOS1 allows you update the BIOS. However, please do the clear-CMOS action. If no jumper cap is "Short". After waiting for 15 seconds, use a jumper cap to short pin2...CMOS when you just finish updating the BIOS, you must boot up the system first, and then shut it down before you do not clear the CMOS right after you to default setup, please turn off the computer and unplug the power cord from the power supply. H370 Pro4 2.5 Jumpers Setup The ...

User Manual
Page 54
Step 1 Please check the item information before update. Click on Step 2 to update. Please update them all soon. Click to select one or more items you will see more details. Step 3 Click Update to start the update process. 48 English 3.3.3 BIOS & Drivers Installing BIOS or Drivers When the "BIOS & Drivers" tab is selected, you want to see a list of recommended or critical updates for the BIOS or drivers.
Step 1 Please check the item information before update. Click on Step 2 to update. Please update them all soon. Click to select one or more items you will see more details. Step 3 Click Update to start the update process. 48 English 3.3.3 BIOS & Drivers Installing BIOS or Drivers When the "BIOS & Drivers" tab is selected, you want to see a list of recommended or critical updates for the BIOS or drivers.
User Manual
Page 84
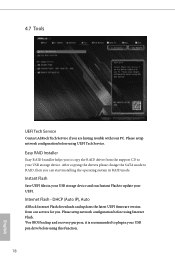
... Auto ASRock Internet Flash downloads and updates the latest UEFI firmware version from the support CD to RAID, then you can start installing the operating system in your USB pen drive before using this function. 78 English Please setup network configuration before using Internet Flash. *For BIOS backup ...and recovery purpose, it is recommended to update your PC. Easy RAID Installer Easy RAID Installer helps you to copy the RAID driver from our servers ...
... Auto ASRock Internet Flash downloads and updates the latest UEFI firmware version from the support CD to RAID, then you can start installing the operating system in your USB pen drive before using this function. 78 English Please setup network configuration before using Internet Flash. *For BIOS backup ...and recovery purpose, it is recommended to update your PC. Easy RAID Installer Easy RAID Installer helps you to copy the RAID driver from our servers ...
Quick Installation Guide
Page 7
... without notice. Because the motherboard specifications and the BIOS software might be updated, the content of this documentation will be subject to quality and endurance. ASRock website http://www.asrock.com. 1.1 Package Contents • ASRock H370 Pro4 Motherboard (ATX Form Factor) • ASRock H370 Pro4 Quick Installation Guide • ASRock H370 Pro4 Support CD • 2 x Serial ATA (SATA) Data Cables (Optional) • 1 x I/O Panel...
... without notice. Because the motherboard specifications and the BIOS software might be updated, the content of this documentation will be subject to quality and endurance. ASRock website http://www.asrock.com. 1.1 Package Contents • ASRock H370 Pro4 Motherboard (ATX Form Factor) • ASRock H370 Pro4 Quick Installation Guide • ASRock H370 Pro4 Support CD • 2 x Serial ATA (SATA) Data Cables (Optional) • 1 x I/O Panel...

Quick Installation Guide
Page 20
... shows how jumpers are "Short" when a jumper cap is placed on these 2 pins. If you need to clear the CMOS when you just finish updating the BIOS, you must boot up the system first, and then shut it down before you to default setup, please turn off the computer and unplug the..., the jumper is removed. Clear CMOS Jumper (CLRMOS1) (see p.1, No. 24) Default Clear CMOS CLRMOS1 allows you do not clear the CMOS right after you update the BIOS. However, please do the clear-CMOS action.
... shows how jumpers are "Short" when a jumper cap is placed on these 2 pins. If you need to clear the CMOS when you just finish updating the BIOS, you must boot up the system first, and then shut it down before you to default setup, please turn off the computer and unplug the..., the jumper is removed. Clear CMOS Jumper (CLRMOS1) (see p.1, No. 24) Default Clear CMOS CLRMOS1 allows you do not clear the CMOS right after you update the BIOS. However, please do the clear-CMOS action.


