
User Manual
Page 5
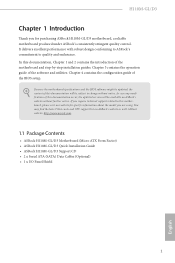
...-step installation guides. You may ind the latest VGA cards and CPU support list on ASRock's website without notice. ASRock website http://www.asrock.com. 1.1 Package Contents • ASRock H110M-GL/D3 Motherboard (Micro ATX Form Factor) • ASRock H110M-GL/D3 Quick Installation Guide • ASRock H110M-GL/D3 Support CD • 2 x Serial ATA (SATA) Data Cables (Optional) • 1 x I/O Panel Shield 1 English Chapter 3 contains...
...-step installation guides. You may ind the latest VGA cards and CPU support list on ASRock's website without notice. ASRock website http://www.asrock.com. 1.1 Package Contents • ASRock H110M-GL/D3 Motherboard (Micro ATX Form Factor) • ASRock H110M-GL/D3 Quick Installation Guide • ASRock H110M-GL/D3 Support CD • 2 x Serial ATA (SATA) Data Cables (Optional) • 1 x I/O Panel Shield 1 English Chapter 3 contains...
User Manual
Page 7
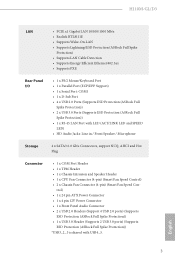
... Panel Audio Connector • 2 x USB 2.0 Headers (Support 4 USB 2.0 ports) (Supports ESD Protection (ASRock Full Spike Protection)) • 1 x USB 3.0 Header (Supports 2 USB 3.0 ports) (Supports ESD Protection (ASRock Full Spike Protection)) *USB3_2_3 is shared with LED (ACT/LINK LED and SPEED LED) • HD Audio ...Fan Connector (4-pin) (Smart Fan Speed Con- H110M-GL/D3 LAN Rear Panel I/O • PCIE x1 Gigabit LAN 10/100/1000 Mb/s • Realtek RTL8111E • Supports Wake-On-LAN • Supports Lightning/ESD Protection (ASRock Full Spike Protection) • Supports LAN Cable ...
... Panel Audio Connector • 2 x USB 2.0 Headers (Support 4 USB 2.0 ports) (Supports ESD Protection (ASRock Full Spike Protection)) • 1 x USB 3.0 Header (Supports 2 USB 3.0 ports) (Supports ESD Protection (ASRock Full Spike Protection)) *USB3_2_3 is shared with LED (ACT/LINK LED and SPEED LED) • HD Audio ...Fan Connector (4-pin) (Smart Fan Speed Con- H110M-GL/D3 LAN Rear Panel I/O • PCIE x1 Gigabit LAN 10/100/1000 Mb/s • Realtek RTL8111E • Supports Wake-On-LAN • Supports Lightning/ESD Protection (ASRock Full Spike Protection) • Supports LAN Cable ...

User Manual
Page 11
Please refer to the table below for the LAN port LED indications. 1.4 I/O Panel 1 2 H110M-GL/D3 3 4 5 11 10 9 8 7 6 No. Description 7 USB 3.0 Ports (USB3_01) 8 USB 2.0 Ports (USB23) 9 D-Sub Port 10 COM Port 11 PS/2 Mouse/Keyboard Port * here are two LEDs on ...
Please refer to the table below for the LAN port LED indications. 1.4 I/O Panel 1 2 H110M-GL/D3 3 4 5 11 10 9 8 7 6 No. Description 7 USB 3.0 Ports (USB3_01) 8 USB 2.0 Ports (USB23) 9 D-Sub Port 10 COM Port 11 PS/2 Mouse/Keyboard Port * here are two LEDs on ...

User Manual
Page 13
.... 9 English Pre-installation Precautions Take note of your motherboard directly on a grounded anti-static pad or in the bag that the motherboard its into it. H110M-GL/D3 Chapter 2 Installation his is a Micro ATX form factor motherboard.
.... 9 English Pre-installation Precautions Take note of your motherboard directly on a grounded anti-static pad or in the bag that the motherboard its into it. H110M-GL/D3 Chapter 2 Installation his is a Micro ATX form factor motherboard.
User Manual
Page 17
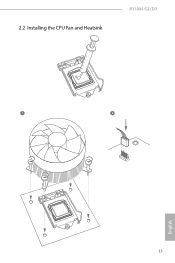
2.2 Installing the CPU Fan and Heatsink H110M-GL/D3 1 2 CPU_FAN English 13
2.2 Installing the CPU Fan and Heatsink H110M-GL/D3 1 2 CPU_FAN English 13

User Manual
Page 21
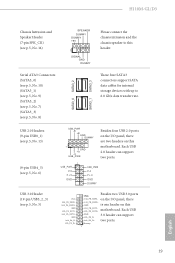
... if the CMOS battery is removed. Ater waiting for 5 seconds. Please be noted that the password, date, time, and user default proile will be detected. H110M-GL/D3 2.5 Jumpers Setup he illustration shows a 3-pin jumper whose pin1 and pin2 are setup. he illustration shows how jumpers are "Short" when a jumper cap is placed...
... if the CMOS battery is removed. Ater waiting for 5 seconds. Please be noted that the password, date, time, and user default proile will be detected. H110M-GL/D3 2.5 Jumpers Setup he illustration shows a 3-pin jumper whose pin1 and pin2 are setup. he illustration shows how jumpers are "Short" when a jumper cap is placed...
User Manual
Page 23
on the I /O panel, there are two headers on this header. Dummy 1 English 19 H110M-GL/D3 Chassis Intrusion and Speaker Header (7-pin SPK_CI1) (see p.5, No. 14) SPEAKER DUMMY DUMMY +5V 1 SIGNAL GND DUMMY Please connect the chassis intrusion and the chassis ...
on the I /O panel, there are two headers on this header. Dummy 1 English 19 H110M-GL/D3 Chassis Intrusion and Speaker Header (7-pin SPK_CI1) (see p.5, No. 14) SPEAKER DUMMY DUMMY +5V 1 SIGNAL GND DUMMY Please connect the chassis intrusion and the chassis ...

User Manual
Page 25
TPM Header (17-pin TPMS1) (see p.5, No. 16) 1 13 12 24 his motherboard provides a 24-pin ATX power connector. H110M-GL/D3 ATX Power Connector (24-pin ATXPWR1) (see p.5, No. 4) ATX 12V Power Connector (4-pin ATX12V1) (see p.5, No. 1) Serial Port Header (9-pin COM2) (see p.5, No. 15) 1 GND ...
TPM Header (17-pin TPMS1) (see p.5, No. 16) 1 13 12 24 his motherboard provides a 24-pin ATX power connector. H110M-GL/D3 ATX Power Connector (24-pin ATXPWR1) (see p.5, No. 4) ATX 12V Power Connector (4-pin ATX12V1) (see p.5, No. 1) Serial Port Header (9-pin COM2) (see p.5, No. 15) 1 GND ...
User Manual
Page 27
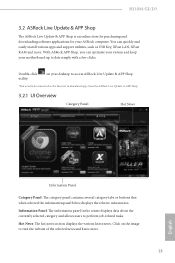
...news and know more . Click on your ASRock computer. Information Panel: he information panel in the center displays data about the currently selected category and allows users to date simply with a few clicks. H110M-GL/D3 3.2 ASRock Live Update & APP Shop he ASRock Live Update & APP Shop is an ...online store for purchasing and downloading sotware applications for your desktop to access ASRock Live Update & APP Shop *You need to be connected to...
...news and know more . Click on your ASRock computer. Information Panel: he information panel in the center displays data about the currently selected category and allows users to date simply with a few clicks. H110M-GL/D3 3.2 ASRock Live Update & APP Shop he ASRock Live Update & APP Shop is an ...online store for purchasing and downloading sotware applications for your desktop to access ASRock Live Update & APP Shop *You need to be connected to...

User Manual
Page 29
Step 4 When installation completes, you want to install the app, click on the upper right corner. H110M-GL/D3 Step 3 If you can icon . *he trash icon may not appear for certain apps. 25 English To uninstall it, simply click on the trash can ind the green "Installed" icon appears on the red icon to start downloading.
Step 4 When installation completes, you want to install the app, click on the upper right corner. H110M-GL/D3 Step 3 If you can icon . *he trash icon may not appear for certain apps. 25 English To uninstall it, simply click on the trash can ind the green "Installed" icon appears on the red icon to start downloading.

User Manual
Page 31
Click on Step 2 to see a list of recommended or critical updates for the BIOS or drivers. H110M-GL/D3 3.2.3 BIOS & Drivers Installing BIOS or Drivers When the "BIOS & Drivers" tab is selected, you want to update. Step 1 Please check the item information before update. Step 3 Click Update to select one or more items you will see more details. Please update them all soon. Click to start the update process. 27 English
Click on Step 2 to see a list of recommended or critical updates for the BIOS or drivers. H110M-GL/D3 3.2.3 BIOS & Drivers Installing BIOS or Drivers When the "BIOS & Drivers" tab is selected, you want to update. Step 1 Please check the item information before update. Step 3 Click Update to select one or more items you will see more details. Please update them all soon. Click to start the update process. 27 English
User Manual
Page 33
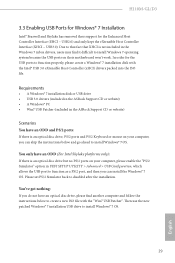
....0) and only kept the eXtensible Host Controller Interface (XHCI - H110M-GL/D3 3.3 Enabling USB Ports for Windows® 7 Installation Intel® Braswell and Skylake has removed their motherboard won't work. Requirements • A Windows® 7 installation disk or USB drive • USB 3.0 drivers (included in the ASRock Support CD or website) • A Windows® PC...
....0) and only kept the eXtensible Host Controller Interface (XHCI - H110M-GL/D3 3.3 Enabling USB Ports for Windows® 7 Installation Intel® Braswell and Skylake has removed their motherboard won't work. Requirements • A Windows® 7 installation disk or USB drive • USB 3.0 drivers (included in the ASRock Support CD or website) • A Windows® PC...

User Manual
Page 35
Step 6 If you are able to install the OS. 31 English hen Press "Start" to Burn". Or please use the patched ISO image to make an OS USB drive to install Windows® 7 on Braswell or Skylake with the new burned CD. Step 7 Now you want to burn the patched image to a CD, please check "Burn Image" and select "Target Device to proceed. If not, the patched ISO image will be exported to save the ISO ile by pressing the red circle as shown as the picture below. H110M-GL/D3 Step 5 Select where to the destination selected in Step5.
Step 6 If you are able to install the OS. 31 English hen Press "Start" to Burn". Or please use the patched ISO image to make an OS USB drive to install Windows® 7 on Braswell or Skylake with the new burned CD. Step 7 Now you want to burn the patched image to a CD, please check "Burn Image" and select "Target Device to proceed. If not, the patched ISO image will be exported to save the ISO ile by pressing the red circle as shown as the picture below. H110M-GL/D3 Step 5 Select where to the destination selected in Step5.
User Manual
Page 37
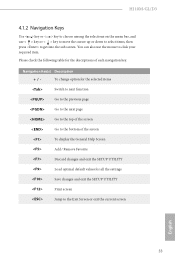
... for all the settings Save changes and exit the SETUP UTILITY Print screen Jump to the Exit Screen or exit the current screen English 33 H110M-GL/D3 4.1.2 Navigation Keys Use < > key or < > key to choose among the selections on the menu bar, and use the mouse to click your required item...
... for all the settings Save changes and exit the SETUP UTILITY Print screen Jump to the Exit Screen or exit the current screen English 33 H110M-GL/D3 4.1.2 Navigation Keys Use < > key or < > key to choose among the selections on the menu bar, and use the mouse to click your required item...
User Manual
Page 39
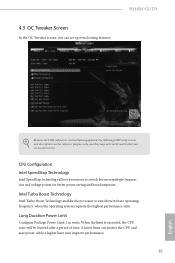
H110M-GL/D3 Because the UEFI sotware is exceeded, the CPU ratio will be lowered ater a period of time. Intel Turbo Boost Technology Intel Turbo Boost Technology enables ...
H110M-GL/D3 Because the UEFI sotware is exceeded, the CPU ratio will be lowered ater a period of time. Intel Turbo Boost Technology Intel Turbo Boost Technology enables ...

User Manual
Page 41
... the precharge command and opening of a row of clock cycles required between a bank active command and issuing the precharge command. Write to the same rank. H110M-GL/D3 and assign the appropriate frequency automatically. Primary Timing CAS# Latency (tCL) he amount of delay that must elapse ater the completion of clock cycles required...
... the precharge command and opening of a row of clock cycles required between a bank active command and issuing the precharge command. Write to the same rank. H110M-GL/D3 and assign the appropriate frequency automatically. Primary Timing CAS# Latency (tCL) he amount of delay that must elapse ater the completion of clock cycles required...
User Manual
Page 43
... read delay. tWRWR_sg Conigure between module write to read delay. RTL (CH B) Conigure round trip latency for channel A. IO-L (CH B) Conigure IO latency for channel A. H110M-GL/D3 39 English tWRRD_sg Conigure between module write to read delay. tWRRD_dg Conigure between module write to write delay. RTL (CH A) Conigure round trip latency for...
... read delay. tWRWR_sg Conigure between module write to read delay. RTL (CH B) Conigure round trip latency for channel A. IO-L (CH B) Conigure IO latency for channel A. H110M-GL/D3 39 English tWRRD_sg Conigure between module write to read delay. tWRRD_dg Conigure between module write to write delay. RTL (CH A) Conigure round trip latency for...

User Manual
Page 45
... A. MRC Fast Boot Enable Memory Fast Boot to change ODT (CH B) Auto/Manual settings. Voltage Coniguration CPU Vcore Voltage Conigure the voltage for booting faster. H110M-GL/D3 tMOD Conigure tMOD. he default value is [Auto]. he default is [Auto]. tZQCS Conigure tZQCS. ODT PARK (CH B) Conigure the memory on die termination resistors...
... A. MRC Fast Boot Enable Memory Fast Boot to change ODT (CH B) Auto/Manual settings. Voltage Coniguration CPU Vcore Voltage Conigure the voltage for booting faster. H110M-GL/D3 tMOD Conigure tMOD. he default value is [Auto]. he default is [Auto]. tZQCS Conigure tZQCS. ODT PARK (CH B) Conigure the memory on die termination resistors...

User Manual
Page 47
... set to 1024 x 768. If the monitor does not support Full HD resolution, then the resolution will be set to 1024 x 768 directly. 43 English H110M-GL/D3 4.4 Advanced Screen In this section may set the conigurations for the following items: CPU Coniguration, Chipset Coniguration, Storage Coniguration, Super IO Coniguration, ACPI Coniguration, USB...
... set to 1024 x 768. If the monitor does not support Full HD resolution, then the resolution will be set to 1024 x 768 directly. 43 English H110M-GL/D3 4.4 Advanced Screen In this section may set the conigurations for the following items: CPU Coniguration, Chipset Coniguration, Storage Coniguration, Super IO Coniguration, ACPI Coniguration, USB...

User Manual
Page 49
... better performance. Enable for better performance. 45 English Adjacent Cache Line Prefetch Automatically prefetch the subsequent cache line while retrieving the currently requested cache line. H110M-GL/D3 No-Execute Memory Protection Processors with No-Execution Memory Protection Technology may prevent certain classes of malicious bufer overlow attacks. Intel Virtualization Technology Intel Virtualization...
... better performance. Enable for better performance. 45 English Adjacent Cache Line Prefetch Automatically prefetch the subsequent cache line while retrieving the currently requested cache line. H110M-GL/D3 No-Execute Memory Protection Processors with No-Execution Memory Protection Technology may prevent certain classes of malicious bufer overlow attacks. Intel Virtualization Technology Intel Virtualization...