User Manual
Page 4
... 2 Installation 10 2.1 Installing the CPU 11 2.2 Installing the CPU Fan and Heatsink 14 2.3 Installing Memory Modules (DIMM) 15 2.4 Expansion Slots (PCI Express Slots) 17 2.5 Jumpers Setup 18 2.6 Onboard Headers and Connectors 19 2.7 PCIe Power Connector Installation Guide 23 2.8 M.2_SSD (NGFF) Module Installation Guide 24 Chapter 3 Software and Utilities Operation 27 3.1 Installing...
... 2 Installation 10 2.1 Installing the CPU 11 2.2 Installing the CPU Fan and Heatsink 14 2.3 Installing Memory Modules (DIMM) 15 2.4 Expansion Slots (PCI Express Slots) 17 2.5 Jumpers Setup 18 2.6 Onboard Headers and Connectors 19 2.7 PCIe Power Connector Installation Guide 23 2.8 M.2_SSD (NGFF) Module Installation Guide 24 Chapter 3 Software and Utilities Operation 27 3.1 Installing...
User Manual
Page 5
Chapter 4 UEFI SETUP UTILITY 37 4.1 Introduction 37 4.1.1 UEFI Menu Bar 37 4.1.2 Navigation Keys 38 4.2 Main Screen 39 4.3 OC Tweaker Screen 40 4.4 Advanced Screen 48 4.4.1 CPU Configuration 49 4.4.2 Chipset Configuration 51 4.4.3 Storage Configuration 54 4.4.4 Super IO Configuration 55 4.4.5 ACPI Configuration 56 4.4.6 USB Configuration 58 4.4.7 Trusted Computing 59 4.5 Tools 60 4.6 Hardware Health Event Monitoring Screen 61 4.7 Security Screen 63 4.8 Boot Screen 64 4.9 Exit Screen 67
Chapter 4 UEFI SETUP UTILITY 37 4.1 Introduction 37 4.1.1 UEFI Menu Bar 37 4.1.2 Navigation Keys 38 4.2 Main Screen 39 4.3 OC Tweaker Screen 40 4.4 Advanced Screen 48 4.4.1 CPU Configuration 49 4.4.2 Chipset Configuration 51 4.4.3 Storage Configuration 54 4.4.4 Super IO Configuration 55 4.4.5 ACPI Configuration 56 4.4.6 USB Configuration 58 4.4.7 Trusted Computing 59 4.5 Tools 60 4.6 Hardware Health Event Monitoring Screen 61 4.7 Security Screen 63 4.8 Boot Screen 64 4.9 Exit Screen 67
User Manual
Page 6
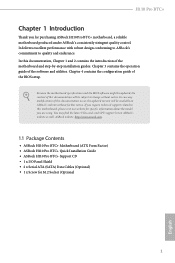
... notice. H110 Pro BTC+ Chapter 1 Introduction Thank you for M.2 Socket (Optional 1 English Chapter 3 contains the operation guide of the BIOS setup. Because the motherboard specifications and the BIOS software might be updated, the content of this documentation, Chapter 1 and 2 contains the introduction of this documentation occur, the updated version will be available on ASRock's website...
... notice. H110 Pro BTC+ Chapter 1 Introduction Thank you for M.2 Socket (Optional 1 English Chapter 3 contains the operation guide of the BIOS setup. Because the motherboard specifications and the BIOS software might be updated, the content of this documentation, Chapter 1 and 2 contains the introduction of this documentation occur, the updated version will be available on ASRock's website...
User Manual
Page 23
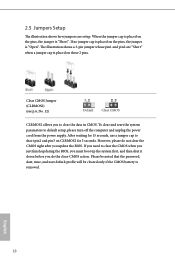
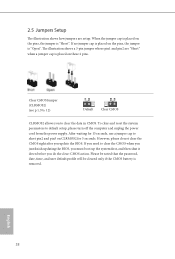
2.5 Jumpers Setup The illustration shows how jumpers are "Short" when a jumper cap is placed on these 2 pins. After waiting for 15 seconds, use a jumper cap to clear ..., you must boot up the system first, and then shut it down before you do not clear the CMOS right after you need to default setup, please turn off the computer and unplug the power cord from the power supply. The illustration shows a 3-pin jumper whose pin1 and pin2 are...
2.5 Jumpers Setup The illustration shows how jumpers are "Short" when a jumper cap is placed on these 2 pins. After waiting for 15 seconds, use a jumper cap to clear ..., you must boot up the system first, and then shut it down before you do not clear the CMOS right after you need to default setup, please turn off the computer and unplug the power cord from the power supply. The illustration shows a 3-pin jumper whose pin1 and pin2 are...
User Manual
Page 39
... the Intel® USB 3.0 eXtensible Host Controller (xHCI) drivers packed into the ISO file. Due to that fact that XHCI is not included in UEFI SETUP UTILITY > Advanced > USB Configuration, which allows the USB port to function as a PS/2 port, and then you can install the Windows® 7 ... • A Windows® 7 installation disk or USB drive • USB 3.0 drivers (included in the ASRock Support CD or website) • A Windows® PC • Win7 USB Patcher (included in the ASRock Support CD or website) Scenarios You have an ODD (For Intel Skylake platforms only): If there is an...
... the Intel® USB 3.0 eXtensible Host Controller (xHCI) drivers packed into the ISO file. Due to that fact that XHCI is not included in UEFI SETUP UTILITY > Advanced > USB Configuration, which allows the USB port to function as a PS/2 port, and then you can install the Windows® 7 ... • A Windows® 7 installation disk or USB drive • USB 3.0 drivers (included in the ASRock Support CD or website) • A Windows® PC • Win7 USB Patcher (included in the ASRock Support CD or website) Scenarios You have an ODD (For Intel Skylake platforms only): If there is an...
User Manual
Page 42
H110 Pro BTC+ Chapter 4 UEFI SETUP UTILITY 4.1 Introduction This section explains how to use the UEFI SETUP UTILITY to enter the UEFI SETUP UTILITY after you see on the computer, otherwise, the Power-On-Self-Test (POST) will continue with the following UEFI setup screens and descriptions are for reference ... hardware status Security For security settings Boot For configuring boot settings and boot priority Exit Exit the current screen or the UEFI Setup Utility English 37 You may not exactly match what you power on your system. If you wish to configure your screen. ...
H110 Pro BTC+ Chapter 4 UEFI SETUP UTILITY 4.1 Introduction This section explains how to use the UEFI SETUP UTILITY to enter the UEFI SETUP UTILITY after you see on the computer, otherwise, the Power-On-Self-Test (POST) will continue with the following UEFI setup screens and descriptions are for reference ... hardware status Security For security settings Boot For configuring boot settings and boot priority Exit Exit the current screen or the UEFI Setup Utility English 37 You may not exactly match what you power on your system. If you wish to configure your screen. ...
User Manual
Page 43
... check the following table for the descriptions of the screen To display the General Help Screen Add / Remove Favorite Discard changes and exit the SETUP UTILITY Load optimal default values for the selected items Switch to next function Go to the previous page Go to the next page Go to... or down to select items, then press to get into the sub screen. To change option for all the settings Save changes and exit the SETUP UTILITY Print screen Jump to the Exit Screen or exit the current screen English 38 4.1.2 Navigation Keys Use < > key or < > key to choose ...
... check the following table for the descriptions of the screen To display the General Help Screen Add / Remove Favorite Discard changes and exit the SETUP UTILITY Load optimal default values for the selected items Switch to next function Go to the previous page Go to the next page Go to... or down to select items, then press to get into the sub screen. To change option for all the settings Save changes and exit the SETUP UTILITY Print screen Jump to the Exit Screen or exit the current screen English 38 4.1.2 Navigation Keys Use < > key or < > key to choose ...
User Manual
Page 44
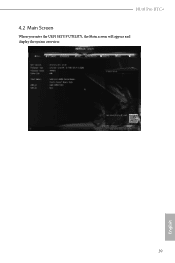
H110 Pro BTC+ 4.2 Main Screen When you enter the UEFI SETUP UTILITY, the Main screen will appear and display the system overview. 39 English
H110 Pro BTC+ 4.2 Main Screen When you enter the UEFI SETUP UTILITY, the Main screen will appear and display the system overview. 39 English
User Manual
Page 45
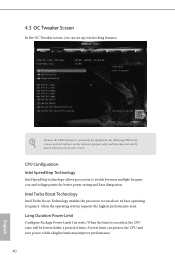
... the UEFI software is exceeded, the CPU ratio will be lowered after a period of time. When the limit is constantly being updated, the following UEFI setup screens and descriptions are for better power saving and heat dissipation. 4.3 OC Tweaker Screen In the OC Tweaker screen, you see on your screen.
... the UEFI software is exceeded, the CPU ratio will be lowered after a period of time. When the limit is constantly being updated, the following UEFI setup screens and descriptions are for better power saving and heat dissipation. 4.3 OC Tweaker Screen In the OC Tweaker screen, you see on your screen.
User Manual
Page 52
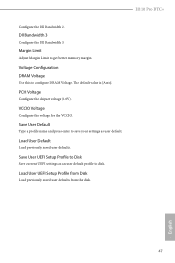
... Save current UEFI settings as an user default profile to save your settings as user default. Load User UEFI Setup Profile from Disk Load previously saved user defaults from the disk. 47 English H110 Pro BTC+ Configure the Dll Bandwidth 2. Voltage Configuration DRAM Voltage Use this to get better memory margin. The default value...
... Save current UEFI settings as an user default profile to save your settings as user default. Load User UEFI Setup Profile from Disk Load previously saved user defaults from the disk. 47 English H110 Pro BTC+ Configure the Dll Bandwidth 2. Voltage Configuration DRAM Voltage Use this to get better memory margin. The default value...
User Manual
Page 63
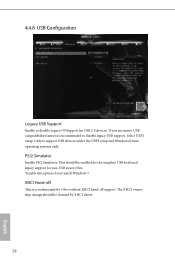
... if you encounter USB compatibility issues it is a workaround for USB 2.0 devices. XHCI Hand-off This is recommended to support USB devices under the UEFI setup and Windows/Linux operating systems only. If you install Windows 7. 4.4.6 USB Configuration Legacy USB Support Enable or disable Legacy OS Support for OSes without XHCI...
... if you encounter USB compatibility issues it is a workaround for USB 2.0 devices. XHCI Hand-off This is recommended to support USB devices under the UEFI setup and Windows/Linux operating systems only. If you install Windows 7. 4.4.6 USB Configuration Legacy USB Support Enable or disable Legacy OS Support for OSes without XHCI...

User Manual
Page 68
...Leave it blank and press enter to use discrete TPM Module. 63 English You may set or change the settings in the UEFI Setup Utility. Secure Boot Use this option to remove the password. Only the administrator has authority to change the supervisor/user password for the... administrator account. Users are unable to change the settings in the UEFI Setup Utility. Intel(R) Platform Trust Technology Enable/disable Intel PTT in ME. User Password Set or change the password for the system. H110 Pro BTC+ 4.7 Security Screen In this section you may also clear the user password...
...Leave it blank and press enter to use discrete TPM Module. 63 English You may set or change the settings in the UEFI Setup Utility. Secure Boot Use this option to remove the password. Only the administrator has authority to change the supervisor/user password for the... administrator account. Users are unable to change the settings in the UEFI Setup Utility. Intel(R) Platform Trust Technology Enable/disable Intel PTT in ME. User Password Set or change the password for the system. H110 Pro BTC+ 4.7 Security Screen In this section you may also clear the user password...
User Manual
Page 69
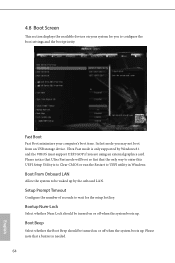
... that the only way to wait for you may not boot from an USB storage device. Fast Boot Fast Boot minimizes your system for the setup hot key. 4.8 Boot Screen This section displays the available devices on your computer's boot time...
... that the only way to wait for you may not boot from an USB storage device. Fast Boot Fast Boot minimizes your system for the setup hot key. 4.8 Boot Screen This section displays the available devices on your computer's boot time...
User Manual
Page 72
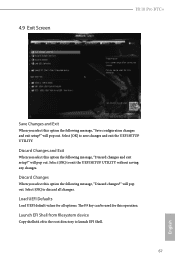
...for all changes. will pop out. Launch EFI Shell from filesystem device Copy shellx64.efi to the root directory to exit the UEFI SETUP UTILITY without saving any changes. Discard Changes and Exit When you select this operation. will pop out. Discard Changes When you select ...option the following message, "Discard changes and exit setup?" Select [OK] to launch EFI Shell. 67 English Select [OK] to discard all options. Select [OK] to save changes and exit the UEFI SETUP UTILITY. will pop out. 4.9 Exit Screen H110 Pro BTC+ Save Changes and Exit When you select this option...
...for all changes. will pop out. Launch EFI Shell from filesystem device Copy shellx64.efi to the root directory to exit the UEFI SETUP UTILITY without saving any changes. Discard Changes and Exit When you select this operation. will pop out. Discard Changes When you select ...option the following message, "Discard changes and exit setup?" Select [OK] to launch EFI Shell. 67 English Select [OK] to discard all options. Select [OK] to save changes and exit the UEFI SETUP UTILITY. will pop out. 4.9 Exit Screen H110 Pro BTC+ Save Changes and Exit When you select this option...
Quick Installation Guide
Page 20
After waiting for 5 seconds. However, please do the clear-CMOS action. If you need to default setup, please turn off the computer and unplug the power cord from the power supply. 2.5 Jumpers Setup The illustration shows how jumpers are "Short" when a jumper cap is placed on the pins, the ...user default profile will be cleared only if the CMOS battery is "Short". English 18 The illustration shows a 3-pin jumper whose pin1 and pin2 are setup. When the jumper cap is placed on these 2 pins. Clear CMOS Jumper (CLRMOS2) (see p.1, No. 12) Default Clear CMOS CLRMOS2 allows ...
After waiting for 5 seconds. However, please do the clear-CMOS action. If you need to default setup, please turn off the computer and unplug the power cord from the power supply. 2.5 Jumpers Setup The illustration shows how jumpers are "Short" when a jumper cap is placed on the pins, the ...user default profile will be cleared only if the CMOS battery is "Short". English 18 The illustration shows a 3-pin jumper whose pin1 and pin2 are setup. When the jumper cap is placed on these 2 pins. Clear CMOS Jumper (CLRMOS2) (see p.1, No. 12) Default Clear CMOS CLRMOS2 allows ...
Quick Installation Guide
Page 144
...ports: If there is an optical disc drive but no PS/2 ports on your computer, please enable the "PS/2 Simulator" option in the ASRock Support CD or website) Scenarios You have an optical disc drive, please find it difficult to function properly, please create a Windows® ... • A Windows® 7 installation disk or USB drive • USB 3.0 drivers (included in the ASRock Support CD or website) • A Windows® PC • Win7 USB Patcher (included in UEFI SETUP UTILITY > Advanced > USB Configuration, which allows the USB port to install Windows® 7 OS. You've...
...ports: If there is an optical disc drive but no PS/2 ports on your computer, please enable the "PS/2 Simulator" option in the ASRock Support CD or website) Scenarios You have an optical disc drive, please find it difficult to function properly, please create a Windows® ... • A Windows® 7 installation disk or USB drive • USB 3.0 drivers (included in the ASRock Support CD or website) • A Windows® PC • Win7 USB Patcher (included in UEFI SETUP UTILITY > Advanced > USB Configuration, which allows the USB port to install Windows® 7 OS. You've...


