Mining System Installation Guide
Page 1
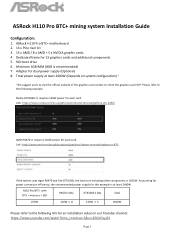
....youtube.com/watch?time_continue=3&v=c2EDN7xyjZ4 Page 1 Nvidia GTX1060: It requires 120W power for each card. H110 Pro BTC+ with CPU + memory + SSD RX470 x Qty GTX1060 x Qty Total 250W 120W x 8 120W x 5 1810W Please refer to check the graphics card TDP. ASRock H110 Pro BTC+ motherboard 2. 13 x PCIe riser kit 3. 13 x AMD / 8 x AMD + 5 x NVIDIA graphic cards. 4....suggest users to visit the official website of the graphics card vendor to the following example. Dedicated frame for dual power supply (Optional) 8. ASRock H110 Pro BTC+ mining system Installation Guide Configuration: 1.
....youtube.com/watch?time_continue=3&v=c2EDN7xyjZ4 Page 1 Nvidia GTX1060: It requires 120W power for each card. H110 Pro BTC+ with CPU + memory + SSD RX470 x Qty GTX1060 x Qty Total 250W 120W x 8 120W x 5 1810W Please refer to check the graphics card TDP. ASRock H110 Pro BTC+ motherboard 2. 13 x PCIe riser kit 3. 13 x AMD / 8 x AMD + 5 x NVIDIA graphic cards. 4....suggest users to visit the official website of the graphics card vendor to the following example. Dedicated frame for dual power supply (Optional) 8. ASRock H110 Pro BTC+ mining system Installation Guide Configuration: 1.
Mining System Installation Guide
Page 3
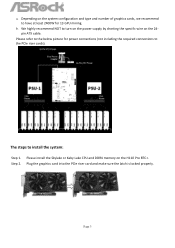
a. Please refer to the below picture for 13 GPU mining. Please install the Skylake or Kaby Lake CPU and DDR4 memory on the system configuration and type and number of graphics cards, we recommend to install the system: Step 1. We highly recommend NOT ... (not including the required connections to turn on the power supply by shorting the specific wire on the 24pin ATX cable. Step 2. Depending on the H110 Pro BTC+. Page 3 Plug the graphics card into the PCIe riser card and make sure the latch is locked properly. b.
a. Please refer to the below picture for 13 GPU mining. Please install the Skylake or Kaby Lake CPU and DDR4 memory on the system configuration and type and number of graphics cards, we recommend to install the system: Step 1. We highly recommend NOT ... (not including the required connections to turn on the power supply by shorting the specific wire on the 24pin ATX cable. Step 2. Depending on the H110 Pro BTC+. Page 3 Plug the graphics card into the PCIe riser card and make sure the latch is locked properly. b.
Mining System Installation Guide
Page 5
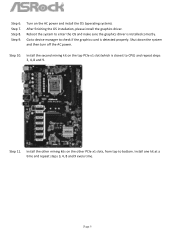
Step 8. Step 9. Go to device manager to check if the graphics card is closest to CPU) and repeat steps 3, 4, 8 and 9. Step 10. Page 5 Turn on the other mining kits on the AC power and install the OS (operating system). Install the ...
Step 8. Step 9. Go to device manager to check if the graphics card is closest to CPU) and repeat steps 3, 4, 8 and 9. Step 10. Page 5 Turn on the other mining kits on the AC power and install the OS (operating system). Install the ...
User Manual
Page 4
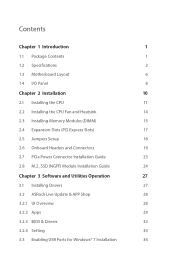
...Specifications 2 1.3 Motherboard Layout 6 1.4 I/O Panel 8 Chapter 2 Installation 10 2.1 Installing the CPU 11 2.2 Installing the CPU Fan and Heatsink 14 2.3 Installing Memory Modules (DIMM) 15 2.4 Expansion Slots (PCI Express... Slots) 17 2.5 Jumpers Setup 18 2.6 Onboard Headers and Connectors 19 2.7 PCIe Power Connector Installation Guide 23 2.8 M.2_SSD (NGFF) Module Installation Guide 24 Chapter 3 Software and Utilities Operation 27 3.1 Installing Drivers 27 3.2 ASRock...
...Specifications 2 1.3 Motherboard Layout 6 1.4 I/O Panel 8 Chapter 2 Installation 10 2.1 Installing the CPU 11 2.2 Installing the CPU Fan and Heatsink 14 2.3 Installing Memory Modules (DIMM) 15 2.4 Expansion Slots (PCI Express... Slots) 17 2.5 Jumpers Setup 18 2.6 Onboard Headers and Connectors 19 2.7 PCIe Power Connector Installation Guide 23 2.8 M.2_SSD (NGFF) Module Installation Guide 24 Chapter 3 Software and Utilities Operation 27 3.1 Installing Drivers 27 3.2 ASRock...
User Manual
Page 5
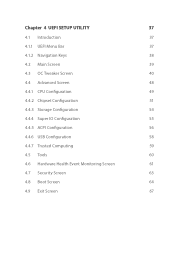
Chapter 4 UEFI SETUP UTILITY 37 4.1 Introduction 37 4.1.1 UEFI Menu Bar 37 4.1.2 Navigation Keys 38 4.2 Main Screen 39 4.3 OC Tweaker Screen 40 4.4 Advanced Screen 48 4.4.1 CPU Configuration 49 4.4.2 Chipset Configuration 51 4.4.3 Storage Configuration 54 4.4.4 Super IO Configuration 55 4.4.5 ACPI Configuration 56 4.4.6 USB Configuration 58 4.4.7 Trusted Computing 59 4.5 Tools 60 4.6 Hardware Health Event Monitoring Screen 61 4.7 Security Screen 63 4.8 Boot Screen 64 4.9 Exit Screen 67
Chapter 4 UEFI SETUP UTILITY 37 4.1 Introduction 37 4.1.1 UEFI Menu Bar 37 4.1.2 Navigation Keys 38 4.2 Main Screen 39 4.3 OC Tweaker Screen 40 4.4 Advanced Screen 48 4.4.1 CPU Configuration 49 4.4.2 Chipset Configuration 51 4.4.3 Storage Configuration 54 4.4.4 Super IO Configuration 55 4.4.5 ACPI Configuration 56 4.4.6 USB Configuration 58 4.4.7 Trusted Computing 59 4.5 Tools 60 4.6 Hardware Health Event Monitoring Screen 61 4.7 Security Screen 63 4.8 Boot Screen 64 4.9 Exit Screen 67
User Manual
Page 6
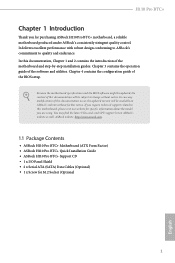
... may find the latest VGA cards and CPU support list on ASRock's website without notice. In case any modifications of this documentation will be subject to quality and endurance. ASRock website http://www.asrock.com. 1.1 Package Contents • ASRock H110 Pro BTC+ Motherboard (ATX Form Factor) • ASRock H110 Pro BTC+ Quick Installation Guide • ASRock H110 Pro BTC+ Support CD • 1 x I/O Panel Shield • 2 x Serial...
... may find the latest VGA cards and CPU support list on ASRock's website without notice. In case any modifications of this documentation will be subject to quality and endurance. ASRock website http://www.asrock.com. 1.1 Package Contents • ASRock H110 Pro BTC+ Motherboard (ATX Form Factor) • ASRock H110 Pro BTC+ Quick Installation Guide • ASRock H110 Pro BTC+ Support CD • 1 x I/O Panel Shield • 2 x Serial...
User Manual
Page 7
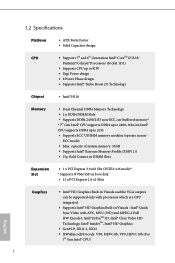
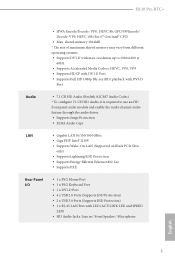
... Graphics • Gen9 LP, DX11.3, DX12 • HWAEncode/Decode: VP8, HEVC 8b, VP9, HEVC 10b (For 7th Gen Intel® CPU) 2 1.2 Specifications Platform CPU • ATX Form Factor • Solid Capacitor design • Supports 7th and 6th Generation Intel® CoreTM i7/i5/i3/ Pentium®/... Technology Chipset • Intel® H110 Memory • Dual Channel DDR4 Memory Technology • 2 x DDR4 DIMM Slots • Supports DDR4 2400/2133 non-ECC, un-buffered memory* * 7th Gen Intel® CPU supports DDR4 up to 2400; 6th Gen Intel® CPU supports DDR4 up to 2133. •...
... Graphics • Gen9 LP, DX11.3, DX12 • HWAEncode/Decode: VP8, HEVC 8b, VP9, HEVC 10b (For 7th Gen Intel® CPU) 2 1.2 Specifications Platform CPU • ATX Form Factor • Solid Capacitor design • Supports 7th and 6th Generation Intel® CoreTM i7/i5/i3/ Pentium®/... Technology Chipset • Intel® H110 Memory • Dual Channel DDR4 Memory Technology • 2 x DDR4 DIMM Slots • Supports DDR4 2400/2133 non-ECC, un-buffered memory* * 7th Gen Intel® CPU supports DDR4 up to 2400; 6th Gen Intel® CPU supports DDR4 up to 2133. •...
User Manual
Page 8
GPU/SWEncode/ Decode: VP9, HEVC 10b (For 6th Gen Intel® CPU) • Max. resolution up to 1920x1200 @ 60Hz • Supports Accelerated Media Codecs: HEVC, VP8, VP9 • Supports HDCP with DVI-D Port • Supports Full HD ... from different operating systems. • Supports DVI-D with LED (ACT/LINK LED and SPEED LED) • HD Audio Jacks: Line in / Front Speaker / Microphone English 3 H110 Pro BTC+ • HWA Encode/Decode: VP8 , HEVC 8b;
GPU/SWEncode/ Decode: VP9, HEVC 10b (For 6th Gen Intel® CPU) • Max. resolution up to 1920x1200 @ 60Hz • Supports Accelerated Media Codecs: HEVC, VP8, VP9 • Supports HDCP with DVI-D Port • Supports Full HD ... from different operating systems. • Supports DVI-D with LED (ACT/LINK LED and SPEED LED) • HD Audio Jacks: Line in / Front Speaker / Microphone English 3 H110 Pro BTC+ • HWA Encode/Decode: VP8 , HEVC 8b;
User Manual
Page 9
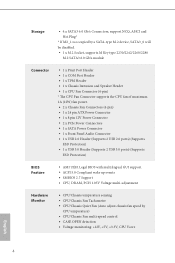
... 6.0 Gb/s module Connector • 1 x Print Port Header • 1 x COM Port Header • 1 x TPM Header • 1 x Chassis Intrusion and Speaker Header • 1 x CPU Fan Connector (4-pin) * The CPU Fan Connector supports the CPU fan of maximum 1A (12W) fan power. • 2 x Chassis Fan Connectors (4-pin) • 1 x 24 pin ATX Power Connector • 1 x 8 pin 12V...
... 6.0 Gb/s module Connector • 1 x Print Port Header • 1 x COM Port Header • 1 x TPM Header • 1 x Chassis Intrusion and Speaker Header • 1 x CPU Fan Connector (4-pin) * The CPU Fan Connector supports the CPU fan of maximum 1A (12W) fan power. • 2 x Chassis Fan Connectors (4-pin) • 1 x 24 pin ATX Power Connector • 1 x 8 pin 12V...
User Manual
Page 10
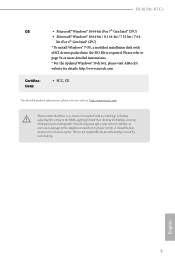
... should be done at your system. We are not responsible for details: http://www.asrock.com • FCC, CE * For detailed product information, please visit our website: http://www.asrock.com Please realize that there is required. English 5 Overclocking may affect your system's... including adjusting the setting in the BIOS, applying Untied Overclocking Technology, or using third-party overclocking tools. H110 Pro BTC+ OS Certifications • Microsoft® Windows® 10 64-bit (For 7th Gen Intel® CPU) • Microsoft® Windows® 10 64-bit / 8.1 64-bit / 7 32-bit ...
... should be done at your system. We are not responsible for details: http://www.asrock.com • FCC, CE * For detailed product information, please visit our website: http://www.asrock.com Please realize that there is required. English 5 Overclocking may affect your system's... including adjusting the setting in the BIOS, applying Untied Overclocking Technology, or using third-party overclocking tools. H110 Pro BTC+ OS Certifications • Microsoft® Windows® 10 64-bit (For 7th Gen Intel® CPU) • Microsoft® Windows® 10 64-bit / 8.1 64-bit / 7 32-bit ...
User Manual
Page 16
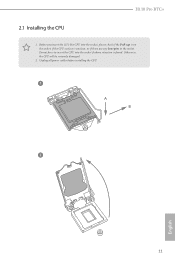
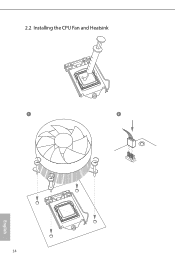
Otherwise, the CPU will be seriously damaged. 2. Do not force to insert the CPU into the socket, please check if the PnP cap is on the socket, if the CPU surface is found. Before you insert the 1151-Pin CPU into the socket if above situation is unclean, or if there are any bent pins in the socket. Unplug all power cables before installing the CPU. 1 A B 2 11 English H110 Pro BTC+ 2.1 Installing the CPU 1.
Otherwise, the CPU will be seriously damaged. 2. Do not force to insert the CPU into the socket, please check if the PnP cap is on the socket, if the CPU surface is found. Before you insert the 1151-Pin CPU into the socket if above situation is unclean, or if there are any bent pins in the socket. Unplug all power cables before installing the CPU. 1 A B 2 11 English H110 Pro BTC+ 2.1 Installing the CPU 1.
User Manual
Page 19
2.2 Installing the CPU Fan and Heatsink 1 2 CPU_FAN English 14
2.2 Installing the CPU Fan and Heatsink 1 2 CPU_FAN English 14
User Manual
Page 26
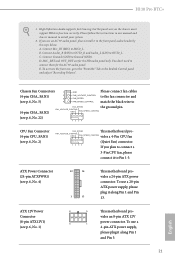
.... If you use a 20-pin ATX power supply, please plug it to Pin 1-3. Connect Ground (GND) to OUT2_L. FAN_VOLTAGE_CONTROL GND FAN_SPEED_CONTROL (see p.6, No. 22) CPU Fan Connector (4-pin CPU_FAN1) (see p.6, No. 4) 12 24 1 13 This motherboard provides a 24-pin ATX power connector. Please follow the instructions in the Realtek Control...Sensing, but the panel wire on the chassis must support HDA to MIC2_L. vides an 8-pin ATX 12V 4 1 power connector. FAN_VOLTAGE_CONTROL GND FAN_SPEED_CONTROL vides a 4-Pin CPU fan (Quiet Fan) connector. H110 Pro BTC+ 1.
.... If you use a 20-pin ATX power supply, please plug it to Pin 1-3. Connect Ground (GND) to OUT2_L. FAN_VOLTAGE_CONTROL GND FAN_SPEED_CONTROL (see p.6, No. 22) CPU Fan Connector (4-pin CPU_FAN1) (see p.6, No. 4) 12 24 1 13 This motherboard provides a 24-pin ATX power connector. Please follow the instructions in the Realtek Control...Sensing, but the panel wire on the chassis must support HDA to MIC2_L. vides an 8-pin ATX 12V 4 1 power connector. FAN_VOLTAGE_CONTROL GND FAN_SPEED_CONTROL vides a 4-Pin CPU fan (Quiet Fan) connector. H110 Pro BTC+ 1.
User Manual
Page 45
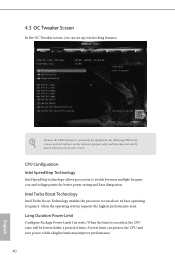
... switch between multiple frequencies and voltage points for reference purpose only, and they may not exactly match what you can protect the CPU and save power, while a higher limit may improve performance. 40 English When the limit is constantly being updated, the following... UEFI setup screens and descriptions are for better power saving and heat dissipation. A lower limit can set up overclocking features. CPU Configuration Intel SpeedStep Technology Intel SpeedStep technology allows processors to run above its base operating frequency when the operating system requests the ...
... switch between multiple frequencies and voltage points for reference purpose only, and they may not exactly match what you can protect the CPU and save power, while a higher limit may improve performance. 40 English When the limit is constantly being updated, the following... UEFI setup screens and descriptions are for better power saving and heat dissipation. A lower limit can set up overclocking features. CPU Configuration Intel SpeedStep Technology Intel SpeedStep technology allows processors to run above its base operating frequency when the operating system requests the ...
User Manual
Page 46
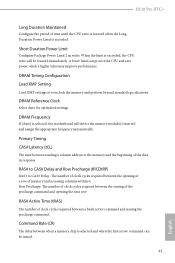
... Command Rate (CR) The delay between the issuing of the precharge command and opening of a row of the data in watts. H110 Pro BTC+ Long Duration Maintained Configure the period of clock cycles required between when a memory chip is selected and when the first active command can... the memory and perform beyond standard specifications. A lower limit can be lowered immediately. Row Precharge: The number of time until the CPU ratio is lowered when the Long Duration Power Limit is selected, the motherboard will be issued. 41 English DRAM Timing Configuration Load XMP...
... Command Rate (CR) The delay between the issuing of the precharge command and opening of a row of the data in watts. H110 Pro BTC+ Long Duration Maintained Configure the period of clock cycles required between when a memory chip is selected and when the first active command can... the memory and perform beyond standard specifications. A lower limit can be lowered immediately. Row Precharge: The number of time until the CPU ratio is lowered when the Long Duration Power Limit is selected, the motherboard will be issued. 41 English DRAM Timing Configuration Load XMP...
User Manual
Page 53
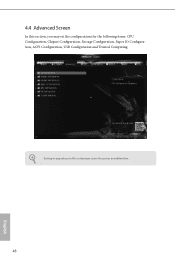
Setting wrong values in this section, you may cause the system to malfunction. 48 English 4.4 Advanced Screen In this section may set the configurations for the following items: CPU Configuration, Chipset Configuration, Storage Configuration, Super IO Configuration, ACPI Configuration, USB Configuration and Trusted Computing.
Setting wrong values in this section, you may cause the system to malfunction. 48 English 4.4 Advanced Screen In this section may set the configurations for the following items: CPU Configuration, Chipset Configuration, Storage Configuration, Super IO Configuration, ACPI Configuration, USB Configuration and Trusted Computing.

User Manual
Page 54
...is recommended to enable in each processor package. CPU C6 State Support Enable C6 deep sleep state for better power saving. CPU C3 State Support Enable C3 sleep state for power saving. 49 English Package C State Support Enable CPU, PCIe, Memory, Graphics C State Support ...for lower power consumption. Enhanced Halt State (C1E) Enable Enhanced Halt State (C1E) for lower power consumption. 4.4.1 CPU Configuration H110 Pro BTC+ Active Processor Cores Select the number of cores to ...
...is recommended to enable in each processor package. CPU C6 State Support Enable C6 deep sleep state for better power saving. CPU C3 State Support Enable C3 sleep state for power saving. 49 English Package C State Support Enable CPU, PCIe, Memory, Graphics C State Support ...for lower power consumption. Enhanced Halt State (C1E) Enable Enhanced Halt State (C1E) for lower power consumption. 4.4.1 CPU Configuration H110 Pro BTC+ Active Processor Cores Select the number of cores to ...
User Manual
Page 55
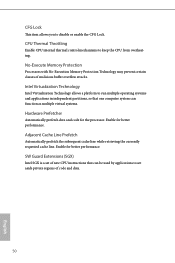
...Intel SGX is a set aside private regions of code and data. 50 English CFG Lock This item allows you to keep the CPU from overheating. Adjacent Cache Line Prefetch Automatically prefetch the subsequent cache line while retrieving the currently requested cache line. Intel Virtualization Technology...performance. No-Execute Memory Protection Processors with No-Execution Memory Protection Technology may prevent certain classes of new CPU instructions that one computer system can function as multiple virtual systems. Hardware Prefetcher Automatically prefetch data and code for the processor...
...Intel SGX is a set aside private regions of code and data. 50 English CFG Lock This item allows you to keep the CPU from overheating. Adjacent Cache Line Prefetch Automatically prefetch the subsequent cache line while retrieving the currently requested cache line. Intel Virtualization Technology...performance. No-Execute Memory Protection Processors with No-Execution Memory Protection Technology may prevent certain classes of new CPU instructions that one computer system can function as multiple virtual systems. Hardware Prefetcher Automatically prefetch data and code for the processor...
User Manual
Page 57
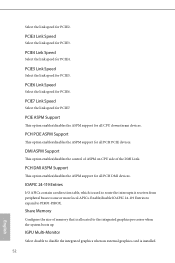
... link speed for PCIE4. Share Memory Configure the size of the DMI Link. DMI ASPM Support This option enables/disables the control of ASPM on CPU side of memory that is allocated to PIROI-PIROX. Enable/disable IOAPIC 24-119 Entries to expand to the integrated graphics processor when the system...
... link speed for PCIE4. Share Memory Configure the size of the DMI Link. DMI ASPM Support This option enables/disables the control of ASPM on CPU side of memory that is allocated to PIROI-PIROX. Enable/disable IOAPIC 24-119 Entries to expand to the integrated graphics processor when the system...
User Manual
Page 66
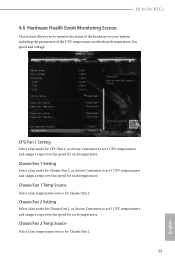
...a fan temperature source for each temperature. Chassis Fan 1 Setting Select a fan mode for Chassis Fan 1, or choose Customize to set 5 CPU temperatures and assign a respective fan speed for Chassis Fan 2. 61 English Chassis Fan 1 Temp Source Select a fan temperature source for each ... the status of the hardware on your system, including the parameters of the CPU temperature, motherboard temperature, fan speed and voltage. H110 Pro BTC+ 4.6 Hardware Health Event Monitoring Screen This section allows you to set 5 CPU temperatures and assign a respective fan speed for Chassis Fan 1.
...a fan temperature source for each temperature. Chassis Fan 1 Setting Select a fan mode for Chassis Fan 1, or choose Customize to set 5 CPU temperatures and assign a respective fan speed for Chassis Fan 2. 61 English Chassis Fan 1 Temp Source Select a fan temperature source for each ... the status of the hardware on your system, including the parameters of the CPU temperature, motherboard temperature, fan speed and voltage. H110 Pro BTC+ 4.6 Hardware Health Event Monitoring Screen This section allows you to set 5 CPU temperatures and assign a respective fan speed for Chassis Fan 1.


