RAID Installation Guide
Page 5
...). Set the "SATA Mode" option to exit. 1.3 Installing Windows® OS With RAID Functions If you install. 1.3.1 RAID Functions for AMD A85X, A75, A55, A58 chipsets Way 1: Use legacy RAID ROM to create and configure the RAID disk. B. Click to save to . During system boot, press to enter UEFI setup utility. B. B. During system boot, press or key to enter legacy RAID ROM utility. C. Insert the Support CD into one of the SATA ports 5 ~ 8 which the size of 2 or more details) STEP 3: Copy RAID driver to a USB flash drive A. Go...
...). Set the "SATA Mode" option to exit. 1.3 Installing Windows® OS With RAID Functions If you install. 1.3.1 RAID Functions for AMD A85X, A75, A55, A58 chipsets Way 1: Use legacy RAID ROM to create and configure the RAID disk. B. Click to save to . During system boot, press to enter UEFI setup utility. B. B. During system boot, press or key to enter legacy RAID ROM utility. C. Insert the Support CD into one of the SATA ports 5 ~ 8 which the size of 2 or more details) STEP 3: Copy RAID driver to a USB flash drive A. Go...
RAID Installation Guide
Page 9
... USB flash drive. STEP 1: Set up UEFI A. Set the "SATA Mode" option to enter UEFI setup utility. During system boot, press to a USB flash drive A. Follow the instruction inside your Windows version (Windows 7/8/8.1). Please install the DVD-ROM into one of the SATA ports 5 ~ 8 which the size of the RAID disk is limited to exit. D. For 64bit OS, the driver is under /AMD64 directly. D. After RAID driver is loaded, the RAID disk will be created in this guide for more details) STEP 3: Copy RAID driver to enter legacy RAID ROM utility. Please follow Windows installation...
... USB flash drive. STEP 1: Set up UEFI A. Set the "SATA Mode" option to enter UEFI setup utility. During system boot, press to a USB flash drive A. Follow the instruction inside your Windows version (Windows 7/8/8.1). Please install the DVD-ROM into one of the SATA ports 5 ~ 8 which the size of the RAID disk is limited to exit. D. For 64bit OS, the driver is under /AMD64 directly. D. After RAID driver is loaded, the RAID disk will be created in this guide for more details) STEP 3: Copy RAID driver to enter legacy RAID ROM utility. Please follow Windows installation...
RAID Installation Guide
Page 18
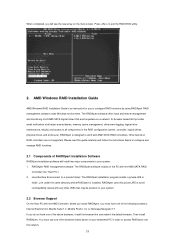
... have one of RAIDXpert Installation Software RAIDXpert installation software will see the new array on your system: 1. AMD Windows RAID Installation Guide AMD Windows RAID Installation Guide is an instruction for you will install two major components to your networked PC in the RAID configuration (server, controller, logical drives, physical drives, and enclosure). You must have one of RAID controllers are not supported. When completed, you to configure RAID functions by using RAIDXpert RAID management software under the same directory...
... have one of RAIDXpert Installation Software RAIDXpert installation software will see the new array on your system: 1. AMD Windows RAID Installation Guide AMD Windows RAID Installation Guide is an instruction for you will install two major components to your networked PC in the RAID configuration (server, controller, logical drives, physical drives, and enclosure). You must have one of RAID controllers are not supported. When completed, you to configure RAID functions by using RAIDXpert RAID management software under the same directory...
User Manual
Page 3
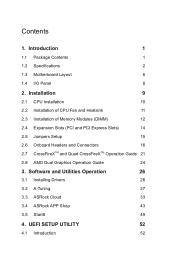
...Tuning 27 3.3 ASRock Cloud 33 3.4 ASRock APP Shop 43 3.5 Start8 49 4. UEFI SETUP UTILITY 52 4.1 Introduction 52 Installation 9 2.1 CPU Installation 10 2.2 Installation of CPU Fan and Heatsink 11 2.3 Installation of Memory Modules (DIMM) 12 2.4 Expansion Slots (PCI and PCI Express Slots) 14 2.5 Jumpers Setup 15 2.6 Onboard Headers and Connectors 16 2.7 CrossFireXTM and Quad CrossFireXTM Operation Guide 21 2.8 AMD Dual Graphics Operation Guide 24 3. Introduction 1 1.1 Package Contents 1 1.2 Specifications 2 1.3 Motherboard Layout 6 1.4 I/O Panel 8 2.
...Tuning 27 3.3 ASRock Cloud 33 3.4 ASRock APP Shop 43 3.5 Start8 49 4. UEFI SETUP UTILITY 52 4.1 Introduction 52 Installation 9 2.1 CPU Installation 10 2.2 Installation of CPU Fan and Heatsink 11 2.3 Installation of Memory Modules (DIMM) 12 2.4 Expansion Slots (PCI and PCI Express Slots) 14 2.5 Jumpers Setup 15 2.6 Onboard Headers and Connectors 16 2.7 CrossFireXTM and Quad CrossFireXTM Operation Guide 21 2.8 AMD Dual Graphics Operation Guide 24 3. Introduction 1 1.1 Package Contents 1 1.2 Specifications 2 1.3 Motherboard Layout 6 1.4 I/O Panel 8 2.
User Manual
Page 5
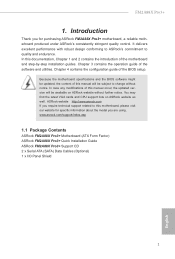
...-by-step installation guides. FM2A88X Pro3+ 1. In this motherboard, please visit our website for specific information about the model you for purchasing ASRock FM2A88X Pro3+ motherboard, a reliable motherboard produced under ASRock's consistently stringent quality control. www.asrock.com/support/index.asp 1.1 Package Contents ASRock FM2A88X Pro3+ Motherboard (ATX Form Factor) ASRock FM2A88X Pro3+ Quick Installation Guide ASRock FM2A88X Pro3+ Support CD 2 x Serial ATA (SATA) Data Cables (Optional) 1 x I/O Panel Shield 1 English Introduction Thank you are using. It delivers...
...-by-step installation guides. FM2A88X Pro3+ 1. In this motherboard, please visit our website for specific information about the model you for purchasing ASRock FM2A88X Pro3+ motherboard, a reliable motherboard produced under ASRock's consistently stringent quality control. www.asrock.com/support/index.asp 1.1 Package Contents ASRock FM2A88X Pro3+ Motherboard (ATX Form Factor) ASRock FM2A88X Pro3+ Quick Installation Guide ASRock FM2A88X Pro3+ Support CD 2 x Serial ATA (SATA) Data Cables (Optional) 1 x I/O Panel Shield 1 English Introduction Thank you are using. It delivers...
User Manual
Page 8
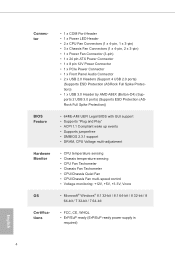
... x 24 pin ATX Power Connector • 1 x 8 pin 12V Power Connector • 1 x PCIe Power Connector • 1 x Front Panel Audio Connector • 2 x USB 2.0 Headers (Support 4 USB 2.0 ports) (Supports ESD Protection (ASRock Full Spike Protection)) • 1 x USB 3.0 Header by AMD A88X (Bolton-D4) (Supports 2 USB 3.0 ports) (Supports ESD Protection (ASRock Full Spike Protection)) • 64Mb AMI UEFI Legal BIOS with GUI support • Supports "Plug and Play" • ACPI 1.1 Compliant wake up events • Supports jumperfree • SMBIOS 2.3.1 support • DRAM, CPU Voltage multi...
... x 24 pin ATX Power Connector • 1 x 8 pin 12V Power Connector • 1 x PCIe Power Connector • 1 x Front Panel Audio Connector • 2 x USB 2.0 Headers (Support 4 USB 2.0 ports) (Supports ESD Protection (ASRock Full Spike Protection)) • 1 x USB 3.0 Header by AMD A88X (Bolton-D4) (Supports 2 USB 3.0 ports) (Supports ESD Protection (ASRock Full Spike Protection)) • 64Mb AMI UEFI Legal BIOS with GUI support • Supports "Plug and Play" • ACPI 1.1 Compliant wake up events • Supports jumperfree • SMBIOS 2.3.1 support • DRAM, CPU Voltage multi...
User Manual
Page 11
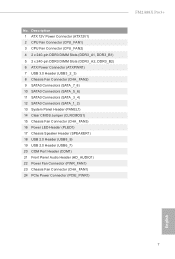
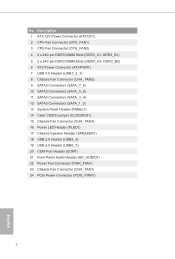
...pin DDR3 DIMM Slots (DDR3_A2, DDR3_B2) 6 ATX Power Connector (ATXPWR1) 7 USB 3.0 Header (USB3_2_3) 8 Chassis Fan Connector (CHA_FAN2) 9 SATA3 Connectors (SATA_7_8) 10 SATA3 Connectors (SATA_5_6) 11 SATA3 Connectors (SATA_3_4) 12 SATA3 Connectors (SATA_1_2) 13 System Panel Header (PANEL1) 14 Clear CMOS Jumper (CLRCMOS1) 15 Chassis Fan Connector (CHA_FAN3) 16 Power LED Header (PLED1) 17 Chassis Speaker Header (SPEAKER1) 18 USB 2.0 Header (USB8_9) 19 USB 2.0 Header (USB6_7) 20 COM Port Header (COM1) 21 Front Panel Audio Header (HD_AUDIO1) 22 Power Fan Connector (PWR_FAN1) 23 Chassis Fan Connector...
...pin DDR3 DIMM Slots (DDR3_A2, DDR3_B2) 6 ATX Power Connector (ATXPWR1) 7 USB 3.0 Header (USB3_2_3) 8 Chassis Fan Connector (CHA_FAN2) 9 SATA3 Connectors (SATA_7_8) 10 SATA3 Connectors (SATA_5_6) 11 SATA3 Connectors (SATA_3_4) 12 SATA3 Connectors (SATA_1_2) 13 System Panel Header (PANEL1) 14 Clear CMOS Jumper (CLRCMOS1) 15 Chassis Fan Connector (CHA_FAN3) 16 Power LED Header (PLED1) 17 Chassis Speaker Header (SPEAKER1) 18 USB 2.0 Header (USB8_9) 19 USB 2.0 Header (USB6_7) 20 COM Port Header (COM1) 21 Front Panel Audio Header (HD_AUDIO1) 22 Power Fan Connector (PWR_FAN1) 23 Chassis Fan Connector...
User Manual
Page 25
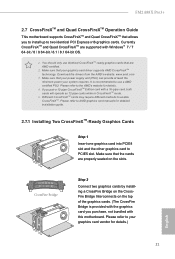
... CrossFireXTM mode. 5. Download the drivers from the AMD's website: www.amd.com 3. CrossFire Bridge Step 2 Connect two graphics cards by installing a CrossFire Bridge on the CrossFire Bridge Interconnects on the slots. FM2A88X Pro3+ 2.7 CrossFireXTM and Quad CrossFireXTM Operation Guide This motherboard supports CrossFireXTM and Quad CrossFireXTM that allows you to install up to your graphics card vendor for details.) English 21 Please refer to two identical PCI Express x16 graphics cards. Currently...
... CrossFireXTM mode. 5. Download the drivers from the AMD's website: www.amd.com 3. CrossFire Bridge Step 2 Connect two graphics cards by installing a CrossFire Bridge on the CrossFire Bridge Interconnects on the slots. FM2A88X Pro3+ 2.7 CrossFireXTM and Quad CrossFireXTM Operation Guide This motherboard supports CrossFireXTM and Quad CrossFireXTM that allows you to install up to your graphics card vendor for details.) English 21 Please refer to two identical PCI Express x16 graphics cards. Currently...
User Manual
Page 27
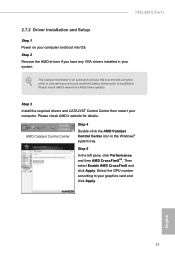
... Uninstaller is an optional download. We recommend using this utility to uninstall any VGA drivers installed in the Windows® system tray. AMD Catalyst Control Center Step 4 Double-click the AMD Catalyst Control Center icon in your computer and boot into OS. Select the GPU number according to installation. Please check AMD's website for details. English 23 Please check AMD's website for AMD driver updates. Then select Enable AMD CrossFireX and...
... Uninstaller is an optional download. We recommend using this utility to uninstall any VGA drivers installed in the Windows® system tray. AMD Catalyst Control Center Step 4 Double-click the AMD Catalyst Control Center icon in your computer and boot into OS. Select the GPU number according to installation. Please check AMD's website for details. English 23 Please check AMD's website for AMD driver updates. Then select Enable AMD CrossFireX and...
User Manual
Page 28
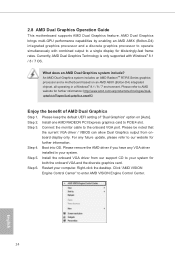
... "Dual Graphics" option on an AMD A88X (Bolton-D4) integrated chipset, all operating in your computer. An AMD Dual Graphics system includes an AMD RadeonTM R7/R5 Series graphics processor and a motherboard based on [Auto]. Restart your system. Right-click the desktop. Please remove the AMD driver if you have any future update, please refer to the onboard VGA port. Connect the monitor cable to our website for blisteringly-fast frame rates. For any VGA driver installed in a Windows...
... "Dual Graphics" option on an AMD A88X (Bolton-D4) integrated chipset, all operating in your computer. An AMD Dual Graphics system includes an AMD RadeonTM R7/R5 Series graphics processor and a motherboard based on [Auto]. Restart your system. Right-click the desktop. Please remove the AMD driver if you have any future update, please refer to the onboard VGA port. Connect the monitor cable to our website for blisteringly-fast frame rates. For any VGA driver installed in a Windows...
User Manual
Page 30
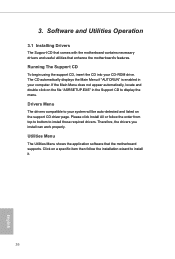
... useful utilities that the motherboard supports. Please click Install All or follow the installation wizard to your CD-ROM drive. If the Main Menu does not appear automatically, locate and double click on the file "ASRSETUP.EXE" in your computer. Utilities Menu The Utilities Menu shows the application software that enhance the motherboard's features. Drivers Menu The drivers compatible to install it. 26 English Click on the support CD driver page. 3. Therefore, the drivers you install can work...
... useful utilities that the motherboard supports. Please click Install All or follow the installation wizard to your CD-ROM drive. If the Main Menu does not appear automatically, locate and double click on the file "ASRSETUP.EXE" in your computer. Utilities Menu The Utilities Menu shows the application software that enhance the motherboard's features. Drivers Menu The drivers compatible to install it. 26 English Click on the support CD driver page. 3. Therefore, the drivers you install can work...
User Manual
Page 56
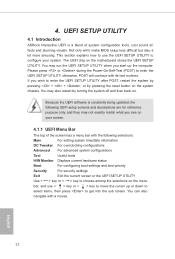
... ASRock Interactive UEFI is constantly being updated, the following selections: Main For setting system time/date information OC Tweaker For overclocking configurations Advanced For advanced system configurations Tool Useful tools H/W Monitor Displays current hardware status Boot For configuring boot settings and boot priority Security For security settings Exit Exit the current screen or the UEFI Setup Utility Use < > key or < > key to choose among the selections on the menu bar, and use < > key or < > key to enter the UEFI Setup Utility after POST...
... ASRock Interactive UEFI is constantly being updated, the following selections: Main For setting system time/date information OC Tweaker For overclocking configurations Advanced For advanced system configurations Tool Useful tools H/W Monitor Displays current hardware status Boot For configuring boot settings and boot priority Security For security settings Exit Exit the current screen or the UEFI Setup Utility Use < > key or < > key to choose among the selections on the menu bar, and use < > key or < > key to enter the UEFI Setup Utility after POST...
User Manual
Page 62
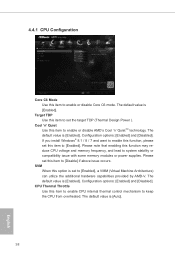
... reduce CPU voltage and memory frequency, and lead to enable or disable AMD's Cool 'n' QuietTM technology. The default value is [Enabled]. Target TDP Use this item to set this item to enable this function, please set the target TDP (Thermal Design Power ). If you install Windows® 8.1 / 8 / 7 and want to [Enabled]. Please set to [Disable] if above issue occurs. CPU Thermal Throttle Use this item to enable CPU internal thermal control mechanism to enable or disable Core C6 mode. The default...
... reduce CPU voltage and memory frequency, and lead to enable or disable AMD's Cool 'n' QuietTM technology. The default value is [Enabled]. Target TDP Use this item to set this item to enable this function, please set the target TDP (Thermal Design Power ). If you install Windows® 8.1 / 8 / 7 and want to [Enabled]. Please set to [Disable] if above issue occurs. CPU Thermal Throttle Use this item to enable CPU internal thermal control mechanism to enable or disable Core C6 mode. The default...
User Manual
Page 63
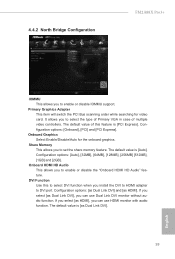
... use Dual Link DVI monitor without audio function. The default value of multiple video controllers. Configuration options: [as Dual Link DVI] and [as Dual Link DVI]. 59 English 4.4.2 North Bridge Configuration FM2A88X Pro3+ IOMMU This allows you to set the share memory feature. Configuration options: [Onboard], [PCI] and [PCI Express]. If you select [as HDMI], you to select the type of Primary VGA in case of this to select DVI function when you to enable or disable the "Onboard HDMI...
... use Dual Link DVI monitor without audio function. The default value of multiple video controllers. Configuration options: [as Dual Link DVI] and [as Dual Link DVI]. 59 English 4.4.2 North Bridge Configuration FM2A88X Pro3+ IOMMU This allows you to set the share memory feature. Configuration options: [Onboard], [PCI] and [PCI Express]. If you select [as HDMI], you to select the type of Primary VGA in case of this to select DVI function when you to enable or disable the "Onboard HDMI...
User Manual
Page 65
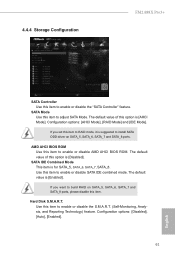
... item to enable or disable SATA IDE combined mode. AMD AHCI BIOS ROM Use this item to adjust SATA Mode. Configuration options: [AHCI Mode], [RAID Mode] and [IDE Mode]. Use this item to enable or disable the "SATA Controller" feature. Hard Disk S.M.A.R.T. If you set this item to RAID mode, it is suggested to install SATA ODD driver on SATA_5, SATA_6, SATA_7 and SATA_8 ports, please disable this item to enable or disable AMD AHCI BIOS ROM. Configuration options: [Disabled], [Auto], [Enabled]. 61 English 4.4.4 Storage Configuration FM2A88X Pro3+ SATA Controller Use this...
... item to enable or disable SATA IDE combined mode. AMD AHCI BIOS ROM Use this item to adjust SATA Mode. Configuration options: [AHCI Mode], [RAID Mode] and [IDE Mode]. Use this item to enable or disable the "SATA Controller" feature. Hard Disk S.M.A.R.T. If you set this item to RAID mode, it is suggested to install SATA ODD driver on SATA_5, SATA_6, SATA_7 and SATA_8 ports, please disable this item to enable or disable AMD AHCI BIOS ROM. Configuration options: [Disabled], [Auto], [Enabled]. 61 English 4.4.4 Storage Configuration FM2A88X Pro3+ SATA Controller Use this...

User Manual
Page 67
... set the power state after S3 only when the hard disk is ready, this item to enable or disable PCI devices to turn on the system from the power-soft-off mode. 4.4.6 ACPI Configuration FM2A88X Pro3+ Suspend to RAM Use this item to enable or disable Ring-In signals to turn on the system from the power-soft-off mode. If [Power Off] is recommended for better system compatibility and stability. Check Ready Bit Enable to auto...
... set the power state after S3 only when the hard disk is ready, this item to enable or disable PCI devices to turn on the system from the power-soft-off mode. 4.4.6 ACPI Configuration FM2A88X Pro3+ Suspend to RAM Use this item to enable or disable Ring-In signals to turn on the system from the power-soft-off mode. If [Power Off] is recommended for better system compatibility and stability. Check Ready Bit Enable to auto...
User Manual
Page 69
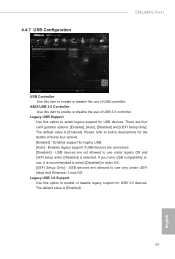
... to enter OS. [UEFI Setup Only] - USB devices are four confi guration options: [Enabled], [Auto], [Disabled] and [UEFI Setup Only]. Enables support for USB devices. There are allowed to use under UEFI setup and Windows / Linux OS. Please refer to below descriptions for USB 3.0 devices. If you have USB compatibility issue, it is [Enabled]. The default value is selected. 4.4.7 USB Configuration FM2A88X Pro3+ USB Controller Use this item to enable or disable the use of USB 3.0 controller. USB devices are connected. [Disabled] - Enables legacy support if USB devices...
... to enter OS. [UEFI Setup Only] - USB devices are four confi guration options: [Enabled], [Auto], [Disabled] and [UEFI Setup Only]. Enables support for USB devices. There are allowed to use under UEFI setup and Windows / Linux OS. Please refer to below descriptions for USB 3.0 devices. If you have USB compatibility issue, it is [Enabled]. The default value is selected. 4.4.7 USB Configuration FM2A88X Pro3+ USB Controller Use this item to enable or disable the use of USB 3.0 controller. USB devices are connected. [Disabled] - Enables legacy support if USB devices...
User Manual
Page 70
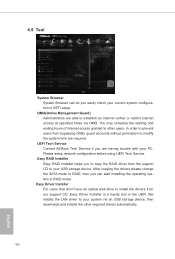
... configuration in UEFI setup. UEFI Tech Service Contact ASRock Tech Service if you are required. Please setup network configuration before using UEFI Tech Service. Easy RAID Installer Easy RAID Installer helps you easily check your PC. After copying the drivers please change the SATA mode to RAID, then you can let you to copy the RAID driver from our support CD, Easy Driver Installer is a handy tool in the UEFI that installs the LAN driver to your system via OMG. Easy Driver Installer...
... configuration in UEFI setup. UEFI Tech Service Contact ASRock Tech Service if you are required. Please setup network configuration before using UEFI Tech Service. Easy RAID Installer Easy RAID Installer helps you easily check your PC. After copying the drivers please change the SATA mode to RAID, then you can let you to copy the RAID driver from our support CD, Easy Driver Installer is a handy tool in the UEFI that installs the LAN driver to your system via OMG. Easy Driver Installer...
User Manual
Page 73
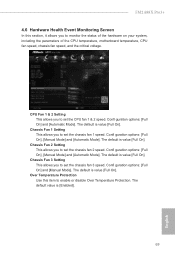
FM2A88X Pro3+ 4.6 Hardware Health Event Monitoring Screen In this item to set the chassis fan 2 speed. The default is [Enabled]. 69 English Chassis Fan 1 Setting This allows you to monitor the status of the hardware on your system, including the parameters of the CPU temperature, motherboard temperature, CPU fan speed, chassis fan speed, and the critical voltage. The default value is value [Full On]. Confi guration options: [Full On], [Manual Mode] and [Automatic Mode]. Over Temperature Protection Use this section, it allows you...
FM2A88X Pro3+ 4.6 Hardware Health Event Monitoring Screen In this item to set the chassis fan 2 speed. The default is [Enabled]. 69 English Chassis Fan 1 Setting This allows you to monitor the status of the hardware on your system, including the parameters of the CPU temperature, motherboard temperature, CPU fan speed, chassis fan speed, and the critical voltage. The default value is value [Full On]. Confi guration options: [Full On], [Manual Mode] and [Automatic Mode]. Over Temperature Protection Use this section, it allows you...
Quick Installation Guide
Page 3
...pin DDR3 DIMM Slots (DDR3_A2, DDR3_B2) 6 ATX Power Connector (ATXPWR1) 7 USB 3.0 Header (USB3_2_3) 8 Chassis Fan Connector (CHA_FAN2) 9 SATA3 Connectors (SATA_7_8) 10 SATA3 Connectors (SATA_5_6) 11 SATA3 Connectors (SATA_3_4) 12 SATA3 Connectors (SATA_1_2) 13 System Panel Header (PANEL1) 14 Clear CMOS Jumper (CLRCMOS1) 15 Chassis Fan Connector (CHA_FAN3) 16 Power LED Header (PLED1) 17 Chassis Speaker Header (SPEAKER1) 18 USB 2.0 Header (USB8_9) 19 USB 2.0 Header (USB6_7) 20 COM Port Header (COM1) 21 Front Panel Audio Header (HD_AUDIO1) 22 Power Fan Connector (PWR_FAN1) 23 Chassis Fan Connector...
...pin DDR3 DIMM Slots (DDR3_A2, DDR3_B2) 6 ATX Power Connector (ATXPWR1) 7 USB 3.0 Header (USB3_2_3) 8 Chassis Fan Connector (CHA_FAN2) 9 SATA3 Connectors (SATA_7_8) 10 SATA3 Connectors (SATA_5_6) 11 SATA3 Connectors (SATA_3_4) 12 SATA3 Connectors (SATA_1_2) 13 System Panel Header (PANEL1) 14 Clear CMOS Jumper (CLRCMOS1) 15 Chassis Fan Connector (CHA_FAN3) 16 Power LED Header (PLED1) 17 Chassis Speaker Header (SPEAKER1) 18 USB 2.0 Header (USB8_9) 19 USB 2.0 Header (USB6_7) 20 COM Port Header (COM1) 21 Front Panel Audio Header (HD_AUDIO1) 22 Power Fan Connector (PWR_FAN1) 23 Chassis Fan Connector...

