User Manual
Page 16
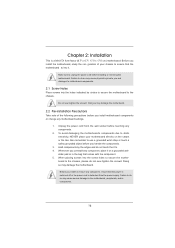
... you install motherboard components or change any component, ensure that comes with the component. 5. static pad or in the bag that the power is switched off or the power cord is a Mini-ITX form factor (6.7" x 6.7", 17.0 x 17.0 cm) motherboard. When placing screws into the screw holes to the chassis, please do so may damage...
... you install motherboard components or change any component, ensure that comes with the component. 5. static pad or in the bag that the power is switched off or the power cord is a Mini-ITX form factor (6.7" x 6.7", 17.0 x 17.0 cm) motherboard. When placing screws into the screw holes to the chassis, please do so may damage...
User Manual
Page 21
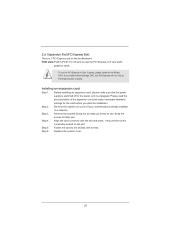
... in a chassis). Keep the screws for the card before you start the installation. Step 2. Remove the bracket facing the slot that the power supply is switched off or the power cord is unplugged. Align the card connector with screws. Step 4. Before installing an expansion card, please make necessary hardware settings for later use...
... in a chassis). Keep the screws for the card before you start the installation. Step 2. Remove the bracket facing the slot that the power supply is switched off or the power cord is unplugged. Align the card connector with screws. Step 4. Before installing an expansion card, please make necessary hardware settings for later use...

User Manual
Page 29
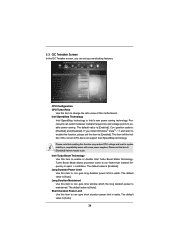
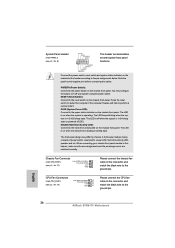
... when the system is reading or writing data. The LED is on the chassis front panel. A front panel module mainly consists of power switch, reset switch, power LED, hard drive activity LED, speaker and etc. System Panel Header (9-pin PANEL1) (see p.13, No. 17) FAN_SPEED_CONTROL CHA_FAN_SPEED ... pin assign-ments are matched correctly. The LED keeps blinking when the system is in S1/S3 sleep state. When connecting your system using the power switch. CPU Fan Connectors (4-pin CPU_FAN1) (see p.13, No. 16) FAN_SPEED_CONTROL 4 CPU_FAN_SPEED 3 +12V 2 GND 1 Please connect the CPU fan...
... when the system is reading or writing data. The LED is on the chassis front panel. A front panel module mainly consists of power switch, reset switch, power LED, hard drive activity LED, speaker and etc. System Panel Header (9-pin PANEL1) (see p.13, No. 17) FAN_SPEED_CONTROL CHA_FAN_SPEED ... pin assign-ments are matched correctly. The LED keeps blinking when the system is in S1/S3 sleep state. When connecting your system using the power switch. CPU Fan Connectors (4-pin CPU_FAN1) (see p.13, No. 16) FAN_SPEED_CONTROL 4 CPU_FAN_SPEED 3 +12V 2 GND 1 Please connect the CPU fan...
User Manual
Page 38
... Use this function may reduce CPU voltage and lead to con gure short duration power limit in speci c conditions. If you can switch between multiple frequencies and voltage points to enable power saving. CPU Configuration CPU Turbo Ratio Use this motherboard. Processors can set this item to run faster than marked...
... Use this function may reduce CPU voltage and lead to con gure short duration power limit in speci c conditions. If you can switch between multiple frequencies and voltage points to enable power saving. CPU Configuration CPU Turbo Ratio Use this motherboard. Processors can set this item to run faster than marked...
Quick Installation Guide
Page 13
...study the configuration of the following precautions before you install motherboard components or change any component, ensure that the power is switched off or the power cord is a Mini-ITX form factor (6.7" x 6.7", 17.0 x 17.0 cm) motherboard. 2. Failure to do not touch the ICs. ... the power cord before touching any component, place it . Installation This is detached from the wall socket before installing or removing the motherboard. Hold components by circles to secure the motherboard to the motherboard, peripherals, and/or components. 13 ASRock B75M-ITX Motherboard...
...study the configuration of the following precautions before you install motherboard components or change any component, ensure that the power is switched off or the power cord is a Mini-ITX form factor (6.7" x 6.7", 17.0 x 17.0 cm) motherboard. 2. Failure to do not touch the ICs. ... the power cord before touching any component, place it . Installation This is detached from the wall socket before installing or removing the motherboard. Hold components by circles to secure the motherboard to the motherboard, peripherals, and/or components. 13 ASRock B75M-ITX Motherboard...

Quick Installation Guide
Page 18
... your motherboard is 1 PCI Express slot on the slot. Step 5. Step 3. Remove the bracket facing the slot that the power supply is switched off or the power cord is used for the card before you install a Sandy Bridge CPU, the PCI Express will run the PCI Express in... speed. Installing an expansion card Step 1. Keep the screws for later use . Align the card connector with screws. Replace the system cover. 18 ASRock B75M-ITX Motherboard English 2.6 Expansion Slot (PCI Express Slot) There is already installed in Gen 3 speed, please install an Ivy Bridge CPU. PCIE slots:PCIE1...
... your motherboard is 1 PCI Express slot on the slot. Step 5. Step 3. Remove the bracket facing the slot that the power supply is switched off or the power cord is used for the card before you install a Sandy Bridge CPU, the PCI Express will run the PCI Express in... speed. Installing an expansion card Step 1. Keep the screws for later use . Align the card connector with screws. Replace the system cover. 18 ASRock B75M-ITX Motherboard English 2.6 Expansion Slot (PCI Express Slot) There is already installed in Gen 3 speed, please install an Ivy Bridge CPU. PCIE slots:PCIE1...
Quick Installation Guide
Page 26
Note the positive and negative pins before connecting the cables. The LED is reading or writing data. When connecting your system using the power switch. English 26 ASRock B75M-ITX Motherboard You may differ by chassis. The LED keeps blinking when the system is in S1/S3 sleep state. The front panel design may con&#...
Note the positive and negative pins before connecting the cables. The LED is reading or writing data. When connecting your system using the power switch. English 26 ASRock B75M-ITX Motherboard You may differ by chassis. The LED keeps blinking when the system is in S1/S3 sleep state. The front panel design may con&#...


