
User Manual
Page 6
... 1 1.1 Package Contents 1 1.2 Specifications 2 1.3 Motherboard Layout 7 1.4 I/O Panel 9 1.5 WiFi-802.11ac Module and ASRock WiFi 2.4/5 GHz Antennas 10 Chapter 2 Installation 12 2.1 Installing the CPU 13 2.2 Installing the CPU Fan and Heatsink 16 2.3 Installing Memory Modules (DIMM) 17 2.4 Expansion Slots (PCI Express Slots) 19 2.5 Jumpers Setup 21 2.6 Onboard Headers and Connectors 22 2.7 CrossFireXTM and Quad CrossFireXTM Operation Guide 27 2.7.1 Installing Two CrossFireXTM-Ready Graphics Cards 27 2.7.2 Driver Installation and Setup 29 2.8 M.2 WiFi/BT Module...
... 1 1.1 Package Contents 1 1.2 Specifications 2 1.3 Motherboard Layout 7 1.4 I/O Panel 9 1.5 WiFi-802.11ac Module and ASRock WiFi 2.4/5 GHz Antennas 10 Chapter 2 Installation 12 2.1 Installing the CPU 13 2.2 Installing the CPU Fan and Heatsink 16 2.3 Installing Memory Modules (DIMM) 17 2.4 Expansion Slots (PCI Express Slots) 19 2.5 Jumpers Setup 21 2.6 Onboard Headers and Connectors 22 2.7 CrossFireXTM and Quad CrossFireXTM Operation Guide 27 2.7.1 Installing Two CrossFireXTM-Ready Graphics Cards 27 2.7.2 Driver Installation and Setup 29 2.8 M.2 WiFi/BT Module...
User Manual
Page 9
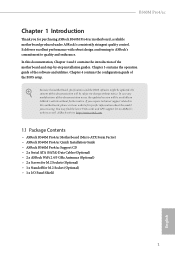
... Screws for M.2 Sockets (Optional) • 1 x Standoff for purchasing ASRock B560M Pro4/ac motherboard, a reliable motherboard produced under ASRock's consistently stringent quality control. Because the motherboard specifications and the BIOS software might be updated, the content of the motherboard and step-by-step installation guides. You may find the latest VGA cards and CPU support list on ASRock's website without notice. If you for M.2 Socket (Optional) • 1 x I/O Panel Shield 1 English Chapter 4 contains the configuration guide of the software and utilities. In this...
... Screws for M.2 Sockets (Optional) • 1 x Standoff for purchasing ASRock B560M Pro4/ac motherboard, a reliable motherboard produced under ASRock's consistently stringent quality control. Because the motherboard specifications and the BIOS software might be updated, the content of the motherboard and step-by-step installation guides. You may find the latest VGA cards and CPU support list on ASRock's website without notice. If you for M.2 Socket (Optional) • 1 x I/O Panel Shield 1 English Chapter 4 contains the configuration guide of the software and utilities. In this...

User Manual
Page 12
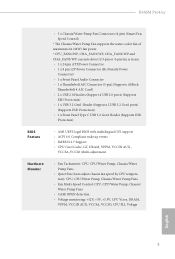
...; 2 x Antenna Ports • 1 x PS/2 Mouse/Keyboard Port • 1 x HDMI Port • 4 x USB 3.2 Gen1 Ports (Supports ESD Protection) • 2 x USB 2.0 Ports (Supports ESD Protection) • 1 x RJ-45 LAN Port with LED (ACT/LINK LED and SPEED LED) • HD Audio Jacks: Line in / Front Speaker / Microphone Storage • 6 x SATA3 6.0 Gb/s Connectors, support Intel Rapid Storage Technology 18, NCQ, AHCI and Hot Plug* * If M2_2 is occupied by a SATA-type M.2 device, SATA3_1 will be disabled. • 1 x Hyper M.2 Socket (M2_1), supports M Key type 2242/2260/2280 M.2 PCI Express module...
...; 2 x Antenna Ports • 1 x PS/2 Mouse/Keyboard Port • 1 x HDMI Port • 4 x USB 3.2 Gen1 Ports (Supports ESD Protection) • 2 x USB 2.0 Ports (Supports ESD Protection) • 1 x RJ-45 LAN Port with LED (ACT/LINK LED and SPEED LED) • HD Audio Jacks: Line in / Front Speaker / Microphone Storage • 6 x SATA3 6.0 Gb/s Connectors, support Intel Rapid Storage Technology 18, NCQ, AHCI and Hot Plug* * If M2_2 is occupied by a SATA-type M.2 device, SATA3_1 will be disabled. • 1 x Hyper M.2 Socket (M2_1), supports M Key type 2242/2260/2280 M.2 PCI Express module...
User Manual
Page 13
... 12V Power Connector (Hi-Density Power Connector) • 1 x Front Panel Audio Connector • 1 x Thunderbolt AIC Connector (5-pin) (Supports ASRock Thunderbolt 4 AIC Card) • 2 x USB 2.0 Headers (Support 4 USB 2.0 ports) (Supports ESD Protection) • 1 x USB 3.2 Gen1 Header (Supports 2 USB 3.2 Gen1 ports) (Supports ESD Protection) • 1 x Front Panel Type C USB 3.2 Gen1 Header (Supports ESD Protection) BIOS Feature • AMI UEFI Legal BIOS with multilingual GUI support • ACPI 6.0 Compliant wake up events • SMBIOS 2.7 Support • CPU Core/Cache, GT, DRAM...
... 12V Power Connector (Hi-Density Power Connector) • 1 x Front Panel Audio Connector • 1 x Thunderbolt AIC Connector (5-pin) (Supports ASRock Thunderbolt 4 AIC Card) • 2 x USB 2.0 Headers (Support 4 USB 2.0 ports) (Supports ESD Protection) • 1 x USB 3.2 Gen1 Header (Supports 2 USB 3.2 Gen1 ports) (Supports ESD Protection) • 1 x Front Panel Type C USB 3.2 Gen1 Header (Supports ESD Protection) BIOS Feature • AMI UEFI Legal BIOS with multilingual GUI support • ACPI 6.0 Compliant wake up events • SMBIOS 2.7 Support • CPU Core/Cache, GT, DRAM...

User Manual
Page 15
... bit, 288-pin module) 29 USB 3.2 Gen1 T: USB3_2 B: USB3_1 USB 3.2 Gen1 Top: T: USB3_4 B: USB3_3 RJ-45 LAN USB3_5_6 M2_1 M2_WIFI Top: LINE IN Center: FRONT Bottom: MIC IN CHA_FAN1/WP PCIE1 CMOS Battery WiFi-802.11ac Module PCIE2 RoHS Intel B560 AUDIO CODEC HD_AUDIO1 1 ADDR_LED2 1 RGB_LED2 1 CLRMOS1 1 1 T B1 PCIE3 CHA_FAN3/WP CHA_FAN2/WP SPK_CI1 USB3_4 USB5_6 1 11 1 PSC DRAM CPU VGA BOOT BIOS ROM...
... bit, 288-pin module) 29 USB 3.2 Gen1 T: USB3_2 B: USB3_1 USB 3.2 Gen1 Top: T: USB3_4 B: USB3_3 RJ-45 LAN USB3_5_6 M2_1 M2_WIFI Top: LINE IN Center: FRONT Bottom: MIC IN CHA_FAN1/WP PCIE1 CMOS Battery WiFi-802.11ac Module PCIE2 RoHS Intel B560 AUDIO CODEC HD_AUDIO1 1 ADDR_LED2 1 RGB_LED2 1 CLRMOS1 1 1 T B1 PCIE3 CHA_FAN3/WP CHA_FAN2/WP SPK_CI1 USB3_4 USB5_6 1 11 1 PSC DRAM CPU VGA BOOT BIOS ROM...

User Manual
Page 16
...) 15 System Panel Header (PANEL1) 16 SATA3 Connector (SATA3_1) 17 SATA3 Connector (SATA3_0) 18 SPI TPM Header (SPI_TPM_J1) 19 USB 2.0 Header (USB5_6) 20 USB 2.0 Header (USB3_4) 21 Chassis Intrusion and Speaker Header (SPK_CI1) 22 Chassis/Water Pump Fan Connector (CHA_FAN2/WP) 23 Chassis/Water Pump Fan Connector (CHA_FAN3/WP) 24 Thunderbolt AIC Connector (TB1) 25 Clear CMOS Jumper (CLRMOS1) 26 RGB LED Header (RGB_LED2) 27 Addressable LED Header (ADDR_LED2) 28 Front Panel Audio Header (HD_AUDIO1) 29 Chassis/Water Pump Fan Connector (CHA_FAN1...
...) 15 System Panel Header (PANEL1) 16 SATA3 Connector (SATA3_1) 17 SATA3 Connector (SATA3_0) 18 SPI TPM Header (SPI_TPM_J1) 19 USB 2.0 Header (USB5_6) 20 USB 2.0 Header (USB3_4) 21 Chassis Intrusion and Speaker Header (SPK_CI1) 22 Chassis/Water Pump Fan Connector (CHA_FAN2/WP) 23 Chassis/Water Pump Fan Connector (CHA_FAN3/WP) 24 Thunderbolt AIC Connector (TB1) 25 Clear CMOS Jumper (CLRMOS1) 26 RGB LED Header (RGB_LED2) 27 Addressable LED Header (ADDR_LED2) 28 Front Panel Audio Header (HD_AUDIO1) 29 Chassis/Water Pump Fan Connector (CHA_FAN1...

User Manual
Page 27
... (PCIe 3.0 x1 slot) is used for the card before you start the installation. Please read the documentation of the expansion card and make sure that the power supply is switched off or the power cord is used for PCI Express x16 lane width graphics cards. PCIe slots: 11th Gen Intel® CoreTM Processors: PCIE1 (PCIe 4.0 x16 slot) is unplugged. B560M Pro4/ac 2.4 Expansion Slots (PCI Express Slots) There are 3 PCI Express slots on the motherboard. PCIE3 (PCIe 3.0 x16 slot) is used for PCI Express x16 lane width graphics cards. PCIe slots...
... (PCIe 3.0 x1 slot) is used for the card before you start the installation. Please read the documentation of the expansion card and make sure that the power supply is switched off or the power cord is used for PCI Express x16 lane width graphics cards. PCIe slots: 11th Gen Intel® CoreTM Processors: PCIE1 (PCIe 4.0 x16 slot) is unplugged. B560M Pro4/ac 2.4 Expansion Slots (PCI Express Slots) There are 3 PCI Express slots on the motherboard. PCIE3 (PCIe 3.0 x16 slot) is used for PCI Express x16 lane width graphics cards. PCIe slots...

User Manual
Page 29
... chassis intrusion status. Clear CMOS Jumper (CLRMOS1) (see p.7, No. 25) 2-pin Jumper CLRMOS1 allows you clear the CMOS, the case open may be cleared only if the CMOS battery is "Short". However, please do the clear-CMOS action. Please adjust the BIOS option "Clear Status" to clear the data in CMOS. To clear and reset the system parameters to short the pins on CLRMOS1 for 5 seconds. Please be noted that the password, date, time, and user default...
... chassis intrusion status. Clear CMOS Jumper (CLRMOS1) (see p.7, No. 25) 2-pin Jumper CLRMOS1 allows you clear the CMOS, the case open may be cleared only if the CMOS battery is "Short". However, please do the clear-CMOS action. Please adjust the BIOS option "Clear Status" to clear the data in CMOS. To clear and reset the system parameters to short the pins on CLRMOS1 for 5 seconds. Please be noted that the password, date, time, and user default...

User Manual
Page 33
... Module (TPM) system, which can securely store keys, digital certificates, passwords, and data. vides a 8-pin ATX 12V 4 1 power connector. Do not plug the PCIe power cable to Pin 1-3. To use a 20-pin ATX power supply, please plug it along Pin 1 and Pin 5. *Warning: Please make sure that the power cable connected is for the CPU and not the graphics card. B560M Pro4/ac CPU/Water Pump Fan Connector (4-pin CPU_FAN2/WP) (see p.7, No. 1) 8 5 This motherboard pro- ATX 12V Power Connector (8-pin ATX12V1) (see p.7, No. 4) FAN_SPEED_CONTROL CPU_FAN_SPEED FAN_VOLTAGE GND...
... Module (TPM) system, which can securely store keys, digital certificates, passwords, and data. vides a 8-pin ATX 12V 4 1 power connector. Do not plug the PCIe power cable to Pin 1-3. To use a 20-pin ATX power supply, please plug it along Pin 1 and Pin 5. *Warning: Please make sure that the power cable connected is for the CPU and not the graphics card. B560M Pro4/ac CPU/Water Pump Fan Connector (4-pin CPU_FAN2/WP) (see p.7, No. 1) 8 5 This motherboard pro- ATX 12V Power Connector (8-pin ATX12V1) (see p.7, No. 4) FAN_SPEED_CONTROL CPU_FAN_SPEED FAN_VOLTAGE GND...

User Manual
Page 35
... to PCIE3 slot. Download the drivers from the AMD's website: www.amd.com 3. It is provided with the graphics card you purchase, not bundled with a 16-pipe card, both cards will operate as 12-pipe cards while in CrossFireXTM mode. 5. B560M Pro4/ac 2.7 CrossFireXTM and Quad CrossFireXTM Operation Guide This motherboard supports CrossFireXTM and Quad CrossFireXTM that allows you to install up to use identical CrossFireXTM-ready graphics cards that are...
... to PCIE3 slot. Download the drivers from the AMD's website: www.amd.com 3. It is provided with the graphics card you purchase, not bundled with a 16-pipe card, both cards will operate as 12-pipe cards while in CrossFireXTM mode. 5. B560M Pro4/ac 2.7 CrossFireXTM and Quad CrossFireXTM Operation Guide This motherboard supports CrossFireXTM and Quad CrossFireXTM that allows you to install up to use identical CrossFireXTM-ready graphics cards that are...
User Manual
Page 37
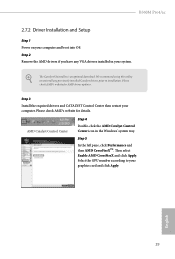
... 2 Remove the AMD drivers if you have any previously installed Catalyst drivers prior to your system. AMD Catalyst Control Center Step 4 Double-click the AMD Catalyst Control Center icon in your graphics card and click Apply. Step 3 Install the required drivers and CATALYST Control Center then restart your computer and boot into OS. Then select Enable AMD CrossFireX and click Apply. Please check AMD's website for AMD driver updates. B560M Pro4/ac 2.7.2 Driver Installation and Setup Step 1 Power...
... 2 Remove the AMD drivers if you have any previously installed Catalyst drivers prior to your system. AMD Catalyst Control Center Step 4 Double-click the AMD Catalyst Control Center icon in your graphics card and click Apply. Step 3 Install the required drivers and CATALYST Control Center then restart your computer and boot into OS. Then select Enable AMD CrossFireX and click Apply. Please check AMD's website for AMD driver updates. B560M Pro4/ac 2.7.2 Driver Installation and Setup Step 1 Power...

User Manual
Page 44
... the installation wizard to your CD-ROM drive. Drivers Menu The drivers compatible to install it. 36 English If the Main Menu does not appear automatically, locate and double click on the file "ASRSETUP.EXE" in your computer. Click on the support CD driver page. Running The Support CD To begin using the support CD, insert the CD into your system will be auto-detected and listed on a specific item...
... the installation wizard to your CD-ROM drive. Drivers Menu The drivers compatible to install it. 36 English If the Main Menu does not appear automatically, locate and double click on the file "ASRSETUP.EXE" in your computer. Click on the support CD driver page. Running The Support CD To begin using the support CD, insert the CD into your system will be auto-detected and listed on a specific item...

User Manual
Page 63
Increasing the CPU Ratio will increase the internal CPU clock speed without affecting the clock speed of other components. B560M Pro4/ac Because the UEFI software is a more stressful workload that lower the AVX ratio to ensure maximum possible ratio for AVX-512 workloads. AVX is constantly being updated, the following UEFI setup screens and descriptions are for reference purpose only, and they may not exactly match...
Increasing the CPU Ratio will increase the internal CPU clock speed without affecting the clock speed of other components. B560M Pro4/ac Because the UEFI software is a more stressful workload that lower the AVX ratio to ensure maximum possible ratio for AVX-512 workloads. AVX is constantly being updated, the following UEFI setup screens and descriptions are for reference purpose only, and they may not exactly match...

User Manual
Page 78
...® Virtualization Technology for overclocking. SR-IOV Support If system has SR-IOV capable PCIe Devices, this option Enables or Disables Single Root IO Virtualization Support. Auto mode is optimizing for Directed I/O helps your virtual machine monitor better utilize hardware by improving application compatibility and reliability, and providing additional levels of manageability, security, isolation, and I/O performance. 4.6.2 Chipset Configuration Primary Graphics Adapter Select a primary VGA. PCIE1 Link Speed Select the link speed for PCIE1...
...® Virtualization Technology for overclocking. SR-IOV Support If system has SR-IOV capable PCIe Devices, this option Enables or Disables Single Root IO Virtualization Support. Auto mode is optimizing for Directed I/O helps your virtual machine monitor better utilize hardware by improving application compatibility and reliability, and providing additional levels of manageability, security, isolation, and I/O performance. 4.6.2 Chipset Configuration Primary Graphics Adapter Select a primary VGA. PCIE1 Link Speed Select the link speed for PCIE1...

User Manual
Page 79
... integrated graphics processor when the system boots up. Share Memory Configure the size of the DMI Link. Select enable to disable the integrated graphics when an external graphics card is installed. PCIE3 Link Speed Select the link speed for enhanced PCI Express power saving in OS. PCH PCIE ASPM Support This option enables/disables the ASPM support for PCIE2. IGPU Multi-Monitor Select disable to keep the integrated graphics enabled at all PCH PCIE devices. Onboard HD Audio Enable/disable onboard HD audio. B560M Pro4/ac PCIE2 Link Speed...
... integrated graphics processor when the system boots up. Share Memory Configure the size of the DMI Link. Select enable to disable the integrated graphics when an external graphics card is installed. PCIE3 Link Speed Select the link speed for enhanced PCI Express power saving in OS. PCH PCIE ASPM Support This option enables/disables the ASPM support for PCIE2. IGPU Multi-Monitor Select disable to keep the integrated graphics enabled at all PCH PCIE devices. Onboard HD Audio Enable/disable onboard HD audio. B560M Pro4/ac PCIE2 Link Speed...

User Manual
Page 80
Onboard HDMI HD Audio Enable audio for power saving when the computer is shut down. Onboard WAN Device Use this item to boot up when the power recovers. Turn On Onboard LED in S5 Turn on AC/Power Loss Select the power state after a power failure. Bluetooth Enable/disable the Bluetooth connectivity. Deep Sleep Configure deep sleep mode for the onboard digital outputs. WAN Radio Enable/disable the WiFi module's connectivity. Restore Onboard LED Default Restore Onboard LED default value. If [Power On] is selected, the power will start to enable or...
Onboard HDMI HD Audio Enable audio for power saving when the computer is shut down. Onboard WAN Device Use this item to boot up when the power recovers. Turn On Onboard LED in S5 Turn on AC/Power Loss Select the power state after a power failure. Bluetooth Enable/disable the Bluetooth connectivity. Deep Sleep Configure deep sleep mode for the onboard digital outputs. WAN Radio Enable/disable the WiFi module's connectivity. Restore Onboard LED Default Restore Onboard LED default value. If [Power On] is selected, the power will start to enable or...

User Manual
Page 82
... Thunderbolt(TM) Support Enable or disable the Discrete Thunderbolt(TM) Support. no RTD3. 74 English Titan Ridge Workaround for OSUP Enable or disable Titan Ridge Workaround for OSUP. Windows 10 Thunderbolt support Specify Windows 10 Thunderbolt support level. Enabled: OS Native support only. Disabled: No OS native support. Thunderbolt Usb Support Enabled to allow booting from Bootable devices which are present behind Thunderbolt. Thunderbolt Boot Support Enabled to allow booting from Usb devices which are...
... Thunderbolt(TM) Support Enable or disable the Discrete Thunderbolt(TM) Support. no RTD3. 74 English Titan Ridge Workaround for OSUP Enable or disable Titan Ridge Workaround for OSUP. Windows 10 Thunderbolt support Specify Windows 10 Thunderbolt support level. Enabled: OS Native support only. Disabled: No OS native support. Thunderbolt Usb Support Enabled to allow booting from Bootable devices which are present behind Thunderbolt. Thunderbolt Boot Support Enabled to allow booting from Usb devices which are...
User Manual
Page 87
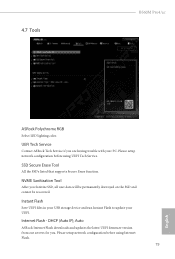
... Service. Internet Flash - 4.7 Tools B560M Pro4/ac ASRock Polychrome RGB Select LED lighting color. Please setup network configuration before using Internet Flash. 79 English DHCP (Auto IP), Auto ASRock Internet Flash downloads and updates the latest UEFI firmware version from our servers for you Sanitize SSD, all user data will be permanently destroyed on the SSD and cannot be recovered. NVME Sanitization Tool After you . SSD Secure Erase Tool All the SSD's listed that supports...
... Service. Internet Flash - 4.7 Tools B560M Pro4/ac ASRock Polychrome RGB Select LED lighting color. Please setup network configuration before using Internet Flash. 79 English DHCP (Auto IP), Auto ASRock Internet Flash downloads and updates the latest UEFI firmware version from our servers for you Sanitize SSD, all user data will be permanently destroyed on the SSD and cannot be recovered. NVME Sanitization Tool After you . SSD Secure Erase Tool All the SSD's listed that supports...

User Manual
Page 88
*For BIOS backup and recovery purpose, it is recommended to download the UEFI firmware. 80 English UEFI Download Server Select a server to plug in the setup utility. Internet Setting Enable or disable sound effects in your USB pen drive before using this to configure internet connection settings for Internet Flash. Network Configuration Use this function.
*For BIOS backup and recovery purpose, it is recommended to download the UEFI firmware. 80 English UEFI Download Server Select a server to plug in the setup utility. Internet Setting Enable or disable sound effects in your USB pen drive before using this to configure internet connection settings for Internet Flash. Network Configuration Use this function.

User Manual
Page 92
... the UEFI Setup Utility. User Password Set or change the password for the user account. Supervisor Password Set or change the password for the administrator account. Disable this option to remove the password. Users are unable to remove the password. Leave it blank and press enter to use discrete TPM Module. 84 English Only the administrator has authority to enable or disable support for the system. Secure Boot Use this item to change the supervisor/user password for Secure Boot. 4.9 Security Screen...
... the UEFI Setup Utility. User Password Set or change the password for the user account. Supervisor Password Set or change the password for the administrator account. Disable this option to remove the password. Users are unable to remove the password. Leave it blank and press enter to use discrete TPM Module. 84 English Only the administrator has authority to enable or disable support for the system. Secure Boot Use this item to change the supervisor/user password for Secure Boot. 4.9 Security Screen...


