RAID Installation Guide
Page 1
NVIDIA BIOS RAID Installation Guide 2 1.1 Introduction to RAID 2 1.2 RAID Configurations Precautions 3 1.3 Create Disk Array 4 2. NVIDIA RAID Installation Guide 1. NVIDIA Windows RAID Installation Guide 8 2.1 NVIDIA Windows RAID Installation Guide for Windows 2000 / XP / XP 64-bit Users 8 2.2 NVIDIA Windows RAID Installation Guide for Windows Vista / Vista 64-bit Users 18 1
NVIDIA BIOS RAID Installation Guide 2 1.1 Introduction to RAID 2 1.2 RAID Configurations Precautions 3 1.3 Create Disk Array 4 2. NVIDIA RAID Installation Guide 1. NVIDIA Windows RAID Installation Guide 8 2.1 NVIDIA Windows RAID Installation Guide for Windows 2000 / XP / XP 64-bit Users 8 2.2 NVIDIA Windows RAID Installation Guide for Windows Vista / Vista 64-bit Users 18 1

RAID Installation Guide
Page 4
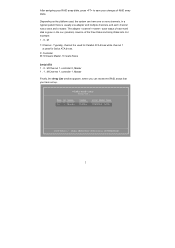
...After adjusting the system BIOS to press . The RAID prompt appears as default. Define a New Array window appears. After rebooting your data first before you create RAID functions. We take 4 For example, if..."Clear Disk Data" or not. And the Striping Block is set it to select "Yes", and then your hard disks before the window disappears. 2. It is recommended to Striping if you set is set to Mirroring, but please set to create a RAID 1 (mirroring... RAID software prompting you press , the NVIDIA RAID Utility - After you to RAID mode, the below window appears.
...After adjusting the system BIOS to press . The RAID prompt appears as default. Define a New Array window appears. After rebooting your data first before you create RAID functions. We take 4 For example, if..."Clear Disk Data" or not. And the Striping Block is set it to select "Yes", and then your hard disks before the window disappears. 2. It is recommended to Striping if you set is set to Mirroring, but please set to create a RAID 1 (mirroring... RAID software prompting you press , the NVIDIA RAID Utility - After you to RAID mode, the below window appears.
RAID Installation Guide
Page 7
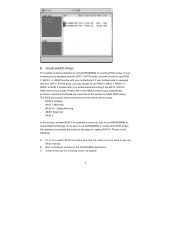
... system there is given in the Loc (location) columns of the Free Disks and Array Disks lists. M 1: Channel - M Channel 1, controller 1, Master Finally, the Array List window appears, where you can have set up. Depending on the platform used for Serial ATA drives. 0: Controller M: M means Master, S means Slave Serial ATA 1 . 0 . Healthy NVIDIA...
... system there is given in the Loc (location) columns of the Free Disks and Array Disks lists. M 1: Channel - M Channel 1, controller 1, Master Finally, the Array List window appears, where you can have set up. Depending on the platform used for Serial ATA drives. 0: Controller M: M means Master, S means Slave Serial ATA 1 . 0 . Healthy NVIDIA...

RAID Installation Guide
Page 8
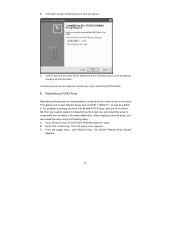
Please follow the instructions below screen appears. 8 Please enter NVRAIDMAN by using NVIDIAMAN under Windows environment. 2. NVIDIA Windows RAID Installation Guide NVIDIA Windows RAID Installation Guide is an instruction for Windows 2000 / XP / XP 64-bit Users A. Enter NVRAIDMAN RAID driver is also a ".... After you finish the driver installation, you install. 2.1 NVIDIA Windows RAID Installation Guide for you to configure and manage RAID functions. For Windows 2000 / XP / XP 64-bit and Windows Vista / Vista 64-bit, there are different installation procedures. Please...
Please follow the instructions below screen appears. 8 Please enter NVRAIDMAN by using NVIDIAMAN under Windows environment. 2. NVIDIA Windows RAID Installation Guide NVIDIA Windows RAID Installation Guide is an instruction for Windows 2000 / XP / XP 64-bit Users A. Enter NVRAIDMAN RAID driver is also a ".... After you finish the driver installation, you install. 2.1 NVIDIA Windows RAID Installation Guide for you to configure and manage RAID functions. For Windows 2000 / XP / XP 64-bit and Windows Vista / Vista 64-bit, there are different installation procedures. Please...
RAID Installation Guide
Page 9
... may choose to use NVRAIDMAN to create RAID 0 (Striping). Boot to use RAID 0, RAID 1, or JBOD function with two SATA / SATAII ports, you want to Windows and launch the NVRAIDMAN application. B. B. Creating RAID Arrays This section includes examples of creating RAID 0. If your motherboard is equipped with four SATA / SATAII ports...
... may choose to use NVRAIDMAN to create RAID 0 (Striping). Boot to use RAID 0, RAID 1, or JBOD function with two SATA / SATAII ports, you want to Windows and launch the NVRAIDMAN application. B. B. Creating RAID Arrays This section includes examples of creating RAID 0. If your motherboard is equipped with four SATA / SATAII ports...
RAID Installation Guide
Page 15
.... Then the popup menu appears. B. This applies only to a hard drive from other drives in the array. Click Next and the following steps: A. Go to Windows and run the NVIDIA RAID Management utility. From the popup menu, click Rebuild Array. After creating a mirrored array, you need to replace the failed drive...
.... Then the popup menu appears. B. This applies only to a hard drive from other drives in the array. Click Next and the following steps: A. Go to Windows and run the NVIDIA RAID Management utility. From the popup menu, click Rebuild Array. After creating a mirrored array, you need to replace the failed drive...

RAID Installation Guide
Page 18
... array. Enter Storage RAID driver is built in NVIDIA ALL in one driver provided in a short period of time. 2.2 NVIDIA Windows RAID Installation Guide for Windows Vista / Vista 64-bit Users A. NVRAIDMAN window indicates that the array is also a "Storage" shortcut on Start → Programs → NVIDIA Corporation → Storage. (There is synchronizing...
... array. Enter Storage RAID driver is built in NVIDIA ALL in one driver provided in a short period of time. 2.2 NVIDIA Windows RAID Installation Guide for Windows Vista / Vista 64-bit Users A. NVRAIDMAN window indicates that the array is also a "Storage" shortcut on Start → Programs → NVIDIA Corporation → Storage. (There is synchronizing...

User Manual
Page 3
...HDD Hot Plug Feature and Operation Guide ....... 26 2.13 Driver Installation Guide 28 2.14 Installing Windows® 2000 / XP / XP 64-bit / VistaTM / VistaTM 64-bit Without RAID Functions 28 2.15 Installing Windows® 2000 / XP / XP 64-bit / VistaTM / VistaTM 64-bit With RAID ...Serial ATA (SATA) / Serial ATAII (SATAII) Hard Disks Installation 25 2.11 Hot Plug and Hot Swap Functions for Windows® VistaTM Premium 2007 and Basic Logo 9 1.4 Motherboard Layout 10 1.5 ASRock 6CH Premium I/O 11 2 . BIOS SETUP UTILITY 31 3.1 Introduction 31 3.1.1 BIOS Menu Bar 31 3.1.2 Navigation Keys ...
...HDD Hot Plug Feature and Operation Guide ....... 26 2.13 Driver Installation Guide 28 2.14 Installing Windows® 2000 / XP / XP 64-bit / VistaTM / VistaTM 64-bit Without RAID Functions 28 2.15 Installing Windows® 2000 / XP / XP 64-bit / VistaTM / VistaTM 64-bit With RAID ...Serial ATA (SATA) / Serial ATAII (SATAII) Hard Disks Installation 25 2.11 Hot Plug and Hot Swap Functions for Windows® VistaTM Premium 2007 and Basic Logo 9 1.4 Motherboard Layout 10 1.5 ASRock 6CH Premium I/O 11 2 . BIOS SETUP UTILITY 31 3.1 Introduction 31 3.1.1 BIOS Menu Bar 31 3.1.2 Navigation Keys ...
User Manual
Page 6
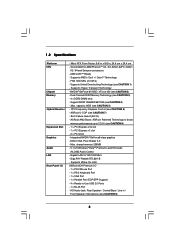
...GT/s) - NVIDIA® GeForce 6150SE / nForce 430 (see CAUTION 4) - ASRock AM2 Boost: ASRock Patented Technology to boost memory performance up to -Use USB 2.0 Ports - 1 x RJ-45 Port - shared memory 256MB - 5.1 CH Windows® VistaTM Premium Level HD Audio (ALC662 Audio Codec) - Supports AMD's ...Cool 'n' QuietTM Technology - capacity: 8GB (see CAUTION 7) - ASRock U-COP (see CAUTION 5) - Integrated NVIDIA® GeForce6-class graphics - DX9.0 ...
...GT/s) - NVIDIA® GeForce 6150SE / nForce 430 (see CAUTION 4) - ASRock AM2 Boost: ASRock Patented Technology to boost memory performance up to -Use USB 2.0 Ports - 1 x RJ-45 Port - shared memory 256MB - 5.1 CH Windows® VistaTM Premium Level HD Audio (ALC662 Audio Codec) - Supports AMD's ...Cool 'n' QuietTM Technology - capacity: 8GB (see CAUTION 7) - ASRock U-COP (see CAUTION 5) - Integrated NVIDIA® GeForce6-class graphics - DX9.0 ...

User Manual
Page 7
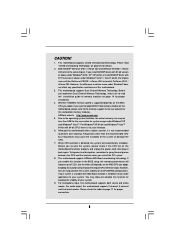
... system stability, or even cause damage to the components and devices of your own risk and expense. CPU Fan Tachometer - CPU Quiet Fan - Microsoft® Windows® 2000 / XP / XP Media Center / XP 64-bit / VistaTM / VistaTM 64-bit compliant - FCC, CE, Microsoft® WHQL Certificated WARNING Please realize that there...
... system stability, or even cause damage to the components and devices of your own risk and expense. CPU Fan Tachometer - CPU Quiet Fan - Microsoft® Windows® 2000 / XP / XP Media Center / XP 64-bit / VistaTM / VistaTM 64-bit compliant - FCC, CE, Microsoft® WHQL Certificated WARNING Please realize that there...
User Manual
Page 8
... system will be GeForce 6150SE / nForce 430 instead of your system. For audio output, this motherboard. 3. ASRock website http://www.asrock.com 5. Frequencies other than 4GB for the reservation for system usage under Windows® 2000 / XP / XP 64-bit, or install NVIDIA® driver with 64-bit CPU, there... sure to spray thermal grease between the CPU and the heatsink when you install NVIDIA® driver with 91.63 version or above under Windows® does not affect any specification and feature of the system or damage the CPU. 7. However, we can not guarantee the system ...
... system will be GeForce 6150SE / nForce 430 instead of your system. For audio output, this motherboard. 3. ASRock website http://www.asrock.com 5. Frequencies other than 4GB for the reservation for system usage under Windows® 2000 / XP / XP 64-bit, or install NVIDIA® driver with 64-bit CPU, there... sure to spray thermal grease between the CPU and the heatsink when you install NVIDIA® driver with 91.63 version or above under Windows® does not affect any specification and feature of the system or damage the CPU. 7. However, we can not guarantee the system ...

User Manual
Page 9
...Premium 2007 and Basic Logo For system integrators and users who purchase this motherboard, please refer to Premium Discrete requirement at http://www.asrock.com * After June 1, 2007, all Windows® VistaTM systems are required to meet above . * If you plan to use external graphics card on page 24 to ...adjust your SATAII hard disk drive to SATAII mode. If you use onboard VGA with total system memory size 512MB and plan to submit Windows® VistaTM Basic logo, please adjust the shared memory size of onboard VGA to 128MB or above minimum hardware requirements in order to 64MB...
...Premium 2007 and Basic Logo For system integrators and users who purchase this motherboard, please refer to Premium Discrete requirement at http://www.asrock.com * After June 1, 2007, all Windows® VistaTM systems are required to meet above . * If you plan to use external graphics card on page 24 to ...adjust your SATAII hard disk drive to SATAII mode. If you use onboard VGA with total system memory size 512MB and plan to submit Windows® VistaTM Basic logo, please adjust the shared memory size of onboard VGA to 128MB or above minimum hardware requirements in order to 64MB...

User Manual
Page 11
... playbacks two different audio streams simultaneously", and click "ok". Then reboot your system. Please select "Mixer ToolBox" , click "Enable playback multi-streaming", and click "ok". 1 . 5 ASRock 6CH Premium I/O Panel 1 2 5 3 6 4 7 12 11 10 9 8 1 Parallel Port 2 RJ-45 Port 3 Rear Speaker (Black) 4 Central / Bass (Orange) 5...to use Rear Speaker and Front Speaker, or select "Realtek HDA Audio 2nd output" to the front panel audio header. For Windows® XP: After restarting your system. Choose "2CH" or "4CH" and then you use 2-channel speaker, please connect ...
... playbacks two different audio streams simultaneously", and click "ok". Then reboot your system. Please select "Mixer ToolBox" , click "Enable playback multi-streaming", and click "ok". 1 . 5 ASRock 6CH Premium I/O Panel 1 2 5 3 6 4 7 12 11 10 9 8 1 Parallel Port 2 RJ-45 Port 3 Rear Speaker (Black) 4 Central / Bass (Orange) 5...to use Rear Speaker and Front Speaker, or select "Realtek HDA Audio 2nd output" to the front panel audio header. For Windows® XP: After restarting your system. Choose "2CH" or "4CH" and then you use 2-channel speaker, please connect ...
User Manual
Page 17
... the number 2. Please make sure that the value you have installed the onboard VGA driver already, there is no need to this step are under Windows® XP environment. If you select is inserted to install it again. 5. C. E. Set the "Screen Resolution" and "Color Quality" as Secondary.... input monitor cable to the steps below. (The item names and operation procedures described in the Display Properties dialog that you install other Windows® OS, the item names and operation procedures may be designated as appropriate for the second monitor. Boot your system. If you can...
... the number 2. Please make sure that the value you have installed the onboard VGA driver already, there is no need to this step are under Windows® XP environment. If you select is inserted to install it again. 5. C. E. Set the "Screen Resolution" and "Color Quality" as Secondary.... input monitor cable to the steps below. (The item names and operation procedures described in the Display Properties dialog that you install other Windows® OS, the item names and operation procedures may be designated as appropriate for the second monitor. Boot your system. If you can...

User Manual
Page 21
... OS: Click the right-top "Folder" icon , choose "Disable front panel jack detection", and save the change by clicking "OK". F. Enter Windows system. CPU Fan Connector (4-pin CPU_FAN1) (see p.10 No. 14) CHA_FAN_SPEED +12V GND This header accommodates several system front panel functions. Please ...connect a chassis fan cable to this connector and match the black wire to connect them for HD audio panel only. For Windows® 2000 / XP / XP 64-bit OS: Click "Audio I/O", select "Connector Settings" , choose "Disable front panel jack detection",...
... OS: Click the right-top "Folder" icon , choose "Disable front panel jack detection", and save the change by clicking "OK". F. Enter Windows system. CPU Fan Connector (4-pin CPU_FAN1) (see p.10 No. 14) CHA_FAN_SPEED +12V GND This header accommodates several system front panel functions. Please ...connect a chassis fan cable to this connector and match the black wire to connect them for HD audio panel only. For Windows® 2000 / XP / XP 64-bit OS: Click "Audio I/O", select "Connector Settings" , choose "Disable front panel jack detection",...

User Manual
Page 28
...change the BIOS setting. If there is no need for you to install Windows® 2000, Windows® XP or Windows® XP 64-bit on your SATA / SATAII HDDs with RAID functions, please follow below steps. Insert the ASRock Support CD into your optical drive to include SP4. B. ROM as the.... 2.13 Driver Installation Guide To install the drivers to your system, please insert the support CD to install Windows® 2000, Windows® XP, Windows® XP 64-bit, Windows® VistaTM or Windows® VistaTM 64-bit on your SATA / SATAII HDDs without RAID functions, you see the message on the...
...change the BIOS setting. If there is no need for you to install Windows® 2000, Windows® XP or Windows® XP 64-bit on your SATA / SATAII HDDs with RAID functions, please follow below steps. Insert the ASRock Support CD into your optical drive to include SP4. B. ROM as the.... 2.13 Driver Installation Guide To install the drivers to your system, please insert the support CD to install Windows® 2000, Windows® XP, Windows® XP 64-bit, Windows® VistaTM or Windows® VistaTM 64-bit on your SATA / SATAII HDDs without RAID functions, you see the message on the...

User Manual
Page 29
...for proper configuration. E. Set the "SATA Operation Mode" option to [RAID] in the Support CD: .. \ RAID Installation Guide 2.15.2 Installing Windows® VistaTM / VistaTM 64-bit With RAID Functions If you still need to [RAID]. Set the "SATA Operation Mode" option to check the ...RAID installation guide in the Support CD: .. \ RAID Installation Guide STEP 4: Install Windows® 2000 / Windows® XP / Windows® XP-64bit OS on SATA / SATAII HDDs, you want to manage (create, convert, delete, or rebuild) RAID functions on ...
...for proper configuration. E. Set the "SATA Operation Mode" option to [RAID] in the Support CD: .. \ RAID Installation Guide 2.15.2 Installing Windows® VistaTM / VistaTM 64-bit With RAID Functions If you still need to [RAID]. Set the "SATA Operation Mode" option to check the ...RAID installation guide in the Support CD: .. \ RAID Installation Guide STEP 4: Install Windows® 2000 / Windows® XP / Windows® XP-64bit OS on SATA / SATAII HDDs, you want to manage (create, convert, delete, or rebuild) RAID functions on ...
User Manual
Page 30
...convert, delete, or rebuild) RAID functions on SATA / SATAII HDDs, you still need to [RAID] in BIOS first. " page, please insert the ASRock Support CD into your optical drive, and click the "Load Driver" button on the left on your system. Before you start to configure RAID function... that FSB can operate under a more stable overclocking environment. NVIDIA® RAID drivers are in the fixed mode so that , please insert Windows® VistaTM / Windows® VistaTM 64-bit optical disk into the optical drive to boot your system. Then, please set RAID configuration. STEP 2: Use "RAID...
...convert, delete, or rebuild) RAID functions on SATA / SATAII HDDs, you still need to [RAID] in BIOS first. " page, please insert the ASRock Support CD into your optical drive, and click the "Load Driver" button on the left on your system. Before you start to configure RAID function... that FSB can operate under a more stable overclocking environment. NVIDIA® RAID drivers are in the fixed mode so that , please insert Windows® VistaTM / Windows® VistaTM 64-bit optical disk into the optical drive to boot your system. Then, please set RAID configuration. STEP 2: Use "RAID...
User Manual
Page 35
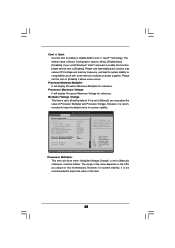
... item to system stability or compatibility issue with some memory modules or power supplies. The range of the value depends on the CPU you install Windows® VistaTM and want to enable this function, please set to [Manual]; If you adopt on User Selection in Setup. +F1 F9 F10 ESC Select...
... item to system stability or compatibility issue with some memory modules or power supplies. The range of the value depends on the CPU you install Windows® VistaTM and want to enable this function, please set to [Manual]; If you adopt on User Selection in Setup. +F1 F9 F10 ESC Select...

User Manual
Page 39
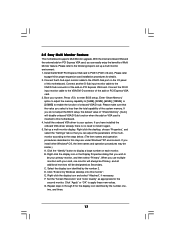
DRAM Voltage Use this item to enable or disable Away Mode support under Windows® XP Media Center OS. Restore on the system from the power-soft-off when the power recovers. PS/2 Keyboard Power On Use this item ...
DRAM Voltage Use this item to enable or disable Away Mode support under Windows® XP Media Center OS. Restore on the system from the power-soft-off when the power recovers. PS/2 Keyboard Power On Use this item ...


