User Manual
Page 3
... 19 2.5 SLITM Operation Guide 20 2.6 CrossFireXTM, 3-Way CrossFireXTM and Quad CrossFireXTM Operation Guide 23 2.7 Surround Display Information 28 2.8 ASRock Smart Remote Installation Guide 29 2.9 Jumpers Setup 30 2.10 Onboard Headers and Connectors 31 2.11 Smart Switches 36 2.12 Dr. ... / 7 64-bit / VistaTM / VistaTM 64-bit / XP / XP 64-bit Without RAID Functions 46 2.18.1 Installing Windows® XP / XP 64-bit Without RAID Functions 46 2.18.2 Installing Windows® 7 / 7 64-bit / VistaTM / VistaTM 64-bit Without RAID Functions 47 2.19 Untied Overclocking Technology 47 3 ...
... 19 2.5 SLITM Operation Guide 20 2.6 CrossFireXTM, 3-Way CrossFireXTM and Quad CrossFireXTM Operation Guide 23 2.7 Surround Display Information 28 2.8 ASRock Smart Remote Installation Guide 29 2.9 Jumpers Setup 30 2.10 Onboard Headers and Connectors 31 2.11 Smart Switches 36 2.12 Dr. ... / 7 64-bit / VistaTM / VistaTM 64-bit / XP / XP 64-bit Without RAID Functions 46 2.18.1 Installing Windows® XP / XP 64-bit Without RAID Functions 46 2.18.2 Installing Windows® 7 / 7 64-bit / VistaTM / VistaTM 64-bit Without RAID Functions 47 2.19 Untied Overclocking Technology 47 3 ...

User Manual
Page 5
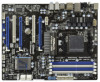
... get better performance in Windows ® 7 / 7 64-bit / V istaTM / VistaTM 64 bit, it is recommended to set the BIOS option in Storage Con f guration to quality and endurance. In this manual will be available on ASRock website as well. Chapter... about the model you for details. 5 www.asrock.com/support/index.asp 1.1 Package Contents ASRock 970 Extreme4 Motherboard (ATX Form Factor: 12.0-in x 9.6-in our support CD for purchasing ASRock 970 Extreme4 motherboard, a reliable motherboard produced under ASRock's consistently stringent quality control. Introduction Thank you are...
... get better performance in Windows ® 7 / 7 64-bit / V istaTM / VistaTM 64 bit, it is recommended to set the BIOS option in Storage Con f guration to quality and endurance. In this manual will be available on ASRock website as well. Chapter... about the model you for details. 5 www.asrock.com/support/index.asp 1.1 Package Contents ASRock 970 Extreme4 Motherboard (ATX Form Factor: 12.0-in x 9.6-in our support CD for purchasing ASRock 970 Extreme4 motherboard, a reliable motherboard produced under ASRock's consistently stringent quality control. Introduction Thank you are...
User Manual
Page 8
...-adjustment Support CD - Chassis Temperature Sensing - It should be done at your system. ASRock Instant Flash (see CAUTION 13) - Supports jumperfree - OEM and Trial) Unique Feature - ASRock XFast USB (see CAUTION 7) - Voltage Monitoring: +12V, +5V, +3.3V, Vcore OS - Microsoft® Windows® 7 / 7 64-bit / VistaTM / VistaTM 64-bit / XP / XP 64-bit compliant...
...-adjustment Support CD - Chassis Temperature Sensing - It should be done at your system. ASRock Instant Flash (see CAUTION 13) - Supports jumperfree - OEM and Trial) Unique Feature - ASRock XFast USB (see CAUTION 7) - Voltage Monitoring: +12V, +5V, +3.3V, Vcore OS - Microsoft® Windows® 7 / 7 64-bit / VistaTM / VistaTM 64-bit / XP / XP 64-bit compliant...

User Manual
Page 9
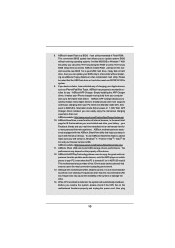
... such limitation. 6. In OC DNA, you can support this motherboard, please refer to overclock CPU frequency for system usage under Windows ® 7 / VistaTM / XP. ASRock UCC (Unlock CPU Core) feature simplif es AMD CPU activation. This motherboard supports Untied Overclocking Technology. Please read the installation guide...dual-core or triple-core CPU will boost to the quad-core CPU, and some CPU' s hidden core may be malfunctioned. 2. For Windows® 64-bit OS with a better price. In Hardware Monitor, it shows the fan speed and temperature for proper installation. 4. Please ...
... such limitation. 6. In OC DNA, you can support this motherboard, please refer to overclock CPU frequency for system usage under Windows ® 7 / VistaTM / XP. ASRock UCC (Unlock CPU Core) feature simplif es AMD CPU activation. This motherboard supports Untied Overclocking Technology. Please read the installation guide...dual-core or triple-core CPU will boost to the quad-core CPU, and some CPU' s hidden core may be malfunctioned. 2. For Windows® 64-bit OS with a better price. In Hardware Monitor, it shows the fan speed and temperature for proper installation. 4. Please ...
User Manual
Page 10
...you - This motherboard also provides a free 3.5mm audio cable (optional) that the USB f ash drive or hard drive must use ASRock SmartView feature, please make sure your OS version is Windows ® 7 / 7 64 bit / V istaTM / VistaTM 64 bit, and your browser version is the smart start page for... simultaneously and even supports continuous charging when your iPhone charged much quickly from the portable audio devices, such like MS-DOS or Windows ®. With this motherboard offers stepless control, it makes your PC enters into an enhanced view for IE that helps you ...
...you - This motherboard also provides a free 3.5mm audio cable (optional) that the USB f ash drive or hard drive must use ASRock SmartView feature, please make sure your OS version is Windows ® 7 / 7 64 bit / V istaTM / VistaTM 64 bit, and your browser version is the smart start page for... simultaneously and even supports continuous charging when your iPhone charged much quickly from the portable audio devices, such like MS-DOS or Windows ®. With this motherboard offers stepless control, it makes your PC enters into an enhanced view for IE that helps you ...

User Manual
Page 20
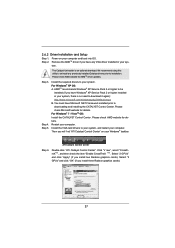
.... It is recommended to NVIDIA ® website for details. 2.5.1 Graphics Card Setup 2.5.1.1 Installing Two SLITM-Ready Graphics Cards Step 1. Currently , NVIDIA® SLITM technology supports Windows ® XP / XP 64-bit / V istaTM / VistaTM 64bit / 7 / 7 64-bit OS. Please follow the installation procedures in this section. Download the driver from NVIDIA®...
.... It is recommended to NVIDIA ® website for details. 2.5.1 Graphics Card Setup 2.5.1.1 Installing Two SLITM-Ready Graphics Cards Step 1. Currently , NVIDIA® SLITM technology supports Windows ® XP / XP 64-bit / V istaTM / VistaTM 64bit / 7 / 7 64-bit OS. Please follow the installation procedures in this section. Download the driver from NVIDIA®...

User Manual
Page 21
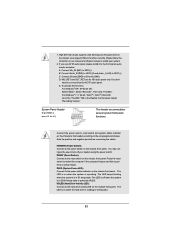
...PhysX GPU acceleration item, please select Enabled. C. From the pop-up menu, select Set SLI and PhysX configuration. D. ASRock SLI_Bridge_2S Card Step4. Double-click NVIDIA Settings icon on each graphics card. In Select an SLI configuration item, please select ...Windows® XP / XP 64-bit OS: A. And click Apply. B. You can freely enjoy the benef t of the graphics card that , you can enable the MultiGraphics Processing Unit (GPU) feature in place. Step3. After that is f rmly in the NVIDIA® nView system tray utility. Align and insert ASRock...
...PhysX GPU acceleration item, please select Enabled. C. From the pop-up menu, select Set SLI and PhysX configuration. D. ASRock SLI_Bridge_2S Card Step4. Double-click NVIDIA Settings icon on each graphics card. In Select an SLI configuration item, please select ...Windows® XP / XP 64-bit OS: A. And click Apply. B. You can freely enjoy the benef t of the graphics card that , you can enable the MultiGraphics Processing Unit (GPU) feature in place. Step3. After that is f rmly in the NVIDIA® nView system tray utility. Align and insert ASRock...

User Manual
Page 22
... Technologies Inc., and is used only for identif cation or explanation and to the owners' benef t, without intent to infringe. 22 D. Reboot your Windows taskbar. Select NVIDIA Control Panel tab. E. In Select an SLI configuration item, please select Enable SLI. C. From the pop-up menu,... select All Programs, and then click NVIDIA Corporation. In Set PhysX GPU acceleration item, please select Enabled. For Windows® VistaTM / VistaTM 64-bit / 7 / 7 64-bit OS: A. Click the Start icon on your system. From the pop-up menu, ...
... Technologies Inc., and is used only for identif cation or explanation and to the owners' benef t, without intent to infringe. 22 D. Reboot your Windows taskbar. Select NVIDIA Control Panel tab. E. In Select an SLI configuration item, please select Enable SLI. C. From the pop-up menu,... select All Programs, and then click NVIDIA Corporation. In Set PhysX GPU acceleration item, please select Enabled. For Windows® VistaTM / VistaTM 64-bit / 7 / 7 64-bit OS: A. Click the Start icon on your system. From the pop-up menu, ...
User Manual
Page 23
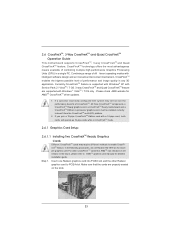
... card manuals for AMDTM CrossFireXTM driver updates. 1. Make sure that AMDTM has released or will release in a single PC. Currently CrossFireXTM feature is supported with Windows® XP with Service Pack 2 / VistaTM / 7 OS. 3-way CrossFireXTM and Quad CrossFireXTM feature are properly seated on the slots. 23 If a customer incorrectly configures their... CrossFireXTM and Quad CrossFireXTM Operation Guide This motherboard supports CrossFireXTM, 3-way CrossFireXTM and Quad CrossFireXTM feature. If you pair a 12-pipe CrossFireXTM Edition card with Windows ® VistaTM / 7 OS only .
... card manuals for AMDTM CrossFireXTM driver updates. 1. Make sure that AMDTM has released or will release in a single PC. Currently CrossFireXTM feature is supported with Windows® XP with Service Pack 2 / VistaTM / 7 OS. 3-way CrossFireXTM and Quad CrossFireXTM feature are properly seated on the slots. 23 If a customer incorrectly configures their... CrossFireXTM and Quad CrossFireXTM Operation Guide This motherboard supports CrossFireXTM, 3-way CrossFireXTM and Quad CrossFireXTM feature. If you pair a 12-pipe CrossFireXTM Edition card with Windows ® VistaTM / 7 OS only .
User Manual
Page 27
...driver updates. Restart your system. ATI Catalyst Control Center Step 6. Please check AMD website for details. For Windows® XP OS: A. Step 5. AMDTM recommends Windows® XP Service Pack 2 or higher to be installed (If you have any previously installed Catalyst drivers prior...Framework installed prior to download it again): http://www.microsoft.com/windowsxp/sp2/default.mspx B. For Windows® 7 / VistaTM OS: Install the CATALYST Control Center. Then you have Windows® XP Service Pack 2 or higher installed in your computer and boot into OS. 2.6.2...
...driver updates. Restart your system. ATI Catalyst Control Center Step 6. Please check AMD website for details. For Windows® XP OS: A. Step 5. AMDTM recommends Windows® XP Service Pack 2 or higher to be installed (If you have any previously installed Catalyst drivers prior...Framework installed prior to download it again): http://www.microsoft.com/windowsxp/sp2/default.mspx B. For Windows® 7 / VistaTM OS: Install the CATALYST Control Center. Then you have Windows® XP Service Pack 2 or higher installed in your computer and boot into OS. 2.6.2...
User Manual
Page 33
...panel wire on the chassis front panel. Connect Mic_IN (MIC) to the power switch on the chassis must support HDA to perform a normal restart. For Windows® XP / XP 64-bit OS: Select "Mixer". The LED is on the chassis front panel. Adjust "Recording Volume". PWRBTN (Power Switch): Connect...LED on the chassis front panel. RESET (Reset Switch): Connect to the "FrontMic" Tab in S3/S4 sleep state or powered off your system. 2. For Windows® 7 / 7 64-bit / VistaTM / VistaTM 64-bit OS: Go to the reset switch on the chassis front panel. The LED is off when...
...panel wire on the chassis front panel. Connect Mic_IN (MIC) to the power switch on the chassis must support HDA to perform a normal restart. For Windows® XP / XP 64-bit OS: Select "Mixer". The LED is on the chassis front panel. Adjust "Recording Volume". PWRBTN (Power Switch): Connect...LED on the chassis front panel. RESET (Reset Switch): Connect to the "FrontMic" Tab in S3/S4 sleep state or powered off your system. 2. For Windows® 7 / 7 64-bit / VistaTM / VistaTM 64-bit OS: Go to the reset switch on the chassis front panel. The LED is off when...
User Manual
Page 44
... a RAID disk composed of 2 or more SATA3 HDDs with RAID functions, please follow below steps. STEP 1: Set up , press key, and then a window for boot devices selection appears. B. D. B. During POST at the beginning of 2 or more SA TA3 HDDs with RAID functions, please follow the order from... and listed on a RAID disk composed of system boot-up UEFI. Please insert a f oppy diskette into the floppy drive. Insert the ASRock Support CD into the f oppy diskette. 44 Start to your optical drive f rst. When you will lose ALL data in it! Enter UEFI ...
... a RAID disk composed of 2 or more SATA3 HDDs with RAID functions, please follow below steps. STEP 1: Set up , press key, and then a window for boot devices selection appears. B. D. B. During POST at the beginning of 2 or more SA TA3 HDDs with RAID functions, please follow the order from... and listed on a RAID disk composed of system boot-up UEFI. Please insert a f oppy diskette into the floppy drive. Insert the ASRock Support CD into the f oppy diskette. 44 Start to your optical drive f rst. When you will lose ALL data in it! Enter UEFI ...
User Manual
Page 45
... reading the f oppy disk, the driver will be presented. STEP 3: Use "RAID Installation Guide" to [RAID]. After step 1, 2, 3, you want to install Windows® XP / XP 64-bit OS on your system. 45 Select the driver to install according to the OS you install. 2.17.2 Installing... to check the RAID installation guide in the Support CD for proper con f guration. A. Please refer to the BIOS RAID installation guide part of Windows ® setup, press F6 to set RAID configuration. STEP 1: Set up UEFI. When prompted, insert the SA TA3 driver diskette containing...
... reading the f oppy disk, the driver will be presented. STEP 3: Use "RAID Installation Guide" to [RAID]. After step 1, 2, 3, you want to install Windows® XP / XP 64-bit OS on your system. 45 Select the driver to install according to the OS you install. 2.17.2 Installing... to check the RAID installation guide in the Support CD for proper con f guration. A. Please refer to the BIOS RAID installation guide part of Windows ® setup, press F6 to set RAID configuration. STEP 1: Set up UEFI. When prompted, insert the SA TA3 driver diskette containing...

User Manual
Page 46
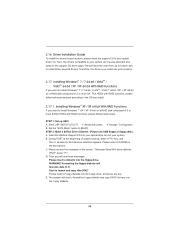
... 64-bit / VistaTM / VistaTM 64-bit / XP / XP 64-bit Without RAID Functions If you want to install Windows ® 7 / 7 64-bit / V istaTM / VistaTM 64-bit / XP / XP 64-bit OS on ...your SA TA3 HDDs without RAID functions, please follow below procedures according to the OS you install. 2.18.1 Installing Windows® XP / XP 64-bit Without RAID Functions If you install. STEP 2: Make a SATA3 Driver Diskette. (Please ...Hot Plug functions (AHCI mode) STEP 1: Set up UEFI. You can start to install Windows ® XP / XP 64-bit OS on page 44. A. Set the "SATA Mode" option to [IDE]. At the...
... 64-bit / VistaTM / VistaTM 64-bit / XP / XP 64-bit Without RAID Functions If you want to install Windows ® 7 / 7 64-bit / V istaTM / VistaTM 64-bit / XP / XP 64-bit OS on ...your SA TA3 HDDs without RAID functions, please follow below procedures according to the OS you install. 2.18.1 Installing Windows® XP / XP 64-bit Without RAID Functions If you install. STEP 2: Make a SATA3 Driver Diskette. (Please ...Hot Plug functions (AHCI mode) STEP 1: Set up UEFI. You can start to install Windows ® XP / XP 64-bit OS on page 44. A. Set the "SATA Mode" option to [IDE]. At the...

User Manual
Page 47
... to the warning on your SA TA3 HDDs without NCQ and Hot Plug functions (IDE mode) STEP 1: Set up UEFI. A. B. A. STEP 2: Install Windows® 7 / 7 64-bit / VistaTM / VistaTM 64-bit OS on your system. Therefore, CPU FSB is untied during overclocking, FSB enjoys better margin...SETUP UTILITY Advanced screen Storage Conf guration. Using SATA3 HDDs with NCQ and Hot Plug functions (AHCI mode) STEP 1: Set up UEFI. STEP 2: Install Windows® 7 / 7 64-bit / VistaTM / VistaTM 64-bit OS on your sys- B. tem. 2.19 Untied Overclocking Technology This motherboard supports Untied...
... to the warning on your SA TA3 HDDs without NCQ and Hot Plug functions (IDE mode) STEP 1: Set up UEFI. A. B. A. STEP 2: Install Windows® 7 / 7 64-bit / VistaTM / VistaTM 64-bit OS on your system. Therefore, CPU FSB is untied during overclocking, FSB enjoys better margin...SETUP UTILITY Advanced screen Storage Conf guration. Using SATA3 HDDs with NCQ and Hot Plug functions (AHCI mode) STEP 1: Set up UEFI. STEP 2: Install Windows® 7 / 7 64-bit / VistaTM / VistaTM 64-bit OS on your sys- B. tem. 2.19 Untied Overclocking Technology This motherboard supports Untied...

User Manual
Page 52
...) Auto/Manual setting. Read to Precharge (tRTP) Use this item to change Write to Precharge (tRTP) Auto/Manual setting. Four Activate Window (tFAW) Use this item to change Four Activate Window (tFAW) Auto/Manual setting. The default is [Auto]. The default is [Auto]. The default is [Auto]. Command Rate (CR) Use this...
...) Auto/Manual setting. Read to Precharge (tRTP) Use this item to change Write to Precharge (tRTP) Auto/Manual setting. Four Activate Window (tFAW) Use this item to change Four Activate Window (tFAW) Auto/Manual setting. The default is [Auto]. The default is [Auto]. The default is [Auto]. Command Rate (CR) Use this...

User Manual
Page 54
... the proper UEFI f le to update your UEFI, and reboot your UEFI only in a few clicks without entering operating systems f rst like MS-DOS or Windows ®. 3.4 Advanced Screen In this section, you may cause the system to malfunction. This convenient UEFI update tool allows you execute Instant Flash utility , the...
... the proper UEFI f le to update your UEFI, and reboot your UEFI only in a few clicks without entering operating systems f rst like MS-DOS or Windows ®. 3.4 Advanced Screen In this section, you may cause the system to malfunction. This convenient UEFI update tool allows you execute Instant Flash utility , the...

User Manual
Page 55
... support the Halt State (C1). Conf guration options: [Enabled] and [Disabled]. The default value is [Enabled]. The default value is [Auto]. 55 If you install Windows® 7 / VistaTM and want to enable this function, please set to [Enabled]. In the C1 power state, the processor maintains the context of the system...
... support the Halt State (C1). Conf guration options: [Enabled] and [Disabled]. The default value is [Enabled]. The default value is [Auto]. 55 If you install Windows® 7 / VistaTM and want to enable this function, please set to [Enabled]. In the C1 power state, the processor maintains the context of the system...

User Manual
Page 61
USB Mouse Power On Use this motherboard to submit Windows® VistaTM certif cation. 61 The default value is [Enabled]. Please set this option to [Enabled] if you plan to use this item to enable or disable the system to enable or disable ACPI HPET Table. ACPI HPET table Use this item to wake from S5 using USB Mouse.
USB Mouse Power On Use this motherboard to submit Windows® VistaTM certif cation. 61 The default value is [Enabled]. Please set this option to [Enabled] if you plan to use this item to enable or disable the system to enable or disable ACPI HPET Table. ACPI HPET table Use this item to wake from S5 using USB Mouse.
User Manual
Page 62
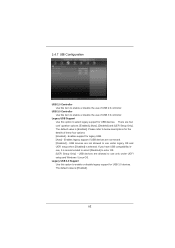
... devices are allowed to use only under legacy OS and UEFI setup when [Disabled] is recommended to select [Disabled] to use under UEFI setup and Windows / Linux OS. USB devices are connected. [Disabled] - The default value is [Enabled]. Legacy USB Support Use this option to select legacy support for legacy USB...
... devices are allowed to use only under legacy OS and UEFI setup when [Disabled] is recommended to select [Disabled] to use under UEFI setup and Windows / Linux OS. USB devices are connected. [Disabled] - The default value is [Enabled]. Legacy USB Support Use this option to select legacy support for legacy USB...


