
User Manual
Page 3
... VistaTM / VistaTM 64-bit / XP / XP 64-bit With RAID Functions 43 2.16.1 Installing Windows® XP / XP 64-bit With RAID Functions 43 2.16.2 Installing Windows® 7 / 7 64-bit / VistaTM / VistaTM 64-bit With RAID Functions 44 2.17 Installing Windows® 7 / 7 64-bit /... VistaTM / VistaTM 64-bit / XP / XP 64-bit Without RAID Functions 45 2.17.1 Installing Windows® XP / XP 64-bit Without RAID Functions 45 2.17.2 Installing Windows® 7 / 7 64-bit / VistaTM / VistaTM 64-bit Without RAID Functions 46 2.18 Untied Overclocking Technology 46 3 Introduction 5 1.1 Package ...
... VistaTM / VistaTM 64-bit / XP / XP 64-bit With RAID Functions 43 2.16.1 Installing Windows® XP / XP 64-bit With RAID Functions 43 2.16.2 Installing Windows® 7 / 7 64-bit / VistaTM / VistaTM 64-bit With RAID Functions 44 2.17 Installing Windows® 7 / 7 64-bit /... VistaTM / VistaTM 64-bit / XP / XP 64-bit Without RAID Functions 45 2.17.1 Installing Windows® XP / XP 64-bit Without RAID Functions 45 2.17.2 Installing Windows® 7 / 7 64-bit / VistaTM / VistaTM 64-bit Without RAID Functions 46 2.18 Untied Overclocking Technology 46 3 Introduction 5 1.1 Package ...

User Manual
Page 7
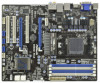
... Content Protection (Realtek ALC892 Audio Codec) - HD Audio Jack: Rear Speaker/Central/Bass/Line in/ Front Speaker/Microphone (see CAUTION 7) - 5 x SATA3 6.0 Gb/s connectors, support RAID (RAID 0, RAID 1, RAID 0+1, RAID 10 and RAID 5), NCQ, AHCI and "Hot Plug" functions - 2 x USB 3.0 ports by Etron EJ168A, support USB 1.0/2.0/3.0 up to -Use USB 3.0 Ports - 1 x RJ-45 LAN Port with LED...
... Content Protection (Realtek ALC892 Audio Codec) - HD Audio Jack: Rear Speaker/Central/Bass/Line in/ Front Speaker/Microphone (see CAUTION 7) - 5 x SATA3 6.0 Gb/s connectors, support RAID (RAID 0, RAID 1, RAID 0+1, RAID 10 and RAID 5), NCQ, AHCI and "Hot Plug" functions - 2 x USB 3.0 ports by Etron EJ168A, support USB 1.0/2.0/3.0 up to -Use USB 3.0 Ports - 1 x RJ-45 LAN Port with LED...

User Manual
Page 40
... SATA3 hard disk. 2.13 Hot Plug and Hot Swap Functions for SATA3 HDDs This motherboard supports Hot Plug and Hot Swap functions for SATA3 in RAID / AHCI mode. AMD SB850 chipset provides hardware support for Advanced Host controller Interface (AHCI), a new programming interface for internal storage devices. STEP 3: ...Connect one end of the SATA data cable to the SATA3 hard disk. If the SATA3 HDDs are built as RAID 1 or RAID 5 then it is called "Hot Plug" for the action to install the SATA3 hard disks. This section will guide you to insert and ...
... SATA3 hard disk. 2.13 Hot Plug and Hot Swap Functions for SATA3 HDDs This motherboard supports Hot Plug and Hot Swap functions for SATA3 in RAID / AHCI mode. AMD SB850 chipset provides hardware support for Advanced Host controller Interface (AHCI), a new programming interface for internal storage devices. STEP 3: ...Connect one end of the SATA data cable to the SATA3 hard disk. If the SATA3 HDDs are built as RAID 1 or RAID 5 then it is called "Hot Plug" for the action to install the SATA3 hard disks. This section will guide you to insert and ...

User Manual
Page 41
...HDD damage and data loss. Make sure to reduce the risk of our motherboard is indicated in RAID / AHCI mode. SATA data cable (Red) B. Below operation procedure is available on our website: www.asrock.com 2. SATA power cable with SATA 15-pin power connector interface A. Please follow below operation... to power supply Caution 1. The latest SATA3 driver is designed only for SATA3 HDD in the product spec on our support website: www.asrock.com 4. Even some SATA3 HDDs provide both SATA 15-pin power connector and IDE 1x4-pin conventional power connector interfaces, the IDE 1x4...
...HDD damage and data loss. Make sure to reduce the risk of our motherboard is indicated in RAID / AHCI mode. SATA data cable (Red) B. Below operation procedure is available on our website: www.asrock.com 2. SATA power cable with SATA 15-pin power connector interface A. Please follow below operation... to power supply Caution 1. The latest SATA3 driver is designed only for SATA3 HDD in the product spec on our support website: www.asrock.com 4. Even some SATA3 HDDs provide both SATA 15-pin power connector and IDE 1x4-pin conventional power connector interfaces, the IDE 1x4...
User Manual
Page 43
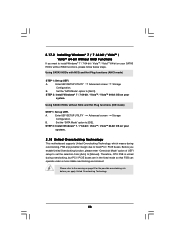
...window for boot devices selection appears. ROM as the boot device. E. C. Enter UEFI SETUP UTILITY Advanced screen Storage Configuration. Insert the ASRock Support CD into your optical drive to your optical drive first. 2.15 Driver Installation Guide To install the drivers to your system, please... insert the support CD to boot your system. Then, the drivers compatible to [RAID]. D. Set the "SATA Mode" option to your system can work properly. 2.16 Installing Windows® 7 / 7 64-bit / VistaTM / ...
...window for boot devices selection appears. ROM as the boot device. E. C. Enter UEFI SETUP UTILITY Advanced screen Storage Configuration. Insert the ASRock Support CD into your optical drive to your optical drive first. 2.15 Driver Installation Guide To install the drivers to your system, please... insert the support CD to boot your system. Then, the drivers compatible to [RAID]. D. Set the "SATA Mode" option to your system can work properly. 2.16 Installing Windows® 7 / 7 64-bit / VistaTM / ...
User Manual
Page 44
... install Windows® XP / XP 64-bit OS on your system. Set the "SATA Mode" option to set RAID configuration. Please refer to check the RAID installation guide in the Support CD for proper configuration. After reading the floppy disk, the driver will be presented. When... prompted, insert the SATA3 driver diskette containing the AMD RAID driver. STEP 1: Set up UEFI. STEP 2: Use "RAID Installation Guide" to [RAID]. STEP 4: Install Windows® 7 / 7 64-bit / VistaTM / VistaTM 64-bit OS on page 43...
... install Windows® XP / XP 64-bit OS on your system. Set the "SATA Mode" option to set RAID configuration. Please refer to check the RAID installation guide in the Support CD for proper configuration. After reading the floppy disk, the driver will be presented. When... prompted, insert the SATA3 driver diskette containing the AMD RAID driver. STEP 1: Set up UEFI. STEP 2: Use "RAID Installation Guide" to [RAID]. STEP 4: Install Windows® 7 / 7 64-bit / VistaTM / VistaTM 64-bit OS on page 43...
User Manual
Page 45
... to install Windows® 7 / 7 64-bit / VistaTM / VistaTM 64-bit / XP / XP 64-bit OS on page 43. Using SATA3 HDDs without RAID functions, please follow below steps. A. B. You can start to install Windows® XP / XP 64-bit OS on your system. 45 When prompted, insert the... A. Enter UEFI SETUP UTILITY Advanced screen Storage Configuration. 2.17 Installing Windows® 7 / 7 64-bit / VistaTM / VistaTM 64-bit / XP / XP 64-bit Without RAID Functions If you want to install Windows® XP / XP 64-bit on your system. Using SATA3 HDDs with NCQ and Hot Plug functions (AHCI...
... to install Windows® 7 / 7 64-bit / VistaTM / VistaTM 64-bit / XP / XP 64-bit OS on page 43. Using SATA3 HDDs without RAID functions, please follow below steps. A. B. You can start to install Windows® XP / XP 64-bit OS on your system. 45 When prompted, insert the... A. Enter UEFI SETUP UTILITY Advanced screen Storage Configuration. 2.17 Installing Windows® 7 / 7 64-bit / VistaTM / VistaTM 64-bit / XP / XP 64-bit Without RAID Functions If you want to install Windows® XP / XP 64-bit on your system. Using SATA3 HDDs with NCQ and Hot Plug functions (AHCI...
User Manual
Page 46
...FSB enjoys better margin due to fixed PCI / PCIE buses. 2.17.2 Installing Windows® 7 / 7 64-bit / VistaTM / VistaTM 64-bit Without RAID Functions If you want to install Windows® 7 / 7 64-bit / VistaTM / VistaTM 64-bit on your SATA3 HDDs without NCQ and Hot Plug ...functions (IDE mode) STEP 1: Set up UEFI. Using SATA3 HDDs without RAID functions, please follow below steps. B. Set the "SATA Mode" option to [AHCI]. Before you apply Untied Overclocking Technology. 46 A. STEP 2: Install Windows®...
...FSB enjoys better margin due to fixed PCI / PCIE buses. 2.17.2 Installing Windows® 7 / 7 64-bit / VistaTM / VistaTM 64-bit Without RAID Functions If you want to install Windows® 7 / 7 64-bit / VistaTM / VistaTM 64-bit on your SATA3 HDDs without NCQ and Hot Plug ...functions (IDE mode) STEP 1: Set up UEFI. Using SATA3 HDDs without RAID functions, please follow below steps. B. Set the "SATA Mode" option to [AHCI]. Before you apply Untied Overclocking Technology. 46 A. STEP 2: Install Windows®...
User Manual
Page 57
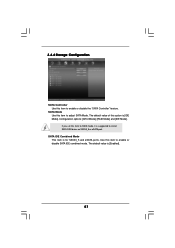
The default value is [IDE Mode]. Configuration options: [AHCI Mode], [RAID Mode] and [IDE Mode]. SATA Mode Use this item to install SATA ODD driver on SATA3_5 or eSATA port. The default value of this option is [Enabled]. 57 SATA IDE Combined Mode This item is suggested to adjust SATA Mode. If you set this item to RAID mode, it is for SATA3_5 and eSATA ports. Use this item to enable or disable the "SATA Controller" feature. 3.4.4 Storage Configuration SATA Controller Use this item to enable or disable SATA IDE combined mode.
The default value is [IDE Mode]. Configuration options: [AHCI Mode], [RAID Mode] and [IDE Mode]. SATA Mode Use this item to install SATA ODD driver on SATA3_5 or eSATA port. The default value of this option is [Enabled]. 57 SATA IDE Combined Mode This item is suggested to adjust SATA Mode. If you set this item to RAID mode, it is for SATA3_5 and eSATA ports. Use this item to enable or disable the "SATA Controller" feature. 3.4.4 Storage Configuration SATA Controller Use this item to enable or disable SATA IDE combined mode.
Quick Installation Guide
Page 7
...HDMI_SPDIF header - 1 x Power LED header - HD Audio Jack: Rear Speaker/Central/Bass/Line in/ Front Speaker/Microphone (see CAUTION 7) - 5 x SATA3 6.0 Gb/s connectors, support RAID (RAID 0, RAID 1, RAID 0+1 and RAID 5), NCQ, AHCI and "Hot Plug" functions - 2 x USB 3.0 ports by Etron EJ168A, support USB 1.0/2.0/3.0 up to -Use USB 3.0 Ports - 1 x RJ-45 LAN Port ...Supports Full HD 1080p Blu-ray (BD) / HD-DVD playback with DVI and HDMI ports - 7.1 CH HD Audio with LED 7 ASRock 890GX Pro3 Motherboard English CPU/Chassis/Power FAN connector - 24 pin ATX power connector - 8 pin 12V power connector -
...HDMI_SPDIF header - 1 x Power LED header - HD Audio Jack: Rear Speaker/Central/Bass/Line in/ Front Speaker/Microphone (see CAUTION 7) - 5 x SATA3 6.0 Gb/s connectors, support RAID (RAID 0, RAID 1, RAID 0+1 and RAID 5), NCQ, AHCI and "Hot Plug" functions - 2 x USB 3.0 ports by Etron EJ168A, support USB 1.0/2.0/3.0 up to -Use USB 3.0 Ports - 1 x RJ-45 LAN Port ...Supports Full HD 1080p Blu-ray (BD) / HD-DVD playback with DVI and HDMI ports - 7.1 CH HD Audio with LED 7 ASRock 890GX Pro3 Motherboard English CPU/Chassis/Power FAN connector - 24 pin ATX power connector - 8 pin 12V power connector -
Quick Installation Guide
Page 37
...steps. A. STEP 2: Install Windows® XP / XP 64-bit OS on your SATA3 HDDs without RAID functions, please follow the order from up UEFI. English 37 ASRock 890GX Pro3 Motherboard Therefore, the drivers you install can be auto-detected and listed on the support CD driver page. ...Enter UEFI SETUP UTILITY Advanced screen Storage Configuration. Using SATA3 HDDs without RAID functions, please follow below procedures according to...
...steps. A. STEP 2: Install Windows® XP / XP 64-bit OS on your SATA3 HDDs without RAID functions, please follow the order from up UEFI. English 37 ASRock 890GX Pro3 Motherboard Therefore, the drivers you install can be auto-detected and listed on the support CD driver page. ...Enter UEFI SETUP UTILITY Advanced screen Storage Configuration. Using SATA3 HDDs without RAID functions, please follow below procedures according to...

Quick Installation Guide
Page 38
...Overclocking function, please enter "Overclock Mode" option of UEFI setup to set the selection from [Auto] to [Manual]. B. English 38 ASRock 890GX Pro3 Motherboard Using SATA3 HDDs without RAID functions, please follow below steps. Set the "SATA Mode" option to [IDE]. STEP 2: Install Windows® 7 / 7 ... Configuration. B. Before you apply Untied Overclocking Technology. 2.14.2 Installing Windows® 7 / 7 64-bit / VistaTM / VistaTM 64-bit Without RAID Functions If you want to install Windows® 7 / 7 64-bit / VistaTM / VistaTM 64-bit on your SATA3 HDDs without NCQ and ...
...Overclocking function, please enter "Overclock Mode" option of UEFI setup to set the selection from [Auto] to [Manual]. B. English 38 ASRock 890GX Pro3 Motherboard Using SATA3 HDDs without RAID functions, please follow below steps. Set the "SATA Mode" option to [IDE]. STEP 2: Install Windows® 7 / 7 ... Configuration. B. Before you apply Untied Overclocking Technology. 2.14.2 Installing Windows® 7 / 7 64-bit / VistaTM / VistaTM 64-bit Without RAID Functions If you want to install Windows® 7 / 7 64-bit / VistaTM / VistaTM 64-bit on your SATA3 HDDs without NCQ and ...
RAID Installation Guide
Page 1
... 3 1.3 Installing Windows 7 / 7 64-bit / Vista / Vista 64-bit / XP / XP 64-bit With RAID Funtions .... 3 1.3.1 Installing Windows XP / XP 64-bit With RAID Funtions 3 1.3.2 Installing Windows 7 / 7 64-bit / Vista / Vista 64-bit With RAID Funtions 4 1.4 Create Disk Array 5 2. AMD BIOS RAID Installation Guide 2 1.1 Introduction to RAIDXpert from the Internet 17 2.9 Running RAIDXpert without Network...
... 3 1.3 Installing Windows 7 / 7 64-bit / Vista / Vista 64-bit / XP / XP 64-bit With RAID Funtions .... 3 1.3.1 Installing Windows XP / XP 64-bit With RAID Funtions 3 1.3.2 Installing Windows 7 / 7 64-bit / Vista / Vista 64-bit With RAID Funtions 4 1.4 Create Disk Array 5 2. AMD BIOS RAID Installation Guide 2 1.1 Introduction to RAIDXpert from the Internet 17 2.9 Running RAIDXpert without Network...
RAID Installation Guide
Page 2
...two hard disks perform the same work as a single drive but at a sustained data transfer rate. Hot-Plug any fault tolerance. RAID 0 (Data Striping) RAID 0 is called data striping that copies and maintains an identical image of Independent Disks", which is striped across the physical drives along...the data blocks. This organization increases performance by accessing multiple physical drives simultaneously for "Redundant Array of data from one drive to RAID The term "RAID" stands for each operation, as well as it will cause data damage or data loss. Data is a method combining two ...
...two hard disks perform the same work as a single drive but at a sustained data transfer rate. Hot-Plug any fault tolerance. RAID 0 (Data Striping) RAID 0 is called data striping that copies and maintains an identical image of Independent Disks", which is striped across the physical drives along...the data blocks. This organization increases performance by accessing multiple physical drives simultaneously for "Redundant Array of data from one drive to RAID The term "RAID" stands for each operation, as well as it will cause data damage or data loss. Data is a method combining two ...

RAID Installation Guide
Page 3
...and the parity information. You can accommodate up your physical drives as RAID Ready. 1.2 RAID Configurations Precautions 1. RAID Ready RAID Ready arranges individual physical drives the same as a logical drive. As a single physical drive, RAID Ready does not offer the performance or security advantages of different sizes... of the same size. If you set is that was previously partitioned, RAIDXpert will be of your new RAID array. 3 In RAIDXpert, you are creating a RAID 0 (striping) array for data protection (the new drive must be the base storage size. Please use ...
...and the parity information. You can accommodate up your physical drives as RAID Ready. 1.2 RAID Configurations Precautions 1. RAID Ready RAID Ready arranges individual physical drives the same as a logical drive. As a single physical drive, RAID Ready does not offer the performance or security advantages of different sizes... of the same size. If you set is that was previously partitioned, RAIDXpert will be of your new RAID array. 3 In RAIDXpert, you are creating a RAID 0 (striping) array for data protection (the new drive must be the base storage size. Please use ...
RAID Installation Guide
Page 4
...to the OS you install. 1.3.1 Installing Windows XP / XP 64-bit With RAID Functions If you want to boot your system. Enter BIOS SETUP UTILITY → Advanced screen →Storage Configuration. B. Insert the ASRock Support CD into your optical drive to "Clear Disk Data" or not. ...During POST at the beginning of 2 or more SATA / SATAII / SATA3 HDDs with RAID functions, please follow below steps. D. Before you start to configure...
...to the OS you install. 1.3.1 Installing Windows XP / XP 64-bit With RAID Functions If you want to boot your system. Enter BIOS SETUP UTILITY → Advanced screen →Storage Configuration. B. Insert the ASRock Support CD into your optical drive to "Clear Disk Data" or not. ...During POST at the beginning of 2 or more SATA / SATAII / SATA3 HDDs with RAID functions, please follow below steps. D. Before you start to configure...
RAID Installation Guide
Page 5
... check this document for proper configuration. Before you start to configure RAID function, you want to set RAID configuration. Select your system. 5 After reading the floppy disk, the driver will be presented. STEP 2: Use "RAID Installation Guide" to install Windows 7 / 7 64-bit / ... / 7 64-bit / Vista / Vista 64-bit With RAID Functions If you need to [RAID]. A. B. STEP 3: Install Windows 7 / 7 64-bit / Vista / Vista 64-bit OS on a RAID disk composed of 2 or more SATA / SATAII / SATA3 HDDs with RAID functions, please follow below steps. prompted, insert the SATA ...
... check this document for proper configuration. Before you start to configure RAID function, you want to set RAID configuration. Select your system. 5 After reading the floppy disk, the driver will be presented. STEP 2: Use "RAID Installation Guide" to install Windows 7 / 7 64-bit / ... / 7 64-bit / Vista / Vista 64-bit With RAID Functions If you need to [RAID]. A. B. STEP 3: Install Windows 7 / 7 64-bit / Vista / Vista 64-bit OS on a RAID disk composed of 2 or more SATA / SATAII / SATA3 HDDs with RAID functions, please follow below steps. prompted, insert the SATA ...

RAID Installation Guide
Page 6
... (for system diagnosis) Press keys, then the RAID Option ROM Utility Main Menu appears. 6 Deleting RAID logical drives - Monitoring RAID and JBOD status - Creating multiple logical drives using the same physical drives - The RAID Option ROM includes a Utility with the disk drives installed, the AMD onboard RAID Option ROM Utility will display the following screen...
... (for system diagnosis) Press keys, then the RAID Option ROM Utility Main Menu appears. 6 Deleting RAID logical drives - Monitoring RAID and JBOD status - Creating multiple logical drives using the same physical drives - The RAID Option ROM includes a Utility with the disk drives installed, the AMD onboard RAID Option ROM Utility will display the following screen...

RAID Installation Guide
Page 7
...disk drive capacity for most applications. WARNING!! Press 2 on the Main Menu screen to cycle through logical drive types, including RAID 0, RAID 1, RAID 5, RAID Ready, JBOD and RAID 10. Then press to use RAID 1 for one logical drive or allocating a portion to a second logical drive. 7 Press the arrow keys to highlight ...spacebar to display the Define LD Menu. You have the option of using all of disk drives to the logical drive. Choose the RAID level you selected will be assigned to your logical drive configuration. Press the arrow key to move to toggle between N and Y ...
...disk drive capacity for most applications. WARNING!! Press 2 on the Main Menu screen to cycle through logical drive types, including RAID 0, RAID 1, RAID 5, RAID Ready, JBOD and RAID 10. Then press to use RAID 1 for one logical drive or allocating a portion to a second logical drive. 7 Press the arrow keys to highlight ...spacebar to display the Define LD Menu. You have the option of using all of disk drives to the logical drive. Choose the RAID level you selected will be assigned to your logical drive configuration. Press the arrow key to move to toggle between N and Y ...

RAID Installation Guide
Page 8
Choose one logical drive. Then please follow the steps below : 1. You have successfully created a new RAID logical drive. Then please follow the steps below . 8 Use the full capacity of the following the detailed instruction of the disk drives to allocate a portion ...
Choose one logical drive. Then please follow the steps below : 1. You have successfully created a new RAID logical drive. Then please follow the steps below . 8 Use the full capacity of the following the detailed instruction of the disk drives to allocate a portion ...


