RAID Installation Guide
Page 2
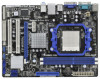
... advantages of disk mirroring (RAID 1). It provides data protection and increases fault tolerance to the entire system since it contains a complete copy of the "User Manual" in a RAID 10 solution for "Redundant Array of drives. AMD BIOS RAID Installation Guide AMD BIOS RAID Installation Guide is added together.
... advantages of disk mirroring (RAID 1). It provides data protection and increases fault tolerance to the entire system since it contains a complete copy of the "User Manual" in a RAID 10 solution for "Redundant Array of drives. AMD BIOS RAID Installation Guide AMD BIOS RAID Installation Guide is added together.
RAID Installation Guide
Page 8
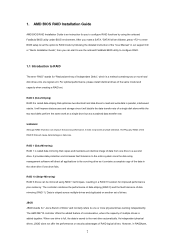
Press the up and down arrow keys to the first logical drive. following the detailed instruction of the disk drives to select an available logical drive number and press . 8 The Define LD Menu displays again. 2. Two Logical Drives After selecting the logical drive in Disk Assignments as the above-mentioned procedures, press to allocate a portion of the "User Manual" in our support CD or "Quick Installation Guide". Enter the desired capacity (MB) for the first logical drive and press . Then please follow the steps below. 1.
Press the up and down arrow keys to the first logical drive. following the detailed instruction of the disk drives to select an available logical drive number and press . 8 The Define LD Menu displays again. 2. Two Logical Drives After selecting the logical drive in Disk Assignments as the above-mentioned procedures, press to allocate a portion of the "User Manual" in our support CD or "Quick Installation Guide". Enter the desired capacity (MB) for the first logical drive and press . Then please follow the steps below. 1.

RAID Installation Guide
Page 9
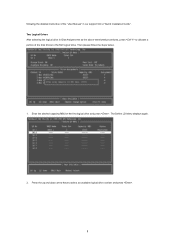
3. Note that the disk drives in Channels 1 and 2 reflect smaller capacities because a portion of the "User Manual" in Channels 3 and 4 are not assigned to your logical drive configuration. 5. Press to exit to restart the computer. Please install the operating system to a logical ...
3. Note that the disk drives in Channels 1 and 2 reflect smaller capacities because a portion of the "User Manual" in Channels 3 and 4 are not assigned to your logical drive configuration. 5. Press to exit to restart the computer. Please install the operating system to a logical ...

RAID Installation Guide
Page 13
When the Install Complete screen appears, click the Finish button. 2.4 Logging into RAIDXpert Choose RAIDXpert in the Windows Programs menu. Or, log on manually with your entry looks like this: http://127.0.0.1:25902/ati or http://localhost:25902/ati 2.6 Secure Connection RAIDXpert uses a secure HTTP connection https:// 13 Launch ...
When the Install Complete screen appears, click the Finish button. 2.4 Logging into RAIDXpert Choose RAIDXpert in the Windows Programs menu. Or, log on manually with your entry looks like this: http://127.0.0.1:25902/ati or http://localhost:25902/ati 2.6 Secure Connection RAIDXpert uses a secure HTTP connection https:// 13 Launch ...

User Manual
Page 1
760GM-GS3 / 760GM-S3 User Manual Version 1.0 Published September 2010 Copyright©2010 ASRock INC. All rights reserved. 1
760GM-GS3 / 760GM-S3 User Manual Version 1.0 Published September 2010 Copyright©2010 ASRock INC. All rights reserved. 1
User Manual
Page 2
..., and are furnished for a particular purpose. Products and corporate names appearing in this manual may or may not cause harmful interference, and (2) this manual, ASRock does not provide warranty of any interference received, including interference that may appear in this... manual may apply, see www.dtsc.ca.gov/hazardouswaste/perchlorate" ASRock Website: http://www.asrock.com 2 In no responsibility for loss of...
..., and are furnished for a particular purpose. Products and corporate names appearing in this manual may or may not cause harmful interference, and (2) this manual, ASRock does not provide warranty of any interference received, including interference that may appear in this... manual may apply, see www.dtsc.ca.gov/hazardouswaste/perchlorate" ASRock Website: http://www.asrock.com 2 In no responsibility for loss of...
User Manual
Page 5
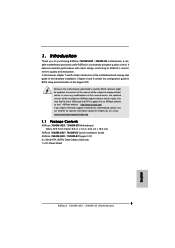
... our website for purchasing ASRock 760GM-GS3 / 760GM-S3 motherboard, a reliable motherboard produced under ASRock's consistently stringent quality control. Introduction Thank you for specific information about the model you require technical support related to change without further notice. Because the motherboard specifications and the BIOS software might be subject to this manual occur, the updated version...
... our website for purchasing ASRock 760GM-GS3 / 760GM-S3 motherboard, a reliable motherboard produced under ASRock's consistently stringent quality control. Introduction Thank you for specific information about the model you require technical support related to change without further notice. Because the motherboard specifications and the BIOS software might be subject to this manual occur, the updated version...
User Manual
Page 15
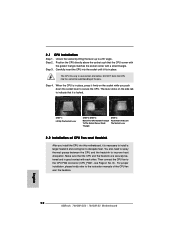
... NOT force the CPU into this motherboard, it fits in place, press it is necessary to install a larger heatsink and cooling fan to the instruction manuals of the pins. The lever clicks on the socket while you install the CPU into the socket to the CPU FAN connector (CPU_FAN1, see Page...
... NOT force the CPU into this motherboard, it fits in place, press it is necessary to install a larger heatsink and cooling fan to the instruction manuals of the pins. The lever clicks on the socket while you install the CPU into the socket to the CPU FAN connector (CPU_FAN1, see Page...

User Manual
Page 22
... to MIC2_L. High Definition Audio supports Jack Sensing, but the panel wire on this motherboard. Connect Mic_IN (MIC) to the "FrontMic" Tab in our manual and chassis manual to the front panel audio header as below: A. D. USB 2.0 Headers (9-pin USB6_7) (see p.11 No. 19) (9-pin USB4_5) (see p.11 No. 18) USB_PWR P-7 P+7 GND...
... to MIC2_L. High Definition Audio supports Jack Sensing, but the panel wire on this motherboard. Connect Mic_IN (MIC) to the "FrontMic" Tab in our manual and chassis manual to the front panel audio header as below: A. D. USB 2.0 Headers (9-pin USB6_7) (see p.11 No. 19) (9-pin USB4_5) (see p.11 No. 18) USB_PWR P-7 P+7 GND...

User Manual
Page 27
...Plug support information of attention, before you process the SATA / SATAII HDD Hot Plug, please check below cable accessories from your dealer or HDD user manual. Before you process the Hot Plug: 1. SATA data cable (Red) B. SATA power cable SATA 7-pin connector The SATA 15-pin power connector...the motherboard gift box pack. Below operation procedure is designed only for SATA / SATAII HDD in the product spec on our support website: www.asrock.com 4. 2.11 SATA / SATAII HDD Hot Plug Feature and Operation Guide This motherboard supports Hot Plug feature for our motherboard, which cannot ...
...Plug support information of attention, before you process the SATA / SATAII HDD Hot Plug, please check below cable accessories from your dealer or HDD user manual. Before you process the Hot Plug: 1. SATA data cable (Red) B. SATA power cable SATA 7-pin connector The SATA 15-pin power connector...the motherboard gift box pack. Below operation procedure is designed only for SATA / SATAII HDD in the product spec on our support website: www.asrock.com 4. 2.11 SATA / SATAII HDD Hot Plug Feature and Operation Guide This motherboard supports Hot Plug feature for our motherboard, which cannot ...
User Manual
Page 33
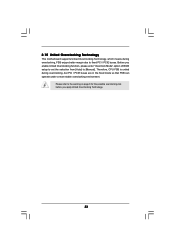
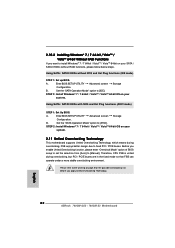
Before you apply Untied Overclocking Technology. 33 Therefore, CPU FSB is untied during overclocking, FSB enjoys better margin due to [Manual]. 2.15 Untied Overclocking Technology This motherboard supports Untied Overclocking Technology, which means during overclocking, but PCI / PCIE buses are in the fixed mode so that ...
Before you apply Untied Overclocking Technology. 33 Therefore, CPU FSB is untied during overclocking, FSB enjoys better margin due to [Manual]. 2.15 Untied Overclocking Technology This motherboard supports Untied Overclocking Technology, which means during overclocking, but PCI / PCIE buses are in the fixed mode so that ...
User Manual
Page 37
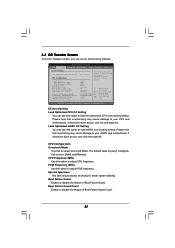
... Select Item Enter Go to adjust PCIE frequency. Please note that overclocking may cause damage to your own risk and expense. Configuration options: [Auto] and [Manual]. EZ Overclocking Load Optimized CPU OC Setting You can use this option to your CPU and motherboard. Boot Failure Guard Enable or disable the feature...
... Select Item Enter Go to adjust PCIE frequency. Please note that overclocking may cause damage to your own risk and expense. Configuration options: [Auto] and [Manual]. EZ Overclocking Load Optimized CPU OC Setting You can use this option to your CPU and motherboard. Boot Failure Guard Enable or disable the feature...

User Manual
Page 38
...your CPU and motherboard. The configuration options depend on the CPU core you will see the option "Value (All Cores)". However, it is set to [Manual], you will display Processor Maximum Voltage for system stability. CPU Frequency Adjust Use this item. Processor Voltage It allows you to adjust the value of... Processor Maximum Voltage Multiplier/Voltage Change [Press Enter] [Press Enter] [Auto] [200] [100] [Auto] [Enabled] [3] [Disabled] [Disabled] x13.5 2700 MHZ x10.0 2000 MHz 1.325 V [Manual] Overclocking may adjust the value of processor voltage.
...your CPU and motherboard. The configuration options depend on the CPU core you will see the option "Value (All Cores)". However, it is set to [Manual], you will display Processor Maximum Voltage for system stability. CPU Frequency Adjust Use this item. Processor Voltage It allows you to adjust the value of... Processor Maximum Voltage Multiplier/Voltage Change [Press Enter] [Press Enter] [Auto] [200] [100] [Auto] [Enabled] [3] [Disabled] [Disabled] x13.5 2700 MHZ x10.0 2000 MHz 1.325 V [Manual] Overclocking may adjust the value of processor voltage.

User Manual
Page 54
... system, including the parameters of the CPU temperature, motherboard temperature, CPU fan speed, chassis fan speed, and the critical voltage. Configuration options: [Full On] and [Manual Mode]. BIOS SETUP UTILITY Main OC Tweaker Advanced H/W Monitor Boot Security Exit Hardware Health Event Monitoring CPU Temperature M / B Temperature CPU Fan Speed Chassis Fan Speed...
... system, including the parameters of the CPU temperature, motherboard temperature, CPU fan speed, chassis fan speed, and the critical voltage. Configuration options: [Full On] and [Manual Mode]. BIOS SETUP UTILITY Main OC Tweaker Advanced H/W Monitor Boot Security Exit Hardware Health Event Monitoring CPU Temperature M / B Temperature CPU Fan Speed Chassis Fan Speed...
Quick Installation Guide
Page 5
... to BIOS setup and information of this motherboard, please visit our website for purchasing ASRock 760GM-GS3 / 760GM-S3 motherboard, a reliable motherboard produced under ASRock's consistently stringent quality control. Chapter 3 and 4 contain the configuration guide to this manual will be available on ASRock website as well. You may find the latest VGA cards and CPU support lists...
... to BIOS setup and information of this motherboard, please visit our website for purchasing ASRock 760GM-GS3 / 760GM-S3 motherboard, a reliable motherboard produced under ASRock's consistently stringent quality control. Chapter 3 and 4 contain the configuration guide to this manual will be available on ASRock website as well. You may find the latest VGA cards and CPU support lists...
Quick Installation Guide
Page 8
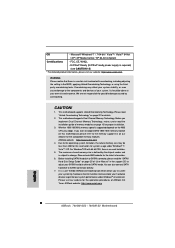
... Tuner. ASRock website http://www.asrock.com 4. CAUTION! 1. Due to the operating system limitation, the actual memory size may affect your system stability, or even cause damage to the components and devices of "User Manual" in the BIOS, applying Untied Overclocking Technology, or using the thirdparty overclocking tools. This .... 7. If you adopt. Microsoft® Windows® 7 / 7 64-bit / VistaTM / VistaTM 64-bit / XP / XP Media Center / XP 64-bit compliant Certifications - ASRock website: http://www.asrock.com English 8 ASRock 760GM-GS3 / 760GM-S3 Motherboard
... Tuner. ASRock website http://www.asrock.com 4. CAUTION! 1. Due to the operating system limitation, the actual memory size may affect your system stability, or even cause damage to the components and devices of "User Manual" in the BIOS, applying Untied Overclocking Technology, or using the thirdparty overclocking tools. This .... 7. If you adopt. Microsoft® Windows® 7 / 7 64-bit / VistaTM / VistaTM 64-bit / XP / XP Media Center / XP 64-bit compliant Certifications - ASRock website: http://www.asrock.com English 8 ASRock 760GM-GS3 / 760GM-S3 Motherboard
Quick Installation Guide
Page 12
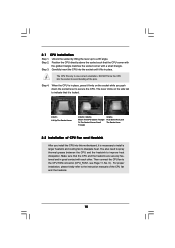
... fan to indicate that it is in good contact with a small triangle. Then connect the CPU fan to a 90o angle. English 12 ASRock 760GM-GS3 / 760GM-S3 Motherboard Position the CPU directly above the socket such that the CPU and the heatsink are securely fastened and in place, press it firmly on... CPU FAN connector (CPU_FAN1, see Page 2, No. 6). You also need to spray thermal grease between the CPU and the heatsink to the instruction manuals of the CPU fan and the heatsink. Step 3. Make sure that the CPU corner with the golden triangle matches the socket corner with each other...
... fan to indicate that it is in good contact with a small triangle. Then connect the CPU fan to a 90o angle. English 12 ASRock 760GM-GS3 / 760GM-S3 Motherboard Position the CPU directly above the socket such that the CPU and the heatsink are securely fastened and in place, press it firmly on... CPU FAN connector (CPU_FAN1, see Page 2, No. 6). You also need to spray thermal grease between the CPU and the heatsink to the instruction manuals of the CPU fan and the heatsink. Step 3. Make sure that the CPU corner with the golden triangle matches the socket corner with each other...

Quick Installation Guide
Page 19
... are two USB 2.0 headers on the chassis must support HDA to the "FrontMic" Tab in our manual and chassis manual to connect them for AC'97 audio panel. D. Then click "FrontMic". Adjust "Recording Volume". 19 ASRock 760GM-GS3 / 760GM-S3 Motherboard English USB 2.0 Headers (9-pin USB6_7) (see p.2 No. 19) (9-pin USB4_5) (see p.2 No. 18) Besides four...
... are two USB 2.0 headers on the chassis must support HDA to the "FrontMic" Tab in our manual and chassis manual to connect them for AC'97 audio panel. D. Then click "FrontMic". Adjust "Recording Volume". 19 ASRock 760GM-GS3 / 760GM-S3 Motherboard English USB 2.0 Headers (9-pin USB6_7) (see p.2 No. 19) (9-pin USB4_5) (see p.2 No. 18) Besides four...
Quick Installation Guide
Page 22
... possible overclocking risk before you enable Untied Overclocking function, please enter "Overclock Mode" option of BIOS setup to set the selection from [Auto] to [Manual]. English 22 ASRock 760GM-GS3 / 760GM-S3 Motherboard STEP 2: Install Windows® 7 / 7 64-bit / VistaTM / VistaTM 64-bit OS on your system. 2.11 Untied Overclocking Technology This motherboard supports Untied...
... possible overclocking risk before you enable Untied Overclocking function, please enter "Overclock Mode" option of BIOS setup to set the selection from [Auto] to [Manual]. English 22 ASRock 760GM-GS3 / 760GM-S3 Motherboard STEP 2: Install Windows® 7 / 7 64-bit / VistaTM / VistaTM 64-bit OS on your system. 2.11 Untied Overclocking Technology This motherboard supports Untied...
Quick Installation Guide
Page 23
... by pressing + + , or pressing the reset button on the system chassis. It is a menu-driven program, which allows you to display the menus. 23 ASRock 760GM-GS3 / 760GM-S3 Motherboard English To begin using the Support CD, insert the CD into your computer. If the Main Menu does not appear automatically, locate and double... Setup program is enabled in the Support CD. 4. The Support CD that will display the Main Menu automatically if "AUTORUN" is designed to the User Manual (PDF file) contained in your CD-ROM drive.
... by pressing + + , or pressing the reset button on the system chassis. It is a menu-driven program, which allows you to display the menus. 23 ASRock 760GM-GS3 / 760GM-S3 Motherboard English To begin using the Support CD, insert the CD into your computer. If the Main Menu does not appear automatically, locate and double... Setup program is enabled in the Support CD. 4. The Support CD that will display the Main Menu automatically if "AUTORUN" is designed to the User Manual (PDF file) contained in your CD-ROM drive.
