RAID Installation Guide
Page 1
... RAID ...3 1.2 RAID Configuration Precautions 3 1.3 BIOS Configuration Utility ...4 1.3.1 Enter BIOS Configuration Utility 4 1.3.2 Create Disk Array ...4 1.3.3 Delete Disk Array ...7 1.3.4 Select Boot Array ...7 2 VIA Windows RAID Installation Guide 9 2.1 VIA Windows RAID Installation Guide for Windows 2000/XP/XP 64-bit Users 9 2.1.1 Create RAID Array ...9 2.1.2 Delete Disk Array ...11 2.1.3 Check All Disks ...12 2.1.4 Verify Mirror Disk ...13...
... RAID ...3 1.2 RAID Configuration Precautions 3 1.3 BIOS Configuration Utility ...4 1.3.1 Enter BIOS Configuration Utility 4 1.3.2 Create Disk Array ...4 1.3.3 Delete Disk Array ...7 1.3.4 Select Boot Array ...7 2 VIA Windows RAID Installation Guide 9 2.1 VIA Windows RAID Installation Guide for Windows 2000/XP/XP 64-bit Users 9 2.1.1 Create RAID Array ...9 2.1.2 Delete Disk Array ...11 2.1.3 Check All Disks ...12 2.1.4 Verify Mirror Disk ...13...

RAID Installation Guide
Page 2
2.2 VIA Windows RAID Installation Guide for Windows Vista/Vista 64-bit Users 18 2.2.1 Create Disk Array ...18 2.2.2 Remove Array ...21 2.2.3 Add/Remove Spare ...21 2.2.4 Synchronize Mirror Disk ...22 2.2.5 Repair Broken Disk Array ...22 2
2.2 VIA Windows RAID Installation Guide for Windows Vista/Vista 64-bit Users 18 2.2.1 Create Disk Array ...18 2.2.2 Remove Array ...21 2.2.3 Add/Remove Spare ...21 2.2.4 Synchronize Mirror Disk ...22 2.2.5 Repair Broken Disk Array ...22 2
RAID Installation Guide
Page 6
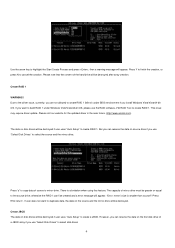
..., the data on disk drives will be destroyed after array creation. Please visit our website for the updated driver in the near future. (http://www.asrock.com) The data on the source and the mirror drive will appear: "Error: mirror's size is a limitation when using this feature. Press ESC ...return". Create JBOD The data on source drive if you install Windows Vista/Vista 64-bit OS. Use the arrow key to highlight the Start Create Process and press , then a warning message will be destroyed if user...
..., the data on disk drives will be destroyed after array creation. Please visit our website for the updated driver in the near future. (http://www.asrock.com) The data on the source and the mirror drive will appear: "Error: mirror's size is a limitation when using this feature. Press ESC ...return". Create JBOD The data on source drive if you install Windows Vista/Vista 64-bit OS. Use the arrow key to highlight the Start Create Process and press , then a warning message will be destroyed if user...

RAID Installation Guide
Page 9
...XP 64-bit Users After GUI software is installed, it will automatically start every time when your Windows OS is started. Please follow the instructions below according to configure RAID functions under Windows environment. "Select Array Creating Method" will appear in the system Just double click on one of...the main interface of disk array- The "RAID Software" is currently running. will be prompted. RAID 1, Span, and RAID 0. 2 VIA Windows RAID Installation Guide You are different installation procedures. An icon tray of the tool bar to indicate that GUI software is...
...XP 64-bit Users After GUI software is installed, it will automatically start every time when your Windows OS is started. Please follow the instructions below according to configure RAID functions under Windows environment. "Select Array Creating Method" will appear in the system Just double click on one of...the main interface of disk array- The "RAID Software" is currently running. will be prompted. RAID 1, Span, and RAID 0. 2 VIA Windows RAID Installation Guide You are different installation procedures. An icon tray of the tool bar to indicate that GUI software is...

RAID Installation Guide
Page 10
...adding a disk drive, user can modify the hard disk drives later. Press "Create" button to create or "Cancel" button to cancel. 3. The "Creating Array" window will pop up to prompt user that the disk array has been created successfully and ask user whether to array. After you select "Custom", the... the available disk drives for array-creating. User can also remove the selected disk drive from array. Click the disk drive in "Array Disks" windows, then click left arrow button to be a disk array. Auto: The software will configure the available hard disk drives to remove the selected disk...
...adding a disk drive, user can modify the hard disk drives later. Press "Create" button to create or "Cancel" button to cancel. 3. The "Creating Array" window will pop up to prompt user that the disk array has been created successfully and ask user whether to array. After you select "Custom", the... the available disk drives for array-creating. User can also remove the selected disk drive from array. Click the disk drive in "Array Disks" windows, then click left arrow button to be a disk array. Auto: The software will configure the available hard disk drives to remove the selected disk...

RAID Installation Guide
Page 11
... user wants to keep the data on the source drive the capacity of JBOD array can 't be greater or equal to delete from the left window. The data on the source drive after clicking "Create" button when you want to the source drive, otherwise the RAID 1 can be expanded behind the...
... user wants to keep the data on the source drive the capacity of JBOD array can 't be greater or equal to delete from the left window. The data on the source drive after clicking "Create" button when you want to the source drive, otherwise the RAID 1 can be expanded behind the...

RAID Installation Guide
Page 12
When a RAID is deleted, the data on the disk array except RAID 1. After you complete the checking, a dialog window will be compatible with ATA/ATAPI-5 specifications and support SMART commands; otherwise the checking will pop up to restart the computer. A message box will fail. ...
When a RAID is deleted, the data on the disk array except RAID 1. After you complete the checking, a dialog window will be compatible with ATA/ATAPI-5 specifications and support SMART commands; otherwise the checking will pop up to restart the computer. A message box will fail. ...

RAID Installation Guide
Page 18
...If the number of available free disks is enough for example. Here we take RAID 1 (Mirror) for a RAID mode, you can finish your Windows OS is currently running. A. When free disks (disks not in the system Just double click on these disks maybe lost, so be needed or conduct...a RAID disk array, you can click on "Create Array" in the Operation block. will appear in any disk array) are selected to below steps for Windows Vista / Vista 64-bit Users After GUI software is installed, it will never be sure these data will automatically start every time when your creation...
...If the number of available free disks is enough for example. Here we take RAID 1 (Mirror) for a RAID mode, you can finish your Windows OS is currently running. A. When free disks (disks not in the system Just double click on these disks maybe lost, so be needed or conduct...a RAID disk array, you can click on "Create Array" in the Operation block. will appear in any disk array) are selected to below steps for Windows Vista / Vista 64-bit Users After GUI software is installed, it will never be sure these data will automatically start every time when your creation...

RAID Installation Guide
Page 21
... disk array, you that will guide you to finish this operation. You can also remove an array by shifting top-left block of main application window to replace the Source or Mirror disk when one of the RAID 1 array and right click the array node and click "Add/ Remove Spare" on...
... disk array, you that will guide you to finish this operation. You can also remove an array by shifting top-left block of main application window to replace the Source or Mirror disk when one of the RAID 1 array and right click the array node and click "Add/ Remove Spare" on...
User Manual
Page 3
...bit / VistaTM / VistaTM 64-bit With RAID Functions 27 2.14.1 Installing Windows® 2000 / XP / XP 64-bit With RAID Functions 27 2.14.2 Installing Windows® VistaTM / VistaTM 64-bit With RAID Functions 28 2.15 Installing Windows® 2000 / XP / XP 64-bit / VistaTM / VistaTM 64-... 2.7 Jumpers Setup 18 2.8 Onboard Headers and Connectors 19 2.9 Serial ATA (SATA) Hard Disks Installation 23 2.10 Hot Plug and Hot Swap Functions for Windows® VistaTM Basic Logo 9 1.4 Motherboard Layout 10 1.5 HD 8CH I/O Panel 11 2. BIOS SETUP UTILITY 30 3.1 Introduction 30 3.1.1 BIOS Menu Bar ...
...bit / VistaTM / VistaTM 64-bit With RAID Functions 27 2.14.1 Installing Windows® 2000 / XP / XP 64-bit With RAID Functions 27 2.14.2 Installing Windows® VistaTM / VistaTM 64-bit With RAID Functions 28 2.15 Installing Windows® 2000 / XP / XP 64-bit / VistaTM / VistaTM 64-... 2.7 Jumpers Setup 18 2.8 Onboard Headers and Connectors 19 2.9 Serial ATA (SATA) Hard Disks Installation 23 2.10 Hot Plug and Hot Swap Functions for Windows® VistaTM Basic Logo 9 1.4 Motherboard Layout 10 1.5 HD 8CH I/O Panel 11 2. BIOS SETUP UTILITY 30 3.1 Introduction 30 3.1.1 BIOS Menu Bar ...

User Manual
Page 6
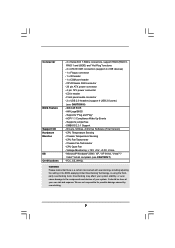
Northbridge: VIA® P4M900 - Max. shared memory 256MB - 7.1 CH Windows® VistaTM Basic Level HD Audio (ALC883 Audio Codec) - HD Audio Jack: Side Speaker/Rear Speaker/Central Bass/ Line in , 24.4 cm x 20.8 cm - LGA ... Port - 1 x Parallel Port (ECP/EPP Support) - 4 x Ready-to-Use USB 2.0 Ports - 1 x RJ-45 Port - Micro ATX Form Factor: 9.6-in x 8.2-in /Front Speaker/Microphone (see CAUTION 5) 6 ASRock U-COP (see CAUTION 3) -
Northbridge: VIA® P4M900 - Max. shared memory 256MB - 7.1 CH Windows® VistaTM Basic Level HD Audio (ALC883 Audio Codec) - HD Audio Jack: Side Speaker/Rear Speaker/Central Bass/ Line in , 24.4 cm x 20.8 cm - LGA ... Port - 1 x Parallel Port (ECP/EPP Support) - 4 x Ready-to-Use USB 2.0 Ports - 1 x RJ-45 Port - Micro ATX Form Factor: 9.6-in x 8.2-in /Front Speaker/Microphone (see CAUTION 5) 6 ASRock U-COP (see CAUTION 3) -
User Manual
Page 7
... 4 x IDE devices) - 1 x Floppy connector - 1 x IR header - 1 x COM port header - CD in the BIOS, applying Untied Overclocking Technology, or using the thirdparty overclocking tools. Microsoft® Windows® 2000 / XP / XP 64-bit / VistaTM / VistaTM 64-bit compliant (see CAUTION 6) - 4Mb AMI BIOS - CPU Temperature Sensing - FCC, CE, WHQL WARNING Please realize...
... 4 x IDE devices) - 1 x Floppy connector - 1 x IR header - 1 x COM port header - CD in the BIOS, applying Untied Overclocking Technology, or using the thirdparty overclocking tools. Microsoft® Windows® 2000 / XP / XP 64-bit / VistaTM / VistaTM 64-bit compliant (see CAUTION 6) - 4Mb AMI BIOS - CPU Temperature Sensing - FCC, CE, WHQL WARNING Please realize...
User Manual
Page 8
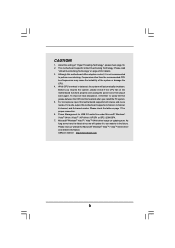
...website for USB 2.0 works fine under Microsoft® Windows® VistaTM 64-bit / VistaTM / XP 64-bit / XP SP1 or SP2 / 2000 SP4. 7. For audio output, this motherboard supports both stereo and mono modes. ASRock website http://www.asrock.com 8 Frequencies other than the recommended CPU bus ... 29 for proper connection. 6. To improve heat dissipation, remember to perform over-clocking. Power Management for Microsoft® Windows® VistaTM / VistaTM 64-bit driver and related information. Please read "Untied Overclocking Technology" on page 11 for details. 3. Microsoft®...
...website for USB 2.0 works fine under Microsoft® Windows® VistaTM 64-bit / VistaTM / XP 64-bit / XP SP1 or SP2 / 2000 SP4. 7. For audio output, this motherboard supports both stereo and mono modes. ASRock website http://www.asrock.com 8 Frequencies other than the recommended CPU bus ... 29 for proper connection. 6. To improve heat dissipation, remember to perform over-clocking. Power Management for Microsoft® Windows® VistaTM / VistaTM 64-bit driver and related information. Please read "Untied Overclocking Technology" on page 11 for details. 3. Microsoft®...
User Manual
Page 9
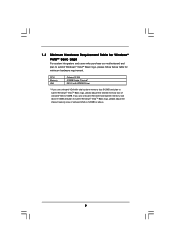
If you use onboard VGA with total system memory size 512MB and plan to submit Windows® VistaTM Basic logo, please adjust the shared memory size of onboard VGA to 128MB or above. 9 CPU Memory VGA Celeron D 326 512MB Single Channel* ... WDDM Driver * If you use onboard VGA with total system memory size above 512MB and plan to submit Windows® VistaTM Basic logo, please adjust the shared memory size of onboard VGA to submit Windows® VistaTM Basic logo, please follow below table for minimum hardware requirement. 1.3 Minimum Hardware Requirement Table for...
If you use onboard VGA with total system memory size 512MB and plan to submit Windows® VistaTM Basic logo, please adjust the shared memory size of onboard VGA to 128MB or above. 9 CPU Memory VGA Celeron D 326 512MB Single Channel* ... WDDM Driver * If you use onboard VGA with total system memory size above 512MB and plan to submit Windows® VistaTM Basic logo, please adjust the shared memory size of onboard VGA to submit Windows® VistaTM Basic logo, please follow below table for minimum hardware requirement. 1.3 Minimum Hardware Requirement Table for...

User Manual
Page 21
... control function. Though this motherboard, please connect it to enter Realtek HD Audio Manager. Connect Audio_R (RIN) to OUT2_R and Audio_L (LIN) to MIC2_L. Enter Windows system. Click "Audio I/O", select "Connector Settings" , choose "Disable front panel jack detection", and save the change by clicking "OK". D. F. Connect Mic_IN (MIC) to OUT2_L. If...
... control function. Though this motherboard, please connect it to enter Realtek HD Audio Manager. Connect Audio_R (RIN) to OUT2_R and Audio_L (LIN) to MIC2_L. Enter Windows system. Click "Audio I/O", select "Connector Settings" , choose "Disable front panel jack detection", and save the change by clicking "OK". D. F. Connect Mic_IN (MIC) to OUT2_L. If...
User Manual
Page 27
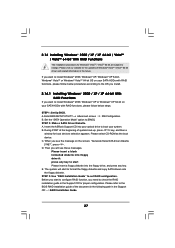
...-bit / VistaTM / VistaTM 64-bit With RAID Functions The installation procedures for the updates of Windows® VistaTM / VistaTM 64-bit driver and related information in the future. STEP 2: Make a SATA Driver Diskette. Insert the ASRock Support CD into the floppy diskette. Then you will start to configure RAID function, you see...
...-bit / VistaTM / VistaTM 64-bit With RAID Functions The installation procedures for the updates of Windows® VistaTM / VistaTM 64-bit driver and related information in the future. STEP 2: Make a SATA Driver Diskette. Insert the ASRock Support CD into the floppy diskette. Then you will start to configure RAID function, you see...
User Manual
Page 28
... screen IDE Configuration. When prompted, insert the SATA driver diskette containing the VIA® RAID driver. page, please insert the ASRock Support CD into your system. Insert the Windows® VistaTM / Windows® VistaTM 64-bit optical disk into the optical drive again to continue the installation. 28 Before you want to manage...
... screen IDE Configuration. When prompted, insert the SATA driver diskette containing the VIA® RAID driver. page, please insert the ASRock Support CD into your system. Insert the Windows® VistaTM / Windows® VistaTM 64-bit optical disk into the optical drive again to continue the installation. 28 Before you want to manage...
User Manual
Page 29
... environment, please install SATA drivers from the Support CD again so that FSB can start to install Windows® 2000 / Windows® XP / Windows® XP 64-bit / Windows® VistaTM / Windows® VistaTM 64-bit OS on your system. 2.16 Untied Overclocking Technology This motherboard supports Untied ...overclocking, FSB enjoys better margin due to fixed PCI / PCIE bus. If you want to install Windows® 2000, Windows® XP, Windows® XP 64-bit, Windows® VistaTM or Windows® VistaTM 64-bit OS on page 7 for the possible overclocking risk before you the actual ...
... environment, please install SATA drivers from the Support CD again so that FSB can start to install Windows® 2000 / Windows® XP / Windows® XP 64-bit / Windows® VistaTM / Windows® VistaTM 64-bit OS on your system. 2.16 Untied Overclocking Technology This motherboard supports Untied ...overclocking, FSB enjoys better margin due to fixed PCI / PCIE bus. If you want to install Windows® 2000, Windows® XP, Windows® XP 64-bit, Windows® VistaTM or Windows® VistaTM 64-bit OS on page 7 for the possible overclocking risk before you the actual ...

User Manual
Page 34
...this item to system stability or compatibility issue with some power supplies. The default value is Intel's new power saving technology. is [Auto]. Windows® XP. This item will be hidden if the current CPU does not support Intel (R) SpeedStep(tm) tech.. Please note that enabling ...enable power savings. If you need to [Enabled]. Processor can switch between multiple frequency and voltage points to [Enabled] if using Microsoft® Windows® XP, or Linux kernel version 2.4.18 or higher. Intel (R) SpeedStep(tm) tech. This option will be hidden if the installed CPU ...
...this item to system stability or compatibility issue with some power supplies. The default value is Intel's new power saving technology. is [Auto]. Windows® XP. This item will be hidden if the current CPU does not support Intel (R) SpeedStep(tm) tech.. Please note that enabling ...enable power savings. If you need to [Enabled]. Processor can switch between multiple frequency and voltage points to [Enabled] if using Microsoft® Windows® XP, or Linux kernel version 2.4.18 or higher. Intel (R) SpeedStep(tm) tech. This option will be hidden if the installed CPU ...

User Manual
Page 37
... [Disabled] for the onboard HD Audio feature. PCI Delay Transaction Enable PCI Delay Transaction to allow other PCI masters to use this motherboard to submit Windows® VistaTM logo test, please disable this item is [Normal]. The default value is [Auto]. 37 OnBoard LAN This allows you plan to use the...
... [Disabled] for the onboard HD Audio feature. PCI Delay Transaction Enable PCI Delay Transaction to allow other PCI masters to use this motherboard to submit Windows® VistaTM logo test, please disable this item is [Normal]. The default value is [Auto]. 37 OnBoard LAN This allows you plan to use the...


