
Data Sheet_e2752She
Page 2
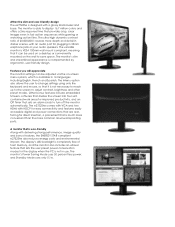
...display's LED backlight is completely free of 20,000,000:1 reveals more common downward-pointing ports. Features you will appreciate The monitor settings can be adjusted via the on the wall to turn off the monitor automatically. The monitor is designed with delivering strong performance, ... darker scenes, with HDCP for easy connectivity and features easily accessible digital and power connections that are rearfacing for plugging in use. E2752She The e2752She comes with VGA and two HDMI with an audio port for direct insertion, a placement that is VESA 100mm wall mount compliant,...
...display's LED backlight is completely free of 20,000,000:1 reveals more common downward-pointing ports. Features you will appreciate The monitor settings can be adjusted via the on the wall to turn off the monitor automatically. The monitor is designed with delivering strong performance, ... darker scenes, with HDCP for easy connectivity and features easily accessible digital and power connections that are rearfacing for plugging in use. E2752She The e2752She comes with VGA and two HDMI with an audio port for direct insertion, a placement that is VESA 100mm wall mount compliant,...
User's Manual_e2752She
Page 2
... the box ...9 Setup Stand & Base...10 Adjusting Viewing Angle...11 Connecting the Monitor...12 Adjusting ...13 Setting Optimal Resolution ...13 Windows Vista ...13 Windows XP ...15 Windows ME/2000...16 Windows 8 ...17 Hotkeys...19 OSD Setting...20 Luminance ...21 Image Setup ...23 Color Setup...25 Picture Boost ...27 OSD Setup ...29 Extra...
... the box ...9 Setup Stand & Base...10 Adjusting Viewing Angle...11 Connecting the Monitor...12 Adjusting ...13 Setting Optimal Resolution ...13 Windows Vista ...13 Windows XP ...15 Windows ME/2000...16 Windows 8 ...17 Hotkeys...19 OSD Setting...20 Luminance ...21 Image Setup ...23 Color Setup...25 Picture Boost ...27 OSD Setup ...29 Extra...

User's Manual_e2752She
Page 14
5 Click Display Settings. 6 Set the resolution SLIDE-BAR to 1920 by 1080. 14
5 Click Display Settings. 6 Set the resolution SLIDE-BAR to 1920 by 1080. 14

User's Manual_e2752She
Page 15
Windows XP For Windows XP: 1 Click START. 2 Click SETTINGS. 3 Click CONTROL PANEL. 4 Click Appearance and Themes. 5 Double click DISPLAY. 15
Windows XP For Windows XP: 1 Click START. 2 Click SETTINGS. 3 Click CONTROL PANEL. 4 Click Appearance and Themes. 5 Double click DISPLAY. 15

User's Manual_e2752She
Page 16
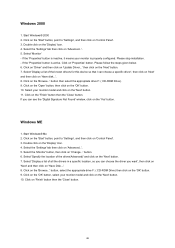
Windows ME/2000 For Windows ME/2000: 1 Click START. 2 Click SETTINGS. 3 Click CONTROL PANEL. 4 Double click DISPLAY. 5 Click SETTINGS. 6 Set the resolution SLIDE-BAR to 1920 by 1080 . 16 6 Click SETTINGS. 7 Set the resolution SLIDE-BAR to 1920 by 1080.
Windows ME/2000 For Windows ME/2000: 1 Click START. 2 Click SETTINGS. 3 Click CONTROL PANEL. 4 Double click DISPLAY. 5 Click SETTINGS. 6 Set the resolution SLIDE-BAR to 1920 by 1080 . 16 6 Click SETTINGS. 7 Set the resolution SLIDE-BAR to 1920 by 1080.

User's Manual_e2752She
Page 17
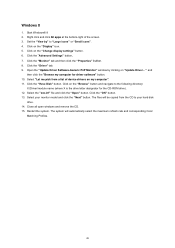
Right click and click All apps at the bottom-right of the screen. 2. Click Appearance and Personalization. 17 Windows 8 For Windows 8: 1. Set the "View by" to "Category". 3.
Right click and click All apps at the bottom-right of the screen. 2. Click Appearance and Personalization. 17 Windows 8 For Windows 8: 1. Set the "View by" to "Category". 3.

User's Manual_e2752She
Page 18
Set the resolution SLIDE-BAR to Optimal preset resolution 18 Click DISPLAY. 4.
Set the resolution SLIDE-BAR to Optimal preset resolution 18 Click DISPLAY. 4.

User's Manual_e2752She
Page 20
...lock the OSD - press and hold the MENU button while the monitor is off and then press power button to turn the monitor on. OSD Setting Basic and simple instruction on the control keys. 1) Press the MENU-button to navigate through the sub-menu functions. Once the desired function is ... of "Image Ratio" is disable to adjust. 3) One of the selected function. Once the desired function is highlighted, press the MENU-button to change the settings of DCR, Color Boost, and Picture Boost functions is active, the other function, repeat steps 2-3. 4) OSD Lock Function: To lock the OSD, press and ...
...lock the OSD - press and hold the MENU button while the monitor is off and then press power button to turn the monitor on. OSD Setting Basic and simple instruction on the control keys. 1) Press the MENU-button to navigate through the sub-menu functions. Once the desired function is ... of "Image Ratio" is disable to adjust. 3) One of the selected function. Once the desired function is highlighted, press the MENU-button to change the settings of DCR, Color Boost, and Picture Boost functions is active, the other function, repeat steps 2-3. 4) OSD Lock Function: To lock the OSD, press and ...
User's Manual_e2752She
Page 37
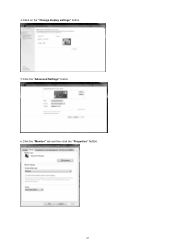
4.Ckick on the "Change display settings" button. 5.Click the "Advanced Settings" button. 6.Click the "Monitor" tab and then click the "Properties" button. 37
4.Ckick on the "Change display settings" button. 5.Click the "Advanced Settings" button. 6.Click the "Monitor" tab and then click the "Properties" button. 37

User's Manual_e2752She
Page 40
Windows Vista 1. Click "Start " and "Control Panel". Click "Advanced Settings...". 40 Then, double-click on "Appearance and Personalization". 2. Click "Personalization" and then "Display Settings". 3.
Windows Vista 1. Click "Start " and "Control Panel". Click "Advanced Settings...". 40 Then, double-click on "Appearance and Personalization". 2. Click "Personalization" and then "Display Settings". 3.

User's Manual_e2752She
Page 43
Please stop installation. - Please follow the steps below. 7. 5. Click on the 'Driver' tab and then click on the 'Advanced' button. 6. button. 43 If the 'Properties' button is properly configured. Select the 'Settings' tab then click on 'Update Driver...' Select 'Monitor' tab - If the 'Properties' button is inactive, it means your monitor is active, click on 'Properties' button.
Please stop installation. - Please follow the steps below. 7. 5. Click on the 'Driver' tab and then click on the 'Advanced' button. 6. button. 43 If the 'Properties' button is properly configured. Select the 'Settings' tab then click on 'Update Driver...' Select 'Monitor' tab - If the 'Properties' button is inactive, it means your monitor is active, click on 'Properties' button.
User's Manual_e2752She
Page 45
... letter designator for driver software" button. 10. Close all open windows and remove the CD. 15. Set the "View by clicking on my computer". 11. Restart the system. Click the "Advanced Settings" button. 7. Open the "Update Driver Software-Generic PnP Monitor" window by " to your monitor model... and click the "Next" button. Click the "OK" button. 13. Windows 8 1. Click on the "Change display settings" button. 6. Click the "Driver" tab. 9. Select the "xxx.inf" file and click the "Open" button. Right click and click All apps at the...
... letter designator for driver software" button. 10. Close all open windows and remove the CD. 15. Set the "View by clicking on my computer". 11. Restart the system. Click the "Advanced Settings" button. 7. Open the "Update Driver Software-Generic PnP Monitor" window by " to your monitor model... and click the "Next" button. Click the "OK" button. 13. Windows 8 1. Click on the "Change display settings" button. 6. Click the "Driver" tab. 9. Select the "xxx.inf" file and click the "Open" button. Right click and click All apps at the...
User's Manual_e2752She
Page 46
...device so that I can see the 'Digital Signature Not Found' window, click on the 'Next' button. 7. Select the 'Settings' tab then click on 'Advanced...'. 5. Select the 'Settings' tab then click on 'Advanced...'. 5. Please follow the steps given below. 6. If you want', then click on 'Next...' button is inactive, it means your monitor is active. If the 'Properties' button is properly configured. Click on the 'Start' button, point to 'Settings', and then click on 'Have Disk...'. 8. Start Windows® 2000 2. Click on 'Finish' button then the 'Close' button. 46 Click on the...
...device so that I can see the 'Digital Signature Not Found' window, click on the 'Next' button. 7. Select the 'Settings' tab then click on 'Advanced...'. 5. Select the 'Settings' tab then click on 'Advanced...'. 5. Please follow the steps given below. 6. If you want', then click on 'Next...' button is inactive, it means your monitor is active. If the 'Properties' button is properly configured. Click on the 'Start' button, point to 'Settings', and then click on 'Have Disk...'. 8. Start Windows® 2000 2. Click on 'Finish' button then the 'Close' button. 46 Click on the...
User's Manual_e2752She
Page 47
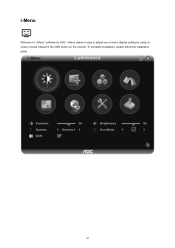
i-Menu makes it easy to "i-Menu" software by using on screen menus instead of the OSD button on the monitor. i-Menu Welcome to adjust your monitor display setting by AOC. To complete installation, please follow the installation guide. 47
i-Menu makes it easy to "i-Menu" software by using on screen menus instead of the OSD button on the monitor. i-Menu Welcome to adjust your monitor display setting by AOC. To complete installation, please follow the installation guide. 47
User's Manual_e2752She
Page 48
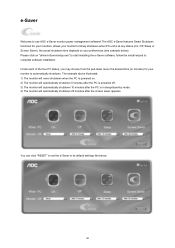
... time (in sleep/stand-by mode. 4) The monitor will automatically shutdown 20 minutes after the screen saver appears. e-Saver Welcome to its default settings like below ). The AOC e-Saver features Smart Shutdown functions for your monitor to timely shutdown when PC unit is in minutes) for your monitors, allows your monitor to.... 3) The monitor will automatically shutdown 10 minutes after the PC is at any status (On, Off, Sleep or Screen Saver); You can click "RESET" to set the e-Saver to use AOC e-Saver monitor power management software!
... time (in sleep/stand-by mode. 4) The monitor will automatically shutdown 20 minutes after the screen saver appears. e-Saver Welcome to its default settings like below ). The AOC e-Saver features Smart Shutdown functions for your monitor to timely shutdown when PC unit is in minutes) for your monitors, allows your monitor to.... 3) The monitor will automatically shutdown 10 minutes after the PC is at any status (On, Off, Sleep or Screen Saver); You can click "RESET" to set the e-Saver to use AOC e-Saver monitor power management software!
User's Manual_e2752She
Page 50
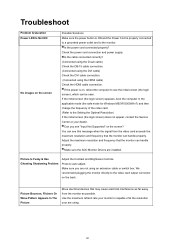
... the screen Possible Solutions Make sure the power button is ON and the Power Cord is capable of the video card. (Refer to the Setting the Optimal Resolution) If the initial screen (the login screen) does not appear, contact the Service Center or your monitor is properly connected... to a grounded power outlet and to the monitor. Use the maximum refresh rate your dealer. Make sure the AOC Monitor Drivers are not using the HDMI cable) Check the HDMI cable connection. Is the power cord connected properly? Troubleshoot Problem & Question Power...
... the screen Possible Solutions Make sure the power button is ON and the Power Cord is capable of the video card. (Refer to the Setting the Optimal Resolution) If the initial screen (the login screen) does not appear, contact the Service Center or your monitor is properly connected... to a grounded power outlet and to the monitor. Use the maximum refresh rate your dealer. Make sure the AOC Monitor Drivers are not using the HDMI cable) Check the HDMI cable connection. Is the power cord connected properly? Troubleshoot Problem & Question Power...
