e2239Fwt English Manual
Page 2
...Angle...10 Dual Stand ...11 Connecting the Monitor...12 Multi-touch Screen ...13 Adjusting ...14 Setting Optimal Resolution ...14 Windows Vista ...14 Windows XP ...16 Windows ME/2000...17 Hotkeys ...18 OSD Setting...19 Eco mode ...20 Color Boost ...22 Luminance ...24 Image Setup ...26... ...28 Picture Boost ...30 Extra Setting ...32 Exit ...34 LED Indicator ...35 Driver ...36 Monitor Driver ...36 Windows 2000 ...36 Windows ME...36 Windows XP ...37 Windows Vista ...40 Windows 7 ...42 i-Menu ...46 e-Saver...47 SRS...48 TouchPal...49 Troubleshoot ...50 Specification ...52 General Specification ...52...
...Angle...10 Dual Stand ...11 Connecting the Monitor...12 Multi-touch Screen ...13 Adjusting ...14 Setting Optimal Resolution ...14 Windows Vista ...14 Windows XP ...16 Windows ME/2000...17 Hotkeys ...18 OSD Setting...19 Eco mode ...20 Color Boost ...22 Luminance ...24 Image Setup ...26... ...28 Picture Boost ...30 Extra Setting ...32 Exit ...34 LED Indicator ...35 Driver ...36 Monitor Driver ...36 Windows 2000 ...36 Windows ME...36 Windows XP ...37 Windows Vista ...40 Windows 7 ...42 i-Menu ...46 e-Saver...47 SRS...48 TouchPal...49 Troubleshoot ...50 Specification ...52 General Specification ...52...
e2239Fwt English Manual
Page 13
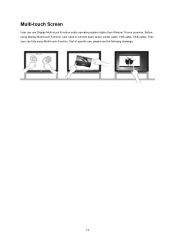
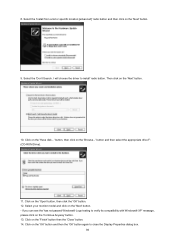
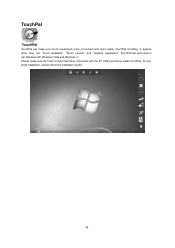
Then user can use , please see the following drawings. 13 Before using Display Multi-touch Function, user need to connect basic wires ( power cable, VGA cable, USB cable). Part of specific use Display Multi-touch Function under operating system higher than Window 7 home premium. Multi-touch Screen User can fully enjoy Multi-touch Function.
Then user can use , please see the following drawings. 13 Before using Display Multi-touch Function, user need to connect basic wires ( power cable, VGA cable, USB cable). Part of specific use Display Multi-touch Function under operating system higher than Window 7 home premium. Multi-touch Screen User can fully enjoy Multi-touch Function.
e2239Fwt English Manual
Page 16
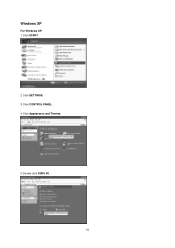
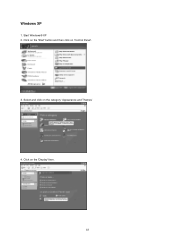
Windows XP For Windows XP: 1 Click START. 2 Click SETTINGS. 3 Click CONTROL PANEL. 4 Click Appearance and Themes. 5 Double click DISPLAY. 16
Windows XP For Windows XP: 1 Click START. 2 Click SETTINGS. 3 Click CONTROL PANEL. 4 Click Appearance and Themes. 5 Double click DISPLAY. 16
e2239Fwt English Manual
Page 17
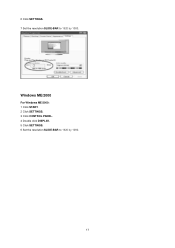
6 Click SETTINGS. 7 Set the resolution SLIDE-BAR to 1920 by 1080. Windows ME/2000 For Windows ME/2000: 1 Click START. 2 Click SETTINGS. 3 Click CONTROL PANEL. 4 Double click DISPLAY. 5 Click SETTINGS. 6 Set the resolution SLIDE-BAR to 1920 by 1080. 17
6 Click SETTINGS. 7 Set the resolution SLIDE-BAR to 1920 by 1080. Windows ME/2000 For Windows ME/2000: 1 Click START. 2 Click SETTINGS. 3 Click CONTROL PANEL. 4 Double click DISPLAY. 5 Click SETTINGS. 6 Set the resolution SLIDE-BAR to 1920 by 1080. 17
e2239Fwt English Manual
Page 19
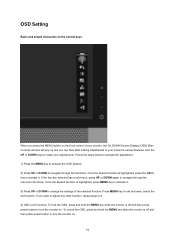
... MENU key to navigate through the sub-menu functions. Follow the steps below to activate the adjustment. 1) Press the MENU key to activate the OSD window. 2) Press UP or DOWN to activate it . 3) Press UP or DOWN to navigate through the functions. Press MENU key to turn the monitor on the... control keys. Use the UP or DOWN keys to make your monitor, the On DOWN Screen Display (OSD) Main Controls window will pop up and you want to adjust any other function, repeat steps 2-3. 4) OSD Lock Function: To lock the OSD, press and hold the MENU...
... MENU key to navigate through the sub-menu functions. Follow the steps below to activate the adjustment. 1) Press the MENU key to activate the OSD window. 2) Press UP or DOWN to activate it . 3) Press UP or DOWN to navigate through the functions. Press MENU key to turn the monitor on the... control keys. Use the UP or DOWN keys to make your monitor, the On DOWN Screen Display (OSD) Main Controls window will pop up and you want to adjust any other function, repeat steps 2-3. 4) OSD Lock Function: To lock the OSD, press and hold the MENU...
e2239Fwt English Manual
Page 36
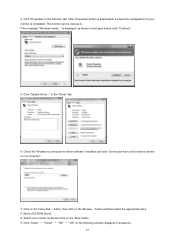
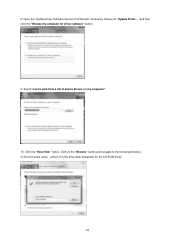
...click on the 'Browse...' Select 'Specify the location of the known drivers for this device so that I can see the 'Digital Signature Not Found' window, click on 'Properties' button. Click on 'Finish' button then the 'Close' button. 36 Click on the 'Browse...' If the 'Properties' ...Settings', and then click on the 'Next' button. 7. then click on the 'Next' button. 10. Select your monitor is active. Driver Monitor Driver Windows 2000 1. Click on the 'Start' button, point to 'Settings', and then click on 'Have Disk...'. 8. Click on the 'OK' button, select ...
...click on the 'Browse...' Select 'Specify the location of the known drivers for this device so that I can see the 'Digital Signature Not Found' window, click on 'Properties' button. Click on 'Finish' button then the 'Close' button. 36 Click on the 'Browse...' If the 'Properties' ...Settings', and then click on the 'Next' button. 7. then click on the 'Next' button. 10. Select your monitor is active. Driver Monitor Driver Windows 2000 1. Click on the 'Start' button, point to 'Settings', and then click on 'Have Disk...'. 8. Click on the 'OK' button, select ...
e2239Fwt English Manual
Page 37
Click on the category 'Appearance and Themes' 4. Windows XP 1. Start Windows® XP 2. Select and click on the 'Display' Item. 37 Click on the 'Start' button and then click on 'Control Panel'. 3.
Click on the category 'Appearance and Themes' 4. Windows XP 1. Start Windows® XP 2. Select and click on the 'Display' Item. 37 Click on the 'Start' button and then click on 'Control Panel'. 3.
e2239Fwt English Manual
Page 39
... 'OK' button. 12. Click on the 'Next' button. 10. Click on the 'Next' button. - If you can see the 'has not passed Windows® Logo testing to install' radio button. Select your monitor model and click on the 'Finish' button then the 'Close' button. 14. Select the '... Search. Click on the 'Browse...' button and then select the appropriate drive F: (CD-ROM Drive). 11. I will choose the driver to verify its compatibility with Windows® XP' message, please click on the 'Continue Anyway' button. 13. button, then click on the 'Have disk...' Click on the 'Next' button. ...
... 'OK' button. 12. Click on the 'Next' button. 10. Click on the 'Next' button. - If you can see the 'has not passed Windows® Logo testing to install' radio button. Select your monitor model and click on the 'Finish' button then the 'Close' button. 14. Select the '... Search. Click on the 'Browse...' button and then select the appropriate drive F: (CD-ROM Drive). 11. I will choose the driver to verify its compatibility with Windows® XP' message, please click on the 'Continue Anyway' button. 13. button, then click on the 'Have disk...' Click on the 'Next' button. ...
e2239Fwt English Manual
Page 40
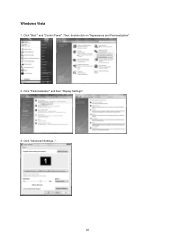
Then, double-click on "Appearance and Personalization". 2. Click "Start " and "Control Panel". Click "Advanced Settings...". 40 Windows Vista 1. Click "Personalization" and then "Display Settings". 3.
Then, double-click on "Appearance and Personalization". 2. Click "Start " and "Control Panel". Click "Advanced Settings...". 40 Windows Vista 1. Click "Personalization" and then "Display Settings". 3.
e2239Fwt English Manual
Page 41
... for driver software" checkbox and click "Let me pick from a list of device drivers on the 'Have disk...' Select your monitor is . If the message "Windows needs..." in the "Monitor" tab. 4. button and then select the appropriate drive F:\Driver (CD-ROM Drive). 8. Click "Update Driver..." Click "Close" → "Close" → "OK...
... for driver software" checkbox and click "Let me pick from a list of device drivers on the 'Have disk...' Select your monitor is . If the message "Windows needs..." in the "Monitor" tab. 4. button and then select the appropriate drive F:\Driver (CD-ROM Drive). 8. Click "Update Driver..." Click "Close" → "Close" → "OK...
e2239Fwt English Manual
Page 42
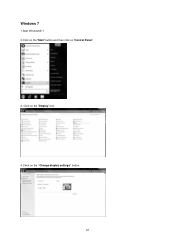
Click on the 'Display' icon. 4.Ckick on 'Control Panel'. 3. Windows 7 1.Start Windows® 7 2.Click on the 'Start' button and then click on the "Change display settings" button. 42
Click on the 'Display' icon. 4.Ckick on 'Control Panel'. 3. Windows 7 1.Start Windows® 7 2.Click on the 'Start' button and then click on the "Change display settings" button. 42
e2239Fwt English Manual
Page 44
Open the "Update Driver Software-Generic PnP Monitor" window by clicking on my computer". 10. Select "Let me pick from a list of device drivers on "Update Driver... Click on the "Browse" button and navigate to the following directory: X:\Driver\module name (where X is the drive letter designator for driver software" button. 9. 8. Click the "Have Disk" button. "and then click the "Browse my computer for the CD-ROM drive). 44
Open the "Update Driver Software-Generic PnP Monitor" window by clicking on my computer". 10. Select "Let me pick from a list of device drivers on "Update Driver... Click on the "Browse" button and navigate to the following directory: X:\Driver\module name (where X is the drive letter designator for driver software" button. 9. 8. Click the "Have Disk" button. "and then click the "Browse my computer for the CD-ROM drive). 44

e2239Fwt English Manual
Page 45
11. The files will automatically select the maximum refresh rate and corresponding Color Matching Profiles. 45 Select the "xxx.inf" file and click the "Open" button. Restart the system. Select your hard disk drive. 13. Click the "OK" button. 12. Close all open windows and remove the CD. 14. The system will be copied from the CD to your monitor model and click the "Next" button.
11. The files will automatically select the maximum refresh rate and corresponding Color Matching Profiles. 45 Select the "xxx.inf" file and click the "Open" button. Restart the system. Select your hard disk drive. 13. Click the "OK" button. 12. Close all open windows and remove the CD. 14. The system will be copied from the CD to your monitor model and click the "Next" button.
e2239Fwt English Manual
Page 49
TouchPal TouchPal can work well un der Windows XP, Windows Vista and Windows 7. Please make your touch experience more convenient and more easily. To com plete installation, please follow the installation guide. 49 TouchPal can make sure the touch monitor has been connected with the PC USB port before install TouchPal. TouchPal including 3 applica tions, they are "Touch Assistant", "Touch Launch" and "Gesture Application".
TouchPal TouchPal can work well un der Windows XP, Windows Vista and Windows 7. Please make your touch experience more convenient and more easily. To com plete installation, please follow the installation guide. 49 TouchPal can make sure the touch monitor has been connected with the PC USB port before install TouchPal. TouchPal including 3 applica tions, they are "Touch Assistant", "Touch Launch" and "Gesture Application".
e2239Fwt English Manual
Page 50
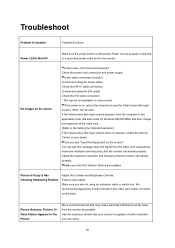
... card output connector on the back . If the initial screen (the login screen) appears, boot the computer in the applicable mode (the safe mode for Windows ME/XP/2000) and then change the frequency of at the resolution your dealer. Press to the Setting the Optimal Resolution) If the initial screen... on the screen? Can you are installed. You can see "Input Not Supported" on the screen Is the power cord connected properly? Make sure the AOC Monitor Drivers are not using . 50
... card output connector on the back . If the initial screen (the login screen) appears, boot the computer in the applicable mode (the safe mode for Windows ME/XP/2000) and then change the frequency of at the resolution your dealer. Press to the Setting the Optimal Resolution) If the initial screen... on the screen? Can you are installed. You can see "Input Not Supported" on the screen Is the power cord connected properly? Make sure the AOC Monitor Drivers are not using . 50
e2239Fwt English Manual
Page 51
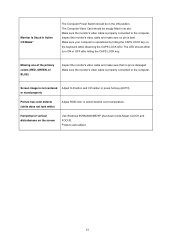
... ON position. Inspect the monitor's video cable and make sure that no pin is operational by hitting the CAPS LOCK key on the screen Use Windows 95/98/2000/ME/XP shut-down mode Adjust CLOCK and FOCUS. Missing one of the primary colors (RED, GREEN, or BLUE) Inspect the monitor...
... ON position. Inspect the monitor's video cable and make sure that no pin is operational by hitting the CAPS LOCK key on the screen Use Windows 95/98/2000/ME/XP shut-down mode Adjust CLOCK and FOCUS. Missing one of the primary colors (RED, GREEN, or BLUE) Inspect the monitor...
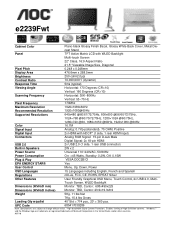
Spec Sheet - e2239Fwt
Page 1
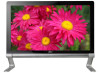
e2239Fwt Cabinet Color Piano-black Glossy Finish Bezel, Glossy White Back Cover, Metal Die- cast Stand Panel TFT Active Matrix LCD with WLED Backlight Multi-touch ...
e2239Fwt Cabinet Color Piano-black Glossy Finish Bezel, Glossy White Back Cover, Metal Die- cast Stand Panel TFT Active Matrix LCD with WLED Backlight Multi-touch ...


