Q2770PQU Data Sheet
Page 1
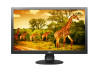
... times the resolution of 720p HD, an array of connectivity, narrow border design, and full adjustability to your needs. AOC Monitors LED monitor 70Series 27", 2560 x 1440 Q2770PQU 27-inch Quad HD High Performance IPS Monitor AOC's Q2770PQU is a wide Quad HD display with 1 fast charger • VGA, DVI-D, HDMI (MHL), Display Port, PC Audio-in the...
... times the resolution of 720p HD, an array of connectivity, narrow border design, and full adjustability to your needs. AOC Monitors LED monitor 70Series 27", 2560 x 1440 Q2770PQU 27-inch Quad HD High Performance IPS Monitor AOC's Q2770PQU is a wide Quad HD display with 1 fast charger • VGA, DVI-D, HDMI (MHL), Display Port, PC Audio-in the...
Q2770PQU Data Sheet
Page 2
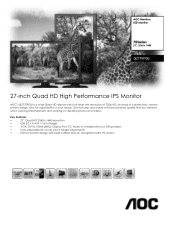
... can enjoy Quad HD at the same time. A Quad HD on a Widescreen With AOC's Q2770PQU, you to 3 times the speed of 720p HD; Q2770PQU Conventional Monitor with 1920x1080 Shows less detail and spacing with relatively blurry images Quad HD 2560x1440 Monitor View greater detail and spacing with a black hairline text front and matte in the...
... can enjoy Quad HD at the same time. A Quad HD on a Widescreen With AOC's Q2770PQU, you to 3 times the speed of 720p HD; Q2770PQU Conventional Monitor with 1920x1080 Shows less detail and spacing with relatively blurry images Quad HD 2560x1440 Monitor View greater detail and spacing with a black hairline text front and matte in the...
Q2770PQU Data Sheet
Page 3
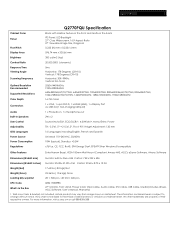
... Angle Scanning Frequency Optimal Resolution Recommended Supported Resolutions Color Depth Connectors Audio Built-In Speakers User Control Adjustability OSD Languages Power Source Power Consumption Regulations Q2770PQU Specification Black with Hairline Texture in the front and matte in the back IPS Panel, LED Backlight 27" Class Widescreen, 16:9 Aspect Ratio 27" Viewable...
... Angle Scanning Frequency Optimal Resolution Recommended Supported Resolutions Color Depth Connectors Audio Built-In Speakers User Control Adjustability OSD Languages Power Source Power Consumption Regulations Q2770PQU Specification Black with Hairline Texture in the front and matte in the back IPS Panel, LED Backlight 27" Class Widescreen, 16:9 Aspect Ratio 27" Viewable...
Q2770PQU User Manual
Page 2
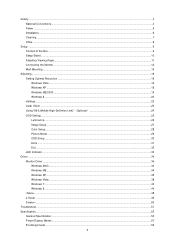
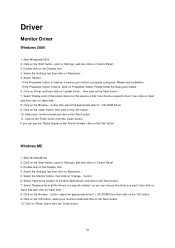
...Conventions...4 Power ...5 Installation...6 Cleaning...7 Other ...8 Setup ...9 Content of the Box ...9 Setup Stand ...10 Adjusting Viewing Angle...11 Connecting the Monitor...12 Wall Mounting ...15 Adjusting ...16 Setting Optimal Resolution ...16 Windows Vista ...16 Windows XP ...18 Windows ME/2000...19 Windows 8 ... Luminance ...26 Image Setup ...27 Color Setup...28 Picture Boost ...29 OSD Setup ...30 Extra ...31 Exit...32 LED Indicator ...33 Driver ...34 Monitor Driver ...34 Windows 2000 ...34 Windows ME...34 Windows XP ...35 Windows Vista ...38 Windows 7 ...40 Windows 8 ...44 i-Menu ...48 e-...
...Conventions...4 Power ...5 Installation...6 Cleaning...7 Other ...8 Setup ...9 Content of the Box ...9 Setup Stand ...10 Adjusting Viewing Angle...11 Connecting the Monitor...12 Wall Mounting ...15 Adjusting ...16 Setting Optimal Resolution ...16 Windows Vista ...16 Windows XP ...18 Windows ME/2000...19 Windows 8 ... Luminance ...26 Image Setup ...27 Color Setup...28 Picture Boost ...29 OSD Setup ...30 Extra ...31 Exit...32 LED Indicator ...33 Driver ...34 Monitor Driver ...34 Windows 2000 ...34 Windows ME...34 Windows XP ...35 Windows Vista ...38 Windows 7 ...40 Windows 8 ...44 i-Menu ...48 e-...
Q2770PQU User Manual
Page 5
... accessible. 5 Do not defeat the safety purpose of time. Overloading can result in fire or electric shock. If your dealer or local power company. The monitor is equipped with a three-pronged grounded plug, a plug with a third (grounding) pin. Unplug the unit during a lightning storm or when it will not be ...not sure of the type of power source indicated on the label. This will fit only into a grounded power outlet as a safety feature. Power The monitor should be operated only from damage due to ground the appliance safely. Do not overload power strips and extension cords.
... accessible. 5 Do not defeat the safety purpose of time. Overloading can result in fire or electric shock. If your dealer or local power company. The monitor is equipped with a three-pronged grounded plug, a plug with a third (grounding) pin. Unplug the unit during a lightning storm or when it will not be ...not sure of the type of power source indicated on the label. This will fit only into a grounded power outlet as a safety feature. Power The monitor should be operated only from damage due to ground the appliance safely. Do not overload power strips and extension cords.
Q2770PQU User Manual
Page 6
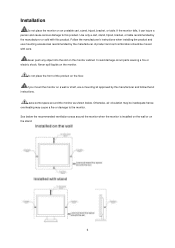
... and cart combination should be inadequate hence overheating may be moved with this product. See below the recommended ventilation areas around the monitor as shown below. Follow the manufacturer's instructions when installing the product and use a mounting kit approved by the manufacturer and follow.... Otherwise, air-circulation may cause a fire or damage to this product. Do not place the front of the product on the monitor. It could damage circuit parts causing a fire or electric shock. Use only a cart, stand, tripod, bracket, or table recommended by the manufacturer...
... and cart combination should be inadequate hence overheating may be moved with this product. See below the recommended ventilation areas around the monitor as shown below. Follow the manufacturer's instructions when installing the product and use a mounting kit approved by the manufacturer and follow.... Otherwise, air-circulation may cause a fire or damage to this product. Do not place the front of the product on the monitor. It could damage circuit parts causing a fire or electric shock. Use only a cart, stand, tripod, bracket, or table recommended by the manufacturer...
Q2770PQU User Manual
Page 8
For display with glossy bezel the user should consider the placement of the display as the bezel may cause disturbing reflections from surrounding light and bright surfaces. 8 Other If the product is emitting a strange smell, sound or smoke, disconnect the power plug IMMEDIATELY and contact a Service Center. Do not engage the LCD monitor in severe vibration or high impact conditions during operation or transportation. Do not knock or drop the monitor during operation. Make sure that the ventilating openings are not blocked by a table or curtain.
For display with glossy bezel the user should consider the placement of the display as the bezel may cause disturbing reflections from surrounding light and bright surfaces. 8 Other If the product is emitting a strange smell, sound or smoke, disconnect the power plug IMMEDIATELY and contact a Service Center. Do not engage the LCD monitor in severe vibration or high impact conditions during operation or transportation. Do not knock or drop the monitor during operation. Make sure that the ventilating openings are not blocked by a table or curtain.
Q2770PQU User Manual
Page 9
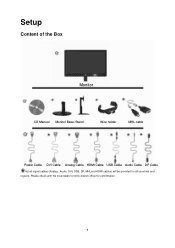
Please check with the local dealer or AOC branch office for all signal cables (Analog , Audio, DVI, USB, DP, MHLand HDMI cables) will be provided for confirmation. 9 Setup Content of the Box Monitor CD Manual Monitor Base /Stand Wire holder MHL cable Power Cable DVI Cable Analog Cable HDMI Cable USB Cable Audio Cable DP Cable Not all countries and regions.
Please check with the local dealer or AOC branch office for all signal cables (Analog , Audio, DVI, USB, DP, MHLand HDMI cables) will be provided for confirmation. 9 Setup Content of the Box Monitor CD Manual Monitor Base /Stand Wire holder MHL cable Power Cable DVI Cable Analog Cable HDMI Cable USB Cable Audio Cable DP Cable Not all countries and regions.
Q2770PQU User Manual
Page 11
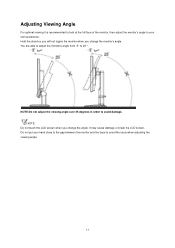
... own preference. Adjusting Viewing Angle For optimal viewing it is recommended to look at the full face of the monitor, then adjust the monitor's angle to your hand close to the gap between the monitor and the base to avoid the injury when adjusting the viewing angle. 11 NOTE:Do not adjust the... LCD screen when you change the angle. It may cause damage or break the LCD screen. Hold the stand so you will not topple the monitor when you change the monitor's angle. You are able to adjust the monitor's angle from -5°to avoid damage.
... own preference. Adjusting Viewing Angle For optimal viewing it is recommended to look at the full face of the monitor, then adjust the monitor's angle to your hand close to the gap between the monitor and the base to avoid the injury when adjusting the viewing angle. 11 NOTE:Do not adjust the... LCD screen when you change the angle. It may cause damage or break the LCD screen. Hold the stand so you will not topple the monitor when you change the monitor's angle. You are able to adjust the monitor's angle from -5°to avoid damage.
Q2770PQU User Manual
Page 12
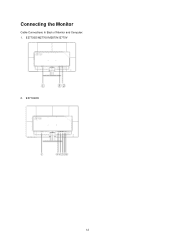
E2770SHE 12 E2770SD/M2770V/M2870V/I2770V 2. Connecting the Monitor Cable Connections In Back of Monitor and Computer: 1.
E2770SHE 12 E2770SD/M2770V/M2870V/I2770V 2. Connecting the Monitor Cable Connections In Back of Monitor and Computer: 1.
Q2770PQU User Manual
Page 13
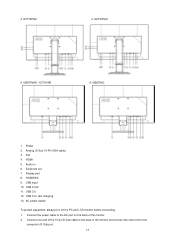
Audio in 6. USB input 10. AC power switch To protect equipment, always turn off the PC and LCD monitor before connecting. 1. Connect the power cable to the AC port on the back of the monitor and connect the other end to the back of the monitor. 2. M2870VQ 1. USB 3.0 12. 3 .E2770PQU 4 .Q2770PQU 5. Earphone out 7. Power 2. Display port 8. USB 3.0+ fast charging 13. HDMI 5. M2870VHE / I2770VHE 6. Analog (D-Sub 15-Pin VGA cable) 3. DVI 4. HDMI/MHL 9. USB 2.0x2 11. Connect one end of the 15-pin D-Sub cable to the computer's D-Sub port. 13
Audio in 6. USB input 10. AC power switch To protect equipment, always turn off the PC and LCD monitor before connecting. 1. Connect the power cable to the AC port on the back of the monitor and connect the other end to the back of the monitor. 2. M2870VQ 1. USB 3.0 12. 3 .E2770PQU 4 .Q2770PQU 5. Earphone out 7. Power 2. Display port 8. USB 3.0+ fast charging 13. HDMI 5. M2870VHE / I2770VHE 6. Analog (D-Sub 15-Pin VGA cable) 3. DVI 4. HDMI/MHL 9. USB 2.0x2 11. Connect one end of the 15-pin D-Sub cable to the computer's D-Sub port. 13

Q2770PQU User Manual
Page 14
... the computer's DP port. 6. (Optional - Connect one end of the DP cable to the back of the monitor and connect the other end to the computer's DVI port. 4. (Optional - Turn on the back of the monitor and connect the other end to the computer's HDMI port. 5. (Optional - If it does not display... port) - Requires a video card with DP port) - Requires a video card with HDMI port) - Connect one end of the MHL cable to the back of the monitor and connect the other end to the computer's MHL port. 7. (Optional)Connect the audio cable to the back of the...
... the computer's DP port. 6. (Optional - Connect one end of the DP cable to the back of the monitor and connect the other end to the computer's DVI port. 4. (Optional - Turn on the back of the monitor and connect the other end to the computer's HDMI port. 5. (Optional - If it does not display... port) - Requires a video card with DP port) - Requires a video card with HDMI port) - Connect one end of the MHL cable to the back of the monitor and connect the other end to the computer's MHL port. 7. (Optional)Connect the audio cable to the back of the...
Q2770PQU User Manual
Page 15
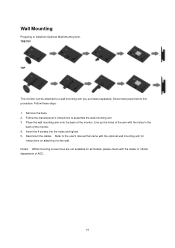
... holes and tighten. 5. Follow these steps: 1. Place the wall mounting arm onto the back of the monitor. 4. Line up the holes of the arm with the dealer or official department of AOC. 15 Noted : VESA mounting screw holes are not available for instructions on attaching it to the user's ...manual that came with the optional wall mounting arm for all models, please check with the holes in the back of the monitor. Refer to the wall....
... holes and tighten. 5. Follow these steps: 1. Place the wall mounting arm onto the back of the monitor. 4. Line up the holes of the arm with the dealer or official department of AOC. 15 Noted : VESA mounting screw holes are not available for instructions on attaching it to the user's ...manual that came with the optional wall mounting arm for all models, please check with the holes in the back of the monitor. Refer to the wall....
Q2770PQU User Manual
Page 22
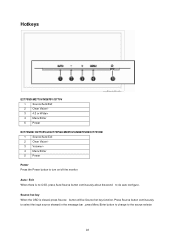
...Source button continuously to select the input source showed in the message bar , press Menu/Enter button to change to turn on/off the monitor. Source hot key When the OSD is no OSD, press Auto/Source button continuously about 3 second to do auto configure . Auto ... key function. Hotkeys E2770SD/M2770V/M2870V/I2770V 1 Source/Auto/Exit 2 Clear Vision/- 3 4:3 or Wide/+ 4 Menu/Enter 5 Power E2770SHE/ E2770PQU/Q2770PQU/M2870VQ/M2870VHE/I2770VHE 1 Source/Auto/Exit 2 Clear Vision/- 3 Volume/+ 4 Menu/Enter 5 Power Power Press the Power button to the source selecte 22
...Source button continuously to select the input source showed in the message bar , press Menu/Enter button to change to turn on/off the monitor. Source hot key When the OSD is no OSD, press Auto/Source button continuously about 3 second to do auto configure . Auto ... key function. Hotkeys E2770SD/M2770V/M2870V/I2770V 1 Source/Auto/Exit 2 Clear Vision/- 3 4:3 or Wide/+ 4 Menu/Enter 5 Power E2770SHE/ E2770PQU/Q2770PQU/M2870VQ/M2870VHE/I2770VHE 1 Source/Auto/Exit 2 Clear Vision/- 3 Volume/+ 4 Menu/Enter 5 Power Power Press the Power button to the source selecte 22
Q2770PQU User Manual
Page 24
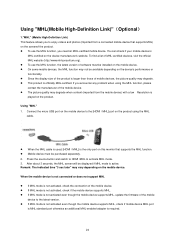
...-Definition Link) This feature allows you to enjoy videos and photos (imported from the mobile device) with a low Resolution is the only port on this monitor that supports MHL) on the screenof the product. To use the MHL function, the latest version of software must be purchased separately. 2.
...-Definition Link) This feature allows you to enjoy videos and photos (imported from the mobile device) with a low Resolution is the only port on this monitor that supports MHL) on the screenof the product. To use the MHL function, the latest version of software must be purchased separately. 2.
Q2770PQU User Manual
Page 25
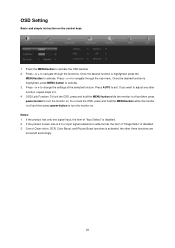
.... If the product screen size is 4:3 or input signal resolution is wide format, the item of the selected function. Press - or + to turn the monitor on the control keys. 1. OSD Setting Basic and simple instruction on . Once the desired function is off accordingly. 25 or + to activate. 3. To... un-lock the OSD, press and hold the MENU-button while the monitor is highlighted, press MENU-button to change the settings of "Image Ratio" is disabled. 2. the other function, repeat steps 2-3. 4. Press -
.... If the product screen size is 4:3 or input signal resolution is wide format, the item of the selected function. Press - or + to turn the monitor on the control keys. 1. OSD Setting Basic and simple instruction on . Once the desired function is off accordingly. 25 or + to activate. 3. To... un-lock the OSD, press and hold the MENU-button while the monitor is highlighted, press MENU-button to change the settings of "Image Ratio" is disabled. 2. the other function, repeat steps 2-3. 4. Press -
Q2770PQU User Manual
Page 34
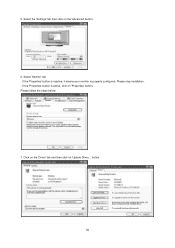
... select the appropriate drive F: ( CD-ROM Drive) then click on the 'Display' Icon. 4. If the 'Properties' button is inactive, it means your monitor is active. Double click on the 'OK' button. 9. Windows ME 1. Select the 'Settings' tab then click on 'Have disk...'. 8. Select 'Specify... location, so you can choose the driver you can choose a specific driver', then click on 'Next' and then click on 'Advanced...'. 5. Select 'Monitor' - Please follow the steps given below. 6. Select 'Display a list of the driver(Advanced)' and click on 'Have Disk...'. 8. button then select...
... select the appropriate drive F: ( CD-ROM Drive) then click on the 'Display' Icon. 4. If the 'Properties' button is inactive, it means your monitor is active. Double click on the 'OK' button. 9. Windows ME 1. Select the 'Settings' tab then click on 'Have disk...'. 8. Select 'Specify... location, so you can choose the driver you can choose a specific driver', then click on 'Next' and then click on 'Advanced...'. 5. Select 'Monitor' - Please follow the steps given below. 6. Select 'Display a list of the driver(Advanced)' and click on 'Have Disk...'. 8. button then select...
Q2770PQU User Manual
Page 36
Click on the 'Driver' tab and then click on the 'Advanced' button. 6. Select 'Monitor' tab - button. 36 If the 'Properties' button is inactive, it means your monitor is active, click on 'Properties' button. If the 'Properties' button is properly configured. Please follow the steps below. 7. Please stop installation. - 5. Select the 'Settings' tab then click on 'Update Driver...'
Click on the 'Driver' tab and then click on the 'Advanced' button. 6. Select 'Monitor' tab - button. 36 If the 'Properties' button is inactive, it means your monitor is active, click on 'Properties' button. If the 'Properties' button is properly configured. Please follow the steps below. 7. Please stop installation. - 5. Select the 'Settings' tab then click on 'Update Driver...'
Q2770PQU User Manual
Page 37
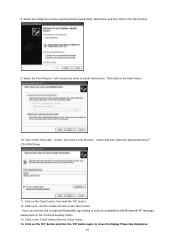
Then click on the 'Have disk...' Click on the 'Next' button. 10. Select your monitor model and click on the 'Open' button, then click the 'OK' button. 12. Click on the 'Next' button. - Select the 'Don't Search. I will choose the ...
Then click on the 'Have disk...' Click on the 'Next' button. 10. Select your monitor model and click on the 'Open' button, then click the 'OK' button. 12. Click on the 'Next' button. - Select the 'Don't Search. I will choose the ...
Q2770PQU User Manual
Page 39
If the message "Windows needs..." in sequence. 39 button, then click on the 'Have disk...' The monitor can be used as is displayed, as shown in the "Monitor" tab. is . Click on the 'Browse...' Click "Close" → "Close" → "OK" → "OK" on the following screens displayed in the "...Driver" tab. 6. Click "Properties" in the figure below, click "Continue". 5. Check the "Browse my computer for your monitor model and click on my computer". 7. button and then select the appropriate drive F:\Driver (CD-ROM Drive). 8. Select your...
If the message "Windows needs..." in sequence. 39 button, then click on the 'Have disk...' The monitor can be used as is displayed, as shown in the "Monitor" tab. is . Click on the 'Browse...' Click "Close" → "Close" → "OK" → "OK" on the following screens displayed in the "...Driver" tab. 6. Click "Properties" in the figure below, click "Continue". 5. Check the "Browse my computer for your monitor model and click on my computer". 7. button and then select the appropriate drive F:\Driver (CD-ROM Drive). 8. Select your...


