2219V1 Manual
Page 1
... technician. Note: If necessary, shielded interface cables and AC power cord must use a grounded power supply cord and the provided shielded video interface cable with the limits for purchasing this guide thoroughly before installation. This monitor generates, uses, and can radiate radio frequency energy. Also, any unauthorized changes or modifications to this monitor would void the user's authority to operate this monitor does cause serious interference to which...
... technician. Note: If necessary, shielded interface cables and AC power cord must use a grounded power supply cord and the provided shielded video interface cable with the limits for purchasing this guide thoroughly before installation. This monitor generates, uses, and can radiate radio frequency energy. Also, any unauthorized changes or modifications to this monitor would void the user's authority to operate this monitor does cause serious interference to which...

2219V1 Manual
Page 2
English Content Safety Precautions 1 First Setup 2 Quick Installation 2-5 Front View of the Product 6 Rear View of the Product 6 Using On Screen Display (OSD) Functions 7-9 Supporting Timing Modes 10 Technical Information 11 Care and Maintenance 12 Troubleshooting 12
English Content Safety Precautions 1 First Setup 2 Quick Installation 2-5 Front View of the Product 6 Rear View of the Product 6 Using On Screen Display (OSD) Functions 7-9 Supporting Timing Modes 10 Technical Information 11 Care and Maintenance 12 Troubleshooting 12

2219V1 Manual
Page 3
... dealer or power company. For PLUG CABLE EQUIPMENT, the Socket-outlet shall be installed near the equipment and shall be operated only at the correct power sources indicated on the label on the cable or power cord. Do not try to repair the monitor yourself as to the monitor as well as it contains no user-serviceable parts. Clean the cabinet with a clean, dry cloth. English Safety Precautions...
... dealer or power company. For PLUG CABLE EQUIPMENT, the Socket-outlet shall be installed near the equipment and shall be operated only at the correct power sources indicated on the label on the cable or power cord. Do not try to repair the monitor yourself as to the monitor as well as it contains no user-serviceable parts. Clean the cabinet with a clean, dry cloth. English Safety Precautions...
2219V1 Manual
Page 4
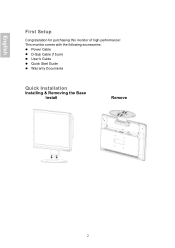
English First Setup Congratulation for purchasing this monitor of high performance! This monitor comes with the following accessories: Power Cable D-Sub Cable (15 pin) User's Guide Quick Start Guide Warranty Documents Quick Installation Installing & Removing the Base Install Remove 2
English First Setup Congratulation for purchasing this monitor of high performance! This monitor comes with the following accessories: Power Cable D-Sub Cable (15 pin) User's Guide Quick Start Guide Warranty Documents Quick Installation Installing & Removing the Base Install Remove 2

2219V1 Manual
Page 5
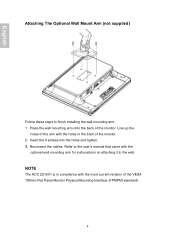
Remove the plastic hinge cover. It is attached to the back of the monitor. 3. Remove the 4 screws holding the stand to a wall mounting arm you can purchase separately. English Preparing To Install The Optional Wall Mount Arm (Not Included) This monitor can be attached to the back of the monitor by hooks. 2. Remove the stand. 3 Lay the monitor face down on a soft surface. 1. Turn the power OFF then dis-connect the cables from the monitor before performing the procedure below.
Remove the plastic hinge cover. It is attached to the back of the monitor. 3. Remove the 4 screws holding the stand to a wall mounting arm you can purchase separately. English Preparing To Install The Optional Wall Mount Arm (Not Included) This monitor can be attached to the back of the monitor by hooks. 2. Remove the stand. 3 Lay the monitor face down on a soft surface. 1. Turn the power OFF then dis-connect the cables from the monitor before performing the procedure below.
2219V1 Manual
Page 6
... the VESA 100mm Flat Panel Monitor Physical Mounting Interface (FPMPMI standard). 4 Reconnect the cables. NOTE The AOC 2219V1 is in the back of the monitor. Place the wall mounting arm onto the back of the monitor. 2. Line up the holes of the arm with the holes in compliance with the optional wall mounting arm for instrucstions on attaching it to finish installing the wall mounting arm: 1. English Attaching...
... the VESA 100mm Flat Panel Monitor Physical Mounting Interface (FPMPMI standard). 4 Reconnect the cables. NOTE The AOC 2219V1 is in the back of the monitor. Place the wall mounting arm onto the back of the monitor. 2. Line up the holes of the arm with the holes in compliance with the optional wall mounting arm for instrucstions on attaching it to finish installing the wall mounting arm: 1. English Attaching...

2219V1 Manual
Page 7
... on the Windows desktop > Properties > Settings > "Desktop Area". Connect Power Cable Connect the power cable to a nearby power outlet. 2. Connect Analog video cable (D-Sub cable) Make sure both monitor and computer are powered OFF. Set the resolution. Connect the video cable ( D-Sub cable) to the computer, then to the DVI input of computer to the monitor. 3. Connection Diagram: 5 Power-ON computer and monitor Power-ON the computer, then Power-ON the monitor. 5. Refresh Rate (vertical frequency) See your graphic card's user guide for instructions. English Connecting the Monitor...
... on the Windows desktop > Properties > Settings > "Desktop Area". Connect Power Cable Connect the power cable to a nearby power outlet. 2. Connect Analog video cable (D-Sub cable) Make sure both monitor and computer are powered OFF. Set the resolution. Connect the video cable ( D-Sub cable) to the computer, then to the DVI input of computer to the monitor. 3. Connection Diagram: 5 Power-ON computer and monitor Power-ON the computer, then Power-ON the monitor. 5. Refresh Rate (vertical frequency) See your graphic card's user guide for instructions. English Connecting the Monitor...

2219V1 Manual
Page 8
English Front View of the Product ➊ OSD TURN ON/OFF ➋ SCROLL DOWN/DECREASE ➌ SCROLL UP/INCREASE ➍ CONFIRM SELECTION ➎ POWER ON/OFF ➏ LED INDICATOR Rear View of the Product ➐ POWER INPUT ➑ DVI INPUT (DVI 24 PIN) ➒ VGA INPUT (D-SUB 15 PIN) 6
English Front View of the Product ➊ OSD TURN ON/OFF ➋ SCROLL DOWN/DECREASE ➌ SCROLL UP/INCREASE ➍ CONFIRM SELECTION ➎ POWER ON/OFF ➏ LED INDICATOR Rear View of the Product ➐ POWER INPUT ➑ DVI INPUT (DVI 24 PIN) ➒ VGA INPUT (D-SUB 15 PIN) 6

2219V1 Manual
Page 9
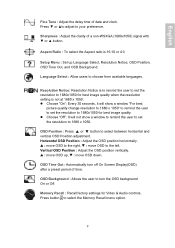
English Using On Screen Display (OSD) Functions 1 2 V or W ▼ + ▲ 1 + ▼ 1 + ▲ Display main menu. When not in OSD menu, it is to image ratio by pressing button W. Confirm the selection. It should be change to immediately activate Contrast/ Brightness. Auto adjust the image when at root menu. It should be change to immediately activate Screen 16:10/ 4:3. Recall both of Contrast and Brightness. When not in OSD menu, it is to Contrast/ Brightness by pressing button V. Power Lock (when...
English Using On Screen Display (OSD) Functions 1 2 V or W ▼ + ▲ 1 + ▼ 1 + ▲ Display main menu. When not in OSD menu, it is to image ratio by pressing button W. Confirm the selection. It should be change to immediately activate Contrast/ Brightness. Auto adjust the image when at root menu. It should be change to immediately activate Screen 16:10/ 4:3. Recall both of Contrast and Brightness. When not in OSD menu, it is to Contrast/ Brightness by pressing button V. Power Lock (when...

2219V1 Manual
Page 10
... luminance of screen image. User Color : Individual adjustments for more accurately display colors the way they were originally intended. Press▼ or ▲button to select the desired color. 2. Information : Display the information regarding the current input signal coming from the graphic card in your graphic card user guide for red (R), green (G), blue (B). 1. W : decrease the width of screen image, V : increase the width of the video. H./V. Position : V : move screen to more information about changing the resolution and refresh rate. V.
... luminance of screen image. User Color : Individual adjustments for more accurately display colors the way they were originally intended. Press▼ or ▲button to select the desired color. 2. Information : Display the information regarding the current input signal coming from the graphic card in your graphic card user guide for red (R), green (G), blue (B). 1. W : decrease the width of screen image, V : increase the width of the video. H./V. Position : V : move screen to more information about changing the resolution and refresh rate. V.
2219V1 Manual
Page 11
... a window "For best picture quality change resolution to 1680 x 1050" to remind the user to set the resolution to the left. Vertical OSD Position : Adjust the OSD position vertically. Memory Recall : Recall factory settings for best image quality when the resolution setting is not at 1680 x 1050. Press button 2 to choose from available languages. English Fine Tune : Adjust the delay time of a non-WSXGA (1680x1050) signal with ▼ or ▲ button. Resolution Notice: Resolution Notice is 16:10 or 4:3 Setup Menu : Set...
... a window "For best picture quality change resolution to 1680 x 1050" to remind the user to set the resolution to the left. Vertical OSD Position : Adjust the OSD position vertically. Memory Recall : Recall factory settings for best image quality when the resolution setting is not at 1680 x 1050. Press button 2 to choose from available languages. English Fine Tune : Adjust the delay time of a non-WSXGA (1680x1050) signal with ▼ or ▲ button. Resolution Notice: Resolution Notice is 16:10 or 4:3 Setup Menu : Set...
2219V1 Manual
Page 12
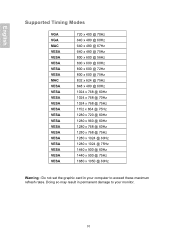
Doing so may result in your monitor. 10 English Supported Timing Modes VGA VGA MAC VESA VESA VESA VESA VESA MAC VESA VESA VESA VESA VESA VESA VESA VESA VESA VESA VESA VESA VESA VESA 720 x 400 @ 70Hz 640 x 480 @ 60Hz 640 x 480 @ 67Hz 640 x 480 @ 75Hz 800 x 600 @ 56Hz 800 x 600 @ 60Hz 800 x 600 @ 72Hz 800 x 600 @ 75Hz 832 x ... @ 60Hz 1280 x 768 @ 60Hz 1280 x 768 @ 75Hz 1280 x 1024 @ 60Hz 1280 x 1024 @ 75Hz 1440 x 900 @ 60Hz 1440 x 900 @ 75Hz 1680 x 1050 @ 60Hz Warning : Do not set the graphic card in permanent damage to your computer to exceed these maximum refresh rates.
Doing so may result in your monitor. 10 English Supported Timing Modes VGA VGA MAC VESA VESA VESA VESA VESA MAC VESA VESA VESA VESA VESA VESA VESA VESA VESA VESA VESA VESA VESA VESA 720 x 400 @ 70Hz 640 x 480 @ 60Hz 640 x 480 @ 67Hz 640 x 480 @ 75Hz 800 x 600 @ 56Hz 800 x 600 @ 60Hz 800 x 600 @ 72Hz 800 x 600 @ 75Hz 832 x ... @ 60Hz 1280 x 768 @ 60Hz 1280 x 768 @ 75Hz 1280 x 1024 @ 60Hz 1280 x 1024 @ 75Hz 1440 x 900 @ 60Hz 1440 x 900 @ 75Hz 1680 x 1050 @ 60Hz Warning : Do not set the graphic card in permanent damage to your computer to exceed these maximum refresh rates.

2219V1 Manual
Page 13
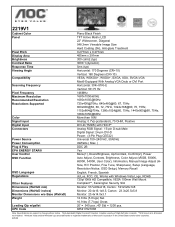
English Technical Information Technical Specification LCD Panel 22"(548.3mm Viewable Image Size) TFT Widescreen LCD Power Management Displayable Resolution Input Signal EPA ENERGY STAR® Off Mode:
English Technical Information Technical Specification LCD Panel 22"(548.3mm Viewable Image Size) TFT Widescreen LCD Power Management Displayable Resolution Input Signal EPA ENERGY STAR® Off Mode:

2219V1 Manual
Page 14
... bodies. Put your monitor. Do not place any colors (red, green, blue) are installed. Keep your service center. Always call your monitor away from your monitor, caution you should remove the power cord immediately and call your service center or a qualified technician to the monitor. Troubleshooting No power Make sure A/C power cord is securely connected to the power adapter and the power supply is installed in the cable connector could cause an improper connection. If not, tightly secure it . Adjust brightness.
... bodies. Put your monitor. Do not place any colors (red, green, blue) are installed. Keep your service center. Always call your monitor away from your monitor, caution you should remove the power cord immediately and call your service center or a qualified technician to the monitor. Troubleshooting No power Make sure A/C power cord is securely connected to the power adapter and the power supply is installed in the cable connector could cause an improper connection. If not, tightly secure it . Adjust brightness.
2219V1 Spec Sheet
Page 1
... Color Panel Pixel Pitch Display Area Brightness Contrast Ratio Response Time Viewing Angle Compatibility Scanning Frequency Pixel Frequency Maximum Resolution Recommended Resolution Resolutions Supported Color Signal Input Digital Input Connectors Power Source Power Consumption Plug & Play EPA ENERGY STAR® User Control OSD Function OSD Languages Regulations Other Features Dimensions (WxHxD mm) Dimensions (WxHxD inches) Monitor Dimensions w/o Base (WxHxD) Weight Loading Qty w/pallet UPC Code Piano Black Finish TFT Active Matrix LCD 22" Widescreen, Diagonal 548.3mm Viewable Image Size...
... Color Panel Pixel Pitch Display Area Brightness Contrast Ratio Response Time Viewing Angle Compatibility Scanning Frequency Pixel Frequency Maximum Resolution Recommended Resolution Resolutions Supported Color Signal Input Digital Input Connectors Power Source Power Consumption Plug & Play EPA ENERGY STAR® User Control OSD Function OSD Languages Regulations Other Features Dimensions (WxHxD mm) Dimensions (WxHxD inches) Monitor Dimensions w/o Base (WxHxD) Weight Loading Qty w/pallet UPC Code Piano Black Finish TFT Active Matrix LCD 22" Widescreen, Diagonal 548.3mm Viewable Image Size...


