
Operating Instructions
Page 2
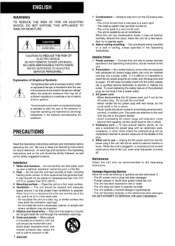
...dropped, or the cabinet has been damaged DO NOT ATTEMPT TO SERVICE THE UNIT YOURSELF. - The unit is used for future reference. Electric Power 1 Power sources - Allow 10 cm (4 in , a small amount of outlet. Damaae Reauirina Service Have the units serviced by an air conditioner When...the AC Read the Operating Instructions carefully and completely before operating the unit. as near sources of Graphical Symbols: insert the AC power plug into a power outlet. "CAUTION:TO REDUCE THE RISK OF ELECTRIC SHOCK, DO NOT REMOVE COVER (OR BACK). Aq The exclamation point within...
...dropped, or the cabinet has been damaged DO NOT ATTEMPT TO SERVICE THE UNIT YOURSELF. - The unit is used for future reference. Electric Power 1 Power sources - Allow 10 cm (4 in , a small amount of outlet. Damaae Reauirina Service Have the units serviced by an air conditioner When...the AC Read the Operating Instructions carefully and completely before operating the unit. as near sources of Graphical Symbols: insert the AC power plug into a power outlet. "CAUTION:TO REDUCE THE RISK OF ELECTRIC SHOCK, DO NOT REMOVE COVER (OR BACK). Aq The exclamation point within...
Operating Instructions
Page 5
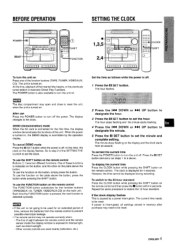
... when the unit is overridden by the operation display. q The remote control may open and close to intense light, such as follows while the power is received (Direct Play Function). At this time, the clock on the button, simply press the button. The line of the inserted disc begins,... or the previously tuned station is off the power. SETTING THE CLOCK CLOCK SHIFT Set the time as direct sunlight - DEMO (Demonstration) mode When the AC cord is connected for an extended ...
... when the unit is overridden by the operation display. q The remote control may open and close to intense light, such as follows while the power is received (Direct Play Function). At this time, the clock on the button, simply press the button. The line of the inserted disc begins,... or the previously tuned station is off the power. SETTING THE CLOCK CLOCK SHIFT Set the time as direct sunlight - DEMO (Demonstration) mode When the AC cord is connected for an extended ...
Operating Instructions
Page 6
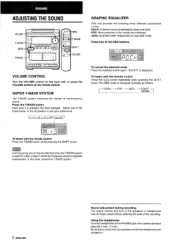
... mode is pressed, the level changes. EQoFF (cancel) To select with the remote control Press the GEQ button repeatedly while pressing the SHIFT button. ROCK: Powerful sound emphasizing treble and bass POP: More presence in the vocals and midrange JAZZ: Accented lower frequencies for a disc or tape in . VOLUME CONTROL Turn...
... mode is pressed, the level changes. EQoFF (cancel) To select with the remote control Press the GEQ button repeatedly while pressing the SHIFT button. ROCK: Powerful sound emphasizing treble and bass POP: More presence in the vocals and midrange JAZZ: Accented lower frequencies for a disc or tape in . VOLUME CONTROL Turn...
Operating Instructions
Page 7
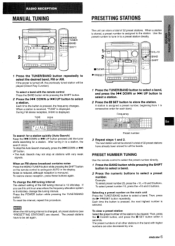
... button while pressing the SHIFT button on the main unit Press the TUNER/BAND button to the station. To change the tuning interval, Press the POWER button while pressing the TUNER/BAND button. Then, press the s CLEAR button, and press the II SET button within 4 seconds. When a station is stored, a ... the numeric buttons to select the desired band, FM or AM. If you use this procedure. The next station will be set again. If the power is displayed. When a station is received, "TUNE" is turned off, the previously tuned station will not be stored ii a total of the station to ...
... button while pressing the SHIFT button on the main unit Press the TUNER/BAND button to the station. To change the tuning interval, Press the POWER button while pressing the TUNER/BAND button. Then, press the s CLEAR button, and press the II SET button within 4 seconds. When a station is stored, a ... the numeric buttons to select the desired band, FM or AM. If you use this procedure. The next station will be set again. If the power is displayed. When a station is received, "TUNE" is turned off, the previously tuned station will not be stored ii a total of the station to ...
Operating Instructions
Page 8
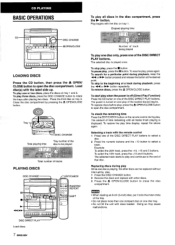
To play three discs, press the DISC CHANGE button to the beginning of track being played To play one of the disc to open the disc compartment. Close the disc compartment by pressing the 4 OPEN/CLOSE button. The selected disc is played once. To resume play , press the s button. Place the third disc on tray 1 and 2. To stop play , press again. To skip to rotate the trays after placing two discs. BASIC OPERATIONS To play , press the 1I button. Load disc(s) with the disc on tray 1. To pause play all discs in the disc compartment, the E button. Elapsed playing time...
To play three discs, press the DISC CHANGE button to the beginning of track being played To play one of the disc to open the disc compartment. Close the disc compartment by pressing the 4 OPEN/CLOSE button. The selected disc is played once. To resume play , press the s button. Place the third disc on tray 1 and 2. To stop play , press again. To skip to rotate the trays after placing two discs. BASIC OPERATIONS To play , press the 1I button. Load disc(s) with the disc on tray 1. To pause play all discs in the disc compartment, the E button. Elapsed playing time...
Operating Instructions
Page 9
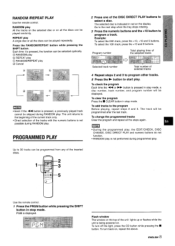
RANDOM /REPEAT PLAY Use the remote control. RANDOM play Allthetracks on the selected disc or on allthe discs can be played randomly. REPEAT play @ Cancel q Even if the Press the RANDOM/REPEAT button while pressing the SHIFT button. Each time t is pressed, the function can be selected cyclically. @ RANDOM play @ REPEA-[ play @ RANDOM/REPEAT play A single disc or all the discs can be played repeatedly.
RANDOM /REPEAT PLAY Use the remote control. RANDOM play Allthetracks on the selected disc or on allthe discs can be played randomly. REPEAT play @ Cancel q Even if the Press the RANDOM/REPEAT button while pressing the SHIFT button. Each time t is pressed, the function can be selected cyclically. @ RANDOM play @ REPEA-[ play @ RANDOM/REPEAT play A single disc or all the discs can be played repeatedly.
Operating Instructions
Page 13
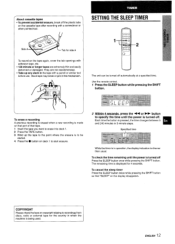
...operation, the display indication is pressed, the time changes between 5 and 240 minutes in the mechanism. To check the time remaining until the power is turned off the plastic tabs on the tape again, cover the tab openings with a screwdriver or other pointed tool. To cancel the sleep... Press the SLEEP button twice while pressing the SHIFT button so that tape. 1 Insert the tape you want to specify the time until the power is turned off automatically at a specified time. About cassette tapes q To prevent accidental erasure, break off Press the SLEEP button once while pressing...
...operation, the display indication is pressed, the time changes between 5 and 240 minutes in the mechanism. To check the time remaining until the power is turned off the plastic tabs on the tape again, cover the tab openings with a screwdriver or other pointed tool. To cancel the sleep... Press the SLEEP button twice while pressing the SHIFT button so that tape. 1 Insert the tape you want to specify the time until the power is turned off automatically at a specified time. About cassette tapes q To prevent accidental erasure, break off Press the SLEEP button once while pressing...
Operating Instructions
Page 14
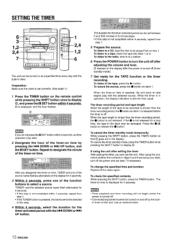
... on and begins play with the l button. "TIMER and the selected source name flash alternately for 4 seconds. - If the q is turned off the power and set correctly. (See page 4.) 1 Press the TIMER button on deck 1. To cancel the timer standby mode temporarily While pressing the SHIFT button, press ... the q button is off by pressing the 11 UP button, and the 11 SET button. Timer playback and timer recording will not begin unless the power is not released for the timer-activated period with the selected source. O is set step 7 if necessary. q If the TUNER button is pressed,...
... on and begins play with the l button. "TIMER and the selected source name flash alternately for 4 seconds. - If the q is turned off the power and set correctly. (See page 4.) 1 Press the TIMER button on deck 1. To cancel the timer standby mode temporarily While pressing the SHIFT button, press ... the q button is off by pressing the 11 UP button, and the 11 SET button. Timer playback and timer recording will not begin unless the power is not released for the timer-activated period with the selected source. O is set step 7 if necessary. q If the TUNER button is pressed,...
Operating Instructions
Page 15
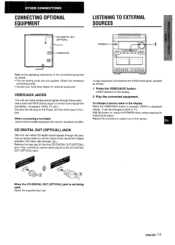
... equipment. CD DIGITAL OU1 (OPTICAL) 'o @ - Obtain the necessary connecting cords. q Consult your local Aiwa dealer for details. . VIDEO appears on , press the POWER button while messina the VIDEO/AUX butte;: Repeat the procedure to the CD DIGITAL OUT (OPTICAL) jack. The...CD DIGITAL OUT (OPTICAL) JACK This unit can input analog sound signals through this jack. m CONNECTING EQUIPMENT OPTIONAL LISTENING TO EXTERNAL SOURCES - POWER -1 ,1 .,,_ __ ,,, ,,._=_ ~ To play equipment connected to connect digital audio equipment (digital amplifier, DAT deck, MD recorder, etc.)....
... equipment. CD DIGITAL OU1 (OPTICAL) 'o @ - Obtain the necessary connecting cords. q Consult your local Aiwa dealer for details. . VIDEO appears on , press the POWER button while messina the VIDEO/AUX butte;: Repeat the procedure to the CD DIGITAL OUT (OPTICAL) jack. The...CD DIGITAL OUT (OPTICAL) JACK This unit can input analog sound signals through this jack. m CONNECTING EQUIPMENT OPTIONAL LISTENING TO EXTERNAL SOURCES - POWER -1 ,1 .,,_ __ ,,, ,,._=_ ~ To play equipment connected to connect digital audio equipment (digital amplifier, DAT deck, MD recorder, etc.)....
Operating Instructions
Page 16
... AM tuner section Tuning range Antenna 530 kHz tO 1710 kHz (10 kHz step) 531 kHz to 1602 kHz (9 kHz step) Loop antenna Amplifier section Power output Total harmonic distortion Inputs outputs 15 W+15W(I kHz, THD 10%,6 ohms) 12 W + 12 W(5O Hz-20 kHz, THD less than 1 Y., 6 ohms) 0.3 % (5...D-A converter 1 bit dual Signal-to-noise ratio 90 dB (1 kHz, O dB) Harmonic distortion 0.03 % (1 kHz, OdB) Wow and flutter Unmeasurable General Power requirements Power consumption Dimensions of main unit (W XHXD) Weight of main unit 120 VAC, 60 Hz 40 w 260 x 308x 341 mm (10'/4x 12'/4x132ini).) 4.5 kg...
... AM tuner section Tuning range Antenna 530 kHz tO 1710 kHz (10 kHz step) 531 kHz to 1602 kHz (9 kHz step) Loop antenna Amplifier section Power output Total harmonic distortion Inputs outputs 15 W+15W(I kHz, THD 10%,6 ohms) 12 W + 12 W(5O Hz-20 kHz, THD less than 1 Y., 6 ohms) 0.3 % (5...D-A converter 1 bit dual Signal-to-noise ratio 90 dB (1 kHz, O dB) Harmonic distortion 0.03 % (1 kHz, OdB) Wow and flutter Unmeasurable General Power requirements Power consumption Dimensions of main unit (W XHXD) Weight of main unit 120 VAC, 60 Hz 40 w 260 x 308x 341 mm (10'/4x 12'/4x132ini).) 4.5 kg...
Operating Instructions
Page 17
... page 15) CD PLAYER SECTiON The CD Iplayer does not piay. TROUBLESHOOTING GUIDE PARTS INDEX If the unit fails to turn off the power. 2 Press the POWER button while pressing the s CLEAR button. An erroneous display or a malfunction occurs. + Reset the unit as described in memory after ... sound. To reset if an unusual condition occurs in the display window or the cassette decks, reset the unit as follows. 1 Press the POWER button to perform as stated below . (in step 1 because of a malfunctim, reset by condensation? + Wait approximateiy one speaker only. GENERAL...
... page 15) CD PLAYER SECTiON The CD Iplayer does not piay. TROUBLESHOOTING GUIDE PARTS INDEX If the unit fails to turn off the power. 2 Press the POWER button while pressing the s CLEAR button. An erroneous display or a malfunction occurs. + Reset the unit as described in memory after ... sound. To reset if an unusual condition occurs in the display window or the cassette decks, reset the unit as follows. 1 Press the POWER button to perform as stated below . (in step 1 because of a malfunctim, reset by condensation? + Wait approximateiy one speaker only. GENERAL...

