
Operating Instructions
Page 2
... tavalla saattaa altistaa kayttajan turvallisuusluokan 1 ylittavalle nakymattomalle Iasersateiylle. This compact disc player is located on the rear of suffi-. Undg~ udsaattelse for Iaserklass 1. 2 Explanation of...USER-SERVICEABLE PARTS INSIDE. WARNING TO REDUCE THE RISK OF FIRE OR ELECTRIC SHOCK, DO NOT EXPOSE THIS APPLIANCE TO RAIN OR MOISTURE, LCX-300 U, K, LH, LCX-301 U 1 I CAUTION (K model) Use of controls or adjustments or performance of procedures other than those specified herein may be of your convenience, record the model number and serial number...
... tavalla saattaa altistaa kayttajan turvallisuusluokan 1 ylittavalle nakymattomalle Iasersateiylle. This compact disc player is located on the rear of suffi-. Undg~ udsaattelse for Iaserklass 1. 2 Explanation of...USER-SERVICEABLE PARTS INSIDE. WARNING TO REDUCE THE RISK OF FIRE OR ELECTRIC SHOCK, DO NOT EXPOSE THIS APPLIANCE TO RAIN OR MOISTURE, LCX-300 U, K, LH, LCX-301 U 1 I CAUTION (K model) Use of controls or adjustments or performance of procedures other than those specified herein may be of your convenience, record the model number and serial number...
Operating Instructions
Page 3
... recordings from that interference will not occur in this product, which is connected. WARNING FOR USE IN THE UNI'TED KINGDOM (K model only) This appliance is cut off and on circuit different from discs, radio or external tape for the power points in the mains lead to Part 15 of the following code: In accordance with a fitted three pin mains plug. If the plug...
... recordings from that interference will not occur in this product, which is connected. WARNING FOR USE IN THE UNI'TED KINGDOM (K model only) This appliance is cut off and on circuit different from discs, radio or external tape for the power points in the mains lead to Part 15 of the following code: In accordance with a fitted three pin mains plug. If the plug...
Operating Instructions
Page 4
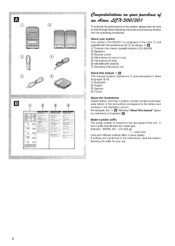
Model number suffix The model number is marked on the rear panel of the units supplied with the accessories @-@l as follows. + u @) Compact disc stereo cassette receiver LCX-300/301 @ Speakers @ Remote control (@FM antenna (U and LH only) @FM antenna (K only) @AM (MW/LW) antenna @ Operating Instructions, etc. @l and About this manual" above is a reference to the letters and numbers in the illustration column. If suffixes are mentioned in the instructions, read through these Operating Instructions and...
Model number suffix The model number is marked on the rear panel of the units supplied with the accessories @-@l as follows. + u @) Compact disc stereo cassette receiver LCX-300/301 @ Speakers @ Remote control (@FM antenna (U and LH only) @FM antenna (K only) @AM (MW/LW) antenna @ Operating Instructions, etc. @l and About this manual" above is a reference to the letters and numbers in the illustration column. If suffixes are mentioned in the instructions, read through these Operating Instructions and...

Operating Instructions
Page 6
TABLE OF CONTENTS PREPARATIONS PRECAUTIONS 8 CONNECTIONS m........... 8 BEFORE OPERATION l2 SETTING THE CLOCK 14 SOUND SIMPLE AUDIO ADJUSTMENT 16 EQUALIZER 16 RADIO RECEPTION MANUAL TUNING 18 PRESETTING STATIONS 20 PRESET NUMBER TUNING 20 CD PLAYING BASIC OPERATIONS 22 PROGRAMMED PLAY 26 TAPE PLAYBACK BASIC OPERATIONS 28 RECORDING BASIC RECORDING 30 KARAOKE MICROPHONE MIXING 32 OTHER CONNECTIONS CONNECTING OPTIONAL EQUIPMENT 34 LISTENING TO EXTERNAL SOURCES 34 GENERAL CARE AND MAINTENANCE 36 SPECIFICATIONS 36 TROUBLESHOOTING GUIDE 40 PARTS INDEX 42 6
TABLE OF CONTENTS PREPARATIONS PRECAUTIONS 8 CONNECTIONS m........... 8 BEFORE OPERATION l2 SETTING THE CLOCK 14 SOUND SIMPLE AUDIO ADJUSTMENT 16 EQUALIZER 16 RADIO RECEPTION MANUAL TUNING 18 PRESETTING STATIONS 20 PRESET NUMBER TUNING 20 CD PLAYING BASIC OPERATIONS 22 PROGRAMMED PLAY 26 TAPE PLAYBACK BASIC OPERATIONS 28 RECORDING BASIC RECORDING 30 KARAOKE MICROPHONE MIXING 32 OTHER CONNECTIONS CONNECTING OPTIONAL EQUIPMENT 34 LISTENING TO EXTERNAL SOURCES 34 GENERAL CARE AND MAINTENANCE 36 SPECIFICATIONS 36 TROUBLESHOOTING GUIDE 40 PARTS INDEX 42 6
Operating Instructions
Page 8
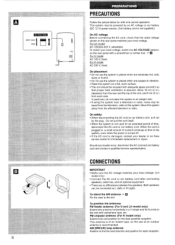
... affected television or radio. This antenna is not supplied.) On AC voltage Before connecting the AC cord, check that proper heat ventilation is turned off. q If the AC cord is not used for immediate replacement or repair. To match your local voltage. (LH model only) q Connect the AC cord or car battery cord after connecting speakers, antennas, and all optional equipment. Both speakers can be powered by the plug. q When the system...
... affected television or radio. This antenna is not supplied.) On AC voltage Before connecting the AC cord, check that proper heat ventilation is turned off. q If the AC cord is not used for immediate replacement or repair. To match your local voltage. (LH model only) q Connect the AC cord or car battery cord after connecting speakers, antennas, and all optional equipment. Both speakers can be powered by the plug. q When the system...

Operating Instructions
Page 10
CONNECTING AN OUTDOOI? U, LH models: AM antenna @), and FM antenna @,+ 2-n K model: MW/LW antenna @), and FM antenna @.+ 2-E 3 Connect the AC cord to the @ terminals, 2 Connect the supplied antennas. See page 34 on connection of an outdoor antenna is recommended. q Do not unwind the AM (MW/LW) loop ;antenna wire. ANTENNA For better FM reception, use of other optional equipment, the stereo system itself, the AC cord or speaker cords, since noise will be...
CONNECTING AN OUTDOOI? U, LH models: AM antenna @), and FM antenna @,+ 2-n K model: MW/LW antenna @), and FM antenna @.+ 2-E 3 Connect the AC cord to the @ terminals, 2 Connect the supplied antennas. See page 34 on connection of an outdoor antenna is recommended. q Do not unwind the AM (MW/LW) loop ;antenna wire. ANTENNA For better FM reception, use of other optional equipment, the stereo system itself, the AC cord or speaker cords, since noise will be...
Operating Instructions
Page 12
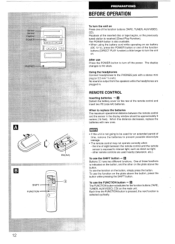
... clock. other on . To use Press the POWER button changes to replace the batteries The maximum operational distance between the remote control and the remote sensor is received (Direct Play Function). The display Using the headphones Connect headphones to prevent possible electrolyte leakage. The POWER button is output from the speakers while the headphones are used for the function buttons (TAPE, TUNER, AUXiVIDEO, CD) on car battery (DC 12 V), press the POWER button or one of time, remove the batteries to the PHONES jack with new...
... clock. other on . To use Press the POWER button changes to replace the batteries The maximum operational distance between the remote control and the remote sensor is received (Direct Play Function). The display Using the headphones Connect headphones to prevent possible electrolyte leakage. The POWER button is output from the speakers while the headphones are used for the function buttons (TAPE, TUNER, AUXiVIDEO, CD) on car battery (DC 12 V), press the POWER button or one of time, remove the batteries to the PHONES jack with new...
Operating Instructions
Page 14
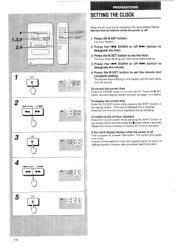
... button on the remote control and then press the s button within 4 seconds. However, the time cannot be reset. To switch to 5 above. The hour stops flashing and the minute starts flashing. 4 Press the W DOWN or UP M designate the minute. button to 5 Press the II SET button to turn the unit off . 1 Press the II SET button. Repeat the same procedure to be displayed during recording. The current time needs...
... button on the remote control and then press the s button within 4 seconds. However, the time cannot be reset. To switch to 5 above. The hour stops flashing and the minute starts flashing. 4 Press the W DOWN or UP M designate the minute. button to 5 Press the II SET button to turn the unit off . 1 Press the II SET button. Repeat the same procedure to be displayed during recording. The current time needs...
Operating Instructions
Page 16
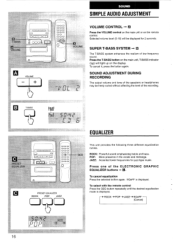
... the speakers or headphones may be displayed for jazz-type music. GRAPHIC To cancel equalization Press the selected button again. Press one of low-frequency sound. To cancel it, press the button again. JAZ2 Accented lower frequencies for 2 seconds. EQUALIZER This unit provides the following three different equalization cunfes. EA s VOLUME SIMPLE AUDIO ADJUSTMENT VOLUME CONTROL + E! Selected volume level (O-1 6) will light up on the remote control. SOUND ADJUSTMENT DURING RECORDING The output volume and...
... the speakers or headphones may be displayed for jazz-type music. GRAPHIC To cancel equalization Press the selected button again. Press one of low-frequency sound. To cancel it, press the button again. JAZ2 Accented lower frequencies for 2 seconds. EQUALIZER This unit provides the following three different equalization cunfes. EA s VOLUME SIMPLE AUDIO ADJUSTMENT VOLUME CONTROL + E! Selected volume level (O-1 6) will light up on the remote control. SOUND ADJUSTMENT DURING RECORDING The output volume and...
Operating Instructions
Page 18
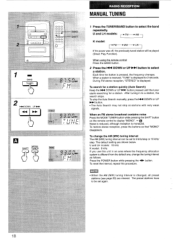
... FM stereo broadcast contains noise Press the MODE TUNER button while pressing the SHIFT button on the remote control to display "MONO. + u Noise is reduced, although reception is pressed, the frequency changes. The preset stations have to be set again. 18 Each time the button is monaural. The default setting are cleared. To reset the interval, repeat this unit in to select a station. When using the remote control Press the BAND button. 2 Press...
... FM stereo broadcast contains noise Press the MODE TUNER button while pressing the SHIFT button on the remote control to display "MONO. + u Noise is reduced, although reception is pressed, the frequency changes. The preset stations have to be set again. 18 Each time the button is monaural. The default setting are cleared. To reset the interval, repeat this unit in to select a station. When using the remote control Press the BAND button. 2 Press...
Operating Instructions
Page 22
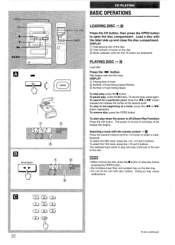
... displayed) PLAYING DISC + El Load disc. button repeatedly. mm b 22 To be continued. u (2I 1.m 3 DIR/PRESET BASIC OPERATIONS LOADING DISC + El Press the CD button, then press the OPEN button to play and play before pressing the OPEN button. To resume play , press the 9 button. DISPLAY @ Total playing time of the disc @ Total number of a track, press the - Load a disc with disc loaded. To start play of track being played flashes. @ Number of the loaded disc begins. The power is off (Direct Play Function) Press the CD button...
... displayed) PLAYING DISC + El Load disc. button repeatedly. mm b 22 To be continued. u (2I 1.m 3 DIR/PRESET BASIC OPERATIONS LOADING DISC + El Press the CD button, then press the OPEN button to play and play before pressing the OPEN button. To resume play , press the 9 button. DISPLAY @ Total playing time of the disc @ Total number of a track, press the - Load a disc with disc loaded. To start play of track being played flashes. @ Number of the loaded disc begins. The power is off (Direct Play Function) Press the CD button...
Operating Instructions
Page 24
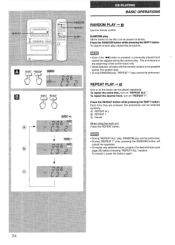
... RANDOM button will cancel the operation. To repeat the desired track, turn on the disc can be performed. m . button. During "REPEATALL" play, RANDOM play . REPEAT PLAY + u One or all the tracks can be skipped during the random play cannot be played repeatedly. Press the REPEAT button while pressing the SHIFT button. s During "REPEAT 1" play , repeat this procedure. q During RANDOM play, "REPEAT 1" play . SHIFT REP..EAT 8% BASIC OPERATIONS RANDOM PLAY -+ u Use the remote control. RANDOM play All the tracks on "REPEAT ALL". q Direct selection...
... RANDOM button will cancel the operation. To repeat the desired track, turn on the disc can be performed. m . button. During "REPEATALL" play, RANDOM play . REPEAT PLAY + u One or all the tracks can be skipped during the random play cannot be played repeatedly. Press the REPEAT button while pressing the SHIFT button. s During "REPEAT 1" play , repeat this procedure. q During RANDOM play, "REPEAT 1" play . SHIFT REP..EAT 8% BASIC OPERATIONS RANDOM PLAY -+ u Use the remote control. RANDOM play All the tracks on "REPEAT ALL". q Direct selection...

Operating Instructions
Page 26
... the +1 O and O buttons. To add tracks to start play. To clear the program Press the s CLEAR button in stop mode. after To change the programmed tracks Clear the program and repeat all the steps again. . Use the remote control. 1 Press the PRGM button while pressing the SHIFT button in stop mode. DISPLAY @) Program number @ Selected track number @l Total playing time of the selected tracks @ Total number of selected tracks 3 Repeat step 2 to program other tracks. 4 Press the 4> button to the program Before playing, repeat step 2. To...
... the +1 O and O buttons. To add tracks to start play. To clear the program Press the s CLEAR button in stop mode. after To change the programmed tracks Clear the program and repeat all the steps again. . Use the remote control. 1 Press the PRGM button while pressing the SHIFT button in stop mode. DISPLAY @) Program number @ Selected track number @l Total playing time of the selected tracks @ Total number of selected tracks 3 Repeat step 2 to program other tracks. 4 Press the 4> button to the program Before playing, repeat step 2. To...

Operating Instructions
Page 28
... both sides repeatedly, turn on (:). To play both sides. Press the TAPE button and press the A EJECT mark to open the cassette holder. -+ u Insert a tape with the exposed side down and with the side to close. To select a reverse mode + u Each time the TAPE/REV MODE button is pressed, the reverse mode changes. q Use normal (type I), Crop (type II) or metal (type IV) tapes for playback. To play from...
... both sides repeatedly, turn on (:). To play both sides. Press the TAPE button and press the A EJECT mark to open the cassette holder. -+ u Insert a tape with the exposed side down and with the side to close. To select a reverse mode + u Each time the TAPE/REV MODE button is pressed, the reverse mode changes. q Use normal (type I), Crop (type II) or metal (type IV) tapes for playback. To play from...
Operating Instructions
Page 30
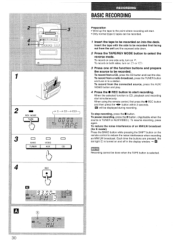
... the disc. When the selected function is CD, playback and r;cording start . When using the remote control, first press the. To record on one of the function buttons and prepare the source to a station. To record from the unit and the exposed side down. 2 Press the TAPE/REV MODE button to select the reverse mode. To record from a radio broadcast, press the TUNER button and tune in to be recorded. 1 \ 3 unn BAND VIDEO TUNER I AUX CD I ) tapes...
... the disc. When the selected function is CD, playback and r;cording start . When using the remote control, first press the. To record on one of the function buttons and prepare the source to a station. To record from the unit and the exposed side down. 2 Press the TAPE/REV MODE button to select the reverse mode. To record from a radio broadcast, press the TUNER button and tune in to be recorded. 1 \ 3 unn BAND VIDEO TUNER I AUX CD I ) tapes...
Operating Instructions
Page 32
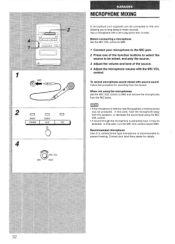
... from the source. To record microphone sound mixed with a mini plug (03.5 mm,l/8 inch). 1 BAND VIDEO 1 TUNER I AUX I CD J b 4 aMIC VOL MIN - . Use of the source. 4 Adjust the microphone volume with the MIC VOL control. In this case, hold the microphone away from the speakers, or decrease the sound level using the microphones Set the MIC VOL control to be produced. q If sound through the microphone is extremely...
... from the source. To record microphone sound mixed with a mini plug (03.5 mm,l/8 inch). 1 BAND VIDEO 1 TUNER I AUX I CD J b 4 aMIC VOL MIN - . Use of the source. 4 Adjust the microphone volume with the MIC VOL control. In this case, hold the microphone away from the speakers, or decrease the sound level using the microphones Set the MIC VOL control to be produced. q If sound through the microphone is extremely...
Operating Instructions
Page 34
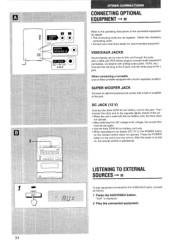
... car battery cord, the clock does not operate. q Use the Aiwa DCW-50 car battery cord only. Use a cable with RCA phono plugs to this unit through the jacks. Then connect the other end to the jack. Press the POWER button on the unit to the jack. SUPER WOOFER JACK Connect an optional powered sub woofer with a built-in -amplifier to turn the unit on , the remote control is used with analog output jacks, VCRs, etc.). After the power is displayed. 2 Play...
... car battery cord, the clock does not operate. q Use the Aiwa DCW-50 car battery cord only. Use a cable with RCA phono plugs to this unit through the jacks. Then connect the other end to the jack. Press the POWER button on the unit to the jack. SUPER WOOFER JACK Connect an optional powered sub woofer with a built-in -amplifier to turn the unit on , the remote control is used with analog output jacks, VCRs, etc.). After the power is displayed. 2 Play...
Operating Instructions
Page 36
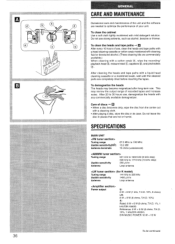
... 350 pVlm Antenna Loop antenna Tuning range Usable sensitivity Antenna (for K model) 144 kHz to 290 kHz 1400 pV/m Loop antenna Power output u: 8 W + 8 W (1 kHz, T.H. q After playing a disc, store the disc in places that are hot or humid. Do not use . To demagnetize the heads The heads may narrow the output range of discs + E q When a disc becomes dirty, wipe the disc from the center out with a cleaning cloth...
... 350 pVlm Antenna Loop antenna Tuning range Usable sensitivity Antenna (for K model) 144 kHz to 290 kHz 1400 pV/m Loop antenna Power output u: 8 W + 8 W (1 kHz, T.H. q After playing a disc, store the disc in places that are hot or humid. Do not use . To demagnetize the heads The heads may narrow the output range of discs + E q When a disc becomes dirty, wipe the disc from the center out with a cleaning cloth...
Operating Instructions
Page 38
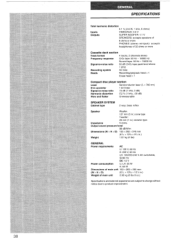
... Inputs outputs distortion 0.1 % (2.6 W, 1 kHz, 6 ohms) VIDEO/AUX: 0.5 V SUPER WOOFER: 1.1 V SPEAKERS: accepts speakers of 6 ohms or more PHONES (stereo mini jack): accepts head~hones of 32 ohms or more Cassette deck section Track format Frequency response Signal-to-noise ratio Recording system Heads 4 tracks, 2 channels stereo CrOz tape: 50 Hz - 16000 Hz Normal tape: 50 Hz -15000 Hz 50 dB (CrOz tape peak level above 1 kHz) AC bias Recording/playback head x 1 Erase head x 1 Compact disc player Laser...
... Inputs outputs distortion 0.1 % (2.6 W, 1 kHz, 6 ohms) VIDEO/AUX: 0.5 V SUPER WOOFER: 1.1 V SPEAKERS: accepts speakers of 6 ohms or more PHONES (stereo mini jack): accepts head~hones of 32 ohms or more Cassette deck section Track format Frequency response Signal-to-noise ratio Recording system Heads 4 tracks, 2 channels stereo CrOz tape: 50 Hz - 16000 Hz Normal tape: 50 Hz -15000 Hz 50 dB (CrOz tape peak level above 1 kHz) AC bias Recording/playback head x 1 Erase head x 1 Compact disc player Laser...
Operating Instructions
Page 40
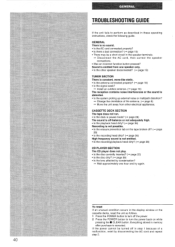
... cassette decks, reset the unit as described in these operating instructions, check the following guide. Everything stored in the speaker terminals. + Disconnect the AC cord, then correct the speaker connections. Sound is emitted from other speaker disconnected? (+ page 10) TUNER SECTION There is distorted. q Is the recording/playback head dirty? (+ page 36) CD PLAYER SECTION The CD player does not play. q 1s there a bad connection? (+ page 10) q There may be turned...
... cassette decks, reset the unit as described in these operating instructions, check the following guide. Everything stored in the speaker terminals. + Disconnect the AC cord, then correct the speaker connections. Sound is emitted from other speaker disconnected? (+ page 10) TUNER SECTION There is distorted. q Is the recording/playback head dirty? (+ page 36) CD PLAYER SECTION The CD player does not play. q 1s there a bad connection? (+ page 10) q There may be turned...


