Product Manual
Page 45
... Adjusting the temperature zone divider 53 Changing the light fitting 53 Proper loading 54 Ideal drinking temperatures 54 Defrosting 54 Cleaning 54 Energy-saving tips 55 What to do if ....Troubleshooting 55 Guarantee 57 Operating noises 59 45 Contents Safety Instructions / Standards 46 Disposal of packaging and old appliances 47 Installation / Installation site 48 Your cooler needs air 49 Installation 49 Electrical connection 50 Product description 51 Interior fittings 51 User panel...
... Adjusting the temperature zone divider 53 Changing the light fitting 53 Proper loading 54 Ideal drinking temperatures 54 Defrosting 54 Cleaning 54 Energy-saving tips 55 What to do if ....Troubleshooting 55 Guarantee 57 Operating noises 59 45 Contents Safety Instructions / Standards 46 Disposal of packaging and old appliances 47 Installation / Installation site 48 Your cooler needs air 49 Installation 49 Electrical connection 50 Product description 51 Interior fittings 51 User panel...
Product Manual
Page 46
... operation, installation and maintenance of all kinds. Children should be accepted for compliance with electrical safety regulations in accordance with wet hands. This appliance should be used for their safety. Never pull the plug out of the instal- You must ensure that the cooling circuit is undamaged when handling this case neither the guarantee nor any subsequent user. Never use...
... operation, installation and maintenance of all kinds. Children should be accepted for compliance with electrical safety regulations in accordance with wet hands. This appliance should be used for their safety. Never pull the plug out of the instal- You must ensure that the cooling circuit is undamaged when handling this case neither the guarantee nor any subsequent user. Never use...
Product Manual
Page 47
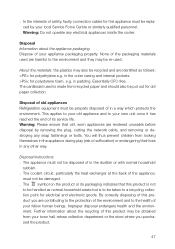
... disposing of this product is not to be handled as follows: >PE< for old paper collection. Warning: Do not operate any snap fastenings or bolts. Disposal of old appliances Refrigeration equipment must not be re-used is to be taken to your old appliance and...replaced by removing the plug, cutting the network cable, and removing or destroying any electrical appliances inside the cooler. Further information about the appliance packaging Dispose of safety, faulty connection cables for this product may also be put out for polyethylene e.g. In the interests of your local Service...
... disposing of this product is not to be handled as follows: >PE< for old paper collection. Warning: Do not operate any snap fastenings or bolts. Disposal of old appliances Refrigeration equipment must not be re-used is to be taken to your old appliance and...replaced by removing the plug, cutting the network cable, and removing or destroying any electrical appliances inside the cooler. Further information about the appliance packaging Dispose of safety, faulty connection cables for this product may also be put out for polyethylene e.g. In the interests of your local Service...
Product Manual
Page 48
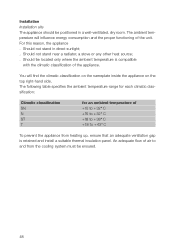
... flow of air to + 43° C To prevent the appliance from the cooling system must be positioned in direct sunlight; . Should be located only where the ambient temperature is retained and install a suitable thermal insulation panel. The ambient temperature will find the climatic classification on the nameplate inside the appliance on the top right-hand side. Installation Installation site The...
... flow of air to + 43° C To prevent the appliance from the cooling system must be positioned in direct sunlight; . Should be located only where the ambient temperature is retained and install a suitable thermal insulation panel. The ambient temperature will find the climatic classification on the nameplate inside the appliance on the top right-hand side. Installation Installation site The...
Product Manual
Page 49
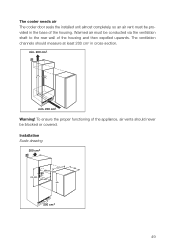
min. 200 cm2 50 min. 200 cm2 Warning! The cooler needs air The cooler door seals the installed unit almost completely, so an air vent must be conducted via the ventilation shaft to the rear wall of the housing. To ensure the proper functioning of the appliance, air vents should measure at least 200 cm2 in the base of the housing and then expelled upwards. The ventilation channels should never be provided in cross-section. Installation Scale drawing 200 cm 2 547 566 550 min. 50 874 - 880 560 min. 873 200 cm 2 49 Warmed air must be blocked or covered.
min. 200 cm2 50 min. 200 cm2 Warning! The cooler needs air The cooler door seals the installed unit almost completely, so an air vent must be conducted via the ventilation shaft to the rear wall of the housing. To ensure the proper functioning of the appliance, air vents should measure at least 200 cm2 in the base of the housing and then expelled upwards. The ventilation channels should never be provided in cross-section. Installation Scale drawing 200 cm 2 547 566 550 min. 50 874 - 880 560 min. 873 200 cm 2 49 Warmed air must be blocked or covered.

Product Manual
Page 50
... to increased condensation and thus to higher energy consumption (see the section headed "Troubleshooting"). e.g. Electrical fuse protection of frequency with earthing contact is possible to pull out the mains plug. After installing the unit, and particularly if the door hinge is reversed, please ensure that the door seal is located inside the appliance on the left or right-hand side adjacent to...
... to increased condensation and thus to higher energy consumption (see the section headed "Troubleshooting"). e.g. Electrical fuse protection of frequency with earthing contact is possible to pull out the mains plug. After installing the unit, and particularly if the door hinge is reversed, please ensure that the door seal is located inside the appliance on the left or right-hand side adjacent to...
Product Manual
Page 51
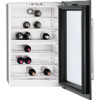
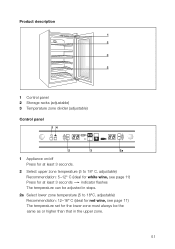
Product description 1 2 3 2 1 Control panel 2 Storage racks (adjustable) 3 Temperature zone divider (adjustable) Control panel 14 2 3 2a 1 Appliance on/off Press for at least 3 seconds. 2 Select upper zone temperature (5 to 18° C, adjustable) Recommendation: 5-12° C (ideal for white wine, see page 11) Press for at least 3 seconds indicator flashes The temperature can be adjusted in steps. 2a Select lower zone temperature (5 to 18°C, adjustable) Recommendation: 12...
Product description 1 2 3 2 1 Control panel 2 Storage racks (adjustable) 3 Temperature zone divider (adjustable) Control panel 14 2 3 2a 1 Appliance on/off Press for at least 3 seconds. 2 Select upper zone temperature (5 to 18° C, adjustable) Recommendation: 5-12° C (ideal for white wine, see page 11) Press for at least 3 seconds indicator flashes The temperature can be adjusted in steps. 2a Select lower zone temperature (5 to 18°C, adjustable) Recommendation: 12...
Product Manual
Page 52
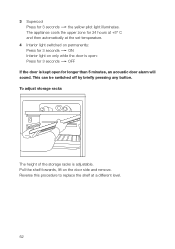
Reverse this procedure to replace the shelf at the set temperature. 4 Interior light switched on permanently: Press for 3 seconds ON Interior light on the door side and remove. Pull the shelf forwards, lift on only while the door is open for 3 seconds the yellow pilot light illuminates. 3 Supercool Press for longer than 5 minutes, an acoustic door alarm will sound. To adjust storage racks The height of the storage racks is kept...
Reverse this procedure to replace the shelf at the set temperature. 4 Interior light switched on permanently: Press for 3 seconds ON Interior light on the door side and remove. Pull the shelf forwards, lift on only while the door is open for 3 seconds the yellow pilot light illuminates. 3 Supercool Press for longer than 5 minutes, an acoustic door alarm will sound. To adjust storage racks The height of the storage racks is kept...

Product Manual
Page 53
... insert a new LED light fitting. Pull forwards away from the rear wall, and lift on door side. To change LED lighting Click off the LED light cover. Note: Please use only original LED light fittings provided by 1 position. Reverse this procedure to replace at a different level. Please ensure that the rear section of the LED light fitting. To adjust the temperature zone divider The temperature zone...
... insert a new LED light fitting. Pull forwards away from the rear wall, and lift on door side. To change LED lighting Click off the LED light cover. Note: Please use only original LED light fittings provided by 1 position. Reverse this procedure to replace at a different level. Please ensure that the rear section of the LED light fitting. To adjust the temperature zone divider The temperature zone...
Product Manual
Page 54
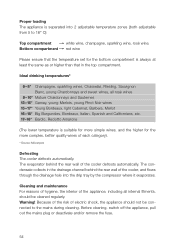
Before cleaning, switch off the appliance, pull out the mains plug or deactivate and/or remove the fuse. 54 The evaporator behind the rear wall of the cooler defrosts automatically. Because of the risk of electric shock, the appliance should be connected to ... the bottom compartment is separated into the drip tray by the compressor where it evaporates. Cleaning and maintenance For reasons of hygiene, the interior of each category). * Source: Mövenpick Defrosting The cooler defrosts automatically. Warning! Ideal drinking temperatures* 6 - 8° Champagne, sparkling ...
Before cleaning, switch off the appliance, pull out the mains plug or deactivate and/or remove the fuse. 54 The evaporator behind the rear wall of the cooler defrosts automatically. Because of the risk of electric shock, the appliance should be connected to ... the bottom compartment is separated into the drip tray by the compressor where it evaporates. Cleaning and maintenance For reasons of hygiene, the interior of each category). * Source: Mövenpick Defrosting The cooler defrosts automatically. Warning! Ideal drinking temperatures* 6 - 8° Champagne, sparkling ...
Product Manual
Page 55
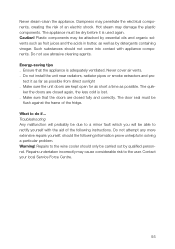
.... Do not use abrasive cleaning agents. Make sure the unit doors are kept open for as short a time as by qualified personnel. Make sure that the appliance is adequately ventilated. Troubleshooting Any malfunction will probably be due to a minor fault which you will be flush against the frame of the fridge. Repairs undertaken incorrectly may penetrate the electrical components, creating...
.... Do not use abrasive cleaning agents. Make sure the unit doors are kept open for as short a time as by qualified personnel. Make sure that the appliance is adequately ventilated. Troubleshooting Any malfunction will probably be due to a minor fault which you will be flush against the frame of the fridge. Repairs undertaken incorrectly may penetrate the electrical components, creating...
Product Manual
Page 56
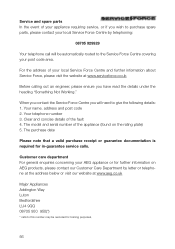
... details under the heading "Something Not Working." Clear and concise details of the fault 4. The model and serial number of the appliance (found on AEG products, please contact our Customer Care Department by telephoning: 08705 929929 Your telephone call will need to the Service Force Centre covering your local Service Force Centre and further information about Service Force, please visit the website...
... details under the heading "Something Not Working." Clear and concise details of the fault 4. The model and serial number of the appliance (found on AEG products, please contact our Customer Care Department by telephoning: 08705 929929 Your telephone call will need to the Service Force Centre covering your local Service Force Centre and further information about Service Force, please visit the website...
Product Manual
Page 57
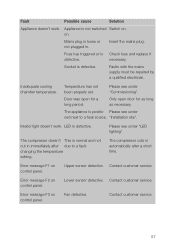
Faults with the mains supply must be repaired by a qualified electrician. Temperature has not been properly set. "Installation site". The compressor doesn't This is positio- Contact customer service. Insert the mains plug. necessary. Inadequate cooling chamber temperature. Only open for as long as necessary. Interior light doesn't work . changing the temperature setting. Contact customer service. 57 Fault Possible cause Solution Appliance doesn't work . Appliance is not switched Switch on control panel. The appliance is normal and...
Faults with the mains supply must be repaired by a qualified electrician. Temperature has not been properly set. "Installation site". The compressor doesn't This is positio- Contact customer service. Insert the mains plug. necessary. Inadequate cooling chamber temperature. Only open for as long as necessary. Interior light doesn't work . changing the temperature setting. Contact customer service. 57 Fault Possible cause Solution Appliance doesn't work . Appliance is not switched Switch on control panel. The appliance is normal and...
Product Manual
Page 58
... of AEG. 7. Parts removed during guarantee repairs become the property of installation or AEG workshop). 5. Your new home is for the same period and to stipulate the place of this brand or range of use . 2. a normal household . European Guarantee . The guarantee or free replacement includes both labour and materials. 6. The guarantee covers all parts or components which must inform the nearest customer service office (AEG's service...
... of AEG. 7. Parts removed during guarantee repairs become the property of installation or AEG workshop). 5. Your new home is for the same period and to stipulate the place of this brand or range of use . 2. a normal household . European Guarantee . The guarantee or free replacement includes both labour and materials. 6. The guarantee covers all parts or components which must inform the nearest customer service office (AEG's service...
Product Manual
Page 59
.... Operating noise will then ensure that it is cooled by changes in . Noises which are not normal Unusual noise is aware of your move please contact your nearest Customer Care centre, listed below, to give them details of operating noise will be heard more acutely. However, this is inevitable. However, a certain level of noise, dependent on the size of improper installation. Before you and your new...
.... Operating noise will then ensure that it is cooled by changes in . Noises which are not normal Unusual noise is aware of your move please contact your nearest Customer Care centre, listed below, to give them details of operating noise will be heard more acutely. However, this is inevitable. However, a certain level of noise, dependent on the size of improper installation. Before you and your new...
Product Manual
Page 60
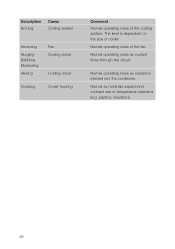
Description Droning Cause Cooling system Humming Gurgling Babbling Murmuring Hissing Fan Cooling circuit Cooling circuit Cracking Cooler housing Comment Normal operating noise of the fan. Normal operating noise of the cooling system. Normal operating noise as coolant is dependent on the size of cooler. Normal as coolant flows through the circuit. plastics, insulation). 60 Normal operating noise as materials expand and contract due to temperature variations (e.g. The level is injected into the condenser.
Description Droning Cause Cooling system Humming Gurgling Babbling Murmuring Hissing Fan Cooling circuit Cooling circuit Cracking Cooler housing Comment Normal operating noise of the fan. Normal operating noise of the cooling system. Normal operating noise as coolant is dependent on the size of cooler. Normal as coolant flows through the circuit. plastics, insulation). 60 Normal operating noise as materials expand and contract due to temperature variations (e.g. The level is injected into the condenser.


