AEG SCT71800S1 Support Question
AEG SCT71800S1 Support Question
Find answers below for this question about AEG SCT71800S1.Need a AEG SCT71800S1 manual? We have 1 online manual for this item!
Question posted by Jeffersonmaureen on December 20th, 2015
Drainage Pin
Does the drainage pin have to be removed on installation
Current Answers
Answer #1: Posted by TechSupport101 on December 20th, 2015 4:12 AM
TechSupport101

Member since:
May 24th, 2013 Points: 12,171,275

Member since:
May 24th, 2013 Points: 12,171,275
Hi. The manual is silent about a 'drainage pin' but do see the Installation section on page 13+ of the manual here https://www.helpowl.com/manuals/AEG/SCT71800S1/236142 for the best installation pointer.
Related AEG SCT71800S1 Manual Pages
Product Manual - Page 2
... you have the following data available. WHAT TO DO IF 13 7. Model, PNC, Serial Number. CARE AND CLEANING 12 6. SAFETY INSTRUCTIONS 3 2. DAILY USE 8 4. NOISES 22 9. INSTALLATION 15 8.
Product Manual - Page 3
... household and similar applications such as you can) and remove the door to prevent playing children to suffer electric shock...moved or sold, so that spring lock unusable before installing and first using the appliance are thoroughly familiar with the...- 1. SAFETY INSTRUCTIONS
ENGLISH 3
In the interest of the refrigerant circuit become damaged:
- To avoid unnecessary mistakes and accidents,...
Product Manual - Page 4
... be re-frozen once it .
• Do not remove nor touch items from the appliance. Any electrical component (... will collect in the bottom of the appliance.
1.5 Installation
For electrical connection carefully follow the instructions relevant to the...To achieve sufficient ventilation follow the instructions given in the refrigerator for household room illumination.
1.3 Daily Use
• ...
Product Manual - Page 5
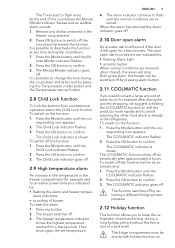
... colder button for some seconds. CONTROL PANEL
ENGLISH 5
ozone layer, in either its refrigerant circuit or insulation materials. Avoid damaging the cooling unit, especially at the rear near the...close to radiators or cookers.
• Make sure that the mains plug is accessible after the installation of the appliance.
• Connect to potable water supply only (If a water connection is...
Product Manual - Page 7
...button.
2.11 COOLMATIC function
If you to confirm. 3. At the end of buzzer. Remove any button. 2. It is possible to confirm. 3. nute Minder indicator flashes. 2. ...an audible alarm sounds: 1. To reset the alarm: 1. Press any drinks contained in the refrigerator. The freezer temperature indicator
shows the highest temperature reached for a few seconds.
ENGLISH 7
4.
...
Product Manual - Page 8
... until the FROSTMATIC indicator flashes.
2.
To switch off the function: 1. The function switches off by selecting a different freezer set temperature. 2.
Press the OK button to remove the typical smell of the DYNAMICAIR function increases the energy consumption.
3.
responding icon appears. To switch off the function: 1. DAILY USE
3.1 Cleaning the interior
Before...
Product Manual - Page 9
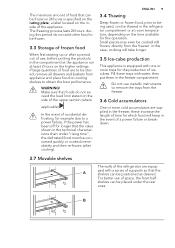
...depending on the inside of icecubes. The maximum amount of food that can be thawed in the refrigerator compartment or at least 2 hours on the higher settings. The freezing process lasts 24 hours: ...ENGLISH 9
3.4 Thawing
Deep-frozen or frozen food, prior to being used, can be stored, remove all drawers and baskets from the freezer.
3.6 Cold accumulators
One or more trays for this period...
Product Manual - Page 10
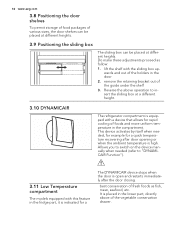
...proceed as fish, meat, seafood, etc. wards and out of fresh foods as follow: 1. remove the retaining bracket out of the vegetable conservation drawer. Allows you to switch on the device manually ... the sliding box
The sliding box can be placed at a different height.
3.10 DYNAMICAIR
The refrigerator compartment is equipped with this feature in the fridge part, it is high.
10 www.aeg....
Product Manual - Page 11
... kept in the bottle rack on the evaporator. HELPFUL HINTS AND TIPS
ENGLISH 11
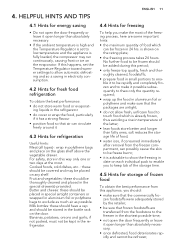
4.1 Hints for refrigeration
Useful hints: Meat (all types) : wrap in aluminium foil or polythene bags to low temperature ... . salt reduces the storage life of food;
• water ices, if consumed immediately after removal from the freezer compartment, can be frozen in the shortest possible time;
• not open...
Product Manual - Page 12
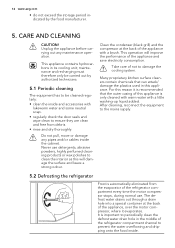
... and some neutral soap.
• regularly check the door seals and wipe clean to ensure they are clean and free from the evaporator of the refrigerator compartment channel to prevent the water overflowing and dripping onto the food inside. Clean the condenser (black grill) and the compressor at the back of...
Product Manual - Page 13
... if the appliance stands stable (all accessories
• leave the door/doors ajar to the continuous circulation of cold air inside from electricity supply
• remove all food
• defrost (if foreseen) and clean the appliance and all the four feet should be on the other hand, is a "no voltage in...
Product Manual - Page 14
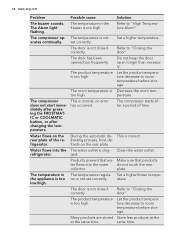
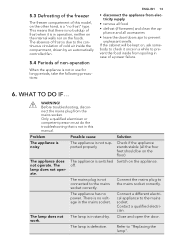
... water outlet is too high. The temperature regulator is too high.
The product temperature is not set correctly.
The compressor starts after changing the temperature.
refrigerator. Set a higher/lower temperature.
Refer to "Closing the door".
Do not keep the door open longer than necessary.
The compressor does not start immediately after...
Product Manual - Page 15
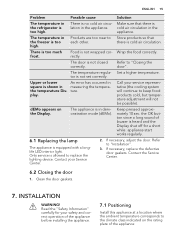
...
The temperature in the
appliance. cold air circulation in the refrigerator is lation in demonstration mode (dEMo).
Store products so that... the "Safety Information" carefully for your safety and correct operation of the appliance before installing the appliance.
7.1 Positioning
Install this appliance at a location where the ambient temperature corresponds to keep food products cold...
Product Manual - Page 16
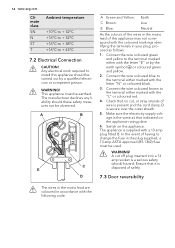
Check that indicated on the appliance.
Ensure that it is the same as follows:
1. Connect the wire coloured green and yellow to install this appliance may not correspond with the following code: The appliance is secure over the outer sheath.
5. The manufacturer declines any liability should be carried ...
Product Manual - Page 17

... hinge. • Install the spacer. • Install the upper door. • Tighten the upper pin. To open the door to the right. ENGLISH 17
The door of the appliance opens to the left, do these steps before you install the appliance. • Loosen and remove the upper pin. • Remove the upper door. • Remove the spacer.
•...
Product Manual - Page 18

min. 200 cm2
7.5 Installing the appliance
CAUTION!
x x
Do the following steps:
If necessary cut the adhesive sealing strip and apply it to the appliance as shown in figure. 18 www.aeg.com
7.4 Ventilation requirements
5 cm min. 200 cm2
The airflow behind the appliance must be sufficient. Make sure that the mains cable can move freely.
Product Manual - Page 19

... hinge.
1
4 mm 44 mm
I I
Adjust the appliance in position. Make sure that the distance between the appliance and the kitchen furniture is 4 mm.
ENGLISH 19
Install the appliance in the accessories bag) makes sure that the distance between the appliance and the cupboard frontedge is 44 mm.
Product Manual - Page 20
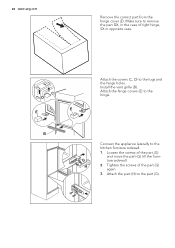
Tighten the screws of right hinge, SX in opposite case. Make sure to remove the part DX, in the case of the part (G) again.
3. Install the vent grille (B).
B
Connect the appliance laterally to the hinge. G
ture sidewall. H
2. 20 www.aeg.com
Remove the correct part from the hinge cover (E). Loosen the screws of the...
Product Manual - Page 21

... the part (Hc) on the inner side of 90°. ca. 50 mm 90°
21 mm 90°
ca. 50 mm
21 mm
Ha
Install the part (Ha) on the part (Ha).
Product Manual - Page 22
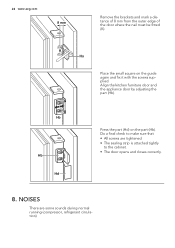
...sealing strip is attached tightly to make sure that:
• All screws are some sounds during normal running (compressor, refrigerant circulation). K Ha
Place the small square on the part (Hb).
Do a final check to the cabinet.
&#... door by adjusting the part (Hb).
22 www.aeg.com
8 mm
Remove the brackets and mark a distance of 8 mm from the outer edge of the door where the nail must...