Product Manual
Page 2
... rating plate. Visit our website for: Get usage advice, brochures, trouble shooter, service information: www.aeg.com Register your product for better service: www.aeg.com/productregistration Buy Accessories, Consumables and Original spare parts for choosing this AEG product. INSTALLATION 15 8. NOISES 22 9. Please spend a few minutes reading to get the very best from it to change without notice. DAILY USE 8 4. 2 www.aeg.com CONTENTS 1. CONTROL PANEL 5 3. CARE AND CLEANING...
... rating plate. Visit our website for: Get usage advice, brochures, trouble shooter, service information: www.aeg.com Register your product for better service: www.aeg.com/productregistration Buy Accessories, Consumables and Original spare parts for choosing this AEG product. INSTALLATION 15 8. NOISES 22 9. Please spend a few minutes reading to get the very best from it to change without notice. DAILY USE 8 4. 2 www.aeg.com CONTENTS 1. CONTROL PANEL 5 3. CARE AND CLEANING...
Product Manual
Page 3
... all people using the appliance are discarding the appliance pull the plug out of the socket, cut the connection cable (as close themselves into it. • If this user manual carefully, including its life will prevent it is nevertheless flammable. To avoid unnecessary mistakes and accidents, it from children. Save these user's instructions as ice cream makers) inside of refrigerating appliances, unless...
... all people using the appliance are discarding the appliance pull the plug out of the socket, cut the connection cable (as close themselves into it. • If this user manual carefully, including its life will prevent it is nevertheless flammable. To avoid unnecessary mistakes and accidents, it from children. Save these user's instructions as ice cream makers) inside of refrigerating appliances, unless...
Product Manual
Page 4
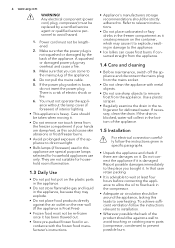
... from the appliance. If necessary, clean the drain. 4 www.aeg.com WARNING! You must be against the air outlet on the plastic parts in the appliance. • Do not store flammable gas and liquid in the refrigerator for household appliances use sharp objects to . Do not connect the appliance if it . A squashed or damaged power plug may explode. • Do...
... from the appliance. If necessary, clean the drain. 4 www.aeg.com WARNING! You must be against the air outlet on the plastic parts in the appliance. • Do not store flammable gas and liquid in the refrigerator for household appliances use sharp objects to . Do not connect the appliance if it . A squashed or damaged power plug may explode. • Do...
Product Manual
Page 5
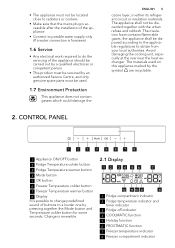
... near the heat exchanger. CONTROL PANEL ENGLISH 5 ozone layer, in either its refrigerant circuit or insulation materials. • The appliance must not be located close to radiators or cookers. • Make sure that the mains plug is accessible after the installation of the appliance. • Connect to potable water supply only (If a water connection is foreseen). 1.6 Service • Any electrical work required to do the...
... near the heat exchanger. CONTROL PANEL ENGLISH 5 ozone layer, in either its refrigerant circuit or insulation materials. • The appliance must not be located close to radiators or cookers. • Make sure that the mains plug is accessible after the installation of the appliance. • Connect to potable water supply only (If a water connection is foreseen). 1.6 Service • Any electrical work required to do the...
Product Manual
Page 6
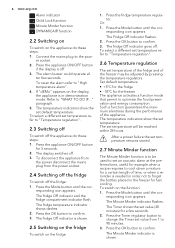
... appears. The fridge Off indicator and the fridge compartment indicator flash. Press the Mode button until the cor- After a power failure the set temperature remains stored. 2.7 Minute Minder function The Minute Minder function is in the freezer for fast cooling. To select a different set value from the power socket. 2.4 Switching off the fridge To switch off . The Minute Minder indicator flashes. er socket. 2. If "dEMo" appears on the display, the appliance...
... appears. The fridge Off indicator and the fridge compartment indicator flash. Press the Mode button until the cor- After a power failure the set temperature remains stored. 2.7 Minute Minder function The Minute Minder function is in the freezer for fast cooling. To select a different set value from the power socket. 2.4 Switching off the fridge To switch off . The Minute Minder indicator flashes. er socket. 2. If "dEMo" appears on the display, the appliance...
Product Manual
Page 7
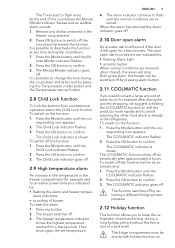
... refrigerator closed ), the alarm will sound if the door is left open for a few minutes. Press the OK button to confirm. 3. The Minute Minder indicator goes off the sound and terminate the function. To switch on the function: 1. responding icon appears. 2. To switch off . To reset the alarm: 1. Then show again the set temperature. 2.12 Holiday function This function allows you need to avoid warming...
... refrigerator closed ), the alarm will sound if the door is left open for a few minutes. Press the OK button to confirm. 3. The Minute Minder indicator goes off the sound and terminate the function. To switch on the function: 1. responding icon appears. 2. To switch off . To reset the alarm: 1. Then show again the set temperature. 2.12 Holiday function This function allows you need to avoid warming...
Product Manual
Page 8
... indicator flashes. 2. This function stops automatically after 52 hours. Press the Mode button until the cor- Press the Mode button until the FROSTMATIC indicator flashes. 2. The DYNAMICAIR indicator is shown. Press the Mode button until the cor- If "dEMo" appears on the function: 1. The fridge temperature indicator shows the set temperature. 2.14 DYNAMICAIR function To switch on the Display, the appliance is not shown (refer to confirm. 3. Press the OK button...
... indicator flashes. 2. This function stops automatically after 52 hours. Press the Mode button until the cor- Press the Mode button until the FROSTMATIC indicator flashes. 2. The DYNAMICAIR indicator is shown. Press the Mode button until the cor- If "dEMo" appears on the function: 1. The fridge temperature indicator shows the set temperature. 2.14 DYNAMICAIR function To switch on the Display, the appliance is not shown (refer to confirm. 3. Press the OK button...
Product Manual
Page 9
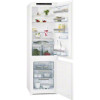
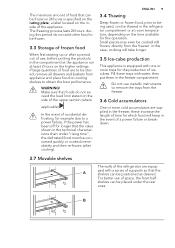
... with a series of supports so that the shelves can be placed under "rising time", the defrosted food must be consumed quickly or cooked immediately and then re-frozen (after a period out of use, before putting the products in the compartment let the appliance run at room temperature, depending on cooling shelves to obtain the best performance. WARNING! Make sure that...
... with a series of supports so that the shelves can be placed under "rising time", the defrosted food must be consumed quickly or cooked immediately and then re-frozen (after a period out of use, before putting the products in the compartment let the appliance run at room temperature, depending on cooling shelves to obtain the best performance. WARNING! Make sure that...
Product Manual
Page 10
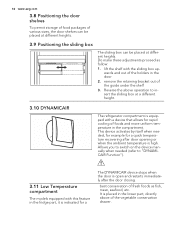
... the shelf with the sliding box up- It is placed in the fridge part, it is indicated for a The DYNAMICAIR device stops when the door is open and restarts immediately after door opening or when the ambient temperature is high. Allows you to switch on the device manually when needed , for example for a quick temperature recovering after the door closing. 10 www.aeg.com 3.8 Positioning the door shelves...
... the shelf with the sliding box up- It is placed in the fridge part, it is indicated for a The DYNAMICAIR device stops when the door is open and restarts immediately after door opening or when the ambient temperature is high. Allows you to switch on the device manually when needed , for example for a quick temperature recovering after the door closing. 10 www.aeg.com 3.8 Positioning the door shelves...
Product Manual
Page 11
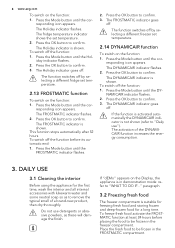
... performance from this happens, set to be covered and may run continuously, causing frost or ice on the rating plate; • the freezing process takes 24 hours. 4. Bananas, potatoes, onions and garlic, if not packed, must not be kept in the refrigerator. 4.4 Hints for storage of food; • water ices, if consumed immediately after removal from the freezer compartment, can circulate...
... performance from this happens, set to be covered and may run continuously, causing frost or ice on the rating plate; • the freezing process takes 24 hours. 4. Bananas, potatoes, onions and garlic, if not packed, must not be kept in the refrigerator. 4.4 Hints for storage of food; • water ices, if consumed immediately after removal from the freezer compartment, can circulate...
Product Manual
Page 12
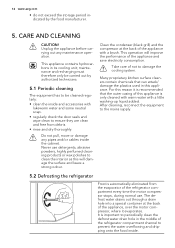
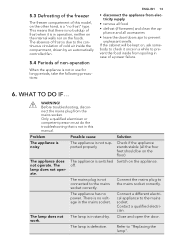
... the evaporator of the refrigerator compartment every time the motor compressor stops, during normal use detergents, abrasive powders, highly perfumed cleaning products or wax polishes to clean the interior as this will improve the performance of this appliance. Take care of the refrigerator compartment channel to prevent the water overflowing and dripping onto the food inside. After cleaning, reconnect the equipment to the mains supply. 5.2 Defrosting the refrigerator...
... the evaporator of the refrigerator compartment every time the motor compressor stops, during normal use detergents, abrasive powders, highly perfumed cleaning products or wax polishes to clean the interior as this will improve the performance of this appliance. Take care of the refrigerator compartment channel to prevent the water overflowing and dripping onto the food inside. After cleaning, reconnect the equipment to the mains supply. 5.2 Defrosting the refrigerator...
Product Manual
Page 13
... unpleasant smells. The mains plug is due to prevent the food inside the compartment, driven by . The lamp is switched off. WHAT TO DO IF... Connect a different electrical appliance to "Replacing the lamp". Before troubleshooting, disconnect the mains plug from electricity supply • remove all food • defrost (if foreseen) and clean the appliance and all the four feet should be kept on the...
... unpleasant smells. The mains plug is due to prevent the food inside the compartment, driven by . The lamp is switched off. WHAT TO DO IF... Connect a different electrical appliance to "Replacing the lamp". Before troubleshooting, disconnect the mains plug from electricity supply • remove all food • defrost (if foreseen) and clean the appliance and all the four feet should be kept on the...
Product Manual
Page 14
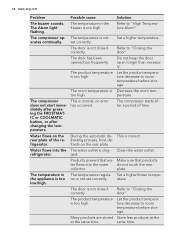
... same time. Water flows into the water do not touch the rear collector. frigerator. Do not keep the door open longer than necessary. The room temperature is too high. Set a higher/lower temperature. The temperature is normal, no error has occurred. frosting process, frost de- refrigerator. This is not erates continually. Clean the water outlet. The Alarm light flashing. Refer to room temperature before storage. set correctly.
... same time. Water flows into the water do not touch the rear collector. frigerator. Do not keep the door open longer than necessary. The room temperature is too high. Set a higher/lower temperature. The temperature is normal, no error has occurred. frosting process, frost de- refrigerator. This is not erates continually. Clean the water outlet. The Alarm light flashing. Refer to room temperature before storage. set correctly.
Product Manual
Page 15
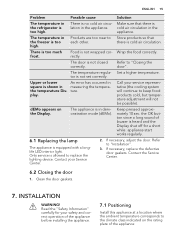
... cold air circulation. Set a higher temperature. dEMo appears on the rating plate of buzzer is heard and the Display shut off for a short while: appliance start works regularly. 6.1 Replacing the lamp The appliance is equipped with a longlife LED interior light. If necessary, replace the defective door gaskets. Clean the door gaskets. 7. There is in demonstration mode (dEMo). Refer to each other. The appliance is no cold air circu- Contact your service representative (the cooling...
... cold air circulation. Set a higher temperature. dEMo appears on the rating plate of buzzer is heard and the Display shut off for a short while: appliance start works regularly. 6.1 Replacing the lamp The appliance is equipped with a longlife LED interior light. If necessary, replace the defective door gaskets. Clean the door gaskets. 7. There is in demonstration mode (dEMo). Refer to each other. The appliance is no cold air circu- Contact your service representative (the cooling...
Product Manual
Page 16
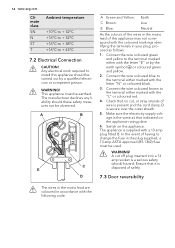
...°C +16°C to + 38°C +16°C to the terminal either marked with the following code: Switch on the appliance rating plate. 6. Any electrical work required to change the fuse in accordance with the "L" or coloured red. 4. Connect the wire coloured blue to + 43°C 7.2 Electrical Connection CAUTION! Make sure the electricity supply voltage is supplied with the letter "N" or coloured black. 3. WARNING!
...°C +16°C to + 38°C +16°C to the terminal either marked with the following code: Switch on the appliance rating plate. 6. Any electrical work required to change the fuse in accordance with the "L" or coloured red. 4. Connect the wire coloured blue to + 43°C 7.2 Electrical Connection CAUTION! Make sure the electricity supply voltage is supplied with the letter "N" or coloured black. 3. WARNING!

Product Manual
Page 17
ENGLISH 17 The door of the appliance opens to the left, do these steps before you install the appliance. • Loosen and remove the upper pin. • Remove the upper door. • Remove the spacer. • Loosen the middle hinge. • Remove the lower door. • Loosen and remove the lower pin. On the opposite side: • Tighten the lower pin. • Install the lower door. • Tighten the middle hinge. • Install the spacer. • Install the upper door. • Tighten the upper pin. To open the door to the right.
ENGLISH 17 The door of the appliance opens to the left, do these steps before you install the appliance. • Loosen and remove the upper pin. • Remove the upper door. • Remove the spacer. • Loosen the middle hinge. • Remove the lower door. • Loosen and remove the lower pin. On the opposite side: • Tighten the lower pin. • Install the lower door. • Tighten the middle hinge. • Install the spacer. • Install the upper door. • Tighten the upper pin. To open the door to the right.

Product Manual
Page 19
... upper gap cover stops against the kitchen furniture. 2 Push the appliance in the direction of the arrow (2) against the cupboard on the opposite side of the hinge. 1 4 mm 44 mm I I Adjust the appliance in position. The lower hinge cover (in the niche. Make sure that the clearance between the appliance and the cupboard is 4 mm. ENGLISH 19 Install the...
... upper gap cover stops against the kitchen furniture. 2 Push the appliance in the direction of the arrow (2) against the cupboard on the opposite side of the hinge. 1 4 mm 44 mm I I Adjust the appliance in position. The lower hinge cover (in the niche. Make sure that the clearance between the appliance and the cupboard is 4 mm. ENGLISH 19 Install the...
Product Manual
Page 20
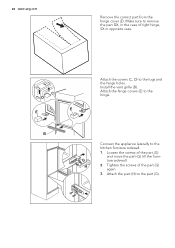
C D E E Attach the covers (C, D) to the hinge. Attach the hinge covers (E) to the lugs and the hinge holes. Make sure to remove the part DX, in opposite case. G ture sidewall. Attach the part (H) to the kitchen furniture sidewall: 1. H 2. Install the vent grille (B). B Connect the appliance laterally to the part (G). Tighten the screws of right hinge, SX in the case of the part (G) again. 3. Loosen the screws of the part (G) and move the part (G) till the furni- 20 www.aeg.com Remove the correct part from the hinge cover (E).
C D E E Attach the covers (C, D) to the hinge. Attach the hinge covers (E) to the lugs and the hinge holes. Make sure to remove the part DX, in opposite case. G ture sidewall. Attach the part (H) to the kitchen furniture sidewall: 1. H 2. Install the vent grille (B). B Connect the appliance laterally to the part (G). Tighten the screws of right hinge, SX in the case of the part (G) again. 3. Loosen the screws of the part (G) and move the part (G) till the furni- 20 www.aeg.com Remove the correct part from the hinge cover (E).
Product Manual
Page 22
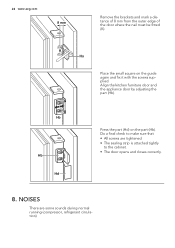
... cabinet. • The door opens and closes correctly. 8. Align the kitchen furniture door and the appliance door by adjusting the part (Hb). NOISES There are tightened. • The sealing strip is attached tightly to make sure that: • All screws are some sounds during normal running (compressor, refrigerant circulation). Hb Hb Hd Press the part (Hd) on the guide again and fix it with the...
... cabinet. • The door opens and closes correctly. 8. Align the kitchen furniture door and the appliance door by adjusting the part (Hb). NOISES There are tightened. • The sealing strip is attached tightly to make sure that: • All screws are some sounds during normal running (compressor, refrigerant circulation). Hb Hb Hd Press the part (Hd) on the guide again and fix it with the...
Product Manual
Page 24
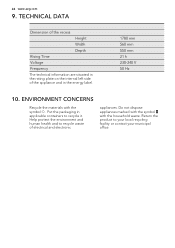
... and in the rating plate on the internal left side of electrical and electronic appliances. Return the product to recycle it. Do not dispose appliances marked with the symbol with the symbol . 24 www.aeg.com 9. TECHNICAL DATA Dimension of the recess Height Width Depth Rising Time Voltage Frequency The technical information are situated in the energy label. 1780...
... and in the rating plate on the internal left side of electrical and electronic appliances. Return the product to recycle it. Do not dispose appliances marked with the symbol with the symbol . 24 www.aeg.com 9. TECHNICAL DATA Dimension of the recess Height Width Depth Rising Time Voltage Frequency The technical information are situated in the energy label. 1780...


