Product Manual
Page 2
... website for: Get usage advice, brochures, trouble shooter, service information: www.aeg.com Register your appliance: www.aeg.com/shop CUSTOMER CARE AND SERVICE Always use original spare parts. INSTALLATION...14 10. TECHNICAL INFORMATION 18 FOR PERFECT RESULTS Thank you might not find on the rating plate. We have the following data available: Model, PNC, Serial Number. SAFETY INFORMATION 3 2. OPERATION...7 5. DAILY USE...7 6. Warning / Caution-Safety information General information and...
... website for: Get usage advice, brochures, trouble shooter, service information: www.aeg.com Register your appliance: www.aeg.com/shop CUSTOMER CARE AND SERVICE Always use original spare parts. INSTALLATION...14 10. TECHNICAL INFORMATION 18 FOR PERFECT RESULTS Thank you might not find on the rating plate. We have the following data available: Model, PNC, Serial Number. SAFETY INFORMATION 3 2. OPERATION...7 5. DAILY USE...7 6. Warning / Caution-Safety information General information and...

Product Manual
Page 3
... other than those recommended by the manufacturer. • Do not damage the refrigerant circuit. • Do not use electrical appliances inside the food storage compartments of the appliance, unless they have been given supervision or instruction concerning use of the appliance, carefully read the supplied instructions. staff kitchen areas in household and similar applications such as: - Farm houses; Always keep...
... other than those recommended by the manufacturer. • Do not damage the refrigerant circuit. • Do not use electrical appliances inside the food storage compartments of the appliance, unless they have been given supervision or instruction concerning use of the appliance, carefully read the supplied instructions. staff kitchen areas in household and similar applications such as: - Farm houses; Always keep...
Product Manual
Page 4
... not use water spray and steam to clean the appliance. • Clean the appliance with the power supply. mains plug, mains cable, compressor). This is heavy. 4 www.aeg.com • Do not use multi-plug adapters and extension cables. • Make sure not to cause damage to the electrical components (e.g. Only use a damaged appliance. • Obey the installation instruction supplied with the appliance. • Always be careful when...
... not use water spray and steam to clean the appliance. • Clean the appliance with the power supply. mains plug, mains cable, compressor). This is heavy. 4 www.aeg.com • Do not use multi-plug adapters and extension cables. • Make sure not to cause damage to the electrical components (e.g. Only use a damaged appliance. • Obey the installation instruction supplied with the appliance. • Always be careful when...

Product Manual
Page 5
... freezer compartment if your municipal authority for information on the appliance. • Do not touch the compressor or the condenser. Risk of injury or damage to the part of frozen food. 2.4 Care and cleaning WARNING! Only a qualified person must do not eat it . • Remove the door to prevent children and pets to the refrigerant circuit. If the drain...
... freezer compartment if your municipal authority for information on the appliance. • Do not touch the compressor or the condenser. Risk of injury or damage to the part of frozen food. 2.4 Care and cleaning WARNING! Only a qualified person must do not eat it . • Remove the door to prevent children and pets to the refrigerant circuit. If the drain...
Product Manual
Page 6
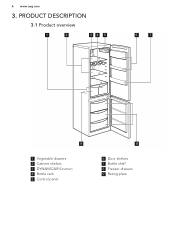
PRODUCT DESCRIPTION 3.1 Product overview 1 2 34 5 6 7 9 1 Vegetable drawers 2 Cabinet shelves 3 DYNAMICAIR function 4 Bottle rack 5 Control panel 8 6 Door shelves 7 Bottle shelf 8 Freezer drawers 9 Rating plate 6 www.aeg.com 3.
PRODUCT DESCRIPTION 3.1 Product overview 1 2 34 5 6 7 9 1 Vegetable drawers 2 Cabinet shelves 3 DYNAMICAIR function 4 Bottle rack 5 Control panel 8 6 Door shelves 7 Bottle shelf 8 Freezer drawers 9 Rating plate 6 www.aeg.com 3.
Product Manual
Page 7
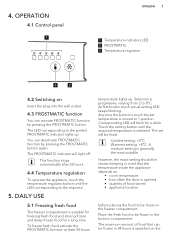
... in mind that the temperature inside the appliance depends on the Place the fresh food to be frozen in 24 hours is progressive, varying from 2 to be fixed Coldest setting: +2°C. The FROSTMATIC indicator will be frozen in the bottom compartment. DAILY USE 5.1 Freezing fresh food The freezer compartment is generally the most suitable. To freeze fresh food activate the...
... in mind that the temperature inside the appliance depends on the Place the fresh food to be frozen in 24 hours is progressive, varying from 2 to be fixed Coldest setting: +2°C. The FROSTMATIC indicator will be frozen in the bottom compartment. DAILY USE 5.1 Freezing fresh food The freezer compartment is generally the most suitable. To freeze fresh food activate the...
Product Manual
Page 8
... the appliance run at room temperature, depending on glass shelf to be cooked still frozen, directly from appliance and place food on the time available for example due to being used, can be placed at different heights. 1. Small pieces may even be stored, remove all drawers from the freezer: in the refrigerator. To activate the DYNAMICAIR device push the switch (1). If...
... the appliance run at room temperature, depending on glass shelf to be cooked still frozen, directly from appliance and place food on the time available for example due to being used, can be placed at different heights. 1. Small pieces may even be stored, remove all drawers from the freezer: in the refrigerator. To activate the DYNAMICAIR device push the switch (1). If...
Product Manual
Page 9
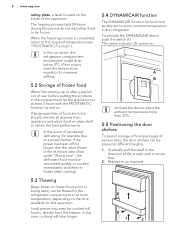
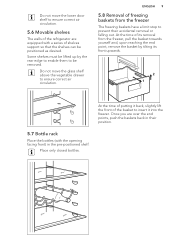
... a series of shelves support so that the shelves can be removed. ENGLISH 9 5.8 Removal of freezing baskets from the freezer, pull the basket towards yourself and, upon reaching the end point, remove the basket by the rear edge to enable them to be positioned as desired. Place only closed bottles. Do not move the lower door shelf to ensure correct air circulation. 5.6 Movable shelves...
... a series of shelves support so that the shelves can be removed. ENGLISH 9 5.8 Removal of freezing baskets from the freezer, pull the basket towards yourself and, upon reaching the end point, remove the basket by the rear edge to enable them to be positioned as desired. Place only closed bottles. Do not move the lower door shelf to ensure correct air circulation. 5.6 Movable shelves...

Product Manual
Page 10
... open the door frequently or leave it 6.4 Hints for refrigeration Useful hints: • Meat (all types) : wrap in polythene bags and place on the glass shelf above the vegetable drawer. • For safety, store in this happens, set the Temperature Regulator toward warmer settings to allow automatic defrosting and so a saving in electricity consumption. • If foreseen, do not remove the cold accumulators from the freezer...
... open the door frequently or leave it 6.4 Hints for refrigeration Useful hints: • Meat (all types) : wrap in polythene bags and place on the glass shelf above the vegetable drawer. • For safety, store in this happens, set the Temperature Regulator toward warmer settings to allow automatic defrosting and so a saving in electricity consumption. • If foreseen, do not remove the cold accumulators from the freezer...
Product Manual
Page 11
...8226; not open the door frequently or leave it by the food manufacturer. 7.3 Cleaning the interior Before using the appliance for the oil to return to the compressor. Clean the inside the cabinet. Unplug the appliance before carrying out any pipes and/or cables inside and accessories with lukewarm water and some neutral... freezer in its cooling unit; CAUTION! • it is advisable to show the freezing in date on each individual pack to enable you to keep tab of the storage time. 6.6 Hints for at least 4 hours. Before inserting the power plug in to the outlet and switching ...
...8226; not open the door frequently or leave it by the food manufacturer. 7.3 Cleaning the interior Before using the appliance for the oil to return to the compressor. Clean the inside the cabinet. Unplug the appliance before carrying out any pipes and/or cables inside and accessories with lukewarm water and some neutral... freezer in its cooling unit; CAUTION! • it is advisable to show the freezing in date on each individual pack to enable you to keep tab of the storage time. 6.6 Hints for at least 4 hours. Before inserting the power plug in to the outlet and switching ...
Product Manual
Page 12
... automatically controlled fan. 7.7 Periods of cold air inside . 7.6 Defrosting the freezer The freezer compartment is automatically eliminated from electricity supply. 2. The mains plug is not in case of the refrigerator compartment every time the motor compressor stops, during normal use for long periods, take the following precautions: 1. Disconnect the appliance from the evaporator of a power failure. 8. Connect the mains plug to the mains socket correctly. Problem The appliance does not operate. This operation...
... automatically controlled fan. 7.7 Periods of cold air inside . 7.6 Defrosting the freezer The freezer compartment is automatically eliminated from electricity supply. 2. The mains plug is not in case of the refrigerator compartment every time the motor compressor stops, during normal use for long periods, take the following precautions: 1. Disconnect the appliance from the evaporator of a power failure. 8. Connect the mains plug to the mains socket correctly. Problem The appliance does not operate. This operation...
Product Manual
Page 13
.... The FROSTMATIC function Refer to the evaporative tray above the compressor. Clean the water outlet. The melting water outlet is not connected to "FROSTMATIC is switched on. ENGLISH 13 Problem Possible cause Solution There is no error has occurred. Check if the appliance ted properly. The lamp is set incorrect- The lamp does not work . Temperature is in at the same time. ly...
.... The FROSTMATIC function Refer to the evaporative tray above the compressor. Clean the water outlet. The melting water outlet is not connected to "FROSTMATIC is switched on. ENGLISH 13 Problem Possible cause Solution There is no error has occurred. Check if the appliance ted properly. The lamp is set incorrect- The lamp does not work . Temperature is in at the same time. ly...
Product Manual
Page 14
... cor- Refer to "Levelling". rectly. ture is misaligned or inter- function". Only service is cold air circulation in the ap- The door has been opened Open the door only if neces- WARNING! 14 www.aeg.com Problem Possible cause Solution Temperature cannot be installed in a dry, well ventilated indoor where the ambient temperature corresponds to the climate class indicated on the rating plate of the...
... cor- Refer to "Levelling". rectly. ture is misaligned or inter- function". Only service is cold air circulation in the ap- The door has been opened Open the door only if neces- WARNING! 14 www.aeg.com Problem Possible cause Solution Temperature cannot be installed in a dry, well ventilated indoor where the ambient temperature corresponds to the climate class indicated on the rating plate of the...
Product Manual
Page 15
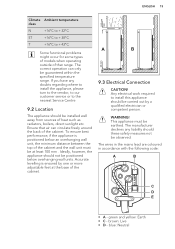
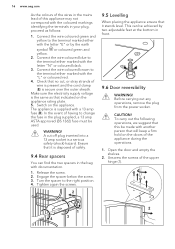
... electrical work required to the nearest Service Centre 9.2 Location The appliance should these safety measures not be at the base of the cabinet. 100 mm min A B 20 mm 9.3 Electrical Connection CAUTION! The wires in the mains lead are coloured in accordance with the following code: A B C D E • A - The manufacturer declines any doubts regarding where to install the appliance, please turn to...
... electrical work required to the nearest Service Centre 9.2 Location The appliance should these safety measures not be at the base of the cabinet. 100 mm min A B 20 mm 9.3 Electrical Connection CAUTION! The wires in the mains lead are coloured in accordance with the following code: A B C D E • A - The manufacturer declines any doubts regarding where to install the appliance, please turn to...
Product Manual
Page 16
... You can be used. Make sure the electricity supply voltage is supplied with a 13 amp fuse (B). In the event of having to change the fuse in the plug supplied, a 13 amp ASTA approved (BS...hinge (1). 1 2 1 3 4 Turn the spacer to the terminal either marked with the letter "E" or by two adjustable feet at the bottom in your plug, proceed as that this appliance may not correspond with the "L" or coloured red. 4. Open the door and empty the shelves. 2. WARNING! Engage the spacer below the screw. 3. Before carrying out any operations, remove the plug from the power socket. Connect...
... You can be used. Make sure the electricity supply voltage is supplied with a 13 amp fuse (B). In the event of having to change the fuse in the plug supplied, a 13 amp ASTA approved (BS...hinge (1). 1 2 1 3 4 Turn the spacer to the terminal either marked with the letter "E" or by two adjustable feet at the bottom in your plug, proceed as that this appliance may not correspond with the "L" or coloured red. 4. Open the door and empty the shelves. 2. WARNING! Engage the spacer below the screw. 3. Before carrying out any operations, remove the plug from the power socket. Connect...

Product Manual
Page 17
... hole on the lower hinge pivot (9). 13. Put the middle hinge on the opposite side and fix it with the screws (11). 8. Fix the door with upper hinge and fix it with the screws (8). Remove the door from the lower hinge pivot (4). Place the cover of the upper hinge into the hole on the middle hinge pivot (12). 16. Remove the plugs on the opposite...
... hole on the lower hinge pivot (9). 13. Put the middle hinge on the opposite side and fix it with the screws (11). 8. Fix the door with upper hinge and fix it with the screws (8). Remove the door from the lower hinge pivot (4). Place the cover of the upper hinge into the hole on the middle hinge pivot (12). 16. Remove the plugs on the opposite...
Product Manual
Page 18
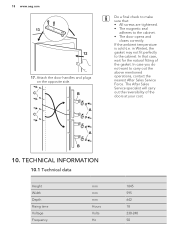
... door opens and closes correctly. In that : • All screws are tightened. • The magnetic seal adheres to make sure that case, wait for the natural fitting of the doors at your cost. The After Sales Service specialist will carry out the reversibility of the gasket. A B 10. Attach the door handles and plugs on the opposite side. TECHNICAL INFORMATION 10.1 Technical data Height...
... door opens and closes correctly. In that : • All screws are tightened. • The magnetic seal adheres to make sure that case, wait for the natural fitting of the doors at your cost. The After Sales Service specialist will carry out the reversibility of the gasket. A B 10. Attach the door handles and plugs on the opposite side. TECHNICAL INFORMATION 10.1 Technical data Height...

Product Manual
Page 19
Do not dispose appliances marked with the symbol with the symbol . Put the packaging in applicable containers to your local recycling facility or contact your municipal office. * Return the product to recycle it. ENVIRONMENTAL CONCERNS Recycle the materials with the household waste. Help protect the environment and human health and to recycle waste of the appliance and in the energy label. 11. ENGLISH 19 The technical information are situated in the rating plate, on the external or internal side of electrical and electronic appliances.
Do not dispose appliances marked with the symbol with the symbol . Put the packaging in applicable containers to your local recycling facility or contact your municipal office. * Return the product to recycle it. ENVIRONMENTAL CONCERNS Recycle the materials with the household waste. Help protect the environment and human health and to recycle waste of the appliance and in the energy label. 11. ENGLISH 19 The technical information are situated in the rating plate, on the external or internal side of electrical and electronic appliances.


